2021 NISSAN MICRA flat tire
[x] Cancel search: flat tirePage 39 of 346
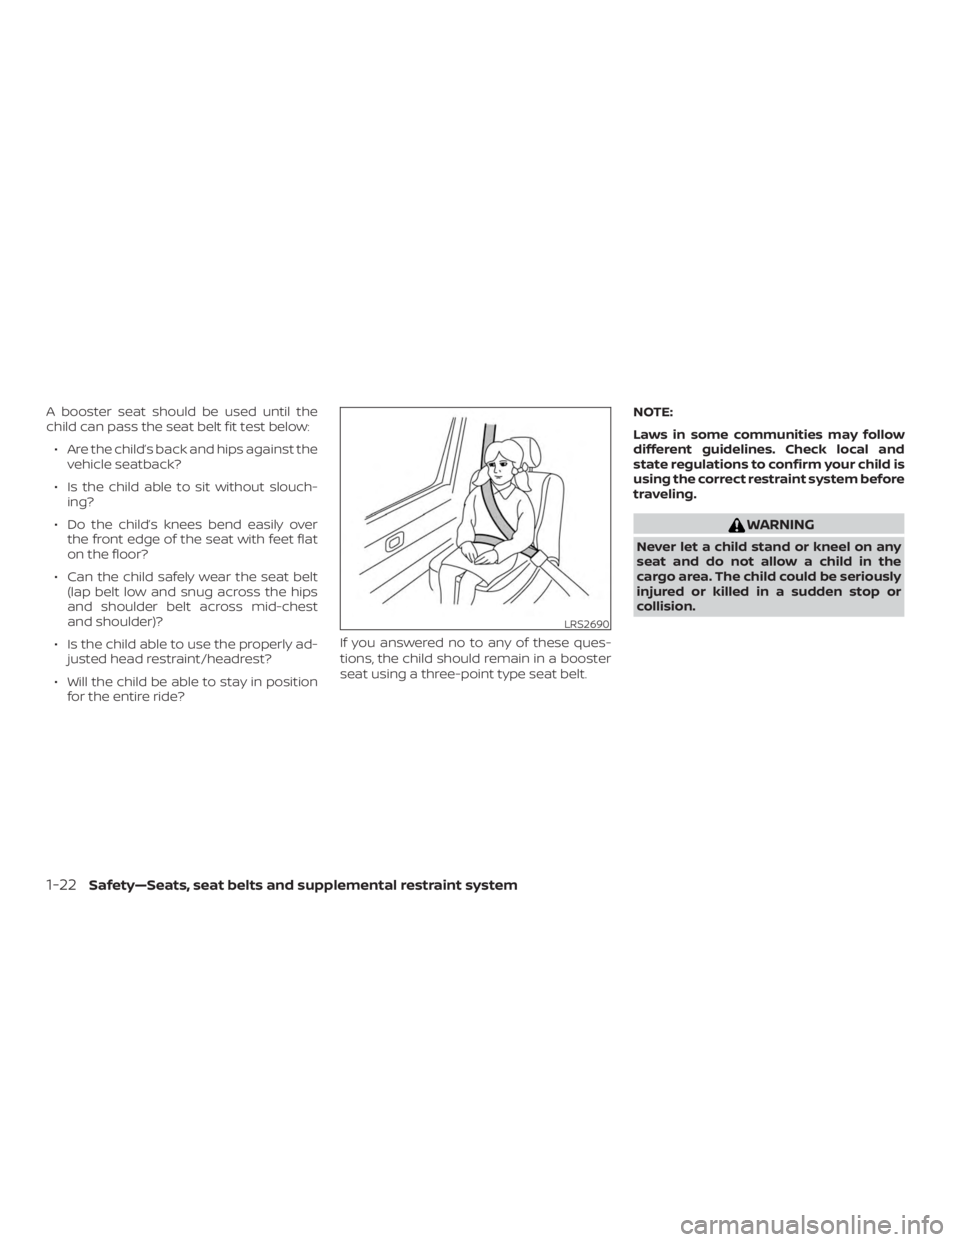
A booster seat should be used until the
child can pass the seat belt fit test below:∙ Are the child’s back and hips against the vehicle seatback?
∙ Is the child able to sit without slouch- ing?
∙ Do the child’s knees bend easily over the front edge of the seat with feet flat
on the floor?
∙ Can the child safely wear the seat belt (lap belt low and snug across the hips
and shoulder belt across mid-chest
and shoulder)?
∙ Is the child able to use the properly ad- justed head restraint/headrest?
∙ Will the child be able to stay in position for the entire ride? If you answered no to any of these ques-
tions, the child should remain in a booster
seat using a three-point type seat belt. NOTE:
Laws in some communities may follow
different guidelines. Check local and
state regulations to confirm your child is
using the correct restraint system before
traveling.
Page 203 of 346
5. If there is nothing in the way, steer thevehicle to follow the road while vehicle
speed is reduced. Do not attempt to
drive the vehicle back onto the road
surface until vehicle speed is reduced.
6. When it is safe to do so, gradually turn the steering wheel until both tires re-
turn to the road surface. When all tires
are on the road surface, steer the ve-
hicle to stay in the appropriate driving
lane.
∙ If you decide that it is not safe to re- turn the vehicle to the road surface
based on vehicle, road or traffic con-
ditions, gradually slow the vehicle to a
stop in a safe place off the road.
RAPID AIR PRESSURE LOSS
Rapid air pressure loss or a “blow-out” can
occur if the tire is punctured or is damaged
due to hitting a curb or pothole. Rapid air
pressure loss can also be caused by driving
on under-inflated tires.
Rapid air pressure loss can affect the han-
dling and stability of the vehicle, especially
at highway speeds. Help prevent rapid air pressure loss by
maintaining the correct air pressure and
visually inspecting the tires for wear and
damage. For additional information, refer
to “Wheels and tires” in the “Do-it-yourself ”
section of this manual. If a tire rapidly loses
air pressure or “blows-out” while driving,
maintain control of the vehicle by following
the procedure below. Please note that this
procedure is only a general guide. The ve-
hicle must be driven as appropriate based
on the conditions of the vehicle, road and
traffic.
Page 207 of 346
∙ Make sure the area around the vehicle isclear.
∙ Check fluid levels such as engine oil, coolant, brake and clutch fluid (if so
equipped), and windshield-washer fluid
as frequently as possible, or at least
whenever you refuel.
∙ Check that all windows and lights are clean.
∙ Visually inspect tires for their appear- ance and condition. Also check tires for
proper inflation.
∙ Lock all doors.
∙ Position seat and adjust head re- straints.
∙ Adjust inside and outside mirrors.
∙ Fasten seat belts and ask all passen- gers to do likewise.
∙ Check the operation of warning lights when the key is turned to the ON posi-
tion. For additional information, refer to
“Warning lights, indicator lights and au-
dible reminders” in the “Instruments
and controls” section of this manual. 1. Apply the parking brake.
2.
Automatic transmission:
Move the shif t lever to P (Park) or N
(Neutral). P (Park) is recommended.
The shif t lever cannot be moved out
of the P (Park) position and into any
of the other gear positions if the ig-
nition switch is placed in the OFF po-
sition or if the key is removed from
the ignition switch.
The starter is designed not to oper-
ate if the shif t lever is in any of the
driving positions.
Manual transmission:
Move the shif t lever to N (Neutral). De-
press the clutch pedal to the floor
while cranking the engine.
3. Crank the engine with your foot off
the accelerator pedal by placing the
ignition switch in the START position.
Release the key when the engine
starts. If the engine starts, but fails to
run, repeat the above procedure.
∙ If the engine is very hard to start in extremely cold weather or when re-
starting, depress the accelerator
pedal a little (approximately 1/3 to the floor) and hold it and then crank the
engine. Release the key and the ac-
celerator pedal when the engine
starts.
∙ If the engine is very hard to start be- cause it is flooded, depress the accel-
erator pedal all the way to the floor
and hold it. Crank the engine for
5-6 seconds. Af ter cranking the en-
gine, release the accelerator pedal.
Crank the engine with your foot off
the accelerator pedal by placing the
ignition in the START position. Re-
lease the key when the engine starts.
If the engine starts, but fails to run,
repeat the above procedure.
Page 227 of 346
TIRE EQUIPMENT
1. SUMMER tires have a tread designed toprovide superior performance on dry
pavement. However, the performance
of these tires will be substantially re-
duced in snowy and icy conditions. If
you operate your vehicle on snowy or
icy roads, NISSAN recommends the use
of MUD & SNOW or ALL SEASON TIRES
on all four wheels. It is recommended
that you visit a NISSAN dealer for the tire
type, size, speed rating and availability
information.
2. For additional traction on icy roads, studded tires may be used. However,
some U.S. states and Canadian prov-
inces prohibit their use. Check local,
state and provincial laws before install-
ing studded tires.
Skid and traction capabilities of studded
snow tires on wet or dry surfaces may be
poorer than that of non-studded snow
tires. 3. Tire chains may be used. For additional information, refer to “Tire chains” in the
“Do-it-yourself ” section of this manual.
SPECIAL WINTER EQUIPMENT
It is recommended that the following items
be carried in the vehicle during winter:
∙ A scraper and stiff-bristled brush to re- move ice and snow from the windows
and wiper blades.
∙ A sturdy, flat board to be placed under the jack to give it firm support.
∙ A shovel to dig the vehicle out of snow- drif ts.
∙ Extra washer fluid to refill the windshield-washer fluid reservoir.
DRIVING ON SNOW OR ICE
Page 232 of 346
WARNING
∙ Make sure the parking brake is se-curely applied and the automatic
transmission (if so equipped) is
shif ted to P (Park) or the manual
transmission (if so equipped) is
shif ted to R (Reverse).
∙ Never change tires when the vehicle is on a slope, ice or slippery areas. This is
hazardous.
∙ Never change tires if oncoming traffic is close to your vehicle. Wait for pro-
fessional road assistance.
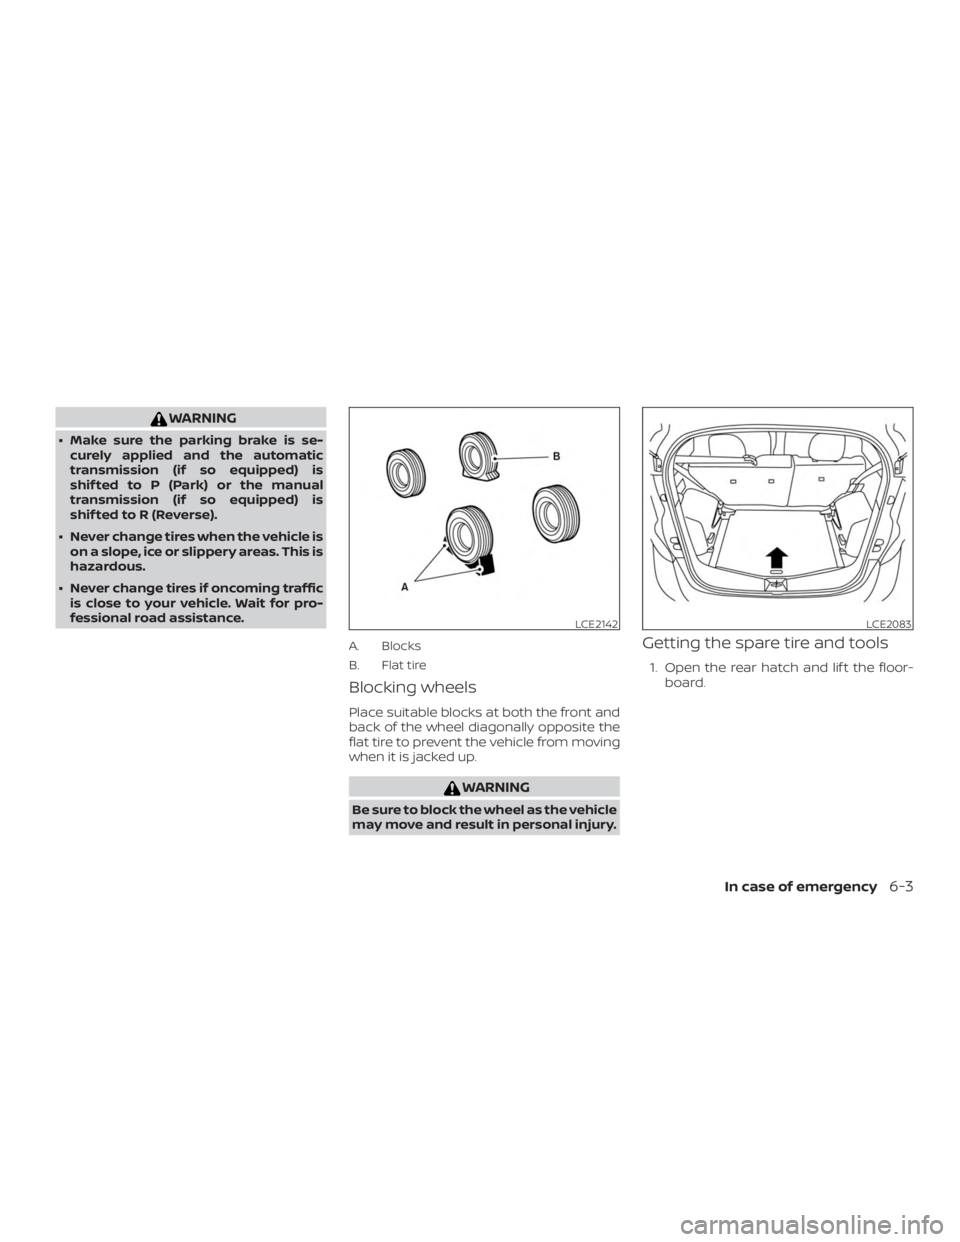
A. Blocks
B. Flat tire
Blocking wheels
Place suitable blocks at both the front and
back of the wheel diagonally opposite the
flat tire to prevent the vehicle from moving
when it is jacked up.
Page 287 of 346
If you have a flat tire, refer to “Flat tire” in
the “In case of emergency ” section of
this manual.
TIRE PRESSURE
Tire inflation pressure
Check the tire pressures (including
the spare) of ten and always prior to
long distance trips. The recom-
mended tire pressure specifications
are shown on the Tire and Loading
Information label under the “Cold
Tire Pressure” heading. The Tire and
Loading Information label is affixed
to the driver side center pillar. Tire
pressures should be checked regu-
larly because:∙ Most tires naturally lose air over time.
∙ Tires can lose air suddenly when driven over potholes or other ob-
jects or if the vehicle strikes a
curb while parking. The tire pressures should be
checked when the tires are cold. The
tires are considered COLD af ter the
vehicle has been parked for 3 or
more hours or driven less than
1.6 km (1 mile) at moderate speeds.
Incorrect tire pressure, including
under inflation, may adversely af-
fect tire life and vehicle handling.
Page 330 of 346
5.Determine the combined weight
of luggage and cargo being
loaded on the vehicle. That
weight may not safely exceed the
available cargo and luggage load
capacity calculated in step 4.
Before driving a loaded vehicle, con-
firm that you do not exceed the
Gross Vehicle Weight Rating (GVWR)
or the Gross Axle Weight Rating
(GAWR) for your vehicle. For addi-
tional information, refer to “Measure-
ment of weights” in this section.
Also check tires for proper inflation
pressures. For additional informa-
tion, refer to “Tire and Loading Infor-
mation label” in this section.
LOADING TIPS
∙ The GVW must not exceed GVWR or GAWR as specified on the C.M-
.V.S.S. certification label.
∙ Do not load the front and rear axle to the GAWR. Doing so will
exceed the GVWR.
Page 337 of 346
C
Capacities and recommended fuel/
lubricants....................10-2
Cargocover...................2-25
Cargo
(See vehicle loading information) .....10-14
Car phone or CB radio ............4-51
Childrestraints........1-20, 1-21, 1-23, 1-25 LATCH (Lower Anchors and Tethers for
CHildren)System..............1-25
Precautions on child
restraints .........1-23, 1-30, 1-36, 1-41
Top tether strap anchor point
locations.................. .1-28
Child safety rear door lock ..........3-6
Chimes, audible reminders .........2-14
Cleaningexteriorandinterior......7-2,7-4
Clockset.....................4-4
Clutch Clutchfluid.................8-10
C.M.V.S.S. certification label .........10-12
Coldweatherdriving.............5-27
Control panel buttons .............4-2
Brightness/contrast button .......4-6
Controls Audio controls (steering wheel) .....4-47
Heater and air conditioner controls . .4-20
Coolant Capacities and recommended
fuel/lubricants...............10-2
Changing engine coolant .........8-5
Checking engine coolant level ......8-5
Corrosionprotection..............7-7
Cruisecontrol..................5-17 Cupholders...............2-24,2-25
Curtain side-impact and rollover air
bag.......................
.1-60
D
Daytime Running Lights (DRL) system. . .2-19
Defroster switch Rear window and outside mirror
defrosterswitch..............2-18
Dimensions and weights ..........10-10
Dimmer switch for instrument panel . . .2-20
Display controls
(see control panel buttons) ..........4-2
Door locks ..................3-3,3-4
Door open warning light ...........2-10
Drivebelt ....................8-14
Driving Cold weather driving ...........5-27
Driving with automatic transmission . .5-9
Driving with manual
transmission ..............5-7,5-14
Precautions when starting and
driving.....................5-2
Drivingthevehicle ...............5-9
E
Economy - fuel .................5-20
Emission control information label . . . .10-12
Emission control system warranty . . . .10-19
Engine Before starting the engine ........5-8
Blockheater................5-29 Capacities and recommended
fuel/lubricants...............10-2
Changing engine coolant
.........8-5
Changing engine oil ............8-7
Changing engine oil filter .........8-8
Checking engine coolant level ......8-5
Checking engine oil level .........8-6
Engine compartment check
locations...................8-3
Engine cooling system ..........8-4
Engine oil ...................8-6
Engine oil and oil filter
recommendation .............10-7
Engine oil pressure warning light . . . .2-10
Engine oil viscosity .............10-7
Engine serial number ..........10-12
Engine specifications ...........10-9
Starting the engine .............5-8
EventDatarecorders ............10-21
Exhaust gas (Carbon monoxide) .......5-2
Explanation of maintenance items .....9-2
Explanation
of scheduled maintenance
items .......................9-5
Extended storage switch ..........8-20
F
Flashers
(Seehazardwarningflasherswitch)....6-2
Flattire......................6-2
Floormatpositioningaid...........7-6
Fluid Automatic transmission fluid (ATF) . . .8-9
Brakefluid..................8-9
11-2