2021 NISSAN FRONTIER stop start
[x] Cancel search: stop startPage 331 of 492
• Keep your engine tuned up.
• Follow the recommended scheduledmaintenance.
• Keep the tires inflated to the correct pres- sure. Low tire pressure increases tire
wear and lowers fuel economy.
• Keep the wheels in correct alignment. Im- proper alignment increases tire wear and
lowers fuel economy.
• For vehicles equipped with
, use 4H
or 4L position only when necessary.
4-Wheel Drive operation lowers fuel
economy.
• Use the recommended viscosity engine oil. For additional information, refer to “En-
gine oil and oil filter recommendations” in
the “Technical and consumer informa-
tion” section of this manual.
CAUTION
• Do not drive the vehicle in the 4H or
4LO position on dry hard surface
roads. Driving on dry, hard surfaces in
4H or 4LO may cause unnecessary
noise, tire wear and increased fuel
consumption.
If the 4WD warning light turns on
when you are driving on dry hard sur-
face roads:
– In the 4H position, shif t the 4WD
shif t switch to 2–Wheel Drive
(2WD).
– In the 4LO position for automatic
transmission vehicles, stop the
vehicle and shif t the shif t lever to
the N (Neutral) position with the
brake pedal depressed and shif t
the 4WD shif t switch to 2WD.
• If the warning light is still on af ter the
above operation, have your vehicle
checked as soon as possible. It is rec-
ommended that you visit a NISSAN
dealer for this service.
INCREASING FUEL ECONOMYUSING 4–WHEEL DRIVE (4WD)
(if so equipped)
Starting and driving5-23
Page 332 of 492
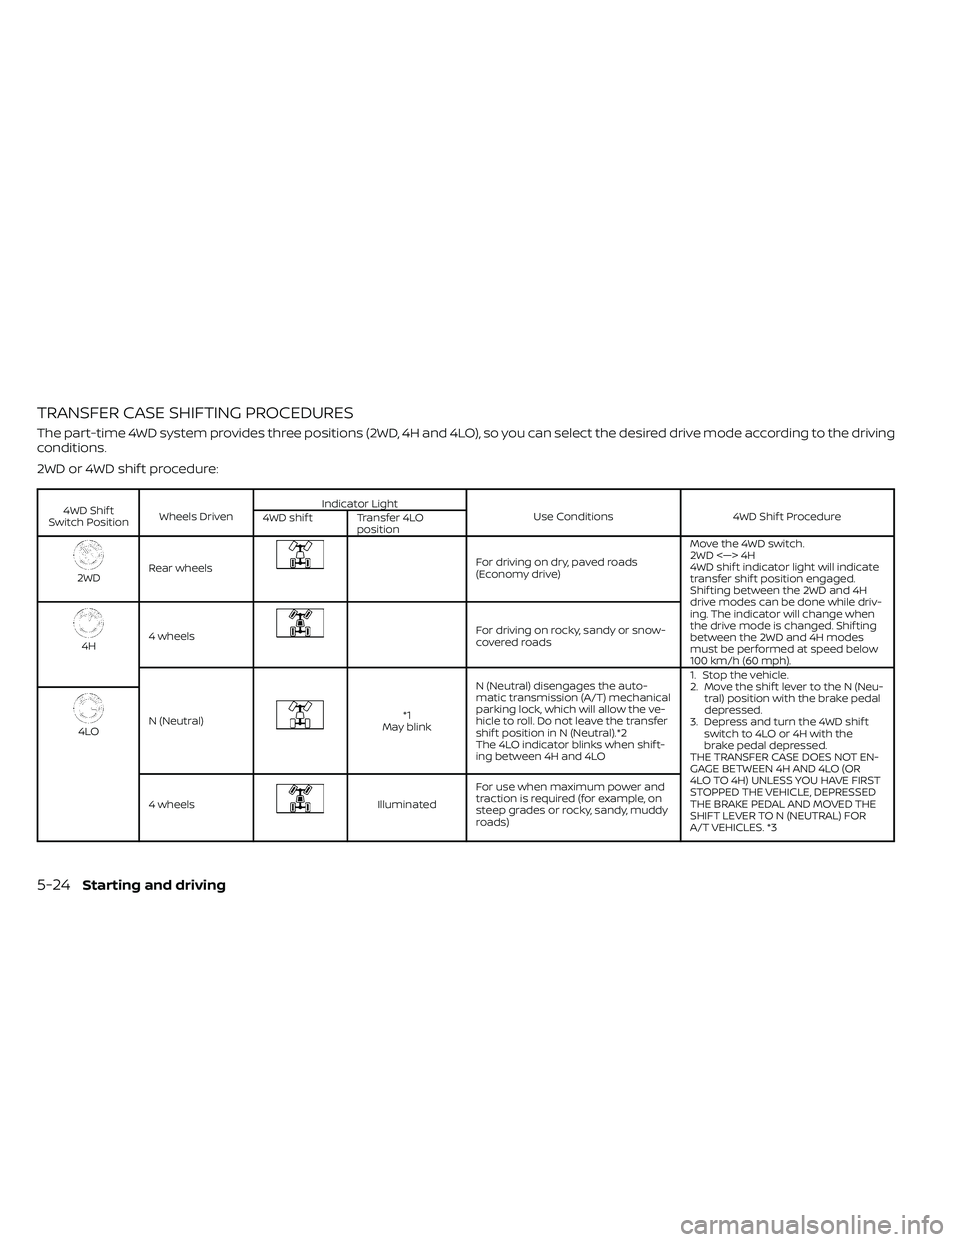
TRANSFER CASE SHIFTING PROCEDURES
The part-time 4WD system provides three positions (2WD, 4H and 4LO), so you can select the desired drive mode according to the driving
conditions.
2WD or 4WD shif t procedure:
4WD Shif t
Switch Position Wheels Driven Indicator Light
Use Conditions 4WD Shif t Procedure
4WD shif t Transfer 4LO
position
2WDRear wheels
For driving on dry, paved roads
(Economy drive) Move the 4WD switch.
2WD <—> 4H
4WD shif t indicator light will indicate
transfer shif t position engaged.
Shif ting between the 2WD and 4H
drive modes can be done while driv-
ing. The indicator will change when
the drive mode is changed. Shif ting
between the 2WD and 4H modes
must be performed at speed below
100 km/h (60 mph).
4H
4 wheels
For driving on rocky, sandy or snow-
covered roads
N (Neutral)
*1
May blink N (Neutral) disengages the auto-
matic transmission (A/T) mechanical
parking lock, which will allow the ve-
hicle to roll. Do not leave the transfer
shif t position in N (Neutral).*2
The 4LO indicator blinks when shif t-
ing between 4H and 4LO 1. Stop the vehicle.
2. Move the shif t lever to the N (Neu-
tral) position with the brake pedal
depressed.
3. Depress and turn the 4WD shif t switch to 4LO or 4H with the
brake pedal depressed.
THE TRANSFER CASE DOES NOT EN-
GAGE BETWEEN 4H AND 4LO (OR
4LO TO 4H) UNLESS YOU HAVE FIRST
STOPPED THE VEHICLE, DEPRESSED
THE BRAKE PEDAL AND MOVED THE
SHIFT LEVER TO N (NEUTRAL) FOR
A/T VEHICLES. *3
4LO
4 wheels
Illuminated For use when maximum power and
traction is required (for example, on
steep grades or rocky, sandy, muddy
roads)
5-24Starting and driving
Page 334 of 492
The transfer case 4WD shif t switch is used
to select either 2WD or 4WD depending on
the driving conditions. There are three
types of drive modes available, 2WD, 4H and
4LO.
The 4WD shif t switch electronically controls
the transfer case operation. Rotate the
switch to move between each mode, 2WD,
4H and 4LO.
To change into or out of 4LO, the vehicle
MUST be stationary, move the shif t lever
to N (Neutral), and depress the brake
pedal. The switch must be depressed
and turned when changing into or out of
4LO.
WARNING
• When parking, apply the parking
brake before stopping the engine
and make sure that the 4WD shif t in-
dicator light is on and the ATP warn-
ing light goes off. Otherwise, the ve-
hicle could unexpectedly move even
if the A/T is in the P (Park) position. •
The transfer 4LO position indicator
light must stop blinking and remain
illuminated or turn off before shif ting
the transmission into gear. If the shif t
lever is shif ted from the N (Neutral)
position to any other gear when the
transfer 4LO position indicator light
is blinking, the vehicle may move
unexpectedly.
CAUTION
• Never shif t the 4WD shif t switch be-
tween 4LO and 4H while driving.
• The 4H position provides greater
traction. Avoid excessive speed, as it
will cause increased fuel consump-
tion and higher oil temperatures, and
could damage drivetrain compo-
nents. Speeds over 62 mph (100
km/h) in 4H is not recommended.
• The 4LO position provides maximum
power and traction. Avoid raising ve-
hicle speed excessively, as the maxi-
mum speed is approximately 31 mph
(50 km/h).
•
When driving straight, shif t the 4WD
shif t switch to the 2WD or 4H position.
Do not move the 4WD shif t switch
when making a turn or reversing.
• Do not shif t the 4WD shif t switch (be-
tween 2WD and 4H) while driving on
steep downhill grades. Use the en-
gine brake and low gears 2 (Second
gear) or 1 (Low gear), for engine
braking.
• Do not operate the 4WD shif t switch
(between 2WD and 4H) with the rear
wheels spinning.
• Do not drive on dry hard surface
roads in the 4H or 4LO position. Driv-
ing on dry hard surfaces in 4H or 4LO
may cause unnecessary noise and
tire wear. NISSAN recommends driv-
ing in the 2WD position under these
conditions.
• The 4WD transfer case may not be
shif ted between 4H and 4LO at low
ambient temperatures and the
transfer 4LO position indicator light
may blink even when the 4WD shif t
switch is shif ted. Af ter driving for a
while you can change the 4WD trans-
fer case between 4H and 4LO.
5-26Starting and driving
Page 339 of 492
WARNING
• Do not stop or park the vehicle over
flammable materials such as dry
grass, waste paper or rags. They may
ignite and cause a fire.
•
Safe parking procedures require that
both the parking brake be set and the
transmission placed into P (Park). Fail-
ure to do so could cause the vehicle to
move unexpectedly or roll away and re-
sult in an accident. Make sure the shif t
lever has been pushed as far forward as
it can go and cannot be moved without
depressing the foot brake pedal.
• Never leave the engine running while
the vehicle is unattended.
• Do not leave children unattended in-
side the vehicle. They could unknow-
ingly activate switches or controls or
make the vehicle move. Unattended
children could become involved in
serious accidents.
•
To help avoid risk of injury or death
through unintended operation of the
vehicle and/or its systems, do not leave
children, people who require the assis-
tance of others or pets unattended in
your vehicle. Additionally, the tempera-
ture inside a closed vehicle on a warm day can quickly become high enough to
cause a significant risk of injury or
death to people and pets.
1. Firmly apply the parking brake.
2. Move the shif t lever to the P (Park)
position.
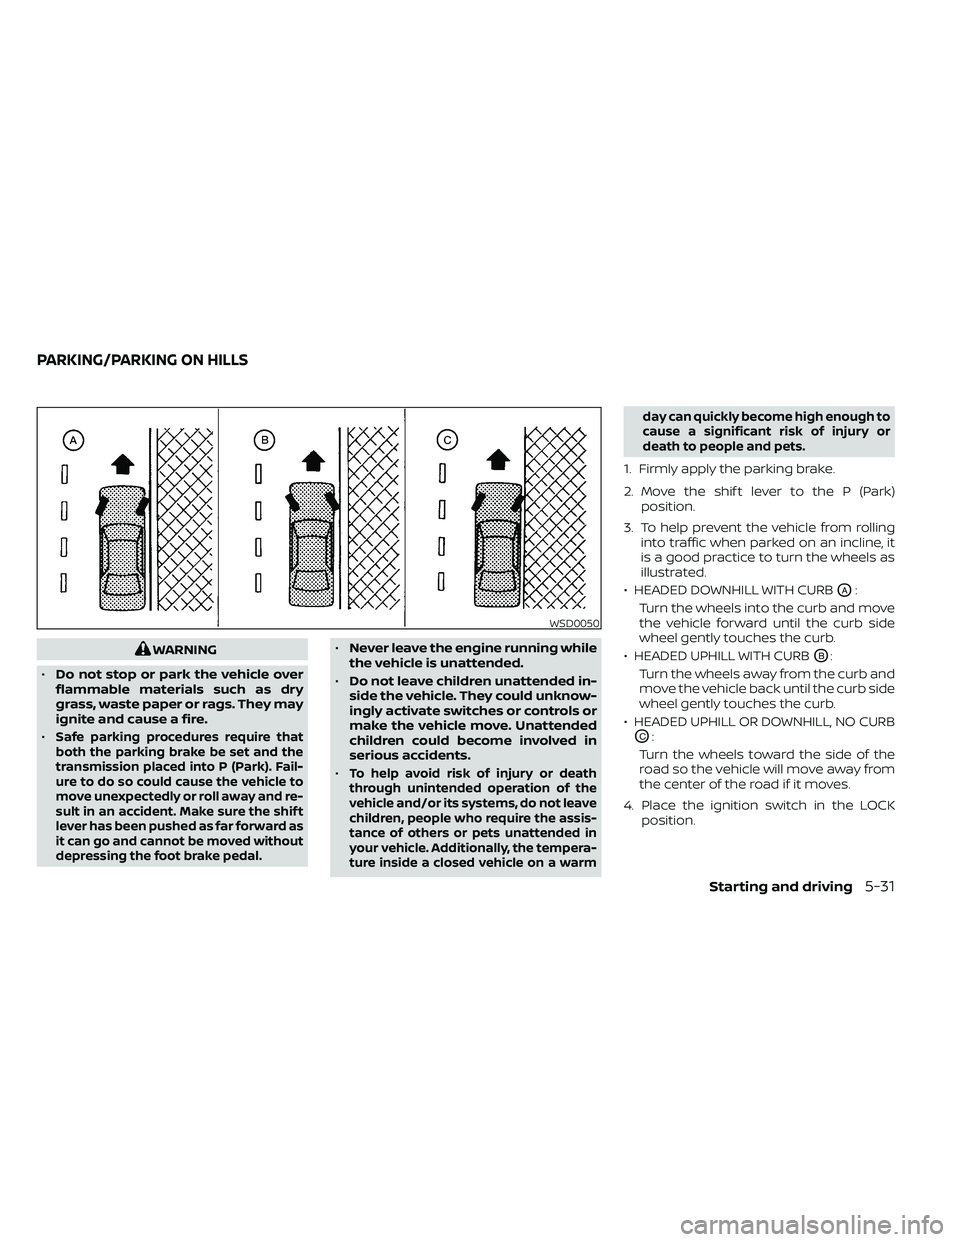
3. To help prevent the vehicle from rolling into traffic when parked on an incline, it
is a good practice to turn the wheels as
illustrated.
• HEADED DOWNHILL WITH CURB
OA:
Turn the wheels into the curb and move
the vehicle forward until the curb side
wheel gently touches the curb.
• HEADED UPHILL WITH CURB
OB:
Turn the wheels away from the curb and
move the vehicle back until the curb side
wheel gently touches the curb.
• HEADED UPHILL OR DOWNHILL, NO CURB
OC:
Turn the wheels toward the side of the
road so the vehicle will move away from
the center of the road if it moves.
4. Place the ignition switch in the LOCK position.
WSD0050
PARKING/PARKING ON HILLS
Starting and driving5-31
Page 349 of 492
•Allow more stopping distance under
these conditions. Braking should be
started sooner than on dry
pavement.
• Allow greater following distances on
slippery roads.
• Watch for slippery spots (glare ice).
These may appear on an otherwise
clear road in shaded areas. If a patch
of ice is seen ahead, brake before
reaching it. Try not to brake while on
the ice, and avoid any sudden steer-
ing maneuvers.
• Do not use the cruise control on slip-
pery roads.
• Snow can trap dangerous exhaust
gases under your vehicle. Keep snow
clear of the exhaust pipe and from
around your vehicle.ENGINE BLOCK HEATER (if so
equipped)
Engine block heaters are used to assist
with cold temperature starting.
The engine block heater should be used
when the outside temperature is 20°F (-7°C)
or lower.
Page 363 of 492
CAUTION
• Do not push start this vehicle. The
three-way catalyst may be
damaged.
• Automatic transmission models can-
not be push-started or tow-started.
Attempting to do so may cause
transmission damage.WARNING
• Do not continue to drive if your ve-
hicle overheats. Doing so could cause
engine damage or a vehicle fire.
• To avoid the danger of being scalded,
never remove the radiator or coolant
reservoir cap while the engine is still
hot. When the radiator or coolant res-
ervoir cap is removed, pressurized
hot water will spurt out, possibly
causing serious injury.
• Do not open the hood if steam is
coming out.
If your vehicle is overheating (indicated by
an extremely high temperature gauge
reading), or if you feel a lack of engine
power, detect abnormal noise, etc. take the
following steps.
1. Move the vehicle safely off the road, ap- ply the parking brake and move the shif t
lever to P (Park).
Do not stop the engine.
2. Turn off the air conditioner. Open all the windows, move the heater or air condi-
tioner temperature control to maximum
hot and fan control to high speed. 3. Get out of the vehicle. Look and listen for
steam or coolant escaping from the ra-
diator before opening the hood. If steam
or coolant is escaping, turn off the en-
gine. Do not open the hood further until
no steam or coolant can be seen.
4. Open the engine hood.
Page 468 of 492
Electric trailer brake controller
Trailers equipped with electric brakes may
require the installation of an af termarket
trailer brake controller.
A Genuine NISSAN jumper harness is avail-
able that is specifically designed to be used
when installing an af termarket brake con-
troller.
Install the af termarket electric trailer brake
controller according to the manufacturer's
instructions.
Pre-towing tips
• Be certain your vehicle maintains a levelposition when a loaded and/or unloaded
trailer is hitched. Do not drive the vehicle if
it has an abnormal nose-up or nose-
down condition; check for improper
tongue load, overload, worn suspension
or other possible causes of either condi-
tion.
• Always secure items in the trailer to pre- vent load shif t while driving.
• Keep the cargo load as low as possible in the trailer to keep the trailer center of
gravity low. • Load the trailer so approximately 60% of
the trailer load is in the front half and 40%
is in the back half. Also make sure the load
is balanced side to side.
• Check your hitch, trailer tire pressure, ve- hicle tire pressure, trailer light operation,
and trailer wheel lug nuts every time you
attach a trailer to the vehicle.
• Be certain your rearview mirrors conform to all federal, state or local regulations. If
not, install any mirrors required for towing
before driving the vehicle.
• Determine the overall height of the ve- hicle and trailer so the required clearance
is known.
Trailer towing tips
In order to gain skill and an understanding
of the vehicle's behavior, you should prac-
tice turning, stopping and backing up in an
area which is free from traffic. Steering sta-
bility and braking performance will be
somewhat different than under normal
driving conditions.
• Always secure items in the trailer to pre-vent load shif t while driving.
• Lock the trailer hitch coupler with a pin or lock to prevent the coupler from inadver-
tently becoming unlatched. • Avoid abrupt starts, acceleration or stops.
• Avoid sharp turns or lane changes.
• Always drive your vehicle at a moderate
speed.
• When backing up, hold the bottom of the steering wheel with one hand. Move your
hand in the direction in which you want
the trailer to go. Make small corrections
and back up slowly. If possible, have
someone guide you when you are back-
ing up.
Always block the wheels on both vehicle
and trailer when parking. Parking on a
slope is not recommended; however, if you
must do so:
Page 469 of 492
4. Apply the parking brake.
5. Shif t the transmission into P (Park).
6. Make sure the
indicator light (if so
equipped) indicates the transfer case is
in 4H, 4L, or 2H and that the ATP light is
off. If the
indicator light is flashing,
or the ATP light is ON, make sure the
transmission is in P (Park) (A/T) and turn
the 4WD switch to 2WD or 4H. For addi-
tional information, refer to “Automatic
transmission park warning light” in the
“Instruments and controls” section and
“Using 4-wheel drive (4WD)” in the “Start-
ing and driving” section of this manual.
7. Turn off the engine.
To drive away:
1. Start the vehicle.
2. Apply and hold the brake pedal.
3. Shif t the transmission into gear.
4. Release the parking brake.
5. Drive slowly until the vehicle and trailer are clear from the blocks.
6. Apply and hold the brake pedal. 7. Have someone retrieve and store the
blocks.
• While going downhill, the weight of the trailer pushing on the tow vehicle may
decrease overall stability. Therefore, to
maintain adequate control, reduce your
speed and shif t to a lower gear. Avoid
long or repeated use of the brakes when
descending a hill, as this reduces their
effectiveness and could cause overheat-
ing. Shif ting to a lower gear instead pro-
vides “engine braking” and reduces the
need to brake as frequently.
• If the engine coolant temperature rises to a high temperature, refer to “If your ve-
hicle overheats” in the “In case of emer-
gency” section of this manual.
• Trailer towing requires more fuel than normal circumstances.
• Avoid towing a trailer for your vehicle's first 500 miles (805 km).
•
For the first 500 miles (805 km) that you do
tow, do not drive over 50 mph (80 km/h).
• Have your vehicle serviced more of ten than at intervals specified. For additional
information, refer to “Maintenance
Schedules” in the “Maintenance and
schedules” section of this manual. • When making a turn, your trailer wheels
will be closer to the inside of the turn than
your vehicle wheels. To compensate for
this, make a larger than normal turning
radius during the turn.
• Crosswinds and rough roads will ad- versely affect vehicle/trailer handling,
possibly causing vehicle sway. When be-
ing passed by larger vehicles, be pre-
pared for possible changes in crosswinds
that could affect vehicle handling.
Do the following if the trailer begins to
sway:
1. Take your foot off the accelerator pedal to allow the vehicle to coast and steer as
straight ahead as the road conditions
allow. This combination will help stabilize
the vehicle
– Do not correct trailer sway by steering or applying the brakes.
2. When the trailer sway stops, gently apply the brakes and pull to the side of the
road in a safe area.
Technical and consumer information10-35