Page 107 of 492
 activate, smoke is re-
leased and a loud noise may be heard. This
smoke is not harmful and does not indi-
cate a fire. Care should be taken not to
inhale it, as it may cause irrit")
When pretensioner(s) activate, smoke is re-
leased and a loud noise may be heard. This
smoke is not harmful and does not indi-
cate a fire. Care should be taken not to
inhale it, as it may cause irritation and
choking. Those with a history of a breath-
ing condition should get fresh air promptly.
Af ter the pretensioner(s’) activation, load
limiters allow the seat belt to release web-
bing (if necessary) to reduce forces against
the chest.
The supplemental air bag warning light
is used to indicate malfunctions in the
pretensioner system. For additional infor-
mation, refer to "Supplemental air bag
warning light" in this section. If the opera-
tion of the supplemental air bag warning
light indicates there is a malfunction, have
the system checked. It is recommended
that you visit a NISSAN dealer for this ser-
vice.
When selling your vehicle, we request that
you inform the buyer about the preten-
sioner system and guide the buyer to the
appropriate sections in this Owner's
Manual.
SUPPLEMENTAL AIR BAG WARNING
LABELS
Warning labels about the supplemental
front-impact air bag system are placed in
the vehicle as shown in the illustration.
in the instrument panel,
monitors the circuits for the air bag sys-
tems, pretensioner(s) and all related wiring.
When the ignition switch is placed in the ON
or START position, the supplemental air
bag warning light illuminates for about 7
seconds and then turns off. This means the
system is operational.
WRS0885
1. SRS Air bag warning labels
The warning labels are located on the
surface of the sun visor.
LRS0100
Page 110 of 492

2 Instruments and controls
Instrument panel................................2-2
Meters and gauges .............................2-4
Speedometer and odometer .................2-4
Tachometer .................................. 2-7
Engine coolant temperature gauge .......... 2-7
Fuel gauge ...................................2-8
Distance To Empty (DTE) .....................2-8
Trip computer (if so equipped) ................2-9
Compass and outside temperature display
(if so equipped) ................................. 2-10
Outside temperature display ................2-10
Compass .................................... 2-11
Warning lights, indicator lights and audible
reminders ...................................... 2-14
Checking lights .............................. 2-15
Warning lights ............................... 2-15
Indicator lights .............................. 2-21
Audible reminders ........................... 2-24
Security systems (if so equipped) ...............2-25
Vehicle security system (if so equipped) .....2-25
NISSAN Vehicle Immobilizer System
(if so equipped) .............................. 2-27
Wiper and washer switch .......................2-28
Switch operation ............................ 2-28
Rear window or outside mirror defroster
switch (if so equipped) ......................... 2-29Headlight and turn signal switch
...............2-30
Headlight control switch ....................2-30
Daytime Running Lights (DRL) system
(if so equipped) .............................. 2-32
Instrument brightness control ..............2-33
Turn signal switch ........................... 2-33
Fog light switch (if so equipped) .............2-33
Horn ........................................... 2-34
Cargo lamp switch ............................. 2-34
Heated seat switches (if so equipped) ..........2-35
Vehicle Dynamic Control (VDC) OFF switch .....2-36
Hill descent control switch (if so equipped) .....2-36
Electronic locking rear differential (E-Lock)
system switch (if so equipped) .................2-37
Rear Sonar System (RSS) OFF switch
(if so equipped) .................................
2-38
P
ower outlets .................................. 2-39
Storage ........................................ 2-40
Front-door pockets ......................... 2-40
Rear-door pockets .......................... 2-40
Seatback pocket (if so equipped) ............2-41
Under-seat storage bins
(if so equipped) .............................. 2-42
Storagetrays................................ 2-44
Glovebox ................................... 2-44
Page 112 of 492
1. Vents (P. 4-22)
2. Headlight/fog light (if so equipped)/turn signal switch (P. 2-30)
3. Steering wheel switch for audio control
(P. 4-71)
Bluetooth® Hands-Free Phone System
(P. 4-79, 4-96)
4. Driver supplemental air bag (P. 1-70) Horn (P. 2-34)
5. Meters and gauges (P. 2-4) Warning and indicator lights (P. 2-24)
6. Cruise control switches (P. 5-19)
7. Wiper and washer switch (P. 2-28)
8. Storage (P. 2-40)
9. Audio system (P. 4-36)
10. Front passenger supplemental air bag
(P. 1-70)
11. Upper and lower glove box (P. 2-40)
12. Passenger air bag status light (P. 1-70)
13. USB connection port (P. 4-55) AUX input (P. 4-55)
14. Power outlets (P. 2-39)
15. Electronic locking rear differential
(E-Lock) system switch (if so equipped)
(P. 2-37)
Heated seat switches (if so equipped)
(P. 2-35)
Rear sonar switch (if so equipped)
(P. 2-38)
Vehicle Dynamic Control (VDC) OFF
switch (P. 2-36)
LIC4475
INSTRUMENT PANEL
Page 140 of 492
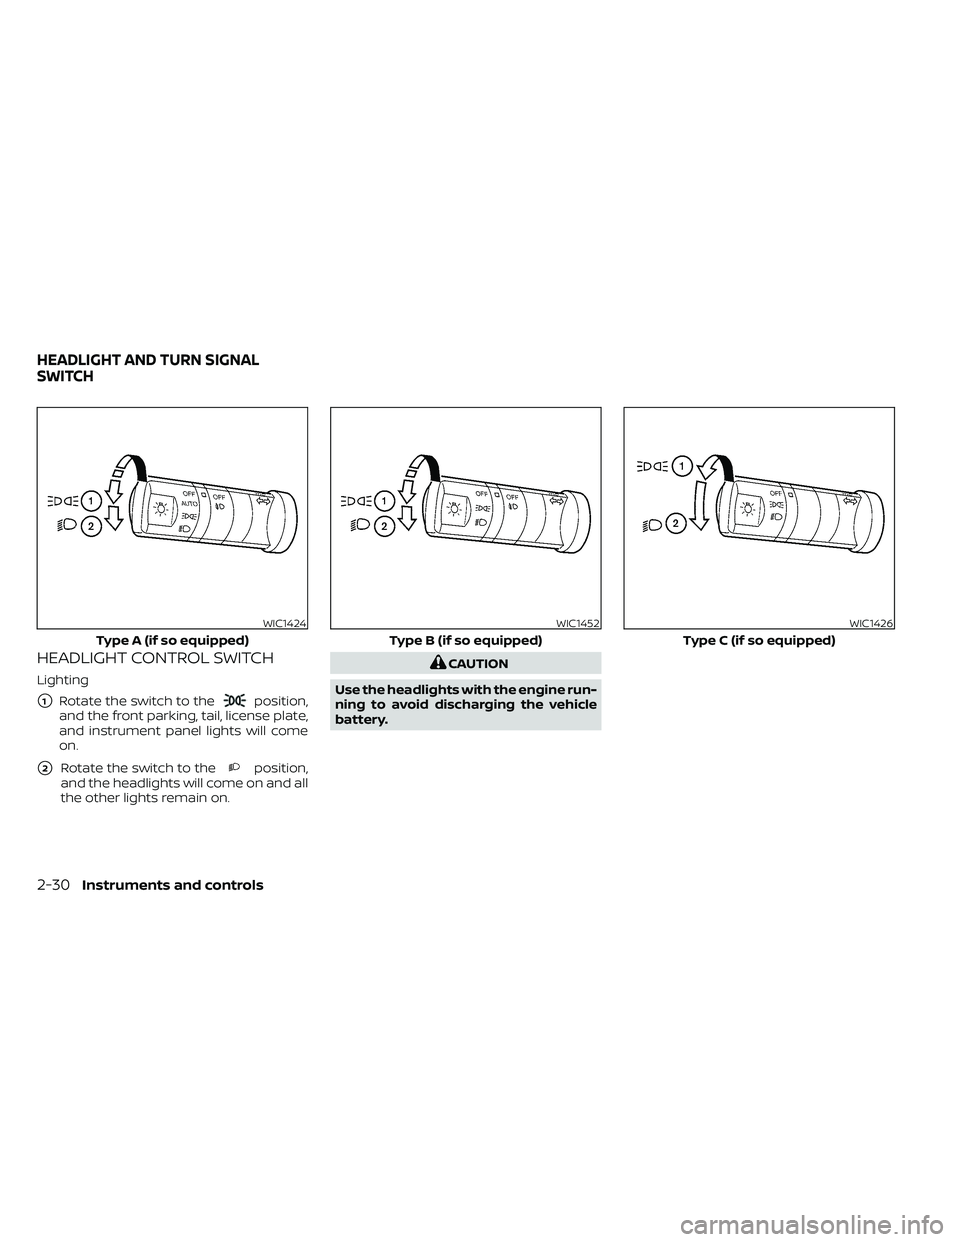
HEADLIGHT CONTROL SWITCH
Lighting
�1Rotate the switch to theposition,
and the front parking, tail, license plate,
and instrument panel lights will come
on.
�2Rotate the switch to theposition,
and the headlights will come on and all
the other lights remain on.
Page 141 of 492

The autolight system allows the headlights
to be set so they turn on and off automati-
cally. The autolight system can:
• Turn on the headlights, front parking, tai")
Autolight system (if so equipped)
The autolight system allows the headlights
to be set so they turn on and off automati-
cally. The autolight system can:
• Turn on the headlights, front parking, tail,license plate and instrument panel lights
automatically when it is dark.
• Turn off all the lights when it is light.
• Keep all the lights on for a period of time af ter you place the ignition switch in the
OFF position and all doors are closed. To turn on the autolight system:
1. Turn the headlight switch to the AUTO
position
O1.
2. Place the ignition switch in the ON position.
3. The autolight system automatically turns the headlights on and off.
Initially, if the ignition switch is placed in the
OFF position and a door is opened and lef t
open, the headlights remain on for a period
of time. If another door is opened while the
headlights are on, then the timer is reset.
To turn the autolight system off, turn the
switch to the OFF,
,orposition.
The headlights will turn on automatically at
twilight or in rainy weather (when the wind-
shield wiper is operated continuously).
If the ignition switch is pushed to the OFF
position and one of the doors is opened
and this condition is continued, the head-
lights remain on for 5 minutes. Be sure you do not put anything on top
of the autolight sensor
O1located in the
top side of the instrument panel. The au-
tolight sensor controls the autolight; if it
is covered, the autolight sensor reacts as
if it is dark out and the headlights will
illuminate. If this occurs while parked
with the engine off and the switch in the
ON position, your vehicle's battery could
become discharged.
LIC0835
Page 143 of 492
,
orposition.
Turn the control
OAto adjust the bright-
ness")
INSTRUMENT BRIGHTNESS
CONTROL
The instrument brightness control oper-
ates when the headlight control switch is in
the AUTO (if so equipped),
orposition.
Turn the control
OAto adjust the bright-
ness of the instrument panel lights when
driving at night.
TURN SIGNAL SWITCH
Turn signal
�1Move the lever up or down to signal the
turning direction. When the turn is com-
pleted, the turn signal cancels
automatically.
Lane change signal
�2Move the lever up or down until the turn
signal begins to flash, but the lever
does not latch, to signal a lane change.
Hold the lever until the lane change is
complete.
FOG LIGHT SWITCH (if so equipped)
To turn the fog lights on, turn the headlight
switch to theposition, then turn the
fog light switch to theposition.
To turn the fog lights on with the headlight
switch in the AUTO position (if so equipped),
the headlights must be on, then turn the
fog light switch to the
position.
To turn the fog lights off, turn the fog light
switch to the OFF position.
LIC4382LIC0563LIC0393
Page 181 of 492

Intelligent Key button operation
light
The light blinks only when you press any
button on the Intelligent Key. The light illu-
mination only signifies that the key fob has
transmitted a signal. You may look and/or
listen to verif y that the vehicle has per-
formed the intended operation. The num-
ber of blinks identifies each registered key
(i.e. 1 blink = 1st key,...,4 blinks = 4th key) for
your own identification purposes.If the light does not blink, your battery may
be too weak to communicate to the ve-
hicle. If this occurs, the battery may need to
be replaced. For additional information re-
garding the replacement of a battery, refer
to “Battery replacement” in the “Do-it-
yourself ” section of this manual.
WARNING SIGNALS
To help prevent the vehicle from moving
unexpectedly by erroneous operation of
the Intelligent Key or to help prevent the
vehicle from being stolen, a chime or chirp
sounds from inside and outside the vehicle
and a warning is displayed in the instru-
ment panel.
When a chime or beep sounds or a warning
is displayed, be sure to check the vehicle
and the Intelligent Key.
For additional information, refer to
“Troubleshooting guide” in this section and
“Warning lights, indicator lights and audible
reminders” in the “Instruments and con-
trols” section of this manual.
LPD2836
Page 183 of 492
1. Pull the hood lock release handleO1lo-
cated below the driver's side instrument
panel. The hood will spring up slightly.
2. Push the lever
O2at the front of the
hood to the side as illustrated with your
fingertips and raise the hood.
3. Insert the support rod into the slot on the underside of the hood
O3.
When closing the hood, return the hood rod
to its original position. Lower the hood ap-
proximately 12 in (30 cm) above the latch
and release it. This allows proper engage-
ment of the hood latch.
LPD2698
HOOD FUEL-FILLER DOOR
Pre-driving checks and adjustments3-13

2. Headlight/fog light (if so equipped)/turn signal switch (P. 2-30)
3. Steering wheel switch for audio control
(P. 4-71)
Bluetooth® Hands-Free Phone System
(P. 4-79, 4-96)
4. Driv")