2021 NISSAN ARMADA ECU
[x] Cancel search: ECUPage 245 of 603

INTELLIGENT AROUND VIEW®
MONITOR SYSTEM LIMITATIONS
WARNING
Listed below are the system limita-
tions for the Intelligent Around View®
Monitor. Failure to operate the vehi-
cle in accordance with these system
limitations could result in serious
injury or death.
.Do not use the Intelligent Around
View® Monitor with the outside
mirrors in the stored position,
and make sure that the liftgate
is securely closed when operating
the vehicle using the Intelligent
Around View® Monitor.
. The apparent distance between
objects viewed on the Intelligent
Around View® Monitor differs
from the actual distance.
. The cameras are installed on the
front grille, the outside mirrors
and above the rear license plate.
Do not put anything on the vehi-
cle that covers the cameras.
. When washing the vehicle with
high pressure water, be sure not
to spray it around the cameras. Otherwise, water may enter the
camera unit causing water con-
densation on the lens, a malfunc-
tion, fire or an electric shock.
. Do not strike the cameras. They
are precision instruments. Doing
so could cause a malfunction or
cause damage resulting in a fire
or an electric shock.
WAE0658X
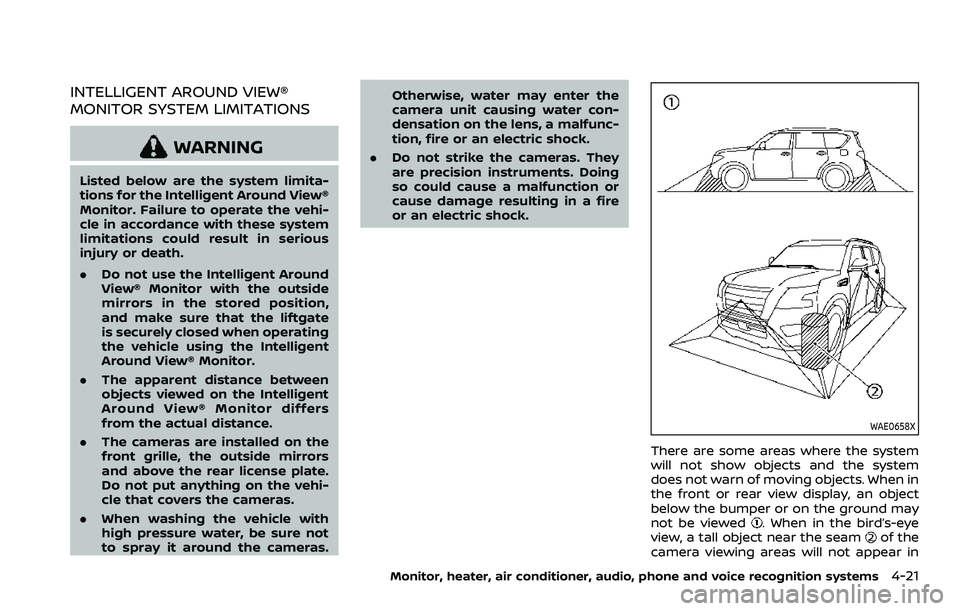
There are some areas where the system
will not show objects and the system
does not warn of moving objects. When in
the front or rear view display, an object
below the bumper or on the ground may
not be viewed
. When in the bird’s-eye
view, a tall object near the seamof the
camera viewing areas will not appear in
Monitor, heater, air conditioner, audio, phone and voice recognition systems4-21
Page 270 of 603

5-4Starting and driving
WARNING
.Do not leave children or adults
who would normally require the
support of others alone in your
vehicle. Pets should not be left
alone either. They could acciden-
tally injure themselves or others
through inadvertent operation of
the vehicle. Also, on hot, sunny
days, temperatures in a closed
vehicle could quickly become
high enough to cause severe or
possibly fatal injuries to people or
animals.
. Properly secure all cargo to help
prevent it from sliding or shifting.
Do not place cargo higher than
the seatbacks. In a sudden stop
or collision, unsecured cargo
could cause personal injury.
EXHAUST GAS (carbon monoxide)
WARNING
.Do not breathe exhaust gases;
they contain colorless and odor-
less carbon monoxide. Carbon
monoxide is dangerous. It can cause unconsciousness or death.
. If you suspect that exhaust fumes
are entering the vehicle, drive
with all windows fully open, and
have the vehicle inspected imme-
diately.
. Do not run the engine in closed
spaces such as a garage.
. Do not park the vehicle with the
engine running for any extended
length of time.
. Keep the liftgate closed while
driving, otherwise exhaust gases
could be drawn into the passen-
ger compartment. If you must
drive with the liftgate open, fol-
low these precautions:
1) Open all the windows.
2) Set the
air recirculation to
off and the fan control to high
to circulate the air.
. If electrical wiring or other cable
connections must pass to a trailer
through the seal on the liftgate or
the body, follow the manufac-
turer’s recommendation to pre-
vent carbon monoxide entry into
the vehicle.
. The exhaust system and body
should be inspected by a quali- fied mechanic whenever:
— The vehicle is raised for ser-
vice.
— You suspect that exhaust fumes are entering into the
passenger compartment.
— You notice a change in the sound of the exhaust system.
— You have had an accident involving damage to the ex-
haust system, underbody, or
rear of the vehicle.
THREE-WAY CATALYST
The three-way catalyst is an emission
control device installed in the exhaust
system. Exhaust gases in the three-way
catalyst are burned at high temperatures
to help reduce pollutants.
WARNING
. The exhaust gas and the exhaust
system are very hot. Keep people,
animals or flammable materials
away from the exhaust system
components.
. Do not stop or park the vehicle
over flammable materials such as
PRECAUTIONS WHEN STARTING
AND DRIVING
Page 277 of 603

WARNING
.Drive carefully when off the road
and avoid dangerous areas. Every
person who drives or rides in this
vehicle should be seated with
their seat belt fastened. This will
keep you and your passengers in
position when driving over rough
terrain.
. Do not drive across steep slopes.
Instead drive either straight up or
straight down the slopes. Off-
road vehicles can tip over side-
ways much more easily than they
can forward or backward.
. Many hills are too steep for any
vehicle. If you drive up them, you
may stall. If you drive down them,
you may not be able to control
your speed. If you drive across
them, you may roll over.
. Do not shift ranges while driving
on downhill grades as this could
cause loss of control of the vehi-
cle.
. Stay alert when driving to the top
of a hill. At the top there could be
a drop-off or other hazard that
could cause an accident. .
If your engine stalls or you cannot
make it to the top of a steep hill,
never attempt to turn around.
Your vehicle could tip or roll over.
Always back straight down in R
(Reverse) range. Never back down
in N (Neutral), using only the
brake, as this could cause loss of
control.
. Heavy braking going down a hill
could cause your brakes to over-
heat and fade, resulting in loss of
control and an accident. Apply
brakes lightly and use a low
range to control your speed.
. Unsecured cargo can be thrown
around when driving over rough
terrain. Properly secure all cargo
so it will not be thrown forward
and cause injury to you or your
passengers.
. To avoid raising the center of
gravity excessively, do not exceed
the rated capacity of the roof rack
(if so equipped) and evenly dis-
tribute the load. Secure heavy
loads in the cargo area as far
forward and as low as possible.
Do not equip the vehicle with tires
larger than specified in this man-
ual. This could cause your vehicle
to roll over. .
Do not grip the inside or spokes
of the steering wheel when driv-
ing off-road. The steering wheel
could move suddenly and injure
your hands. Instead drive with
your fingers and thumbs on the
outside of the rim.
. Before operating the vehicle, en-
sure that the driver and all pas-
sengers have their seat belts
fastened.
. Always drive with the floor mats
in place as the floor may became
hot.
. Lower your speed when encoun-
tering strong crosswinds. With a
higher center of gravity, your
NISSAN is more affected by
strong side winds. Slower speeds
ensure better vehicle control.
. Do not drive beyond the perfor-
mance capability of the tires,
even with 4WD engaged.
. For 4WD equipped vehicles, do
not attempt to raise two wheels
off the ground and shift the
transmission to any drive or re-
verse position with the engine
running. Doing so may result in
drivetrain damage or unexpected
vehicle movement which could
Starting and driving5-11
Page 279 of 603

WARNING
Do not operate the push-button
ignition switch while driving the ve-
hicle except in an emergency. (The
engine will stop when the ignition
switch is pushed 3 consecutive times
or the ignition switch is pushed and
held for more than 2 seconds.) If the
engine stops while the vehicle is
being driven, this could lead to a
crash and serious injury.
Before operating the push-button igni-
tion switch, be sure to move the shift
lever to the P (Park) position.
SSD0436
OPERATING RANGE FOR ENGINE
START FUNCTION
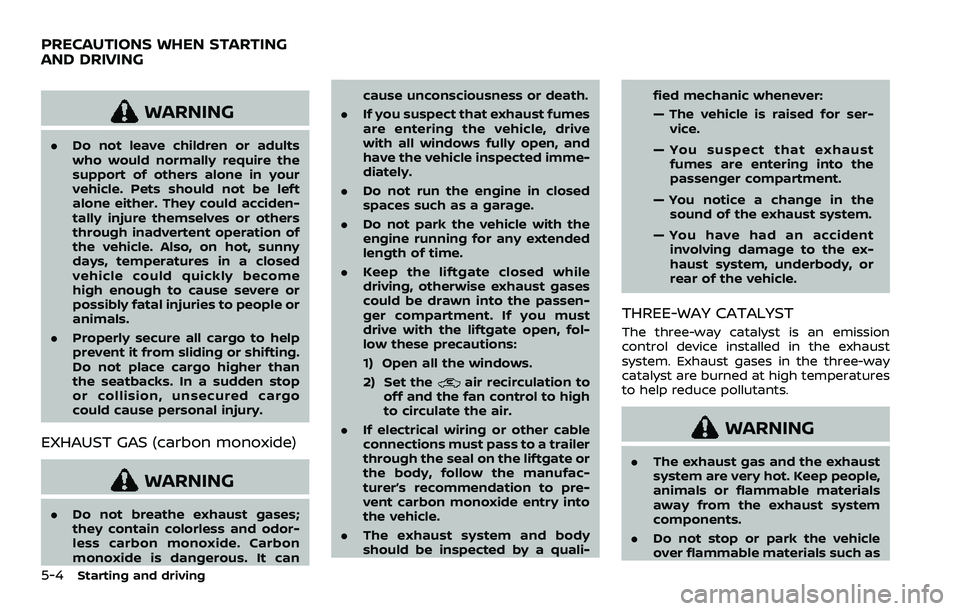
The operating range for starting the
engine inside the vehicleis shown in
the illustration.
. If the Intelligent Key is on the instru-
ment panel, cargo area, inside the
glove box or door pocket, or the
corner of interior compartment, it
may not be possible to start the
engine.
. If the Intelligent Key is near the door or
door glass outside the vehicle, it may
be possible to start the engine.
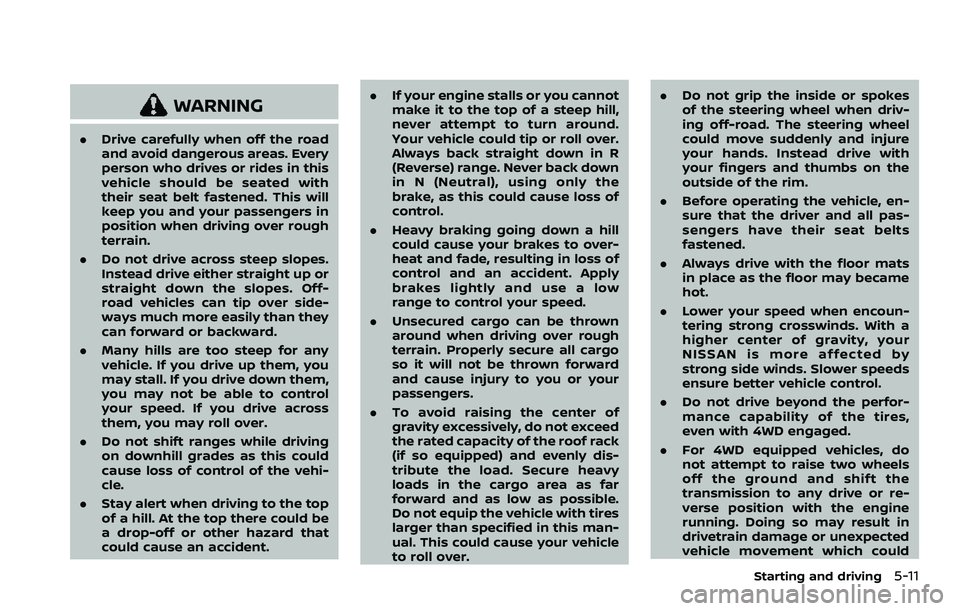
SSD1021
When the ignition switch is pushed with-
out depressing the brake pedal, the igni-
tion switch position will change as
follows:
.Push center once to change to ACC.
. Push center two times to change to
ON.
. Push center three times to change to
OFF. (No position illuminates.)
. Push center four times to return to
ACC.
. Open or close any door to return to
LOCK during the OFF position.
The ignition lock is designed so that the
ignition switch position cannot be
switched to LOCK until the shift lever is
Starting and driving5-13
PUSH-BUTTON IGNITION SWITCH
Page 281 of 603

CAUTION
Do not leave the vehicle with the
push-button ignition switch in ACC or
ON positions when the engine is not
running for an extended period. This
can discharge the battery.
ACC (Accessories) delay timer
function
When the ignition switch is placed in the
OFF position, the ACC (Accessories) delay
timer function is activated. This function
keeps the power supply to the electrical
accessories for up to 10 minutes. When
the driver’s door is opened, this function is
canceled and the electrical power supply
is stopped. The ACC (Accessories) delay
time function can be enabled or disabled.
(See “Vehicle settings” (P.2-23).)
EMERGENCY ENGINE SHUT OFF
To shut off the engine in an emergency
situation while driving, perform the fol-
lowing procedure:
.Rapidly push the push-button ignition
switch 3 consecutive times in less
than 1.5 seconds, or
. Push and hold the push-button igni-
tion switch for more than 2 seconds.
JVS0404X
INTELLIGENT KEY BATTERY DIS-
CHARGE
If the battery of the Intelligent Key is
discharged, or environmental conditions
interfere with the Intelligent Key opera-
tion, start the engine according to the
following procedure:
1. Move the shift lever to the P (Park)
position.
2. Firmly apply the foot brake.
3. Touch the ignition switch with the Intelligent Key as illustrated. (A chime
will sound.)
4. Push the ignition switch while depres- sing the brake pedal within 10 sec- onds after the chime sounds. The
engine will start.
After step 3 is performed, when the
ignition switch is pushed without depres-
sing the brake pedal, the ignition switch
position will change to ACC.
NOTE:
. When the ignition switch is pushed
to the ACC or ON position or the
engine is started by the above pro-
cedures, the Key Battery Low mes-
sage appears on the vehicle
information display even if the In-
telligent Key is inside the vehicle.
This is not a malfunction. To turn off
the Intelligent Key battery discharge
indicator, touch the ignition switch
with the Intelligent Key again.
. If the Key Battery Low message
appears, replace the battery as soon
as possible. (See “Battery” (P.8-11).)
Starting and driving5-15
Page 417 of 603

To shut off the engine in an emergency
situation while driving, perform the fol-
lowing procedure:
.Rapidly push the push-button ignition
switch 3 consecutive times in less
than 1.5 seconds, or
. Push and hold the push-button igni-
tion switch for more than 2 seconds.TIRE PRESSURE MONITORING SYS-
TEM (TPMS)
This vehicle is equipped with the Tire
Pressure Monitoring System (TPMS). It
monitors tire pressure of all tires except
the spare. When the low tire pressure
warning light is lit and the “Tire Pressure
Low Add Air” warning appears in the
vehicle information display, one or more
of your tires is significantly under-inflated.
If the vehicle is being driven with low tire
pressure, the TPMS will activate and warn
you of it by the low tire pressure warning
light. This system will activate only when
the vehicle is driven at speeds above 16
MPH (25 km/h). For more details, see “Low
tire pressure warning light” (P.2-15) and
“Tire Pressure Monitoring System (TPMS)”
(P.5-5).
WARNING
.If the low tire pressure warning
light illuminates or Low Pressure
information is displayed on the
monitor screen while driving,
avoid sudden steering maneu-
vers or abrupt braking, reduce
vehicle speed, pull off the road
to a safe location and stop the
vehicle as soon as possible. Driv-
ing with under-inflated tires may permanently damage the tires
and increase the likelihood of tire
failure. Serious vehicle damage
could occur and may lead to an
accident and could result in ser-
ious personal injury. Check the
tire pressure for all four tires.
Adjust the tire pressure to the
recommended COLD tire pressure
shown on the Tire and Loading
Information label to turn the low
tire pressure warning light OFF. If
the light still illuminates while
driving after adjusting the tire
pressure, a tire may be flat. If
you have a flat tire, replace it with
a spare tire as soon as possible.
. Since the spare tire is not
equipped with the TPMS, when a
spare tire is mounted or a wheel
is replaced, the TPMS will not
function and the low tire pressure
warning light will flash for ap-
proximately 1 minute. The light
will remain on after 1 minute.
Have your tires replaced and/or
TPMS system reset as soon as
possible. It is recommended you
visit a NISSAN dealer for these
services.
. Replacing tires with those not
originally specified by NISSAN
In case of emergency6-3
EMERGENCY ENGINE SHUT OFF FLAT TIRE
Page 418 of 603

6-4In case of emergency
could affect the proper operation
of the TPMS.
. Do not inject any tire liquid or
aerosol tire sealant into the tires,
as this may cause a malfunction
of the tire pressure sensors.
CHANGING A FLAT TIRE
If you have a flat tire, follow the instruc-
tions below.
Stopping the vehicle
1. Safely move the vehicle off the road
and away from traffic.
2. Turn on the hazard warning flashers.
3. Park on a level surface and apply the parking brake. Move the shift lever to
the P (Park) position.
4. Turn off the engine.
5. Raise the hood to warn other traffic, and to signal professional road assis-
tance personnel that you need assis-
tance.
6. Have all passengers get out of the vehicle and stand in a safe place, away
from traffic and clear of the vehicle.
WARNING
.Make sure the parking brake is
securely applied and the auto-
matic transmission is in the P
(Park) position.
. Never change tires when the ve-
hicle is on a slope, ice or slippery
areas. This is hazardous.
. Never change tires if oncoming
traffic is close to your vehicle.
Wait for professional road assis-
tance.
MCE0001A
Blocking wheels
Place suitable blocksat both the front
and back of the wheel diagonally oppo-
site the flat tire to prevent the vehicle
from moving when it is jacked up.
WARNING
Be sure to block the wheel as the
vehicle may move and result in
personal injury.
Page 420 of 603

6-6In case of emergency
JVE0423X
5. Securely screw to connect the T-shaped end of the jack rod and the
extension bar
as illustrated.
6. Fit the square end of the jack rod into the square hole of the wheel nut
wrench to form a handle
. 7. Locate the oval opening above the
middle of the rear bumper.
8. Place the T-shaped end of the jack rod through the opening and direct it
towards the spare wheel winch as-
sembly, located directly above the
spare wheel.
SCE0916
CAUTION
Do not insert the jack rod straight as
it is designed to be inserted at an
angle as shown.
9. Seat the T-shaped end of the jack rod into the T-shaped opening of the
spare wheel winch. Apply pressure to
keep the jack rod engaged in the
spare wheel winch and turn the jack
rod counterclockwise to lower the
spare wheel.