Page 567 of 603
• Full-Function Slimline Remote Control
• Monitor Screen Sharing
GETTING STARTED
Turning the monitor on or off
1. Press thebutton on the top of the
monitor or the remote control to turn
the monitor on or off. When in use, the
front panel controls will illuminate.
2. Af ter the monitor has been turned on
and is displaying a picture, the up/down
viewing angle can be adjusted to opti-
mize the picture quality. Press the push-
button latch located on the top of the
monitor to pivot the screen.
Power up tips
1. Af ter the ignition is turned on, there is a
12 second delay before the monitor
(power) button is operable.
2. On some vehicles af ter the ignition is
turned off, the system will continue to
work for 10 minutes, or until the driver's
door is opened.
3. Remember to turn the monitor off and
pivot the screen to the locked (latched)
position when not in use.
LHA4871
Page 568 of 603

Audio options
Wireless headphones
Each monitor includes a built-in dual chan-
nel infrared transmitter for use with wire-
less headphones. The wireless head-
phones must be used within a line of sight
from the transmitter as infrared signals, like
visible light, travel only in a straight line.
How to use the wireless headphones
When placing the headphones on your
head, make sure to observe the lef t and
right orientation. The headphones must be
oriented correctly (facing forward) to re-
ceive the audio signal. Press the
(power) button on the headphones,
then select channel “A” to listen to monitor
A, or channel “B” to listen to monitor B. Ad-
just the audio level using the volume con-
trol on each headphone.
Wired headphones
There is a 3.5mm stereo headphone out-
put on each monitor which can be used
with most standard stereo headphones
(wired headphones sold separately).
Bluetooth® streaming audio
To listen to audio throughout the entire ve-
hicle, the system includes the ability tostream audio over a Bluetooth® connec-
tion to the vehicle’s stereo system.
When monitor A is selected as the source
to stream from, the audio output to the
wireless and wired headphones will be dis-
abled (only on monitor A). To use the wire-
less or wired headphones with monitor A,
you must turn off the Bluetooth® stream-
ing feature. To enable/disable Bluetooth®
streaming, navigate to the “SETTINGS”
menu, or press
on the remote control
during content playback. For additional in-
formation, see “Settings” in this section.
Media compatibility
For a list of compatible media formats for
this system, see “Storage device format-
ting” in this section.
• The metadata or file information of some
audio and video files may not be correctly
displayed.
• It is not possible to play content that is
protected by DRM (Digital Rights Manage-
ment).
• There may be a delay before playback
begins when using USB flash drives or SD
cards with complex folder hierarchies or
many files.• Some audio, video, and image files may
be incompatible with this system due to
file characteristics, file format, recording
sof tware used, directory structure,
and/or the type of audio/video encoding
used.
Storage device formatting
This system is compatible with several
types of formatting for USB flash drives and
SD cards. Refer to the documentation that
comes with your storage device for more
details on how to format.
FAT32 - USB and SDHC
Good for smaller capacity storage devices,
but individual files on the drive must be
<4GB. This format is good for music and
images.
EX-FAT - USB and SDXC
Better choice for larger capacity storage
devices with files that are >4GB. This format
is better for larger files such as full-length
movies.
NTFS - USB and SDXC
Best choice for very large capacity storage
devices - with no limitations on file size. This
format can be used for all file sizes.
Page 570 of 603

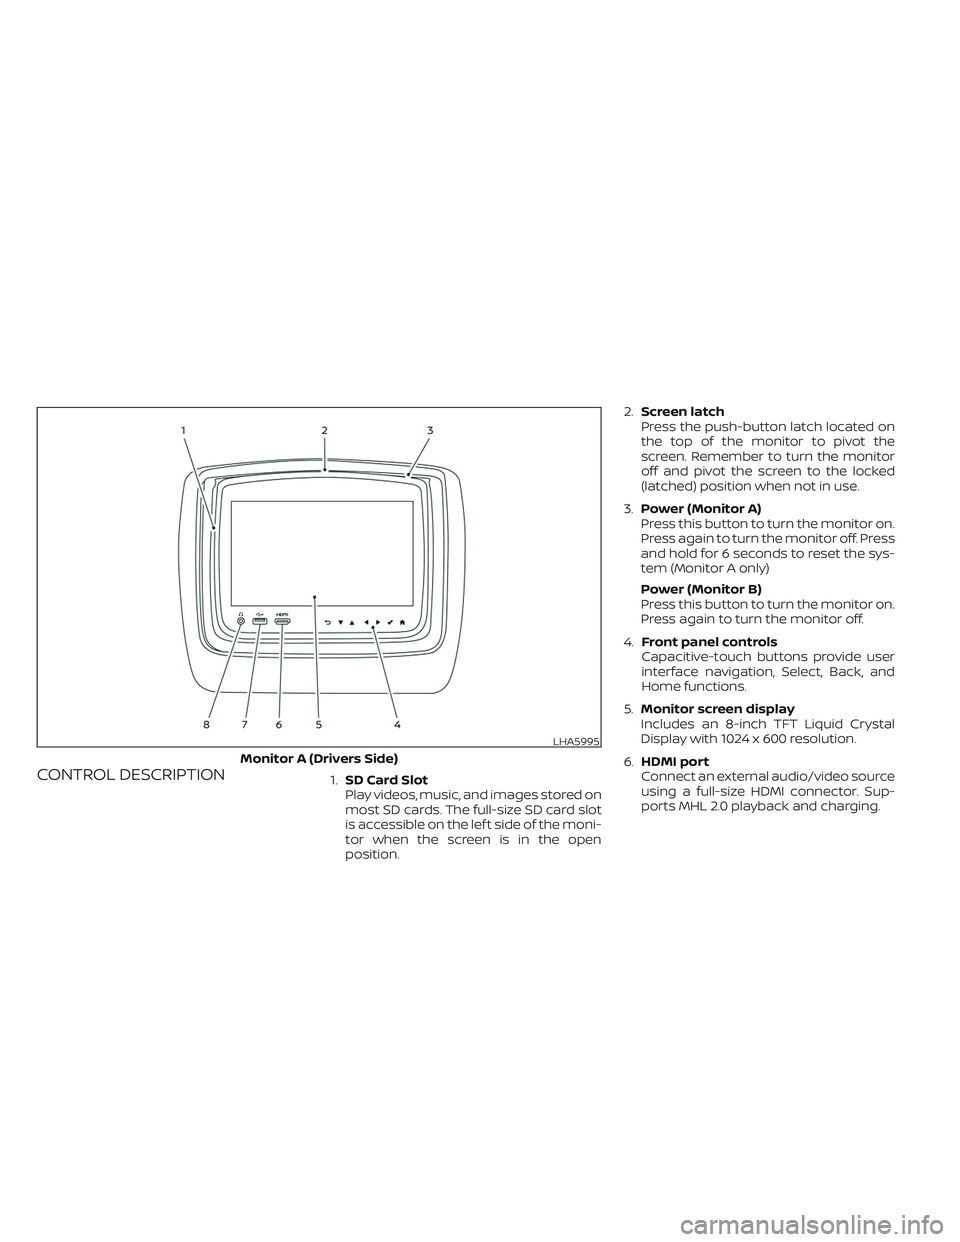
CONTROL DESCRIPTION1.SD Card Slot
Play videos, music, and images stored on
most SD cards. The full-size SD card slot
is accessible on the lef t side of the moni-
tor when the screen is in the open
position.2.Screen latch
Press the push-button latch located on
the top of the monitor to pivot the
screen. Remember to turn the monitor
off and pivot the screen to the locked
(latched) position when not in use.
3.Power (Monitor A)
Press this button to turn the monitor on.
Press again to turn the monitor off. Press
and hold for 6 seconds to reset the sys-
tem (Monitor A only)
Power (Monitor B)
Press this button to turn the monitor on.
Press again to turn the monitor off.
4.Front panel controls
Capacitive-touch buttons provide user
interface navigation, Select, Back, and
Home functions.
5.Monitor screen display
Includes an 8-inch TFT Liquid Crystal
Display with 1024 x 600 resolution.
6.HDMI port
Connect an external audio/video source
using a full-size HDMI connector. Sup-
ports MHL 2.0 playback and charging.
LHA5995
Monitor A (Drivers Side)
Page 571 of 603
7.USB 2.0 port
Play videos, music, and images stored on
most USB devices. Provides up to 2 amps
of output to charge most mobile
devices.8.Headphone output jack
Connect wired headphones using a
3.5mm stereo connector.
CAUTION
•Do not use any harsh solvents or
chemicals when cleaning the
monitor.
•Do not use any abrasive cleaners that
may scratch the screen. Use only a
lightly dampened lint free cloth to
wipe the screen if it is dirty.
•The LCD display screen is not touch-
screen. Do not put pressure or add
suction cups on the screen.
•Caution children to avoid touching or
scratching the screen, as it may be-
come dirty or damaged.
•Place the monitor in the fully closed
position when not in use.
LHA5996
Monitor B (Passenger’s Side)
Page 573 of 603
REMOTE CONTROL BUTTONS
1.Power
Press this button to turn the monitor on.
Press again to turn the monitor off.2.Monitor A
Press this button to transmit the remote
control codes and functions to operate
monitor A (Driver side).
3.Directional pad
Press these buttons to increase/
decrease the volume or navigate up/
down when displaying a menu or file list.
4.Home
Press this button to return to the home
screen.
5.Back
Press this button to go back to the pre-
vious screen.
6.Monitor B
Press this button to transmit the remote
control codes and functions to operate
monitor B (Passenger side).
7.Select
Press this button to make a selection
when displaying a menu or file list.
8.Menu
Press this button to open the context
menu (when available).
NOTE:
You must first select the desired moni-
tor (press A or B) to control it. Example
- Press A, then press Power to turn
monitor A on/off.
LHA4879
Page 577 of 603

NOTE:
For hearing protection, there is a
maximum volume setting to limit the
audio output of the front panel 3.5mm
headphone output. Using the direc-
tional pad on the remote navigate to
“SETTINGS” then “AUDIO” then “HEAD-
PHONES” to adjust the maximum vol-
ume. Once set, the maximum volume
is limited to this setting.
Mirroring content
To mirror the content of the opposite
monitor, using the directional pad on the
remote, select “MIRROR” from the Home
Screen. This will allow the identical content
to play on both monitors.
Multicast
Multicast (Off/On) provides the ability to
watch a video over the built-in Wi-Fi net-
work using an application installed on a
mobile device. When turned on, the video
content will be "cast" over the network to
allow users with multiple mobile devices to
enjoy the same movie. *Requires applica-
tion to be installed on the mobile device.
Bluetooth
Selecting “BLUETOOTH” allows the
Bluetooth® feature to be turned off/on, au-
dio source selection, and lip-sync adjust-
ments. For additional information, see
“Bluetooth® streaming” and “Lip-Sync ad-
justment” in this section.
HDMI/MHL CONNECTION
HDMI connection
Display content from an external source
connected to the system using the HDMI
port located on the front of monitor A. A
standard HDMI cable is required (sold
separately).
To access the HDMI source, using the direc-
tional pad on the remote, select “SOURCE”
from the Home Screen and navigate to
HDMI in the menu. When HDMI is high-
lighted, a preview of the HDMI input will be
displayed in the preview screen.
Press
to return to the source menu.
LHA5998
Page 579 of 603

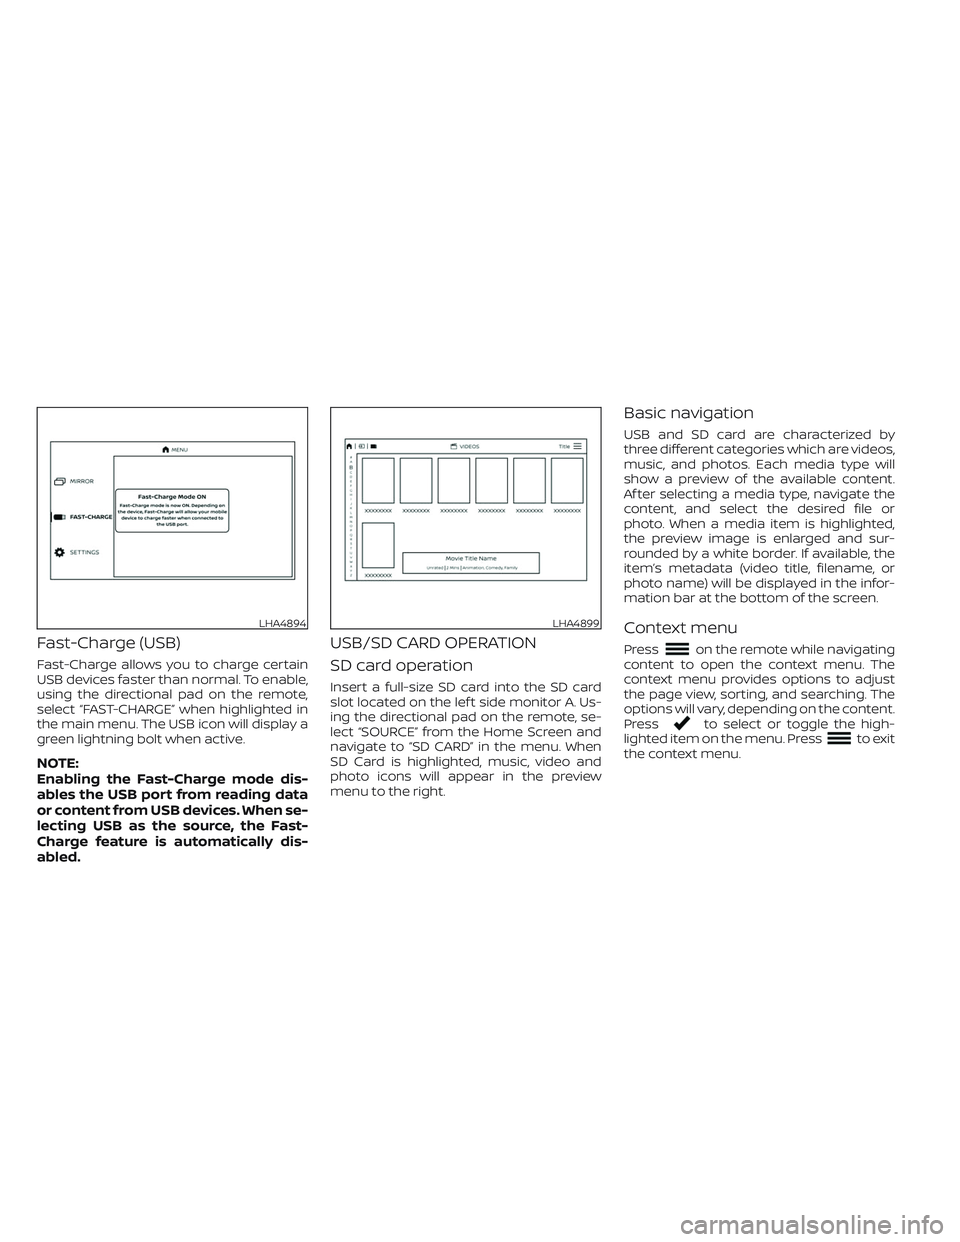
Fast-Charge (USB)
Fast-Charge allows you to charge certain
USB devices faster than normal. To enable,
using the directional pad on the remote,
select “FAST-CHARGE” when highlighted in
the main menu. The USB icon will display a
green lightning bolt when active.
NOTE:
Enabling the Fast-Charge mode dis-
ables the USB port from reading data
or content from USB devices. When se-
lecting USB as the source, the Fast-
Charge feature is automatically dis-
abled.
USB/SD CARD OPERATION
SD card operation
Insert a full-size SD card into the SD card
slot located on the lef t side monitor A. Us-
ing the directional pad on the remote, se-
lect “SOURCE” from the Home Screen and
navigate to “SD CARD” in the menu. When
SD Card is highlighted, music, video and
photo icons will appear in the preview
menu to the right.
Basic navigation
USB and SD card are characterized by
three different categories which are videos,
music, and photos. Each media type will
show a preview of the available content.
Af ter selecting a media type, navigate the
content, and select the desired file or
photo. When a media item is highlighted,
the preview image is enlarged and sur-
rounded by a white border. If available, the
item’s metadata (video title, filename, or
photo name) will be displayed in the infor-
mation bar at the bottom of the screen.
Context menu
Presson the remote while navigating
content to open the context menu. The
context menu provides options to adjust
the page view, sorting, and searching. The
options will vary, depending on the content.
Press
to select or toggle the high-
lighted item on the menu. Pressto exit
the context menu.
LHA4894LHA4899
Page 580 of 603
Page view — music and videos
Using the directional pad on the remote,
select “PAGE VIEW ” to change between List
or Grid. List provides an alphanumeric text
listing of all content, whereas Grid provides
an alphanumeric thumbnail graphic view
of the content.
Page view — photos
Using the directional pad on the remote,
select “PAGE VIEW ” to change between Grid,
Overview, Slideshow, or Full Screen. Grid
provides a large thumbnail graphic view,
whereas Overview provides a small
thumbnail graphic view of the content.
Slideshow will play photos in sequence and
Full Screen fills the entire screen.
Search
Search provides an easy way to find and
play content by name. Using the directional
pad on the remote, select “SEARCH” to dis-
play the on-screen keyboard. Use the di-
rectional pad to navigate the keyboard and
enter the first few characters of the file-
name. Once the desired file is displayed,
press
to hide the keyboard. Pressto begin playback.
LHA4896LHA4897