2021 MERCEDES-BENZ GLE SUV seats
[x] Cancel search: seatsPage 108 of 545
Ad
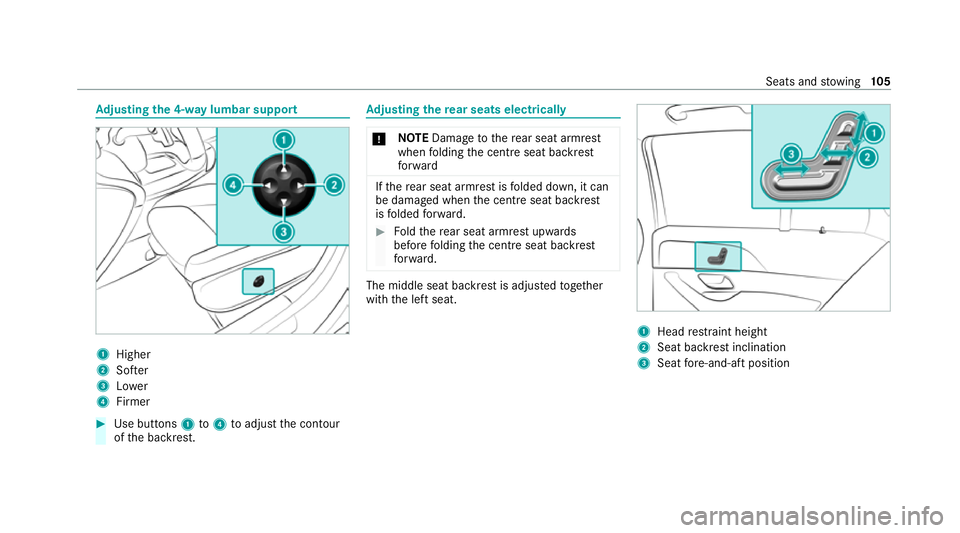
justing the 4-w aylumbar support 1
Higher
2 Softer
3 Lower
4 Firmer #
Use buttons 1to4 toadjust the conto ur
of the backrest. Ad
justing the rear seats electrical ly *
NO
TEDama getothere ar seat armrest
when folding the cent reseat backrest
fo rw ard If
th ere ar seat armrest is folded down, it can
be damaged when the cent reseat backrest
is folded forw ard. #
Foldthere ar seat armrest upwards
before folding the cent reseat backrest
fo rw ard. The middle seat backrest is adjus
tedto ge ther
with the left seat. 1
Head restra int height
2 Seat backrest inclination
3 Seat fore -and-aft position Seats and
stowing 105
Page 109 of 545
Fo
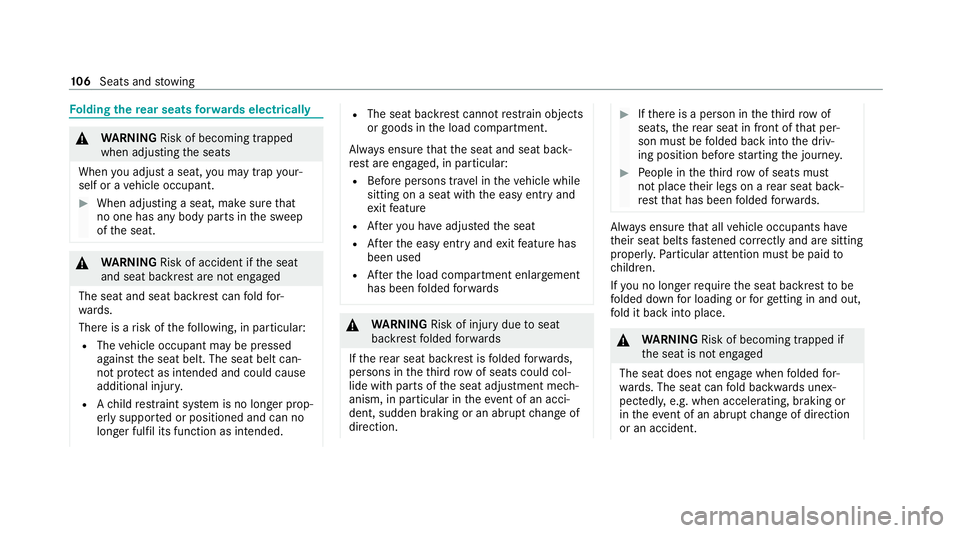
lding there ar seats forw ards electrical ly&
WARNING Risk of becoming trapped
when adjusting the seats
When you adjust a seat, you may trap your‐
self or a vehicle occupant. #
When adjusting a seat, make sure that
no one has any body parts in the sweep
of the seat. &
WARNING Risk of accident if the seat
and seat backrest are not engaged
The seat and seat backrest can fold for‐
wa rds.
There is a risk of thefo llowing, in particular:
R The vehicle occupant may be pressed
against the seat belt. The seat belt can‐
not pr otect as intended and could cause
additional injur y.
R Ach ild restra int sy stem is no longer prop‐
er ly suppor ted or positioned and can no
longer fulfil its function as intended. R
The seat backrest cann otrestra in objects
or goods in the load compartment.
Alw ays ensure that the seat and seat back‐
re st are engaged, in particular:
R Before persons tra vel in theve hicle while
sitting on a seat with the easy entry and
ex itfeature
R Afteryo u ha veadjus tedth e seat
R Afterth e easy entry andexitfeature has
been used
R Afterth e load compartment enlar gement
has been folded forw ards &
WARNING Risk of injury duetoseat
backrest folded forw ards
If th ere ar seat backrest is folded forw ards,
persons in theth ird row of seats could col‐
lide with parts of the seat adjustment mech‐
anism, in particular in theev ent of an acci‐
dent, sudden braking or an abrupt change of
direction. #
Ifth ere is a person in theth ird row of
seats, there ar seat in front of that per‐
son must be folded back into the driv‐
ing position before starting the journe y. #
People in theth ird row of seats must
not place their legs on a rear seat back‐
re st that has been folded forw ards. Alw
ays ensure that all vehicle occupants ha ve
th eir seat belts fastened cor rectly and are sitting
prope rly. Pa rticular attention must be paid to
ch ildren.
If yo u no lon gerre qu ire the seat backrest tobe
fo lded down for loading or forge tting in and out,
fo ld it back into place. &
WARNING Risk of becoming trapped if
th e seat is not engaged
The seat does not engage when folded for‐
wa rds. The seat can fold backwards unex‐
pectedl y,e.g. when accelerating, braking or
in theev ent of an abrupt change of direction
or an accident. 106
Seats and stowing
Page 110 of 545
Pe
ople in the seat's sweep can become trap‐
ped. #
If a seat is folded forw ards, alw aysfo ld
it back before driving off. #
Make sure that the seat is engaged. If a seat on
the second rowof seats is not
engaged, this will be shown on the multifunction
display on the instrument clus ter.
Re quirements:
R The area into which the seat is folded is
clear.
R The seat has been folded up (/ page125).
R Vehicles with comfort seating: the cent re
armrest is folded up.
R Vehicles with an extended centre console:
th estow age compartment in the cent recon‐
sole is closed.
R Vehicles with a centre seat backrest:the
centre seat ba ckrest is in an upright position
(/ page 123). To
make it easier toget in and out, you can fold
th e seats on the second rowof seats forw ards in
ve hicles with a third row of seats. Here, the
centre seat folds forw ards and backwards
to get her with the left-hand seat in vehicles with
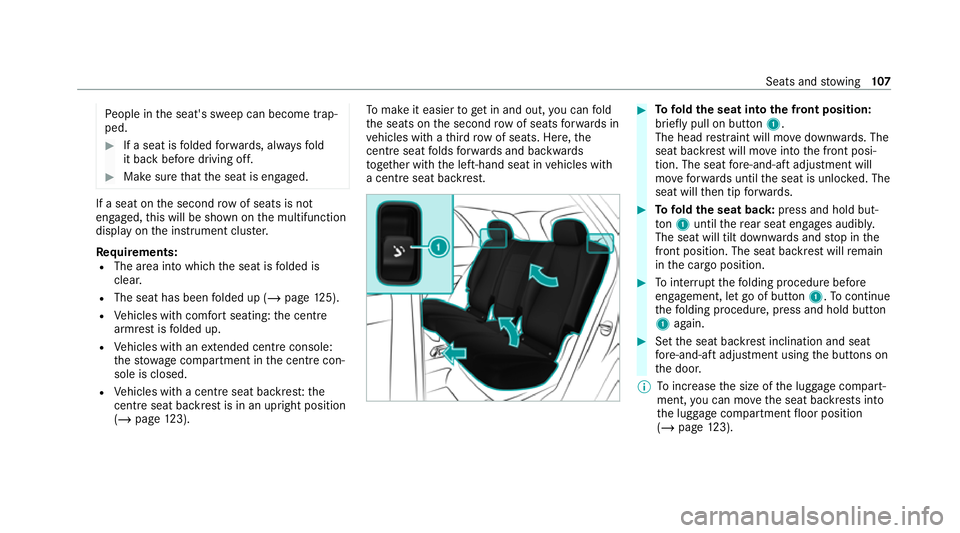
a centre seat backrest. #
Tofold the seat into the front position:
brief lypull on button 1.
The head restra int will mo vedown wards. The
seat backrest will mo veinto the front posi‐
tion. The seat fore -and-aft adjustment will
mo veforw ards until the seat is unloc ked. The
seat will then tip forw ards. #
Tofold the seat back: press and hold but‐
to n1 until there ar seat engages audibl y.
The seat will tilt down wards and stop in the
front position. The seat backrest will remain
in the cargo position. #
Tointer rupt thefo lding procedure before
engagement, let go of button 1.Tocontinue
th efo lding procedure, press and hold button
1 again. #
Set the seat backrest inclination and seat
fo re -and-aft adjustment using the buttons on
th e door.
% Toinc rease the size of the luggage compart‐
ment, you can mo vethe seat backrests into
th e luggage compartment floor position
(/ page 123). Seats and
stowing 107
Page 111 of 545
Fo
lding there ar seats forw ards mechanically
(eme rgency release)
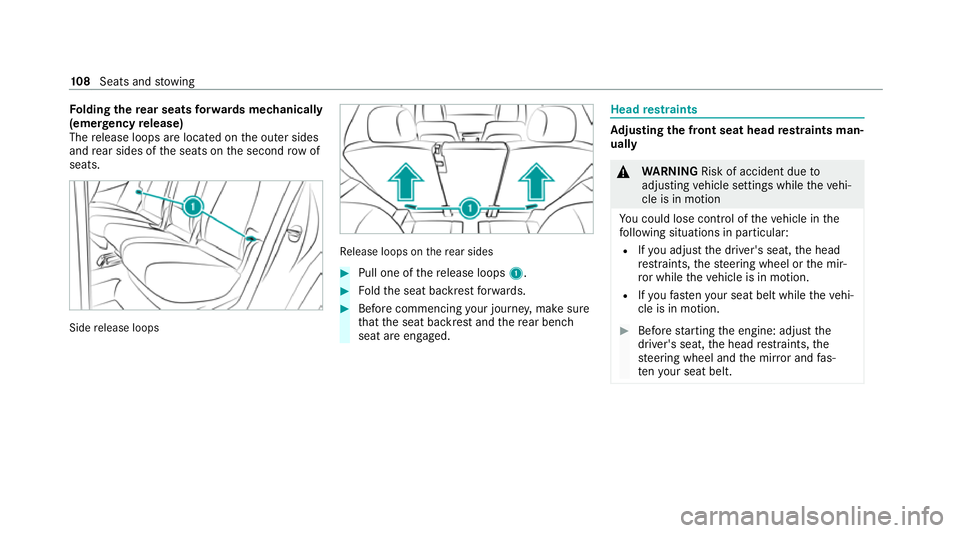
The release loops are located on the outer sides
and rear sides of the seats on the second row of
seats. Side
release loops Re
lease loops on there ar sides #
Pull one of there lease loops 1. #
Foldthe seat backrest forw ards. #
Before commencing your journe y,make sure
th at the seat backrest and there ar ben ch
seat are engaged. Head
restra ints Ad
justing the front seat head restra ints man‐
ually &
WARNING Risk of accident due to
adjusting vehicle settings while theve hi‐
cle is in motion
Yo u could lose cont rol of theve hicle in the
fo llowing situations in particular:
R Ifyo u adjust the driver's seat, the head
re stra ints, thesteering wheel or the mir‐
ro r while theve hicle is in motion.
R Ifyo ufast enyour seat belt while theve hi‐
cle is in motion. #
Before starting the engine: adjust the
driver's seat, the head restra ints, the
st eering wheel and the mir ror and fas‐
te nyo ur seat belt. 108
Seats and stowing
Page 112 of 545
&
WARNING Risk of injury duetohead
re stra ints not being fitted or being adjus‐
te d incor rectly
If head restra ints ha venot been ins talled or
ha ve not been adjus ted cor rectly, there is an
increased risk of injury in the head and neck
area, e.g. in theev ent of an accident or when
braking. #
Alw ays drive with the head restra ints
fi tted. #
Before driving off, ma kesure forev ery
ve hicle occupant that the cent reofthe
head restra int supports the back of the
head at about eye le vel. Do not inter
change the head restra ints of the
front and rear seats. Otherwise, you will not be
able toadjust the height and angle of the head
re stra ints cor rectl y.
Ad just the head restra int fore -and-aft position so
th at it is as close as possible tothe back of your
head. #
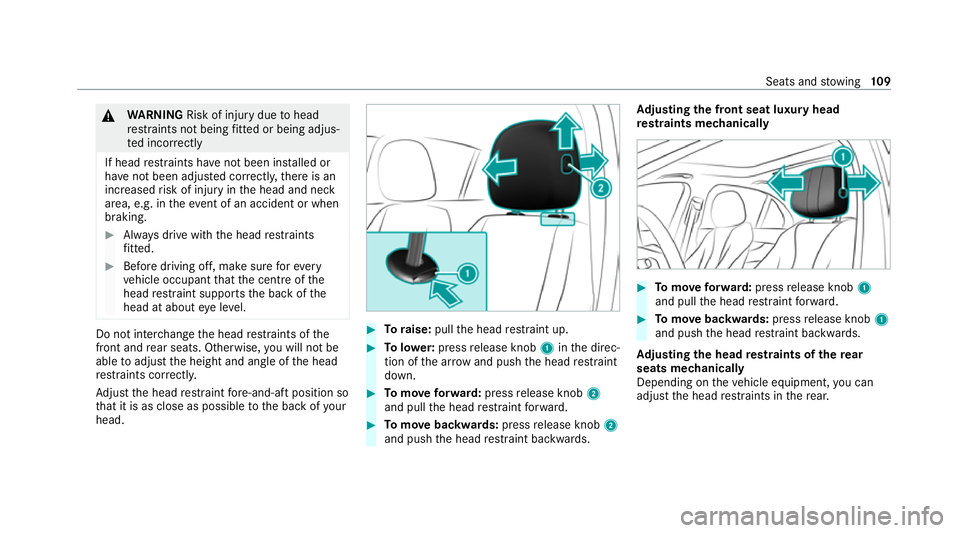
Toraise: pullthe head restra int up. #
Tolowe r:press release knob 1inthe direc‐
tion of the ar row and push the head restra int
down. #
Tomo veforw ard: press release knob 2
and pull the head restra int forw ard. #
Tomo vebackwards: pressrelease knob 2
and push the head restra int backwards. Ad
justing the front seat luxury head
re stra ints mechanically #
Tomo veforw ard: press release knob 1
and pull the head restra int forw ard. #
Tomo vebackwards: pressrelease knob 1
and push the head restra int backwards.
Ad justing the head restra ints of there ar
seats mechanically
Depending on theve hicle equipment, you can
adjust the head restra ints in there ar. Seats and
stowing 109
Page 113 of 545
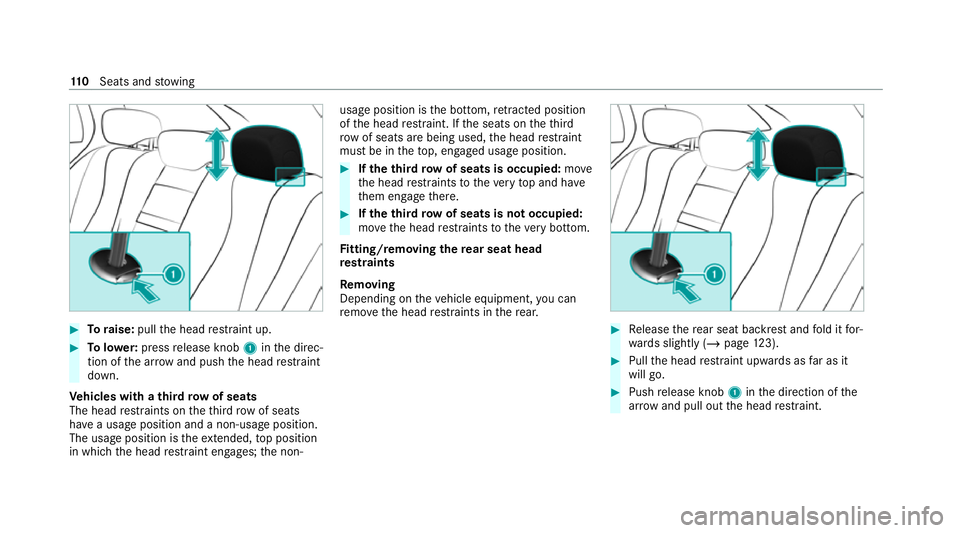
#
Toraise: pullthe head restra int up. #
Tolowe r:press release knob 1inthe direc‐
tion of the ar row and push the head restra int
down.
Ve hicles with a third row of seats
The head restra ints on theth ird row of seats
ha ve a usage position and a non-usage position.
The usage position is theex tended, top position
in which the head restra int engages; the non- usage position is
the bottom, retracted position
of the head restra int. If the seats on theth ird
row of seats are being used, the head restra int
must be in theto p, engaged usage position. #
Ifth eth ird row of seats is occupied: move
th e head restra ints totheve ry top and ha ve
th em engage there. #
Ifth eth ird row of seats is not occupied:
mo vethe head restra ints totheve ry bottom.
Fi tting/ removing the rear seat head
re stra ints
Re moving
Depending on theve hicle equipment, you can
re mo vethe head restra ints in there ar. #
Release there ar seat backrest and fold it for‐
wa rds slightly (/ page123). #
Pull the head restra int upwards as far as it
will go. #
Push release knob 1inthe direction of the
ar row and pull out the head restra int. 11 0
Seats and stowing
Page 114 of 545
Installing
#
Insert the head restra int such that the
notches on the bar are on the left when
vie we d in the direction of tra vel. #
Push the head restra int down until it
engages. #
Foldthere ar seat backrest back until it
engages.
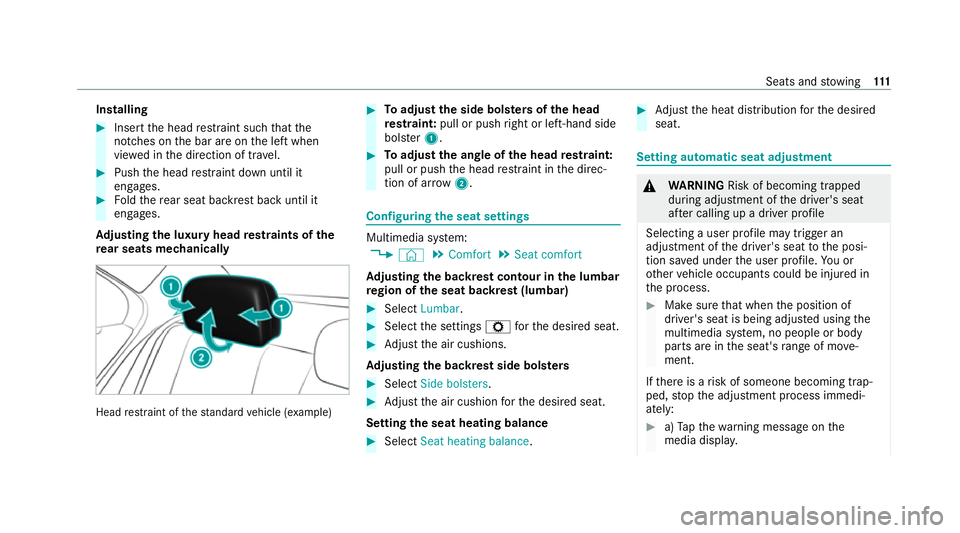
Ad justing the luxury head restra ints of the
re ar seats mechanically Head
restra int of thest andard vehicle (e xamp le) #
Toadjust the side bols ters of the head
re stra int: pull or push right or left-hand side
bols ter1. #
Toadjust the angle of the head restra int:
pull or push the head restra int in the direc‐
tion of ar row2. Configuring
the seat settings Multimedia sy
stem:
4 © 5
Comfort 5
Seat comfort
Ad justing the backrest contour in the lumbar
re gion of the seat backrest (lumbar) #
Select Lumbar . #
Select the settings Zforth e desired seat. #
Adjust the air cushions.
Ad justing the backrest side bols ters #
Select Side bolsters . #
Adjust the air cushion forth e desired seat.
Setting the seat heating balance #
Select Seat heating balance. #
Adjust the heat distribution forth e desired
seat. Setting automatic seat adjustment
&
WARNING Risk of becoming trapped
du ring adjustment of the driver's seat
af te r calling up a driver profile
Selecting a user profile may trigger an
adju stment of the driver's seat tothe posi‐
tion sa ved under the user profile. You or
ot her vehicle occupants could be injured in
th e process. #
Make sure that when the position of
driver's seat is being adjus ted using the
multimedia sy stem, no people or body
parts are in the seat's range of mo ve‐
ment.
If th ere is a risk of someone becoming trap‐
ped, stop the adjustment process immedi‐
ately: #
a)Tapth ewa rning message on the
media displa y. Seats and
stowing 111
Page 115 of 545
or
#
b) Press a memory position button or a
seat adjustment switch on the driver's
door.
The adjustment process will be stop‐
ped. Re
quirements:
R Adapting the driver's seat and steering wheel
position tobody size: automatic seat adjust‐
ment has been switched on.
Multimedia sy stem:
4 © 5
Settings 5
Vehicle
5 Automatic seat adjustment
Switching automatic seat adjustment on/off
When the active user profile is changed while
th eve hicle is stationar y,the driver's seat, steer‐
ing wheel, outside mir rors and seat con tour will
automatically be adap tedto the driver. #
Select OnorOff.
% This setting is available on lyfor individual
user profiles. Forth e guest profile, auto‐
matic seat adjustment cannot be switchedon or off.
Further information about user
profiles .
Ad justing driver's seat and steering wheel
position tobody size
The vehicle calculates a suitable driver's seat
and steering wheel position on the basis of the
driver's body size and sets this directly. #
Toset the unit of measurement: selectcm
or ft/in. #
Set the size using the scale. #
Select Start positioning.
The driver's seat and steering wheel position
is adjus tedto the body size that has been
set.
% Ifth e driver's seat and steering wheel posi‐
tion calculated bytheve hicle is not practical
or comfor table, it can be manually changed
at any time via the buttons.
The exterior mir rors are not set via this func‐
tion. Ins tead, they have tobe set manually
via the switches.
% You can also configure these settings via the
Mercedes me por talfo ryo ur user profile. By syn
chro nising the profiles in theve hicle and
th e Mercedes me connect profiles, you can
car ryove rth ese settings foryo ur vehicle.
Fu rther information about synchronising
user profiles .
Setting the easy entry and exitfeature #
Select Steer. wheel and seat, Steering wheel
only orOff.
% Ifyo u use an individual user profile and ha ve
set your body size, this information is car ried
ove rfo rth e easy entry andexitfeature. This
will cause the driver's seat and steering
wheel tomo veinto the cor rect position auto‐
matically . Overview of massage prog
rammes R
Hot Relaxing back Combination of heat and
massa ge. It starts bymassaging the bac k.In
addition, warm pressure points become
noticeable, starting in the pelvic area.
R Hot Relaxing shoulder Combination of heat
and massage. It starts bymassaging the
shoulders . In addition, warm pressure points 11 2
Seats and stowing