2021 MERCEDES-BENZ GLE SUV light
[x] Cancel search: lightPage 311 of 545
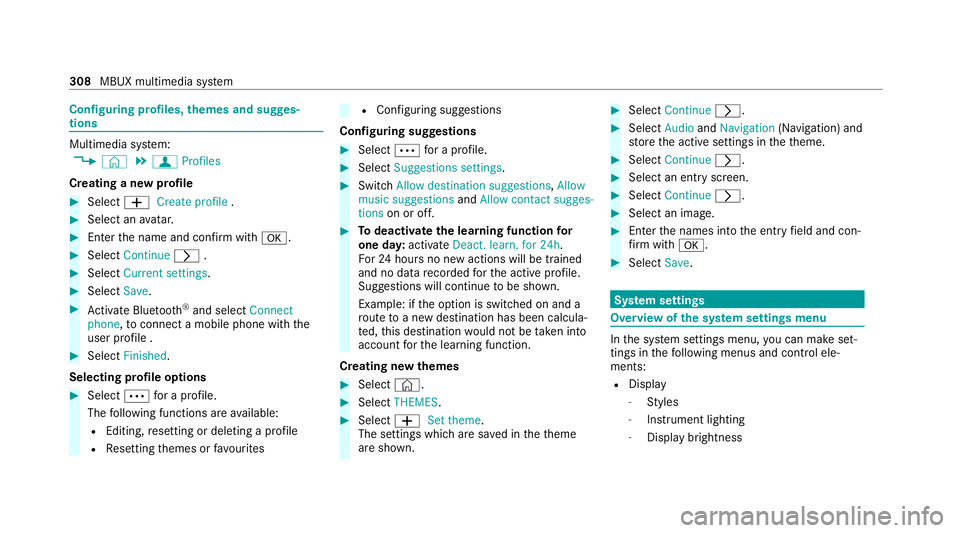
Configuring profiles,
themes and sugges‐
tions Multimedia sy
stem:
4 © 5
f Profiles
Creating a new profile #
Select 0081Create profile .#
Select an avatar. #
Enterth e name and confi rmwith 0076. #
Select Continue 0048. #
Select Current settings. #
Select Save. #
Activate Blu etoo th®
and select Connect
phone, toconnect a mobile phone wi th the
user profile . #
Select Finished.
Selecting profile options #
Select 0062for a profile.
The following functions are available:
R Editing, resetting or deleting a profile
R Resetting themes or favo urites R
Con figuring suggestions
Configuring suggestions #
Select 0062for a profile. #
Select Suggestions settings . #
Switch Allow destination suggestions, Allow
music suggestions andAllow contact sugges-
tions on or off. #
Todeactivate the learning function for
one da y:activate Deact. learn. for 24h .
Fo r24 hours no new actions will be trained
and no data recorded forth e active profile.
Suggestions will continue tobe shown.
Example: if the option is switched on and a
ro ute toa new destination has been calcula‐
te d, this destination would not be take n into
account forth e learning function.
Creating new themes #
Select ©. #
Select THEMES . #
Select 0081Set theme.
The settings which are sa ved in theth eme
are shown. #
Select Continue 0048. #
Select AudioandNavigation (Navigation) and
st ore the active settings in theth eme. #
Select Continue 0048. #
Select an entry screen. #
Select Continue 0048. #
Select an image. #
Enter the names into the entry field and con‐
fi rm with 0076. #
Select Save. Sy
stem settings Overview of
the sy stem settings menu In
the sy stem settings menu, you can make set‐
tings in thefo llowing menus and control ele‐
ments:
R Display
- Styles
- Instrument lighting
- Display brightness 308
MBUX multimedia sy stem
Page 312 of 545
-
Edge lighting
- Day/night design
R Control elements
- Keyboard language and handwriting rec‐
ognition
- Sensitivity of theto uchpad
- Sensitivity of theTo uch Controls
R LINGU ATRO NIC
R Sound
- Enter tainment
- Navigation and traf fic announcements
- Telephone
- Voice amplification tothere ar
R Connectivity
- Wi-Fi, Blu etoo th®
, NFC
R Time & date
R Language
R Units for dis tance
R Software upda tes
R Data impo rt/export R
PIN pr otection
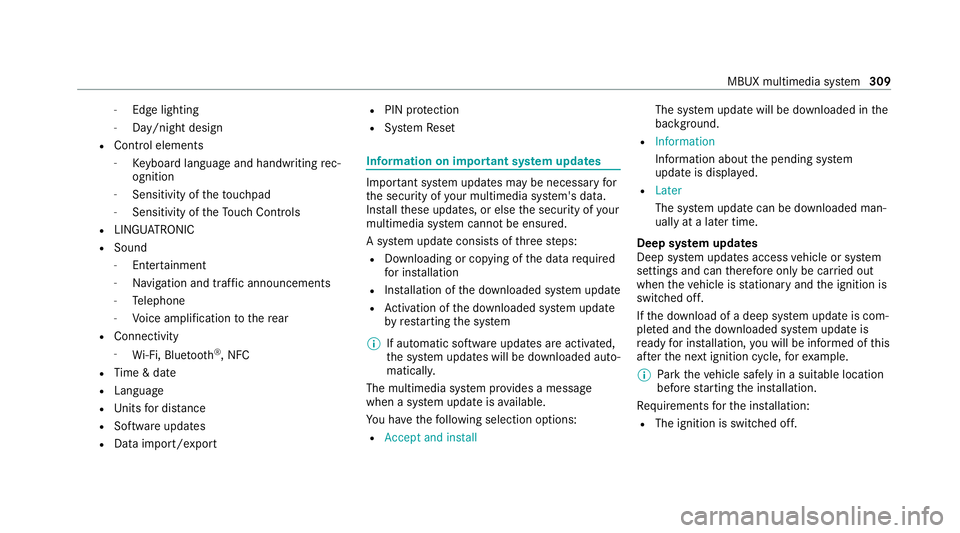
R System Reset Information on important sy
stem updates Impor
tant sy stem updates may be necessary for
th e security of your multimedia sy stem's data.
Ins tallth ese updates, or else the security of your
multimedia sy stem cann otbe ensured.
A sy stem update consists of thre esteps:
R Downloading or copying of the data requ ired
fo r ins tallation
R Installation of the downloaded sy stem update
R Activation of the downloaded sy stem update
by restarting the sy stem
% If automatic software updates are activated,
the sy stem updates will be downloaded auto‐
maticall y.
The multimedia sy stem pr ovides a message
when a sy stem update is available.
Yo u ha vethefo llowing selection options:
R Accept and install The sy
stem update will be downloaded in the
bac kground.
R Information
Info rm ation about the pending sy stem
update is displa yed.
R Later
The sy stem update can be downloaded man‐
ually at a later time.
Deep sy stem updates
Deep sy stem updates access vehicle or sy stem
settings and can therefore only be car ried out
when theve hicle is stationary and the ignition is
switched off.
If th e download of a deep sy stem update is com‐
ple ted and the downloaded sy stem update is
re ady for ins tallation, you will be informed of this
af te rth e next ignition cycle, forex ample.
% Park theve hicle safely in a suitable location
before starting the ins tallation.
Re quirements forth e ins tallation:
R The ignition is switched off. MBUX multimedia sy
stem 309
Page 330 of 545
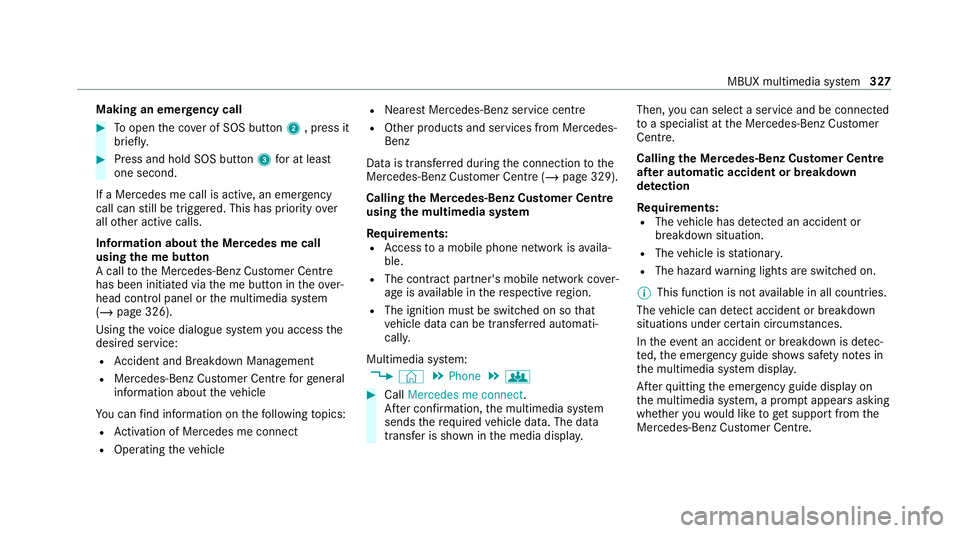
Making an emer
gency call #
Toopen the co ver of SOS button 2, press it
brief ly. #
Press and hold SOS button 3for at least
one second.
If a Mercedes me call is active, an emer gency
call can still be triggered. This has priority over
all other active calls.
Information about the Mercedes me call
using the me but ton
A call tothe Mercedes-Benz Cus tomer Centre
has been initia ted via the me button in theove r‐
head control panel or the multimedia sy stem
(/ page 326).
Using thevo ice dialogue sy stem you access the
desired service:
R Accident and Breakdown Management
R Mercedes-Benz Cu stomer Centre forge neral
information about theve hicle
Yo u can find information on thefo llowing topics:
R Activation of Me rcedes me connect
R Operating theve hicle R
Nearest Mercedes-Benz service centre
R Other products and services from Mercedes-
Benz
Data is transfer red during the connection tothe
Mercedes-Benz Cus tomer Centre (/ page 329).
Calling the Mercedes-Benz Cus tomer Centre
using the multimedia sy stem
Requ irements:
R Access toa mobile phone network is availa‐
ble.
R The contract partner's mobile network co ver‐
age is available in there spective region.
R The ignition must be switched on so that
ve hicle data can be transfer red automati‐
call y.
Multimedia sy stem:
4 © 5
Phone 5
g #
Call Mercedes me connect.
Af ter confirmation, the multimedia sy stem
sends there qu ired vehicle data. The data
transfer is shown in the media displa y.Then,
you can select a service and be connected
to a specialist at the Mercedes-Benz Cus tomer
Centre.
Calling the Mercedes-Benz Cus tomer Centre
af te r automatic accident or breakdown
de tection
Re quirements:
R The vehicle has de tected an accident or
breakdown situation.
R The vehicle is stationar y.
R The hazard warning lights are switched on.
% This function is not available in all countries.
The vehicle can de tect accident or breakdown
situations under cer tain circums tances.
In theeve nt an accident or breakdown is de tec‐
te d, the emer gency guide sho wssafety no tes in
th e multimedia sy stem displa y.
Af terqu itting the emer gency guide displ ayon
th e multimedia sy stem, a prom ptappears asking
whe ther youwo uld like toget support from the
Mercedes-Benz Cus tomer Centre. MBUX multimedia sy
stem 327
Page 355 of 545
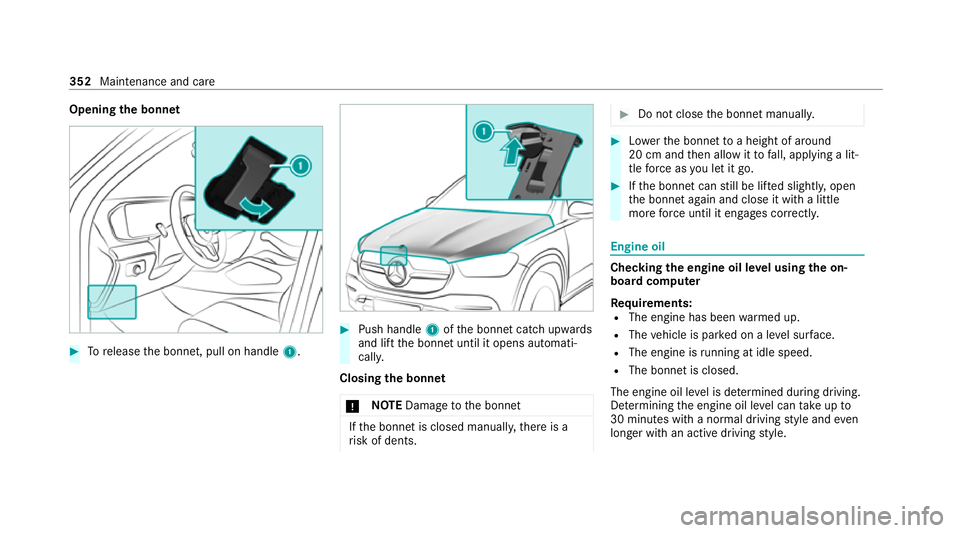
Opening
the bonnet #
Torelease the bonn et, pull on handle 1. #
Push handle 1ofthe bonn etcatch up wards
and lift the bonn etuntil it opens automati‐
call y.
Closing the bonnet
* NO
TEDama getothe bonn et If
th e bonn etis closed manuall y,there is a
ri sk of dents. #
Do not close the bonn etmanually. #
Lowe rth e bonn etto a height of around
20 cm and then allow it tofall, applying a lit‐
tle forc e as you let it go. #
Ifth e bonn etcan still be lif ted slightl y,open
th e bonn etagain and close it with a little
more forc e until it engages cor rectly. Engine oil
Che
cking the engine oil le vel using the on-
board compu ter
Re quirements:
R The engine has been warmed up.
R The vehicle is par ked on a le vel sur face.
R The engine is running at idle speed.
R The bonnet is closed.
The engine oil le vel is de term ined during driving.
De term ining the engine oil le vel can take up to
30 minutes with a normal driving style and even
longer with an active driving style. 352
Maintenance and care
Page 362 of 545
Information on using a high-p
ressure cleaner &
WARNING Risk of an accident when
using high-pressure cleane rswith round-
spray nozzles
The wate r jet can cause extern ally invisible
damage.
Components damaged in this wa y may unex‐
pec tedly fail. #
Do not use a high-pressure cleaner with
round-spr aynozzles. #
Have damaged tyres or chassis parts
re placed immediatel y. To
avo id damage to yourvehicle, obser vethefo l‐
lowing when using a high-pressure cleaner:
R The key is at a minimum distance of 3 m
aw ay from theve hicle. Otherwise theta ilgate
could open unin tentional ly.
R Maintain a dis tance of at least 30 cm tothe
ve hicle.
R Vehicles with decora tivefoil: Parts of your
ve hicle are co vered with a decorative foil. Maintain a dis
tance of at least 70 cm
between thefo il-c ove red parts of theve hicle
and the nozzle of the high-pressure cleaner.
Mo vethe high-pressure cleaner nozzle
around whilst cleaning. The waterte mp era‐
ture of the high-pressure cleaner must not
exc eed 60°C.
R Obser vethe information on the cor rect dis‐
tan ce in the equipment manufacturer's oper‐
ating instructions.
R Do not direct the nozzle of the high-pressure
cleaner directly at sensitive parts, such as
tyres, gaps, elect rical components, batteries,
light sou rces and ventilation slits. Wa
shing theve hicle byhand *
NO
TEEngine damage duetowa ter
ing ress #
Take care not topoint thewate r jet
directly towa rdsth e air inlet grille below
th e bonn et. obser
vethe legal requ irements, e.g. in a number
of countries, washing byhand is only permitted
in specially designated wash ba ys. #
Use a mild cleaning agent, e.g. car shampoo. #
Washtheve hicle with luk ewarmwate r using
a soft car sponge. When doing so, do not
ex pose theve hicle todirect sunlight. #
Carefully hose theve hicle off with water and
dry using a chamois.
% Obse rveth e no tes on the care of car parts
(/ page 361). Note
s on paint work/matt finish paintwork
care Obse
rveth e no tes on cleaning and care toavo id
damaging the paintwork and inter fering wi th the
driver assis tance sy stems.
Pa int
R Insect remains: soak with insect remo ver and
ri nse off the treated areas af terw ards.
R Bird droppings: soak with water and rinse off
af te rw ards. Main
tenance and care 359
Page 363 of 545
R
Tree resin, oils, fuels and greases: remo veby
ru bbing gently wi tha clo thsoaked in petro‐
leum ether or lighter fluid.
R Coolant and brake fluid: remo vewith a damp
clo thand clean water.
R Tarst ains: use tarre mo ver.
R Wax: use silicone remo ver.
R Do not attach sticke rs,fi lms or similar mate‐
ri als. Only have film attached tothe bumper
at a qualified specialist workshop.
R Remo vedirt immediately, where possible.
Matt finish
R Only use care products appr ovedfor
Mercedes-Benz.
R Do not attach sticke rs,fi lms or similar mate‐
ri als. Only ha vefilm attached tothe bumper
at a qualified specialist workshop.
R Do not polish theve hicle and light-alloy
wheels.
R Only use car washes that cor respond tothe
latest engineering standards. R
Do not use car wash programmes with a final
hot wax treatment.
R Do not use paint cleane rs, buf fing or polish‐
ing products, gloss preser vers, e.g. wax.
In theev ent of paintwork damage:
R Alw ays ha vepaintwork repairs car ried out at
a qu alified specialist workshop.
R Make sure thera dar sensors function
(/ page 212). Note
s on cleaning decorative foils Obser
vethe no tes on matt finish care in the
ch ap ter "No tes on paintwork/matt finish paint‐
wo rkcare" (/ page 359). They also app lyto
matt decorative foils.
Obser vethe no tes on cleaning decorative foils to
avo idvehicle damage.
Cleaning R For cleaning, use plenty of water and a mild
cleaning agent without additives or abrasive
subs tances, e.g. a car sha mpoo appr ovedfor
Mercedes-Benz. R
Remo vedirt immediatel y,where possible,
whilst avoiding rubbing too hard. There is
ot herwise a risk of damaging the decorative
fo il ir reparably.
R Ifth ere is dirt on thefinish or if the decora‐
tive foil is dull: use thePa int Cleaner recom‐
mended and appr ovedfo r Mercedes-Benz.
R Insect remains: soak with insect remo ver and
ri nse off the treated areas af terw ards.
R Bird droppings: soak with water and rinse off
af te rw ards.
R Topreve ntwate rst ains, dry a foil-wrapped
ve hicle with a soft, absorbent clo thafter
eve rycar wash.
Av oiding dama getothe decorative foil
R The service life and colouring of decorative
foils are impaired by:
- sunlight
- temp erature, e.g. hot air blo wer
- weather conditions
- stone chippings and dirt
- chemical cleaning agents 360
Maintenance and care
Page 365 of 545
%
Afterch anging the wiper blades or treating
th eve hicle with wax, clean the windscreen
th oroughly with cleaning agents recommen‐
ded for Mercedes-Benz. Failure toobser ve
th e application instructions may result in
damage, smear mar ksor dazzling spots.
% Remo veextern al fogging or dirt on the wind‐
screen in front of the multifunction camera.
Otherwise, driving sy stems and driving
saf ety sy stems may be impaired or not avail‐
able (/ page212).
Wi per blades
R Movethe wiper arms into there placement
position (/ page153).
R With th e wiper arms folded out, clean the
wiper blades with a damp clo th.
% Make sure that the wiper blades are coated.
The coating can lea veresidues on a clo th.
Do not rubth e wiper blades excessively or
clean them too of ten.
Ex terior lighting
R Clean the lenses with a wet sponge and mild
cleaning agent, e.g. car sha mpoo. R
Only use cleaning agents or cleaning clo ths
th at are suitable for plast ic lenses.
Sensors
R Clean the sensors in the front and rear
bumpers with a soft clo thand car shampoo
(/ page 212).
R When using a high-pressure cleaner,maintain
a minimum dis tance of 30 cm.
Ru nning boards
R Use water and acid-free cleaning agents.
R Do not clean the aluminium trim insert of the
ru nning board wi thalkaline or acidic cleaning
agents such as wheel cleaners. Do not use
acidic alloy wheel cleaners toremo vebrake
dust. The aluminium trim inserts could other‐
wise be damaged.
Re versing camera and 360° Camera
R Open the camera co ver with the multimedia
sy stem (/ page270).
R Use clean water and a soft clo thtoclean the
came ralens.
R Do not use a high-pressure cleaner. Ta
ilpipes
R Clean with a cleaning agent recommended
fo r Mercedes-Benz, especially in the winter
and af terwa shing theve hicle.
R Do not use acidic cleaning agents.
Tr ailer hitch
R Obse rveth e no tes on care in the trailer hitch
manufacturer's operating instructions.
R Do not clean the ball neck with a high-pres‐
sure cleaner or solvent.
R Remo vetraces of rust on the ball, forex am‐
ple, with a wire brush.
R Remo vedirt with a lint-free clo th.
R After cleaning, lightly oil or grease the ball
head.
% Before using trailers with anti- torsional cou‐
pling, obser vethe manufacturer's operating
instructions. 362
Maintenance and care
Page 366 of 545
Note
s on care of the interior &
WARNING Risk of injury from plastic
parts breaking off af terth e use of sol‐
ve nt-based care products
Ca reand cleaning products con taining sol‐
ve nts can cause su rfaces in the cockpit to
become porous. When the airbags are
deplo yed, plastic parts may break away. #
Do not use any care or cleaning prod‐
ucts containing sol vents toclean the
cockpit. &
WARNING Risk of injury or death from
bleached seat belts
Bleaching or dyeing seat belts can se verely
we aken them.
This can, forex ample, cause seat belts to
te ar or fail in an accident. #
Never blea chor dye seat belts. To
avo id damage totheve hicle, obser vethefo l‐
lowing no tes on cleaning and care: Seat belts
R Clean with luk ewarmand soapy water.
R Do not use chemical cleaning agents.
R Do not dry byheating them toove r 80°C or
ex posing them todirect sunlight.
Display
R Switch off the display and let it cool down.
R Clean the sur face carefully with a microfibre
clo thand a suitable display care product
(TF T-LC D).
R Do not use any other agents.
Plastic trim R Clean with a damp microfibre clo th.
R For heavy soiling: Use a cleaner recommen‐
ded for Mercedes-Benz.
R Do not attach sticke rs,fi lms or similar mate‐
ri als.
R Do not allow cosmetics, insect repellent or
sun cream tocome in contact wi th the plas‐
tic trim.
Re alwo od and trim elements
R Clean with a mic rofibre clo th. R
Blackpiano-lac quer look: Clean with a damp
clo thand soapy water.
R For heavy soiling: Use a cleaner recommen‐
ded for Mercedes-Benz.
R Do not use sol vent-based cleaning agents,
polishes or waxes.
Ro of lining
R Clean with a brush or dry shampoo.
Carpet
R Use a carpet and textile cleaning agent rec‐
ommended for Mercedes-Benz.
St eering wheel made of genuine leather or
DINAMICA
* NO
TEDama gecaused bywrong cleaners #
Do not use solvent-based cleaning
agents such as tarre mo ver or wheel
cleaner; neither should you use pol‐
ishes or waxes. Otherwise you may
damage thefinish. R
Clean wi tha damp clo thand 1% soapy water
solution and then wipe with a dry clo th. Maintenance and care
363