Page 182 of 525

#
Press DYNA MIC SELECT switch 1forw ards
or backwards.
The drive prog ram selected appears in the
multifunction displa y.Configuring
DYNA MIC SELECT (multimedia
sy stem) Multimedia sy
stem:
4 © 5
Settings 5
Vehicle
5 DYNAMIC SELECT
Setting drive prog ram I #
Select Individual configuration. #
Select and set a categor y.
Switching there storation display on or off #
Swit chAsk when starting on or off.
Fu nction on: the next time theve hicle is star ted
a prom ptappears asking whe ther the last active
drive prog ram should be restored. If the ECO
st art/ stop function was deactivated, an addi‐
tional prom ptappears asking if the function
should remain deactivated. %
The prom ptappears on ly ifthe pr eviously
active settings deviate from thest andard
settings.
Fu nction off: the next time theve hicle is star‐
te dth eA drive program is set automaticall y.
The ECO start/ stop function is activated auto‐
matically.
% This function must be activated for each user
profile sepa rately. Only when this function is
activated will the drive prog ram and Eco
st art/ stop setting forth e pr evious journey
be sa vedfo rth ere spective user profile. Displaying
vehicle data Multimedia sy
stem:
4 © 5
Info #
Select Vehicle.
The vehicle data is displa yed. Displaying engine data
Multimedia sy
stem:
4 © 5
Info #
Select Engine.
The engine data is displa yed.
% The actual (maximum) values that can be
achie vedfo r engine output and engine tor‐
qu e may deviate from the certified values
within the count ry-specific guidelines for
permissible tolerances (basis: UN-ECE No.
85 or country -specific guidelines).
Fa ctors that can influence this are, forex am‐
ple:
R Sea le vel
R Fuel grade
R Outside temp erature
R Operating temp erature of the engine
% The values displa yed ser veonly as orienta‐
tion. The values for engine output and
engine torque sh own in the media display
may deviate from the actual values. Driving and parking
17 9
Page 205 of 525

If
th e00E5 ESP®
wa rning lamp flashes in the
instrument clus ter,one or se veral wheels has
re ached its grip limit:
R Adapt your driving style to suit the cur rent
ro ad and weather conditions.
R Do not deactivate ESP ®
.
R Onlydepress the accelera tor pedal as far as
is necessary when pulling away.
It can be advantageous todeactivate ESP ®
in the
fo llowing situations toimpr ovetraction:
R When using snow chains.
R In deep snow.
R On sand or gr avel.
% Spinning the wheels results in a cutting
action, which enhances traction.
If th e00E5 ESP®
wa rning lamp lights up continu‐
ousl y,ESP ®
is not available due toa malfunction.
Obse rveth efo llowing information:
R Indicator and warning lamps (/ page 467)
R Display messages (/ page 408) ETS/4ETS (Electronic
Traction Sy stem)
ETS/4ETS traction control is pa rtof ESP ®
and
makes it possible topull away and accelerate on
a slippe rycar riag ewa y.
If yo u select theF drive prog ram, a special
ETS sy stem specifically suited tooff-road terrain
is automatically activated.
ETS/4ETS can improvetheve hicle's traction by
inter vening in thefo llowing ways:
R The drive wheels are braked individually if
they spin.
R More drive torque is transferred tothe wheel
or wheels with traction.
Influence of drive prog rams on ESP ®
The drive programs enable ESP ®
to adapt todif‐
fe re nt we ather and road conditions as well as
th e driver's prefer red driving style. Depending on
th e selected drive prog ram, the appropriate
ESP ®
mode will be activated. You can select the
drive programs using theDY NA MIC SELECT
switch (/ page178). Fu
nction of ESP ®
Crosswind Assist ESP
®
Crosswind Assist de tects sudden gu sts of
side wind and helps the driver tokeep theve hi‐
cle in the lane:
R ESP ®
Crosswind Assist is active at vehicle
speeds between appr ox.75 km/h and
200 km/h when driving stra ight ahead or
cornering slight ly.
R The vehicle is stabilised bymeans of individ‐
ual brake application on one side. Fu
nction of ESP ®
trailer stabilisation &
WARNING Risk of accident in poor road
and weather conditions
In poor road and weather conditions, the
trailer stabilisation cannot pr event lu rching of
th eve hicle/trailer combination. Trailers with
a high centre of gr avity may tip over before
ESP ®
de tects this. 202
Driving and parking
Page 386 of 525

#
Tighten the wheel bolts evenly in a diagonal
pattern in the order indicated until they are
fi nger-tight. #
Ifth e collapsible emer gency spa rewheel has
been fitted, infla tethe collapsible emer gency
spa rewheel (/ page 387). #
Lowe rth eve hicle (/ page 383). Lo
weri ngtheve hicle af ter a wheel change Re
quirements:
R The new wheel has been fitted
(/ page 382).
Obse rveth e information on tyre pressure
(/ page 371). #
Place thera tchet ring spanner onto the he xa‐
gon nut of the jack so that the lettering "AB"
is visible. #
Tolowe r the vehicle: turnthera tchet ring
spanner of the jack anti-clockwise. #
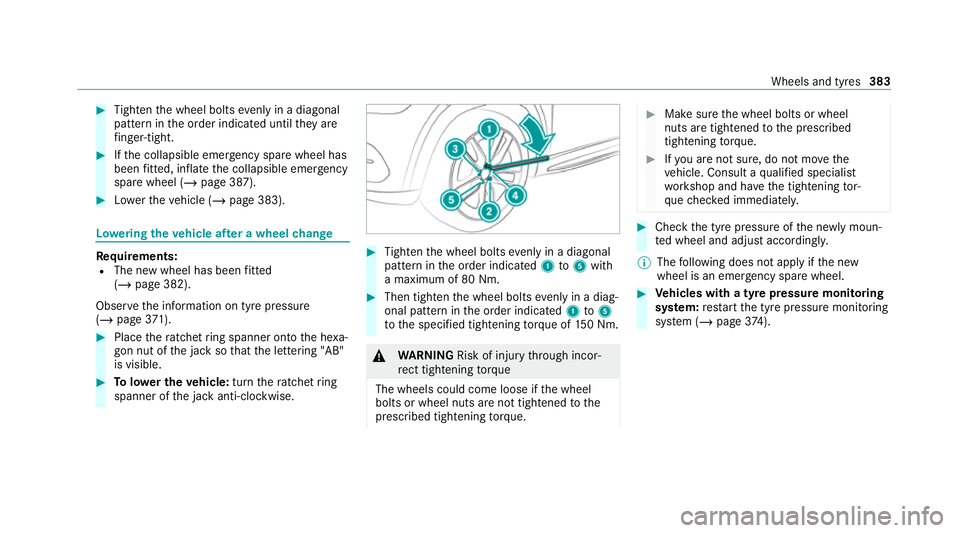
Tighten the wheel bolts evenly in a diagonal
pattern in the order indicated 1to5 with
a maximum of 80 Nm. #
Then tighten the wheel bolts evenly in a diag‐
onal pattern in the order indicated 1to5
to the specified tightening torque of 150 Nm. &
WARNING Risk of injury thro ugh incor‐
re ct tigh tening torque
The wheels could come loose if the wheel
bolts or wheel nuts are not tightened tothe
prescribed tightening torque. #
Makesure the wheel bolts or wheel
nuts are tightened tothe prescribed
tightening torque. #
Ifyo u are not sure, do not mo vethe
ve hicle. Consult a qualified specialist
wo rkshop and ha vethe tightening tor‐
qu ech ecked immediately. #
Check the tyre pressure of the newly moun‐
te d wheel and adjust according ly.
% The following does not apply if the new
wheel is an emer gency spa rewheel. #
Vehicles with a tyre pressure monitoring
sy stem: restart the tyre pressure monitoring
sy stem (/ page374). Wheels and
tyres383