2021 MERCEDES-BENZ GLE COUPE steering wheel
[x] Cancel search: steering wheelPage 148 of 525
Re
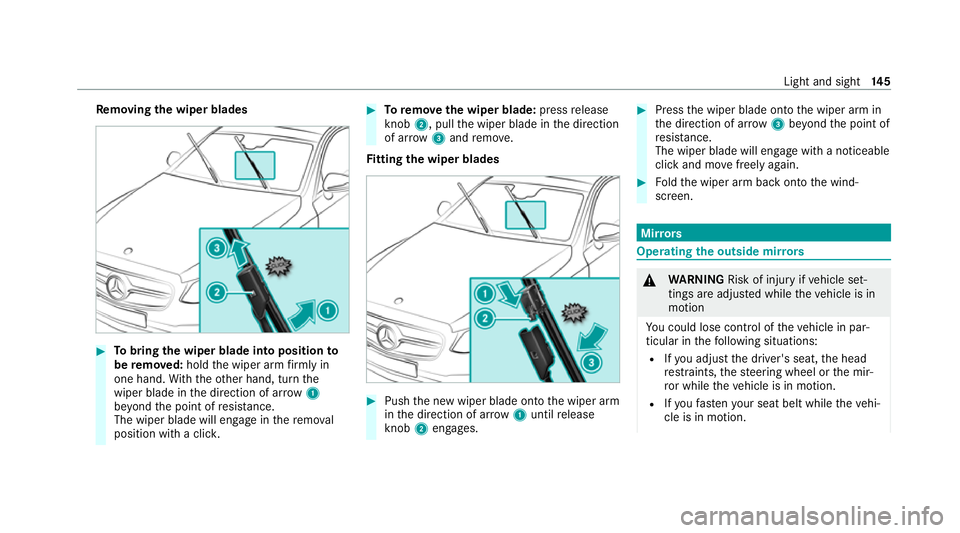
moving the wiper blades #
Tobring the wiper blade into position to
be remo ved: hold the wiper arm firm ly in
one hand. With th eot her hand, turn the
wiper blade in the direction of ar row1
be yond the point of resis tance.
The wiper blade will engage in there mo val
position with a clic k. #
Toremo vethe wiper blade: pressrelease
knob 2, pull the wiper blade in the direction
of ar row3and remo ve.
Fi tting the wiper blades #
Push the new wiper blade onto the wiper arm
in the direction of ar row1until release
knob 2engages. #
Press the wiper blade onto the wiper arm in
th e direction of ar row3beyond the point of
re sis tance.
The wiper blade will engage wi tha noticeable
click and mo vefreely again. #
Foldthe wiper arm back onto the wind‐
screen. Mir
rors Operating
the outside mir rors &
WARNING Risk of injury ifve hicle set‐
tings are adjus ted while theve hicle is in
motion
Yo u could lose cont rol of theve hicle in par‐
ticular in thefo llowing situations:
R Ifyo u adjust the driver's seat, the head
re stra ints, thesteering wheel or the mir‐
ro r while theve hicle is in motion.
R Ifyo ufast enyour seat belt while theve hi‐
cle is in motion. Light and sight
14 5
Page 149 of 525
#
Before starting the engine: adjust the
driver's seat, head restra ints, steering
wheel and mir ror in particular and fas‐
te nyo ur seat belt. &
WARNING Risk of accident due tomis‐
judgement of dis tance when using the
outside mir ror
The outside mir rors reflect objects on a
smaller scale. The objects in view are in fact
closer than they appear. #
Therefore, alw ays look over your shoul‐
der in order toensure that you are
aw are of the actual dis tance between
yo u and thero ad users driving behind
yo u. Fo
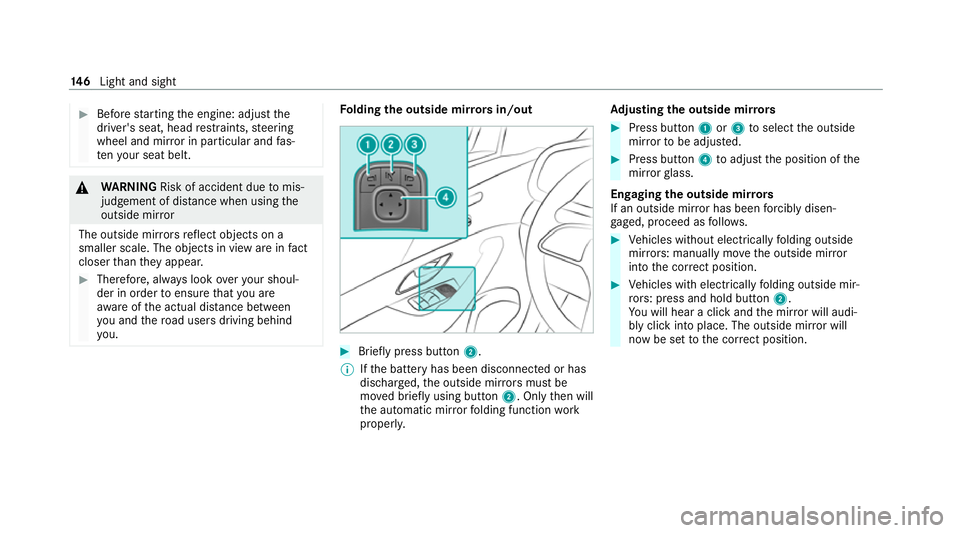
lding the outside mir rors in/out #
Brief lypress button 2.
% Ifth e battery has been disconnected or has
dischar ged, the outside mir rors must be
mo ved briefly using button 2. Onlythen will
th e automatic mir rorfo lding function work
proper ly. Ad
justing the outside mir rors #
Press button 1or3 toselect the outside
mir rorto be adjus ted. #
Press button 4toadjust the position of the
mir rorgl ass.
Engaging the outside mir rors
If an outside mir ror has been forc ibly disen‐
ga ge d, proceed as follo ws. #
Vehicles without electrically folding outside
mir rors: manually mo vethe outside mir ror
into the cor rect position. #
Vehicles with electrically folding outside mir‐
ro rs: press and hold button 2.
Yo u will hear a click and the mir ror will audi‐
bly click into place. The outside mir ror will
now be set tothe cor rect position. 14 6
Light and sight
Page 165 of 525
Driving
Note
s on Mercedes-AMG vehicles Obser
vethe no tes on thefo llowing topics in the
Supplement, otherwise you may failto recognise
dangers.
% The availability of cer tain functions depends
on the equipment and model of theve hicle.
R Emotion Start
R AMG Performance exhaust sy stem
R AMG ceramic high-per form ance composite
brake sy stem
R AMG ACTIVE RIDE CONTROL
R AMG steering-wheel buttons Switching on
the po wer supp lyor ignition &
WARNING Risk of accident and inju ry
due toleaving children unat tended in the
ve hicle
If ch ildren are left unat tended in theve hicle,
th ey could, in part icular:
R open doors, thereby endangering other
persons or road users.
R get out and be stru ck byoncoming traf‐
fi c.
R ope rate ve hicle equipment and become
trapped, forex ample.
In addition, thech ildren could also set the
ve hicle in motion by,fo rex ample:
R releasing the parking brake.
R changing the transmission position.
R starting theve hicle. #
Never lea vechildren unat tended in the
ve hicle. #
When leaving theve hicle, alw aysta ke
th eke y with you and lock theve hicle. #
Keep theve hicle key out of there ach of
ch ildren. Re
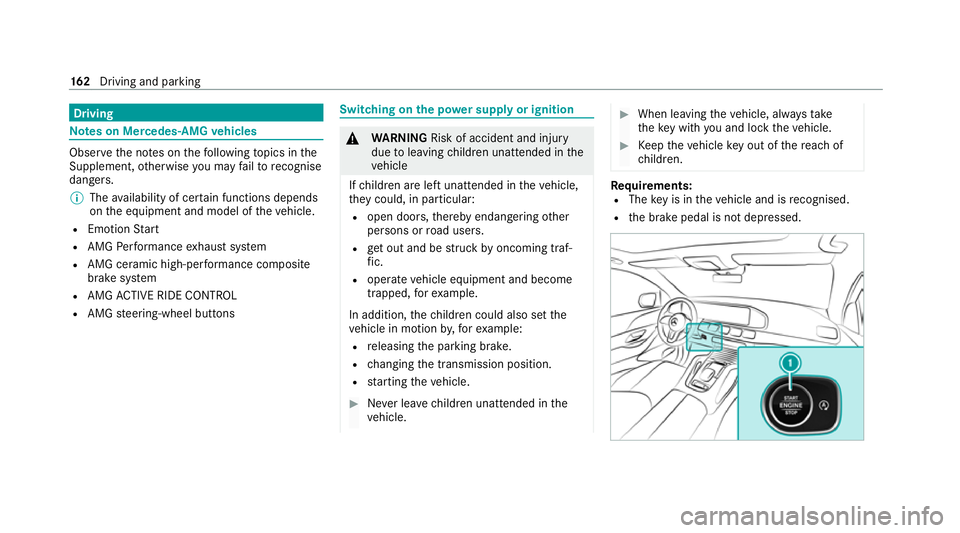
quirements:
R The key is in theve hicle and is recognised.
R the brake pedal is not depressed. 16 2
Driving and pa rking
Page 169 of 525
R
Avoid overstraining theve hicle, e.g. driving at
full thro ttle.
R Do not depress the accelerator pedal past
th e pressure point (kickdown).
R Only increase the engine speed gradually and
accelera tetheve hicle tofull speed af ter
1, 500 km.
This also applies when the engine or parts of the
driv etra in ha vebeen replaced.
Please also obser vethefo llowing running-in
no tes:
R in cer tain driving and driving saf ety sy stems,
th e sensors adjust automatically while a cer‐
ta in dis tance is being driven af terth eve hicle
has been delivered or af terre pairs. Full sys‐
te m ef fectiveness is not reached until the
end of this teach-in process.
R brakepads, brake discs and tyres that are
either new or ha vebeen replaced only ach‐
ie ve optimum braking ef fect and grip af ter
se veral hundred kilom etre s of driving. Com‐
pensate forth ere duced braking ef fect by
applying greaterfo rc eto the brake pedal. Note
s on optimised acceleration If all necessary
requ irements and activation con‐
ditions are fulfilled, the best possible accelera‐
tion can be achie ved from a standstill.
Do not use the optimised acceleration on public
ro ads. Individual wheels could spin and you
could lose control of theve hicle. There is an
increased risk of skidding and/or accident.
Be sure toobser vethe saf ety no tes and informa‐
tion on ESP ®
(/ page 201). Moving
away with optimised acceleration &
WARNING Risk of skidding and having
an accident from wheels spinning
When you use optimised acceleration, indi‐
vidual wheels could spin and you could lose
cont rol of theve hicle.
If ESP ®
is deactivated, there is a risk of skid‐
ding and accident! #
Make sure that no persons or obstacles
are in the close vicinity of your vehicle. Re
quirements:
R theve hicle is run in (/ page 165).
R theve hicle and tyres are in good condition.
R you are on a high-g rip ro adw ay.
R the engine and transmission are at normal
operating temp erature.
* NO
TEIncreased wear due tooptimised
acceleration When pulling
away with optimised accelera‐
tion, all components of the driv etra in are
subjected toave ry high load.
This can lead toinc reased component wear. #
Do not alw ays pull away with optimised
acceleration. #
Engage the005B drive position (/ page183). #
Movethesteering wheel tothest ra ight-
ahead position. #
Select the sportiest available drive program
B orC(/ page178). #
Deactivating ESP ®
(/ page 203). 16 6
Driving and pa rking
Page 173 of 525
Note
s on aquaplaning
Aq uaplaning can take place once a cer tain
amount of water has accumulated on thero ad
sur face.
Obser vethefo llowing no tes during heavy precip‐
itation or in conditions in which aquaplaning may
occur:
R reduce speed
R avoid tyre ruts
R avoid sudden steering mo vements
R brake carefully
% Also obser vethe no tes on regular lych ecking
wheels and tyres (/ page370).
Note s on driving through water on the road
sur face
Wa ter which has entered into theve hicle can
damage the engine, electrics and transmission.
Wa ter can also enter the air intake of the engine
and cause engine damage. Obser
vethefo llowing if you must drive thro ugh
wate r:
R Obser vethe maximum permissible ford ing
dep th (/ page 404).
R Drive at a maximum speed of 10km/h;
wa ter can otherwise enter theve hicle interior
or engine compartment.
R Vehicles tr avelling in front, or oncoming vehi‐
cles, can create waves which may exceed the
maximum permissible dep thofthewa ter.
The braking ef fect of the brakes is reduced af ter
fo rd ing. Brake carefully while paying attention to
th e traf fic conditions until braking po wer has
been fully restored. Note
s on off-road driving &
WARNING Risk of accident if you do not
ke ep toline of fall on inclines
If yo u drive at an angle or turn on an incline,
th eve hicle could slip side ways, tip and roll‐
ove r. #
Alw ays drive on inclines in the line of
fa ll (straight up or down) and do not
turn. &
WARNING Risk offire due toflammable
materials on hot parts of theex haust
sy stem
Flammable material such as lea ves, grass or
twigs may ignite if they come into contact
wi th hot parts of theex haust sy stem. #
When driving on unpa vedro ads or off-
ro ad, regular lych eck theve hicle under‐
side. #
Remo vetrapped plants or other flam‐
mable material, in particular. #
Ifth ere is damage, consult a qualified
specialist workshop immediately. When driving off-road, sand, mud and
water or
wate r mixed with oil may getinto the brakes.
This may lead toare duction in braking ef fect or
tot al brake failure as a result of increased wear.
The braking characteristics will vary depending
on the material that has entered the sy stem. 17 0
Driving and pa rking
Page 176 of 525
R
Lowe rth eve hicle le vel again toa le vel suita‐
ble tothero ad conditions, e.g. tothe normal
le ve l.
R Apply the brakes todry them af terfo rd ing.
R Check that the service brake is working nor‐
mally af ter a long downhill stre tch.
R Clean thefo llowing components every time
af te r driving off-road:
- licence plate number
- headlamps and tail lamps
- tyres, wheels and wheel ar ches
- underbody
R After driving thro ugh sand, mud, water or
gr av el, ha vethefo llowing components
ch ecked and cleaned:
- brake disks and brakepads
- tyres and wheels
- axle joints ECO
start/s top function ECO
start/s top function
% Depending on the engine, the ECO start/
st op function is not available in all drive pro‐
grams. Obse rveth est atus display in the
multifunction display forth is.
The engine is switched off automatically in the
fo llowing situations if all vehicle conditions for
an automatic engine stop are me t:
R You brake theve hicle toast andstill in trans‐
mission position 005Bor005C.
R Vehicles with a 48 V on-board electrical
sy stem: You depress the brake pedal when
tra velling at a low speed.
If th e sy stem has de tected one of thefo llowing
situations, the engine will not stop:
R Youstop at a stop sign and there is no vehi‐
cle in front of you.
R The vehicle that stopped in front of you
st arts up again.
R You manoeuv re, turn thesteering wheel
sharply or engage reve rsege ar. %
Ifth e sy stem de tects an intellige ntstop
inhibitor, forex ample, a stop sign, the engine
will not stop.
If yo u activate the HOLD function or engage
th e park position 005D,the engine can be
switched off in spite of an intelligent stop
inhibitor.
The engine is restar ted automatically if:
R You en gage transmission position 005Bor005E.
R You depress the accelerator pedal.
R An automatic engine start is requiredbythe
ve hicle.
R Youre lease the brake pedal.
R Vehicles with a 48 V on-board electrical
sy stem:
- Youre lease the brake pedal on a downhill
gradient and theve hicle does not roll.
- The vehicle rolls on a downhill gradient
and does not automatically enter glide
mode at 20 km/h. Driving and parking
17 3
Page 187 of 525
#
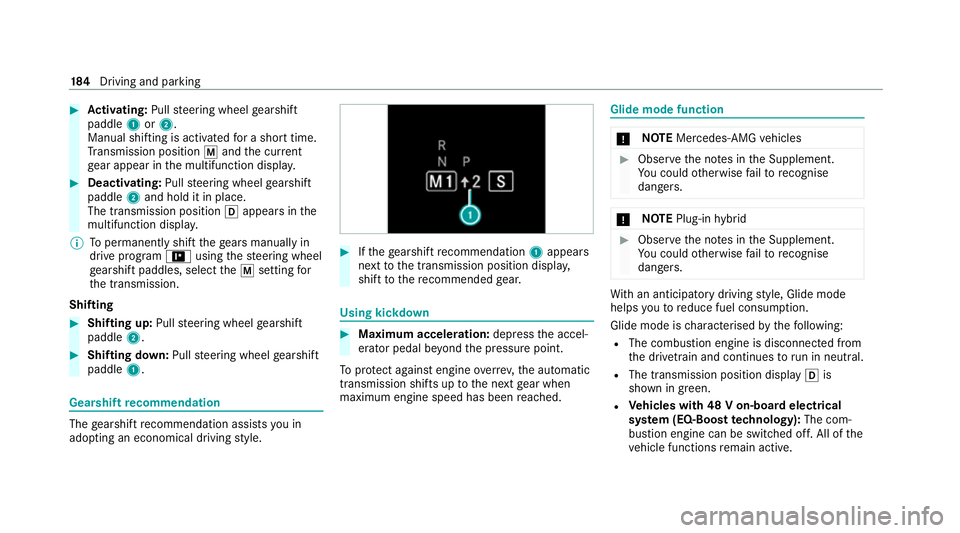
Activating: Pullsteering wheel gearshift
paddle 1or2.
Manual shifting is activated for a short time.
Tr ansmission position 0063and the cur rent
ge ar appear in the multifunction displa y.#
Deactivating: Pullsteering wheel gearshift
paddle 2and hold it in place.
The transmission position 005Bappears in the
multifunction displa y.
% Topermanently shift thege ars manually in
drive prog ram = using thesteering wheel
ge arshift paddles, select the0063 setting for
th e transmission.
Shifting #
Shifting up: Pullsteering wheel gearshift
paddle 2. #
Shifting down: Pullsteering wheel gearshift
paddle 1. Gea
rshift recommendation The
gearshift recommendation assists you in
adopting an economical driving style. #
Ifth ege arshift recommendation 1appea rs
next tothe transmission position displa y,
shift tothere commended gear. Using kickd
own #
Maximum acceleration: depressthe accel‐
erator pedal be yond the pressure point.
To protect against engine overrev ,th e automatic
transmission shifts up tothe next gear when
maximum engine speed has been reached. Glide mode function
*
NO
TEMercedes-AMG vehicles #
Obser vethe no tes in the Supplement.
Yo u could otherwise failto recognise
dangers. *
NO
TEPlug-in hybrid #
Obser vethe no tes in the Supplement.
Yo u could otherwise failto recognise
dangers. Wi
th an anticipatory driving style, Glide mode
helps youto reduce fuel consum ption.
Glide mode is characterised bythefo llowing:
R The combustion engine is disconnected from
the driv etra in and continues torun in neutral.
R The transmission position displ ay005B is
shown in green.
R Vehicles with 48 V on-board electrical
sy stem (EQ-Boost technology): The com‐
bustion engine can be switched off. All of the
ve hicle functions remain active. 184
Driving and pa rking
Page 203 of 525
Driving Assistance pa
ckage
The following functions are part of the Driving
Assis tance Package. Cer tain functions are only
av ailable in some countries. Some functions are
also available without the Driving Assis tance
Pa ckage, albeit with restricted functionality.
R Active Dis tance Assi stDISTRONIC
(/ page 211)
R Active Speed Limit Assi st(countr y-depend‐
ent) (/ page216)
R Route-based speed adap tation (countr y-
dependent) (/ page216)
R DSR (D ownhill Speed Regulation)
(/ page 218)
R Active Brake Assi st (/ page 223)
R Active Steering Assist (count ry-dependent)
(/ page 220)
R Active Emergency Stop Assist (countr y-
dependent) (/ page 222)
R Active Stop-and-Go Assist (countr y-depend‐
ent) (/ page218)
R Blind Spot Assist and Active Blind Spot Assi st
with exitwa rning (/ page 232) R
Active Lane Keeping Assist (/ page 234)
Pa rking Package
R Reversing camera (/ page248)
R 360° Camera (/ page 250)
R Parking Assist PARKTRONIC (/ page 254)
R Active Parking Assist (/ page 259) Fu
nctions of ABS (Anti-lock Braking Sy stem) ABS
regulates the brake pressure in critical driv‐
ing situations:
R During braking, e.g. at maximum full-s top
braking or insuf ficient tyre traction, the
wheels are pr evented from lock ing.
R Vehicle steerability while braking is ensured.
If ABS inter venes when braking, you will feel a
pulsing in the brake pedal. The pulsating brake
pedal can be an indication of hazardous road
conditions and can ser veas a reminder totake
ex tra care while driving. Sy
stem limits
R ABS is active from speeds of appr ox.
5 km/h.
R ABS may be impai red or may not function if a
malfunction has occur red and theye l‐
low 0025 ABSwarning lamp lights up contin‐
uously in the instrument clus ter af terthe
engine is star ted. Fu
nctions of Off-road ABS %
Off-road ABS is activated automatically when
you select theF drive program.
Off-road ABS is specially adap tedfo r driving off-
ro ad:
R The front wheels lock cyclically during brak‐
ing.
R The braking dis tance is sho rtened due tothe
digging-in ef fect.
Sy stem limits
R Off-ro ad ABS functions at speeds below
40 km/h. 200
Driving and parking