2021 MERCEDES-BENZ GLC COUPE steering
[x] Cancel search: steeringPage 6 of 481
Climate control
........................................ 14 2
Overview of climate contro l systems ..........1 42
Operating the climate control sy stem ......... 14 3 Driving and pa
rking ................................. 15 2
Driving ........................................................ 15 2
DY NA MIC SELECT switch ............................1 64
Au tomatic transmission .............................. 16 6
Fu nction of the 4MATIC .............................. 171
Re fuelling .................................................... 171
Pa rking ...................................................... .177
Driving and driving sa fety sy stems .............1 84
Tr ailer hit ch................................................ 239
Bicycle rack function .................................. 24 5
Ve hicle towing instructions ........................ .247 Instrument display and on-board
compu
ter.................................................. 248
No tes on the instrument display and on-
board computer .......................................... 24 8
Instrument display overview ...................... .249
Overview of buttons on thesteering
wheel ..........................................................2 50
Operating the on-board computer .............. 250 Overview of displa
yson the multifunc‐
tion display .................................................2 51
Head-up display .......................................... 252 MBUX multimedia sy
stem ...................... 254
Overview and operation .............................. 254
Sy stem settings .......................................... 262
Na vigation .................................................. 266
Te lephone .................................................. .273
Mercedes me and apps ...............................2 76
Mercedes-Benz emer gency call sy stem ...... 285
Ra dio, media & TV...................................... 289
Sound settings ........................................... 296 Main
tenance and care ............................. 297
ASS YST PLUS service inter val display ........ 297
Engine compartment .................................. 298
Cleaning and care ...................................... .305 Breakdown assi
stance ............................. 313
Emergency .................................................. 313
Flat tyre ...................................................... 315
Battery (vehicle) .......................................... 321 To
w- starting or towing away ....................... 326
Electrical fuses ........................................... 331 Wheels and tyres
..................................... 335
No tes on noise or unusual handling char‐
acteristics .................................................. .335
No tes on regular lyinspecting wheels and
tyres .......................................................... .335
No tes on snow chains ................................ 335
Ty re pressure .............................................. 336
Wheel change ............................................ .340
Emergency spare wheel .............................. 350 Te
ch nical data .......................................... 353
No tes on tech nical da ta.............................. 353
On-board electronics .................................. 353
Re gulatory radio identification of small
components ...............................................3 55
Ve hicle identification plate, VIN and
engine number overview ............................ 355
Operating fluids .......................................... 357
Ve hicle data ................................................ 366
Tr ailer hit ch................................................. 367 Contents
3
Page 10 of 481
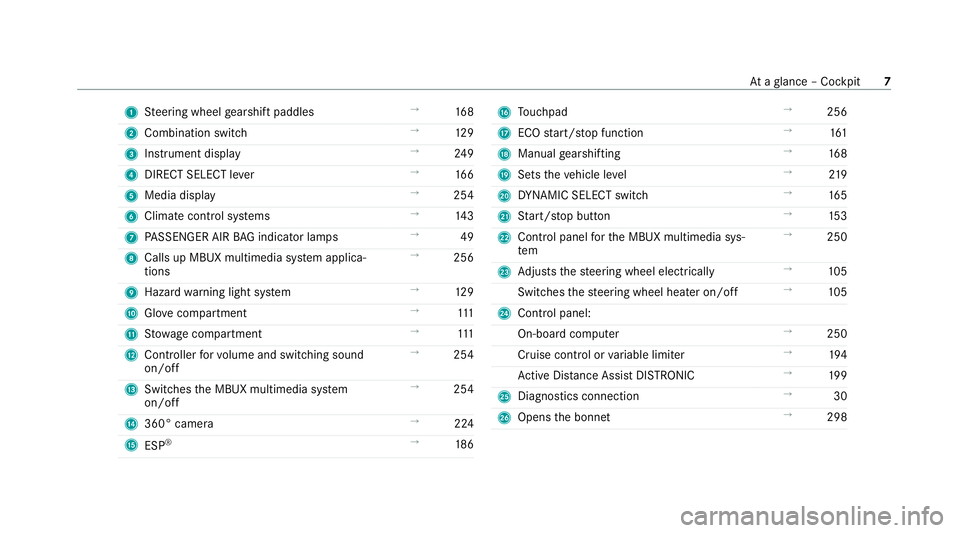
1
Steering wheel gearshift paddles →
16 8
2 Combination swit ch →
12 9
3 Instrument display →
24 9
4 DIRECT SELECT le ver →
16 6
5 Media display →
254
6 Climate contro l systems →
14 3
7 PASSENGER AIR BAG indicator lamps →
49
8 Calls up MBUX multimedia sy stem applica‐
tions →
256
9 Hazard warning light sy stem →
12 9
A Glovecompa rtment →
111
B Stow age compartment →
111
C Controller forvo lume and switching sound
on/off →
254
D Swit ches the MBUX multimedia sy stem
on/off →
254
E 360° camera →
224
F ESP®
→
186 G
Touchpad →
256
H ECO start/ stop function →
161
I Manual gearshifting →
16 8
J Sets theve hicle le vel →
219
K DYNA MIC SELECT switch →
16 5
L Start/ stop button →
15 3
M Control panel forth e MBUX multimedia sys‐
tem →
250
N Adjusts thesteering wheel electrically →
105
Switches thesteering wheel heater on/off →
105
O Control panel:
On-board co mputer →
250
Cruise contro l orvariable limiter →
194
Ac tive Dis tance Assi stDISTRONIC →
19 9
P Diagno stics connection →
30
Q Opens the bonn et →
298 At
aglance – Cockpit 7
Page 38 of 481

ve
hicle itself. Control units of ten contain da ta
memories forve hicle keys,fo rex ample. Their
use permits thete mp orary or permanent docu‐
mentation of tech nical information about the
ve hicle's operating state, component loads,
main tenance requirements and tech nical events
or faults.
Depending on theve hicle equipment, thefo llow‐
ing data are stored:
R operating status of sy stem components,
such as fill le vels, tyre pressure or battery
st atus
R malfunctions or faults in impor tant sy stem
components, such as lights or brakes
R system reactions in special driving situations,
such as airbag deployment or the inter ven‐
tion of stability control sy stems
R information on events leading tovehicle
damage
In cer tain cases, it may be requiredtostore data
th at wo uld ha veotherwise been used only tem‐
porarily. This may be the case if theve hicle has
de tected a malfunction, forex ample. If
yo u use services, such as repair services and
maintenance work,st ored operational data as
we ll as theve hicle identification number can be
re ad out and used. They can be read out by
service network emplo yees, such as workshops
and manufacturers or third parties, such as
breakdown services. The same is true in the
case of warranty claims and quality assurance
measures.
In general, there adout is per form ed via the
legally prescribed port forth e diagnostics con‐
nection in theve hicle. The operational data that
are read out document tech nical states of the
ve hicle or of individual components and assist in
th e diagnosis of malfunctions, compliance with
wa rranty obligations and quality impr ovement.
To that end, these data, in particular information
about component loads, tech nical events, mal‐
functions and other faults may be transmit ted
along with theve hicle identification number to
th e manufacturer. Furthermore, the manufac‐
turer is subject toproduct liability. Forth is rea‐
son the manufacturer also uses operational data
from theve hicle, forex ample, forre calls. These da
ta can also be used toexamine the cus tom‐
er's warranty and guarantee claims.
Fa ult memories in theve hicle can be reset by a
service outlet or at your requ est as part of repair
or maintenance work.
Con venience and inf otainment functions
Yo u can store con venience settings and individ‐
ual settings in theve hicle and change or reset
th em at any time.
Depending on theve hicle equipment, this
includes thefo llowing settings, forex ample:
R seat and steering wheel positions
R suspension and climate control settings
R individual settings, such as interior lighting
Depending on the selected equipment, you can
import data into vehicle inf otainment functions
yo urself.
Depending on theve hicle equipment, this
includes thefo llowing data, forex ample:
R multimedia data, such as music, films or pho‐
to sfo r playback in an integrated multimedia
sy stem General no
tes35
Page 47 of 481
Ac
tivating/deactivating seat belt adjustment
via the multimedia sy stem Multimedia sy
stem:
4 © 5
Settings 5
Vehicle #
Activate or deacti vate Belt adjustment. Re
leasing seat belts #
Press there lease button in the seat belt
buckle and guide the seat belt back with the
seat belt tongue. Seat belt
warning function for the driver and
front passen gerThe
ü seat belt warning lamp in the instru‐
ment display is a reminder that all vehicle occu‐
pants must weartheir seat belts cor rectly.
In addition, a warning tone may sound.
As soon as the driver and front passenger fasten
th eir seat belts, the seat belt warning goes out. Fu
nction of there ar seat belt status display The
rear seat belt status display is on lyavailable
fo r cer tain countries. When
the ignition is switched on, there ar seat
belt status display informs youfo r a cer tain
amount of time which rear seat belt is not fas‐
te ned.
Yo u can immediately dismiss there ar seat belt
st atus display using the back button on the left-
hand side of thesteering wheel (/ page 250).
If a vehicle occupant unfas tens a seat belt in the
re ar while theve hicle is motion, there ar seat
belt status display appears again. In addition, a
warning tone may sound. In this
case, there ar seat belt status display cannot be
hidden using the back button on the left-hand
side of thesteering wheel. Airbags
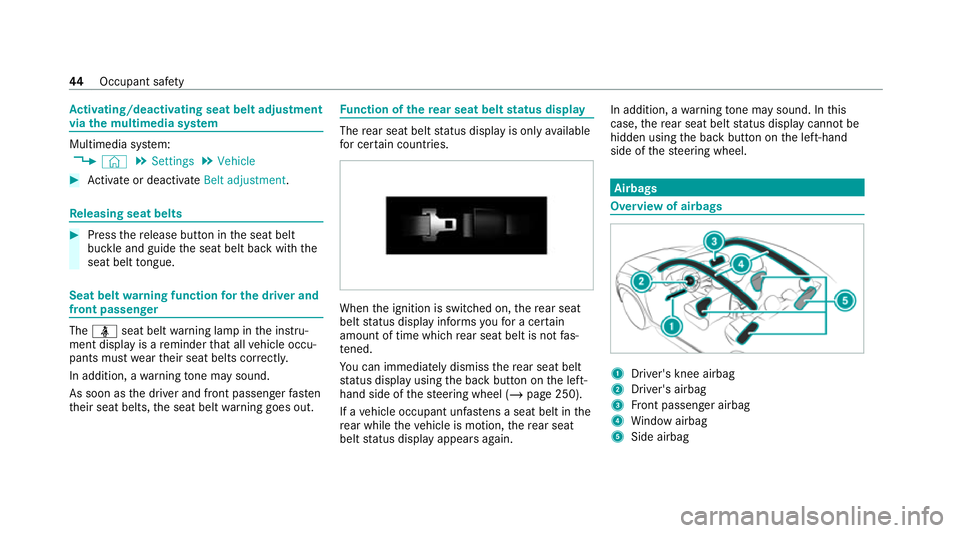
Overview of airbags
1
Driver's knee airbag
2 Driver's airbag
3 Front passenger airbag
4 Window airbag
5 Side airbag 44
Occupant saf ety
Page 49 of 481
Pr
otective capacity of the airbags Depending on
the accident situation, an airbag
may supplement the pr otection of fere dby a cor‐
re ctly fastened seat belt. &
WARNING Risk of injury or death dueto
an incor rect seat position
If yo u deviate from the cor rect seat position,
th e airbag cann otper form its intended pro‐
te ctive function.
Each vehicle occupant must make sure of the
fo llowing:
R Fasten seat belts cor rectl y.Pregnant
wo men must take particular care to
ensure that the lap belt ne ver lies across
th e abdomen.
R Adopt the cor rect seat position and keep
as faraw ay as possible from the airbags.
R Obser vethefo llowing information. #
Alw ays make sure that there are no
objects between the airbag and vehicle
occupant. To
avo idtherisks resulting from the deployment
of an airbag, each vehicle occupant must
obser vethefo llowing information in particular:
R Before starting your journe y,adjust your seat
co rrectly; the driver's seat and front
passenger seat should be mo ved as far back
as possible.
When doing so, alw ays obser vethe informa‐
tion on the cor rect driver's seat position
(/ page 96).
R Only hold thesteering wheel bythesteering
wheel rim. This allows the airbag tobe fully
deplo yed.
R Alw ays lean against the seat backrest when
th eve hicle is in motion. Do not lean forw ards
or against the door or side windo w.You may
ot herwise be in the deployment area of the
airbags.
R The occupants must alw ayske ep their feet
on thefloor. Do not put your feet on the
cockpit, forex ample. Your feet may other‐
wise be in the deployment area of the airbag.
R Ifch ildren are tra velling in theve hicle,
obser vethe additional no tes (/ page54). R
Alwa ys stow and secure objects cor rectl y.
Objects in theve hicle interior may pr event an
airbag from functioning cor rectl y.Each vehicle
occupant must alw ays make sure of thefo llow‐
ing in particular:
R There are no people, animals or objects
between theve hicle occupants and an air‐
bag.
R There are no objects between the seat, door
and door pillar (B-pillar).
R There are no hard objects, e.g. coat hangers,
hanging on the grab handles or coat hooks.
R There are no accessory parts, such as mobile
navigation devices, mobile phones or cup
holders, within the deployment area of an air‐
bag, e.g. on the cockpit, on the door, on the
side window or on the side trim.
In addition, no connecting cables, tensioning
st ra ps or retaining stra ps must be routed or
attached totheve hicle within the deploy‐
ment area of an airbag. Alw ays comply with
th e accessory manufacturer's ins tallation
instructions and, in particular, the no tes on
suitable places for ins tallation. 46
Occupant saf ety
Page 99 of 481
Note
s onthe cor rect driver's seat position &
WARNING Risk of injury ifve hicle set‐
tings are adjus ted while theve hicle is in
motion
Yo u could lose cont rol of theve hicle in par‐
ticular in thefo llowing situations:
R Ifyo u adjust the driver's seat, the head
re stra ints, thesteering wheel or the mir‐
ro r while theve hicle is in motion.
R Ifyo ufast enyour seat belt while theve hi‐
cle is in motion. #
Before starting the engine: adjust the
driver's seat, head restra ints, steering
wheel and mir ror in particular and fas‐
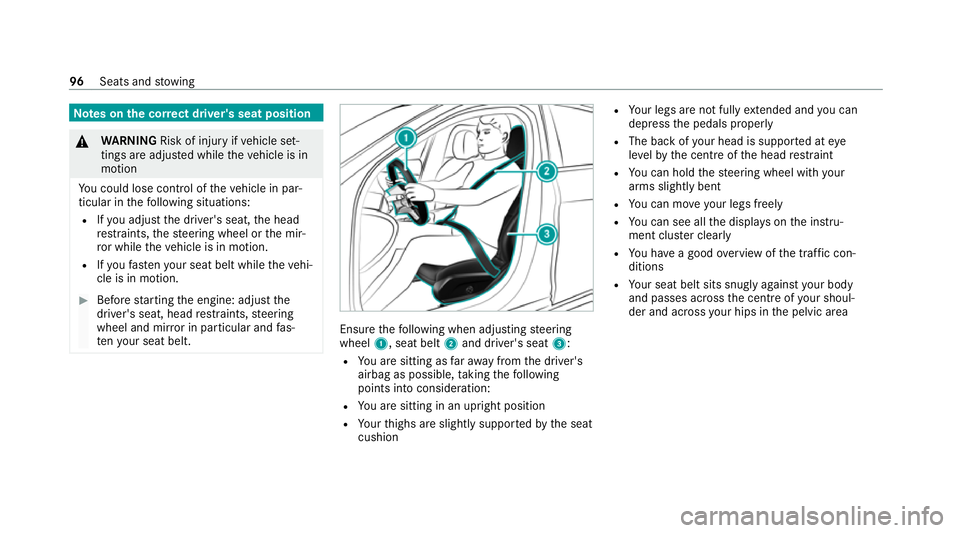
te nyo ur seat belt. Ensure
thefo llowing when adjusting steering
wheel 1, seat belt 2and driver's seat 3:
R You are sitting as faraw ay from the driver's
airbag as possible, taking thefo llowing
points into consideration:
R You are sitting in an upright position
R Your thighs are slight lysuppor tedby the seat
cushion R
Your legs are not fully extended and you can
depress the pedals properly
R The back of your head is suppo rted at eye
le ve lby the cent reofthe head restra int
R You can hold thesteering wheel with your
arms slightly bent
R You can mo veyour legs freely
R You can see all the displa yson the instru‐
ment clus ter clea rly
R You ha vea good overview of the tra ffic con‐
ditions
R Your seat belt sits snug lyagainst your body
and passes across the cent reofyour shoul‐
der and across your hips in the pelvic area 96
Seats and stowing
Page 100 of 481
Seats
Ad
justing the front seat manually and elec‐
trically (without Seat Comfort Package) &
WARNING Risk of becoming trapped if
th e seats are adjus tedby children
Children could become trapped if they adjust
th e seats, particularly when unattended. #
When leaving theve hicle, alw aysta ke
th eke y with you and lock theve hicle. #
Never lea vechildren unat tended in the
ve hicle. Yo
u can adjust the seats when the ignition is
switched off. &
WARNING Risk of becoming trapped
du ring seat adjustment
When you adjust a seat, you or other vehicle
occupants could become trapped, e.g. on the
seat guide rail. #
Make sure when adjusting a seat that
no one has any body parts in the sweep
of the seat. Obser
vethe saf ety no tes on "Airbags" and "Chil‐
dren in theve hicle". &
WARNING Risk of accident due tothe
driver's seat not being engaged
The driver's seat may mo veunexpectedly
while driving.
This could cause youto lose control of the
ve hicle. #
Alw ays make sure that the driver's seat
is engaged before starting theve hicle. &
WARNING Risk of injury ifve hicle set‐
tings are adjus ted while theve hicle is in
motion
Yo u could lose cont rol of theve hicle in par‐
ticular in thefo llowing situations:
R Ifyo u adjust the driver's seat, the head
re stra ints, thesteering wheel or the mir‐
ro r while theve hicle is in motion.
R Ifyo ufast enyour seat belt while theve hi‐
cle is in motion. #
Before starting the engine: adjust the
driver's seat, head restra ints, steering
wheel and mir ror in particular and fas‐
te nyo ur seat belt. &
WARNING Risk of becoming trapped if
th e seat height is adjus ted carelessly
If yo u adjust the seat height carelessly, you
or other vehicle occupants could be trapped
and thereby injured. Seats and
stowing 97
Page 104 of 481
#
Using buttons 1to4 , adjust the conto ur
of the backrest individually tosuit your bac k. Head
restra ints Ad
justing the front seat head restra ints man‐
ually &
WARNING Risk of accident due to
adjusting vehicle settings while theve hi‐
cle is in motion
Yo u could lose cont rol of theve hicle in the
fo llowing situations in particular:
R Ifyo u adjust the driver's seat, the head
re stra ints, thesteering wheel or the mir‐
ro r while theve hicle is in motion.
R Ifyo ufast enyour seat belt while theve hi‐
cle is in motion. #
Before starting the engine: adjust the
driver's seat, the head restra ints, the
st eering wheel and the mir ror and fas‐
te nyo ur seat belt. &
WARNING Risk of injury duetohead
re stra ints not being fitted or being adjus‐
te d incor rectly
If head restra ints ha venot been ins talled or
ha ve not been adjus ted cor rectly, there is an
increased risk of injury in the head and neck
area, e.g. in theev ent of an accident or when
braking. #
Alw ays drive with the head restra ints
fi tted. #
Before driving off, ma kesure forev ery
ve hicle occupant that the cent reofthe
head restra int supports the back of the
head at about eye le vel. Do not inter
change the head restra ints of the
front and rear seats. Otherwise, you will not be
able toadjust the height and angle of the head
re stra ints cor rectl y.
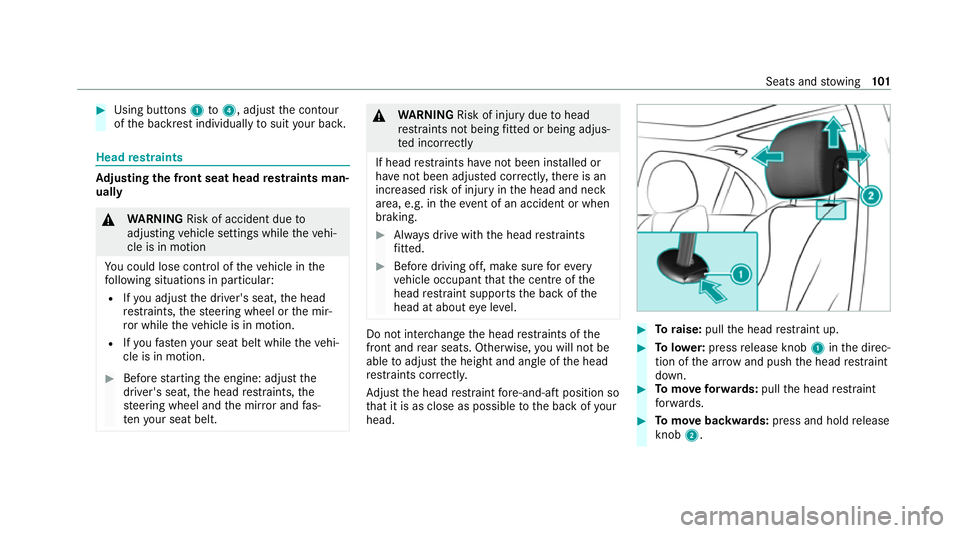
Ad just the head restra int fore -and-aft position so
th at it is as close as possible tothe back of your
head. #
Toraise: pullthe head restra int up. #
Tolowe r:press release knob 1inthe direc‐
tion of the ar row and push the head restra int
down. #
Tomo veforw ards: pullthe head restra int
fo rw ards. #
Tomo vebackwards: press and hold release
knob 2. Seats and
stowing 101