2021 MERCEDES-BENZ GLC COUPE heating
[x] Cancel search: heatingPage 20 of 481
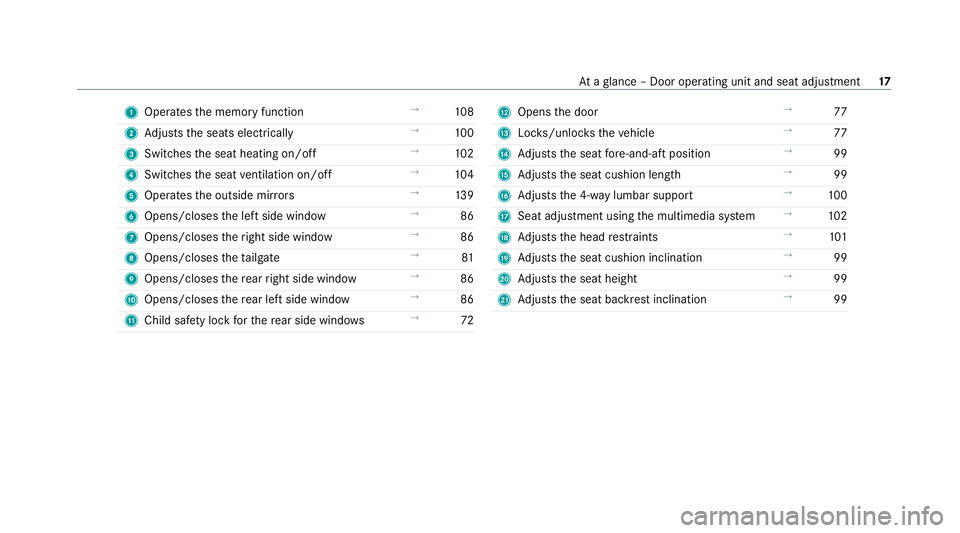
1
Operates the memory function →
108
2 Adjusts the seats electrically →
100
3 Switches the seat heating on/off →
102
4 Switches the seat ventilation on/o ff →
104
5 Operates the outside mir rors →
13 9
6 Opens/closes the left side window →
86
7 Opens/closes theright side window →
86
8 Opens/closes theta ilgate →
81
9 Opens/closes there ar right side window →
86
A Opens/closes there ar left side wind ow→
86
B Child saf ety lock forth ere ar side wind ows →
72 C
Opens the door →
77
D Locks/unloc kstheve hicle →
77
E Adjusts the seat fore -and-aft position →
99
F Adjusts the seat cushion length →
99
G Adjusts the 4-w aylumbar support →
100
H Seat adjustment using the multimedia sy stem →
102
I Adjusts the head restra ints →
101
J Adjusts the seat cushion inclination →
99
K Adjusts the seat height →
99
L Adjusts the seat backrest inclination →
99 At
aglance – Door operating unit and seat adjustment 17
Page 105 of 481
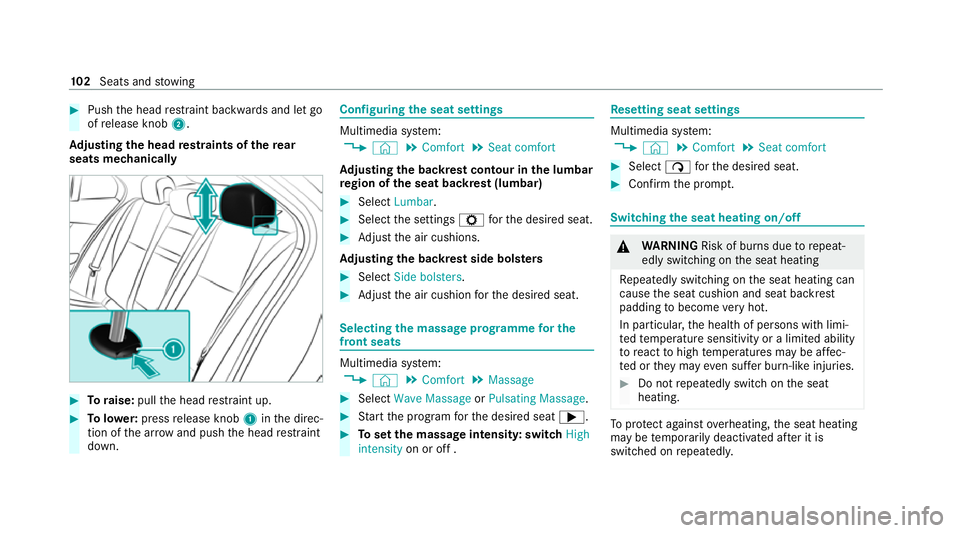
#
Push the head restra int backwards and let go
of release knob 2.
Ad justing the head restra ints of there ar
seats mechanically #
Toraise: pullthe head restra int up. #
Tolowe r:press release knob 1inthe direc‐
tion of the ar row and push the head restra int
down. Configuring
the seat settings Multimedia sy
stem:
4 © 5
Comfort 5
Seat comfort
Ad justing the backrest contour in the lumbar
re gion of the seat backrest (lumbar) #
Select Lumbar . #
Select the settings Zforth e desired seat. #
Adjust the air cushions.
Ad justing the backrest side bols ters #
Select Side bolsters . #
Adjust the air cushion forth e desired seat. Selecting
the massage prog ramme for the
front seats Multimedia sy
stem:
4 © 5
Comfort 5
Massage #
Select Wave Massage orPulsating Massage . #
Start the program forth e desired seat ;. #
Toset the massage intensit y:switch High
intensity on or off . Re
setting seat settings Multimedia sy
stem:
4 © 5
Comfort 5
Seat comfort #
Select ßforth e desired seat. #
Confirm the prom pt. Switching
the seat heating on/off &
WARNING Risk of burn s duetorepeat‐
edly switching on the seat heating
Re peatedly switching on the seat heating can
cause the seat cushion and seat backrest
padding tobecome very hot.
In particular, the health of persons with limi‐
te dte mp erature sensitivity or a limited ability
to react tohigh temp eratures may be af fec‐
te d or they may even suf fer burn-like injuries. #
Do not repeatedly switch on the seat
heating. To
protect against overheating, the seat heating
may be temp orarily deactivated af ter it is
switched on repeatedly. 102
Seats and stowing
Page 106 of 481
*
NO
TEDama getothe seats caused by
objects or documents when the seat
heater is switched on When
the seat heater is switched on, over‐
heating may occur due toobjects or docu‐
ments placed on the seats e.g. seat cushions
or child seats. This could cause damage to
th e seat sur face. #
Makesure that no objects or docu‐
ments are on the seats when the seat
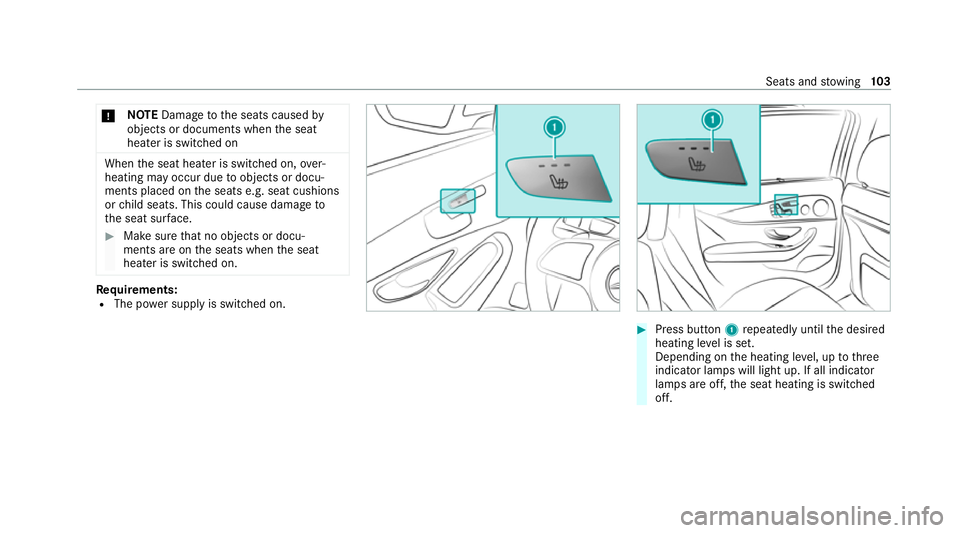
heater is switched on. Re
quirements:
R The po wer supply is switched on. #
Press button 1repeatedly until the desired
heating le vel is set.
Depending on the heating le vel, up tothree
indicator lamps will light up. If all indicator
lamps are off, the seat heating is switched
off. Seats and
stowing 103
Page 107 of 481
%
The seat heating will automatically switch
down from theth re e heating le vels af ter 8,
10 and 20 minutes until the seat heating is
switched off. Switching
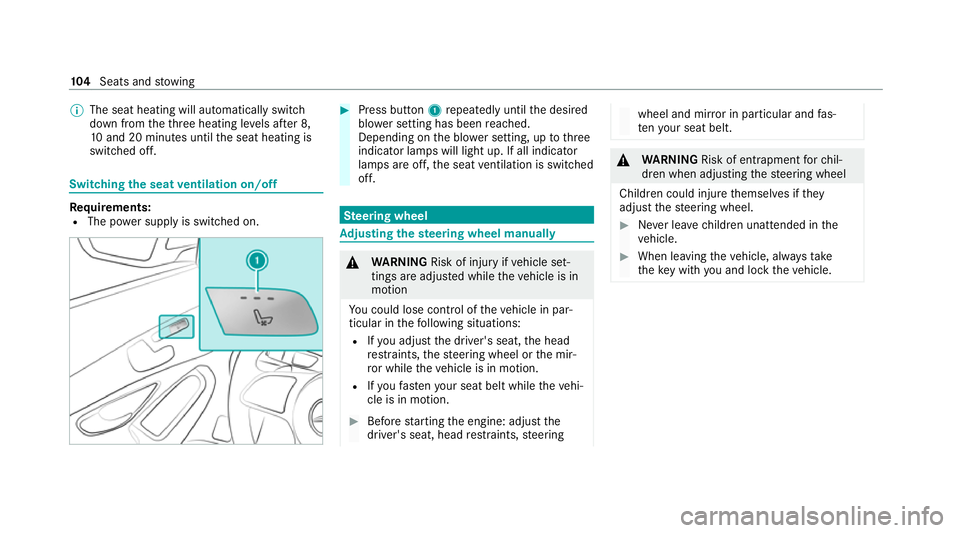
the seat ventilation on/off Re
quirements:
R The po wer supply is switched on. #
Press button 1repeatedly until the desired
blo wer setting has been reached.
Depending on the blo wer setting, up tothree
indicator lamps will light up. If all indicator
lamps are off, the seat ventilation is switched
off. Ste
ering wheel Ad
justing the steering wheel manually &
WARNING Risk of injury ifve hicle set‐
tings are adjus ted while theve hicle is in
motion
Yo u could lose cont rol of theve hicle in par‐
ticular in thefo llowing situations:
R Ifyo u adjust the driver's seat, the head
re stra ints, thesteering wheel or the mir‐
ro r while theve hicle is in motion.
R Ifyo ufast enyour seat belt while theve hi‐
cle is in motion. #
Before starting the engine: adjust the
driver's seat, head restra ints, steering wheel and mir
ror in particular and fas‐
te nyo ur seat belt. &
WARNING Risk of entrapment forch il‐
dren when adjusting thesteering wheel
Children could injure themselves if they
adjust thesteering wheel. #
Never lea vechildren unat tended in the
ve hicle. #
When leaving theve hicle, alw aysta ke
th eke y with you and lock theve hicle. 104
Seats and stowing
Page 113 of 481
&
WARNING Risk of injury duetoan open
load compartment floor
If yo u drive with the load compartment floor
open, objects could be flung around and hit
ve hicle occupants as a result. There is a risk
of injur y,particularly in theeve nt of sudden
braking or a sudden change in direction. #
Alw ays close the load compartment
fl oor before a journe y.*
NO
TEDama getothestow age compart‐
ment under the ashtr aydue tointense
heat The
stow age compartment under the ashtray
is not heat resis tant and could be damaged if
yo ure st a lit cigar ette on it. #
Make sure that the ashtr ayis fully
engaged. &
WARNING ‑ Risk of fire and injury from
th e hot cigar ette lighter
Yo u can burn yourself if youto uch the hot
heating element or the soc ket of the ciga‐
re tte lighter.
In addition, flammable materials may ignite
if:
R you drop the hot cigar ette lighter
R ach ild holds the hot cigar ette lighter to
objects, forex ample #
Alw ays hold the cigar ette lighter bythe
knob. #
Alw ays make sure that the cigar ette
lighter is out of reach of children. #
Never lea vechildren unat tended in the
ve hicle. &
WARNING Risk of burn s fromtheta il‐
pipe and tailpipe trims
The exhaust tailpipe and tailpipe trims can
become very hot. If you come into contact with
these parts of theve hicle, you could
burn yourself. #
Alw ays be particular lycareful around
th eta ilpipe and theta ilpipe trims and
supervise children especially closely in
th is area. #
Allow vehicle parts tocool down before
to uching them. The driving
characteristics of your vehicle are
dependent on the distribution of the load within
th eve hicle. You should bear thefo llowing in
mind when loading theve hicle:
R neverex ceed the permissible gross mass or
th e permissible axle loads forth eve hicle
(including occupants).
Information can be found on theve hicle iden‐
tification plate (/ page 355).
R the load must not pr otru de abo vethe upper
edge of the seat backrests.
R always place the load behind unoccupied
seats if possible. 11 0
Seats and stowing
Page 148 of 481
Demi
sting the windo ws Wi
ndo wsmis ted up on the inside #
Press the ¿ orà button. #
Ifth e windo wscontinue tomist up: press the
¬ button.
Wi ndo wsmis ted up on the outside #
Switch on the windscreen wipers. #
Press button Ã. Switching air-recirculation mode on/off
#
Press theg button.
The interior air will be recirculated.
Air-reci rculation mode automatically swit ches to
fresh air mode af ter some time.
% If air-recirculation mode is switched on, the
windo wsmay mist up more quickl y.Switch
on air- recirculation mode only brie fly. Switching
there sidual heat on/off Re
quirements:
R The vehicle is par ked.
It is possible tomake use of there sidual heat
from the engine tocontinue heating or ventilat‐
ing the front compartment of theve hicle for
appr oximately 30 minutes. #
Toswitch on: pressthe! button.
Re sidual heat is switched off automaticall y. Ac
tivating/deactivating ionisation Ionisation impr
oves thequ ality of theve hicle's
interior air. Ionisation of the interior air is odour‐
less. #
Call up the air conditioning menu
(/ page 143). #
Select Air quality. #
Select IONISATION . Fr
ag rance sy stem Setting
the frag rance sy stem
Re quirements:
R Automatic climate control is activa ted.
R The glove compa rtment is closed.
The fragrance sy stem distributes a pleasant fra‐
grance thro ughout theve hicle interior from a fla‐
con located in theglov e box. #
Call up the air conditioning menu
(/ page 143). #
Select Air quality. #
Select AIR FRESHENER . #
Keep pressing until the desired intensity is
re ached. Climate control
14 5
Page 150 of 481
Dispose of
thege nuine Mercedes-Benz interior
pe rfume flacon when it is em pty and do not refill
it.
Re fillable flacon #
Unscr ew cap 1of em ptyflacon 2. #
Fillflacon 2with a maximum of 15ml. #
Screw cap 1back onto flacon 2.
Alw aysre fill th e em ptyre fillable flacon with the
same perfume. Obser vethe separate informa‐
tion sheet attached totheflacon. St
ationary heater/ventilation St
ationary heater/stationary ventilation
function
The following functions are per form ed:
R The air inside theve hicle is heated or ventila‐
te dto the set temp erature.
R The air inside theve hicle cannot be cooled
down totemp eratures below the outside
te mp erature. R
Ifth e outside temp erature changes, ventila‐
tion mode au tomatical lyswitches toheating
mode or heating mode automatically
switches toventilation mode.
The stationary heater and theex haust gas outlet
are situated at theright-hand front wheel.
Switching thest ationary heater/ventilation
on/off via the air conditioning control panel &
DANG ER Risk of fata l injury due topoi‐
sonous exhaust gases
If th eta ilpipe is bloc ked or suf ficient ventila‐
tion is not possible, poisonous exhaust gases
such as carbon monoxide may enter theve hi‐
cle. This is the case in enclosed spaces or if
th eve hicle gets stuck in sn ow,fo rex ample. #
Alw ays switch thest ationary heater off
in enclosed spaces without an air
ex traction sy stems, e.g. in garage s. #
Keep theta ilpipe and the area around
th eve hicle free from snow when the
engine or thest ationary heater are run‐
ning. #
Open a window on the windward side of
th eve hicle toensure an adequate sup‐
ply of fresh air. &
WARNING Risk offire due tohot station‐
ary heater components and exhaust
ga ses
Flammable materials such as lea ves, grass or
twigs may ignite. #
When thest ationary heater is swit ched
on, make sure that:
R hot vehicle parts do not come into
contact with flammable materials.
R theex haust gas can flow out of the
st ationary heater exhaust pipe
unhindered.
R theex haust gas does not come into
contact with flammable materials. Climate control
147
Page 151 of 481
*
NO
TEBattery discharge caused bysta‐
tionary heater or stationary ventilation
operation Ope
rating thest ationary heater or stationary
ve ntilation drains the batter y. #
After heating or ventilating theve hicle
twice, drive for a longer period of time. Re
quirements:
R The fuel tank is filled toat least there ser ve
le ve l. #
Set the desired temp erature using thew
button (/ page142). #
Press the& button.
The red or blue indicator lamp on button will
light up or go out.
The colours of the indicator lamp ha vethefo l‐
lowing meanings:
R Blue: stationary ventilation is switched on.
R Red:thest ationary heater is swit ched on.
R Yello w: the departure time is preselected. The
stationary heater/ ventilation will switch off
au tomatically af ter 50 minutes.
Operation using the app: thest ationary
heater/ ventilation can also be operated via the
Mercedes me connect app. You can find fur ther
information in the separate Owner's Manual at
https://moba.i.daimler.com/mar kets/ece-r ow/
baix/cars/connectme/en_GB/#emotions/
St artseite.htm l.
Setting thest ationary heater/ventilation via
th e multimedia sy stem #
Tocall up the air conditioning menu
(/ page 143). #
Select Auxiliary heating.
Selecting the departu retime #
Select the time TIME A: XX, TIME B: XXor
TIME C: XX.
Setting the departu retime #
Select the time TIME A: XX, TIME B: XXor
TIME C: XX. #
Select the pen beside the time. #
Set a time. Setting
thest ationary heater/ventilation via
re mo tecont rol
Re quirements:
R The fuel tank is filled toat least there ser ve
le ve l.
Switching on immedia tely #
Press and hold theu button. 14 8
Climate cont rol