2021 LINCOLN CORSAIR turn signal
[x] Cancel search: turn signalPage 118 of 638

Memory Mirrors
You can save and recall the mirror positions
through the memory function. See Memory
Function (page 177).
Signal Indicator Mirrors
(If Equipped)
The outer portion of the appropriate mirror
housing blinks when you switch on the turn
signal.
Auto-Dimming Feature
(If Equipped)
The driver’ s exterior mirror automatically
dims when the interior auto-dimming mirror
turns on.
Lincoln Welcome Mat
(If Equipped)
Projection lights, on the bottom of the mirror
housings, project an image onto the ground
a short distance from the vehicle.
See
Welcome Lighting (page 107).
Blind Spot Monitor
See
Blind Spot Information System (page
299). INTERIOR MIRROR WARNING: Do not adjust the mirrors
when your vehicle is moving. This could
result in the loss of control of your vehicle,
serious personal injury or death.
Note: Do not clean the housing or glass of
any mirror with harsh abrasives, fuel or other
petroleum or ammonia-based cleaning
products.
You can adjust the interior mirror to your
preference. Some mirrors also have a second
pivot point. This lets you move the mirror
head up or down and from side to side.
Auto-Dimming Mirror
(If Equipped)
Do not block the sensors on the front and
back of the mirror. Mirror performance may
be affected. A rear center passenger or
raised rear center head restraint could
prevent light from reaching the sensor. The mirror dims to reduce the effect of bright
light from behind. It returns to normal when
the bright light from behind is no longer
present or if you shift into reverse (R), to
make sure you have a clear view when
backing up.
SUN VISORS
Rotate the sun visor toward the side window
and extend it rearward for extra shade.
115
Corsair (CTF) Canada/United States of America, enUSA, Edition date: 202007, First-Printing Windows and MirrorsE138666
Page 163 of 638

Signaling and Traffic Indication
Displays direction indicators and blind spot
information (if direction indicators are active).
Navigation Display Area
Displays navigation next turn instructions.
Advanced Driver Assistance Systems
Display Area
Displays adaptive cruise control, lane
centering aid and lane keeping system status
and warnings.
System Message Display Area
Displays system messages and notifications
including an incoming phone call.
Advanced Driver Assistance Systems
Message Display Area
Displays advanced driver assistance systems
messages and image adjustment prompts.
Speed Limit Display Area
Displays your speed limit information if it is
available in the map database or is detected
by the camera.
Speedometer Display Area
Displays your current vehicle speed and your
transmission gear selection.
Status Bar
Displays Distance To Empty (DTE), time and
outside air temperature. Next to DTE, the
fuel gauge fill color changes to yellow in low
fuel conditions. You can switch off the status
bar in the head up display settings menu.
Maintaining Your Head Up Display
•
Do not place objects onto the transparent
cover, as they may block you from seeing
portions of the image. These objects
could also damage the cover and affect
the quality of the projected image.
• The system uses a special windshield
designed to provide the optimum image
quality. You must replace the windshield
in a vehicle with this system with a
certified original equipment
manufactured (OEM) head up display
windshield. Replacing this system's
windshield with a non-head up display
windshield causes a double image or
distorted image. Have an authorized
dealer or authorized repair facility replace
the windshield.
• Light conditions such as oncoming
headlamps, sunrise, sunset or reflections
off road surfaces can affect the driver's
ability to see the head up display image.
• Clean the windshield often for optimal
head up display performance. See
Cleaning the Windows and Wiper
Blades
(page 389).
160
Corsair (CTF) Canada/United States of America, enUSA, Edition date: 202007, First-Printing Information Displays
Page 192 of 638

Note:
If the indicator light stays on, the
programming is complete.
Note: If the HomeLite indicator flashes
rapidly, repeat step 5.
Note: If your device still does not operate,
you must program your garage door. See
Programming the Garage Door Opener to
Your Garage Door Opener Motor (page 189).
6. To program additional buttons, repeat Steps 1 – 4.
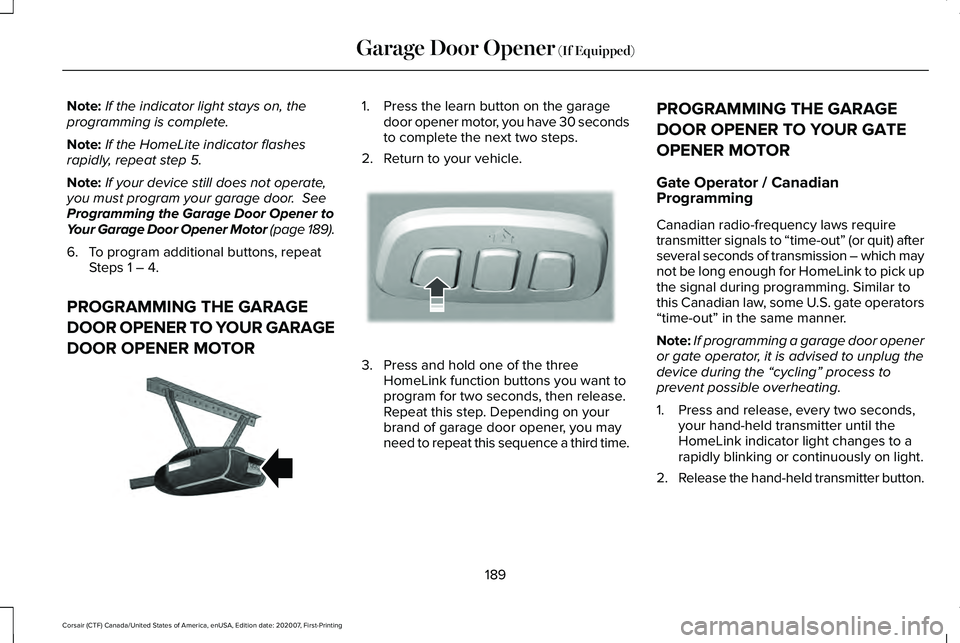
PROGRAMMING THE GARAGE
DOOR OPENER TO YOUR GARAGE
DOOR OPENER MOTOR 1. Press the learn button on the garage
door opener motor, you have 30 seconds
to complete the next two steps.
2. Return to your vehicle. 3. Press and hold one of the three
HomeLink function buttons you want to
program for two seconds, then release.
Repeat this step. Depending on your
brand of garage door opener, you may
need to repeat this sequence a third time. PROGRAMMING THE GARAGE
DOOR OPENER TO YOUR GATE
OPENER MOTOR
Gate Operator / Canadian
Programming
Canadian radio-frequency laws require
transmitter signals to “time-out” (or quit) after
several seconds of transmission – which may
not be long enough for HomeLink to pick up
the signal during programming. Similar to
this Canadian law, some U.S. gate operators
“time-out” in the same manner.
Note:
If programming a garage door opener
or gate operator, it is advised to unplug the
device during the “cycling” process to
prevent possible overheating.
1. Press and release, every two seconds, your hand-held transmitter until the
HomeLink indicator light changes to a
rapidly blinking or continuously on light.
2. Release the hand-held transmitter button.
189
Corsair (CTF) Canada/United States of America, enUSA, Edition date: 202007, First-Printing Garage Door Opener
(If Equipped)E142659 E188212
Page 275 of 638

WHAT IS ACTIVE PARK ASSIST
Assists you with parking in and out of parking
spaces.
SWITCHING ACTIVE PARK ASSIST
ON AND OFF
Press the active park assist button,
then press the active park assist
icon on the touchscreen to bring
up full screen notifications.
Press the soft keys on the touchscreen to
switch between the parallel park in,
perpendicular park in, or parallel park out
parking modes.
Cancelling Active Park Assist
To cancel parking assistance at any time,
shift out of neutral (N).
Pausing Active Park Assist
To pause parking assistance at any time,
release the active park assist button. If you open the passenger or rear doors,
active park assist pauses.
To resume parking, press and hold the
button again.
ENTERING A PARALLEL PARKING
SPACE
1. Press the active park assist button.
Note:
The system detects other vehicles and
curbs to find a parking space.
2. Use the turn signal lever to search for a parking space on the driver or passenger
side of your vehicle.
Note: If you do not use the turn signal lever,
the system searches for a parking space on
the passenger side of your vehicle.
3. Drive your vehicle approximately 3 ft (1 m)
away from and parallel to the other
parked vehicles when searching for a
parking space. Note:
A tone sounds and a message
appears in the information and
entertainment display when active park
assist finds a suitable parking space.
4. Press and hold the brake pedal.
5. Release the steering wheel and shift into
neutral (N).
6. Press and hold the active park assist button.
7. Release the brake pedal to allow your vehicle to park.
Note: You can slow down your vehicle at
any time by pressing the brake pedal.
Note: When parallel parking between
objects, the system parks closer to the object
in front of your vehicle to allow easier access
to the luggage compartment.
Note: When parking is complete, your
vehicle shifts into park (P).
ENTERING A PERPENDICULAR
PARKING SPACE
1. Press the active park assist button.
272
Corsair (CTF) Canada/United States of America, enUSA, Edition date: 202007, First-Printing Active Park Assist (If Equipped)E326188P
Page 276 of 638

Note:
Active park assist does not recognize
parking space lines and centers your vehicle
between objects.
2. Press the active park assist icon on the touchscreen.
3. Select perpendicular parking.
4. Use the turn signal lever to search for a parking space on the driver or passenger
side of your vehicle.
Note: If you do not use the turn signal lever,
the system searches for a parking space on
the passenger side of your vehicle.
5. Drive your vehicle approximately 3 ft (1 m)
away from and perpendicular to the other
parked vehicles when searching for a
parking space.
Note: A tone sounds and a message
appears in the information and
entertainment display when active park
assist finds a parking space.
6. Press and hold the brake pedal.
7. Release the steering wheel and shift into
neutral (N). 8. Press and hold the active park assist
button.
9. Release the brake pedal to allow the vehicle to park.
Note: Active park assist backs your vehicle
into parking spaces.
Note: Active park assist aligns the front end
of your vehicle with the lane side of the
object next to it.
Note: When the system detects only one
object, it allows enough distance to open
the door on either side.
Note: You can slow down your vehicle at
any time by pressing the brake pedal.
Note: When parking is complete, your
vehicle shifts into park (P).
EXITING A PARKING SPACE
Active park assist only assists leaving parallel
parking spaces.
1. Press the active park assist button.
2. Press the active park assist icon on the touchscreen. 3. Select parallel park exit.
4. Use the turn signal to choose the
direction to exit the parking space.
5. Press and hold the brake pedal.
6. Release the steering wheel and shift into
neutral (N).
7. Release the parking brake.
8. Press and hold the active park assist button.
9. Release the brake pedal to allow your vehicle to move.
Note: After active park assist drives your
vehicle to a position where you can exit the
parking space in a forward movement, a
message appears instructing you to take full
control of your vehicle.
10. Take control of your vehicle.
Note: You can slow down your vehicle at
any time by pressing the brake pedal.
273
Corsair (CTF) Canada/United States of America, enUSA, Edition date: 202007, First-Printing Active Park Assist (If Equipped)
Page 287 of 638

SETTING THE ADAPTIVE CRUISE
CONTROL GAP
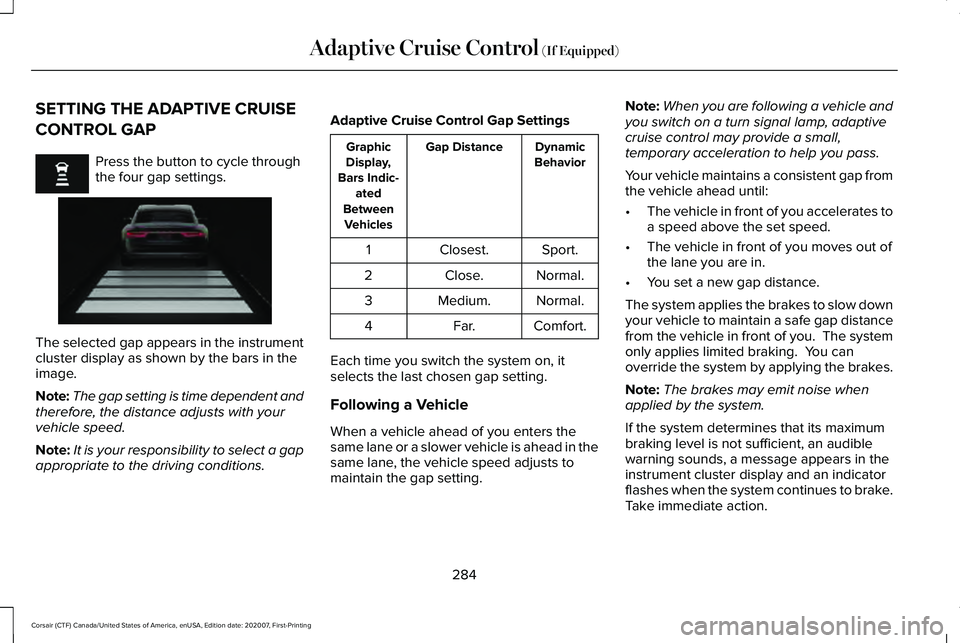
Press the button to cycle through
the four gap settings.
The selected gap appears in the instrument
cluster display as shown by the bars in the
image.
Note:
The gap setting is time dependent and
therefore, the distance adjusts with your
vehicle speed.
Note: It is your responsibility to select a gap
appropriate to the driving conditions. Adaptive Cruise Control Gap Settings Dynamic
Behavior
Gap Distance
Graphic
Display,
Bars Indic- ated
Between Vehicles
Sport.
Closest.
1
Normal.
Close.
2
Normal.
Medium.
3
Comfort.
Far.
4
Each time you switch the system on, it
selects the last chosen gap setting.
Following a Vehicle
When a vehicle ahead of you enters the
same lane or a slower vehicle is ahead in the
same lane, the vehicle speed adjusts to
maintain the gap setting. Note:
When you are following a vehicle and
you switch on a turn signal lamp, adaptive
cruise control may provide a small,
temporary acceleration to help you pass.
Your vehicle maintains a consistent gap from
the vehicle ahead until:
• The vehicle in front of you accelerates to
a speed above the set speed.
• The vehicle in front of you moves out of
the lane you are in.
• You set a new gap distance.
The system applies the brakes to slow down
your vehicle to maintain a safe gap distance
from the vehicle in front of you. The system
only applies limited braking. You can
override the system by applying the brakes.
Note: The brakes may emit noise when
applied by the system.
If the system determines that its maximum
braking level is not sufficient, an audible
warning sounds, a message appears in the
instrument cluster display and an indicator
flashes when the system continues to brake.
Take immediate action.
284
Corsair (CTF) Canada/United States of America, enUSA, Edition date: 202007, First-Printing Adaptive Cruise Control (If Equipped) E255686
Page 313 of 638

Note:
If you switch active braking off, evasive
steering assist turns off. Blocked Sensors Camera.
1
Radar sensor (if equipped).
2 If a message regarding a blocked sensor or
camera appears in the information display,
the radar signals or camera images are
obstructed. If your vehicle has a radar sensor,
it is behind the fascia cover in the center of
the lower grille. With a blocked sensor or
camera, the pre-collision assist system may
not operate or performance may reduce. The
following table lists possible causes and
actions for when this message displays.
Camera Troubleshooting Action
Cause
Clean the outside of the windshield in front of the camera.
The windshield in front of the camera is dirty or obstructed in some
way.
Wait a short time. It could take several minutes for the camera todetect that there is no obstruction.
The windshield in front of the camera is clean but the message remains
in the display screen.
310
Corsair (CTF) Canada/United States of America, enUSA, Edition date: 202007, First-Printing Driving AidsE268024
Page 332 of 638

Trailer Lamps
WARNING: Never connect any trailer
lamp wiring to the vehicle's tail lamp wiring;
this may damage the electrical system
resulting in fire. Contact your authorized
dealer as soon as possible for assistance
in proper trailer tow wiring installation.
Additional electrical equipment may be
required.
Trailer lamps are required on most towed
vehicles. Make sure all running lights, brake
lights, turn signals and hazard lights are
working.
Before Towing a Trailer
Practice turning, stopping and backing up to
get the feel of your vehicle-trailer
combination before starting on a trip. When
turning, make wider turns so the trailer
wheels clear curbs and other obstacles. When Towing a Trailer
•
Do not drive faster than 70 mph
(113 km/h) during the first 500 mi
(800 km).
• Do not make full-throttle starts.
• Check your hitch, electrical connections
and trailer wheel lug nuts thoroughly after
you have traveled
50 mi (80 km).
• When stopped in congested or heavy
traffic during hot weather, place the
transmission in park (P) to aid engine and
transmission cooling and to help A/C
performance.
• Turn off the speed control with heavy
loads or in hilly terrain. The speed control
may turn off automatically when you are
towing on long, steep grades.
• Shift to a lower gear when driving down
a long or steep hill. Do not apply the
brakes continuously, as they may
overheat and become less effective. •
If your transmission is equipped with a
Grade Assist or Tow/Haul feature, use
this feature when towing. This provides
engine braking and helps eliminate
excessive transmission shifting for
optimum fuel economy and transmission
cooling.
• Allow more distance for stopping with a
trailer attached. Anticipate stops and
brake gradually.
• Avoid parking on a grade. However, if
you must park on a grade:
1. Turn the steering wheel to point your vehicle tires away from traffic flow.
2. Set your vehicle parking brake.
3. Place the transmission in park (P).
4. Place wheel chocks in front and back of the trailer wheels. Chocks are not
included with your vehicle.
Launching or Retrieving a Boat or
Personal Watercraft (PWC)
Note: Disconnect the wiring to the trailer
before
backing the trailer into the water.
329
Corsair (CTF) Canada/United States of America, enUSA, Edition date: 202007, First-Printing Towing