2021 LEXUS RX350 equipped
[x] Cancel search: equippedPage 139 of 508
1393-4. Adjusting the steering wheel and mirrors
3
Before driving
3-4.Adjusting the steering wheel and mirrors
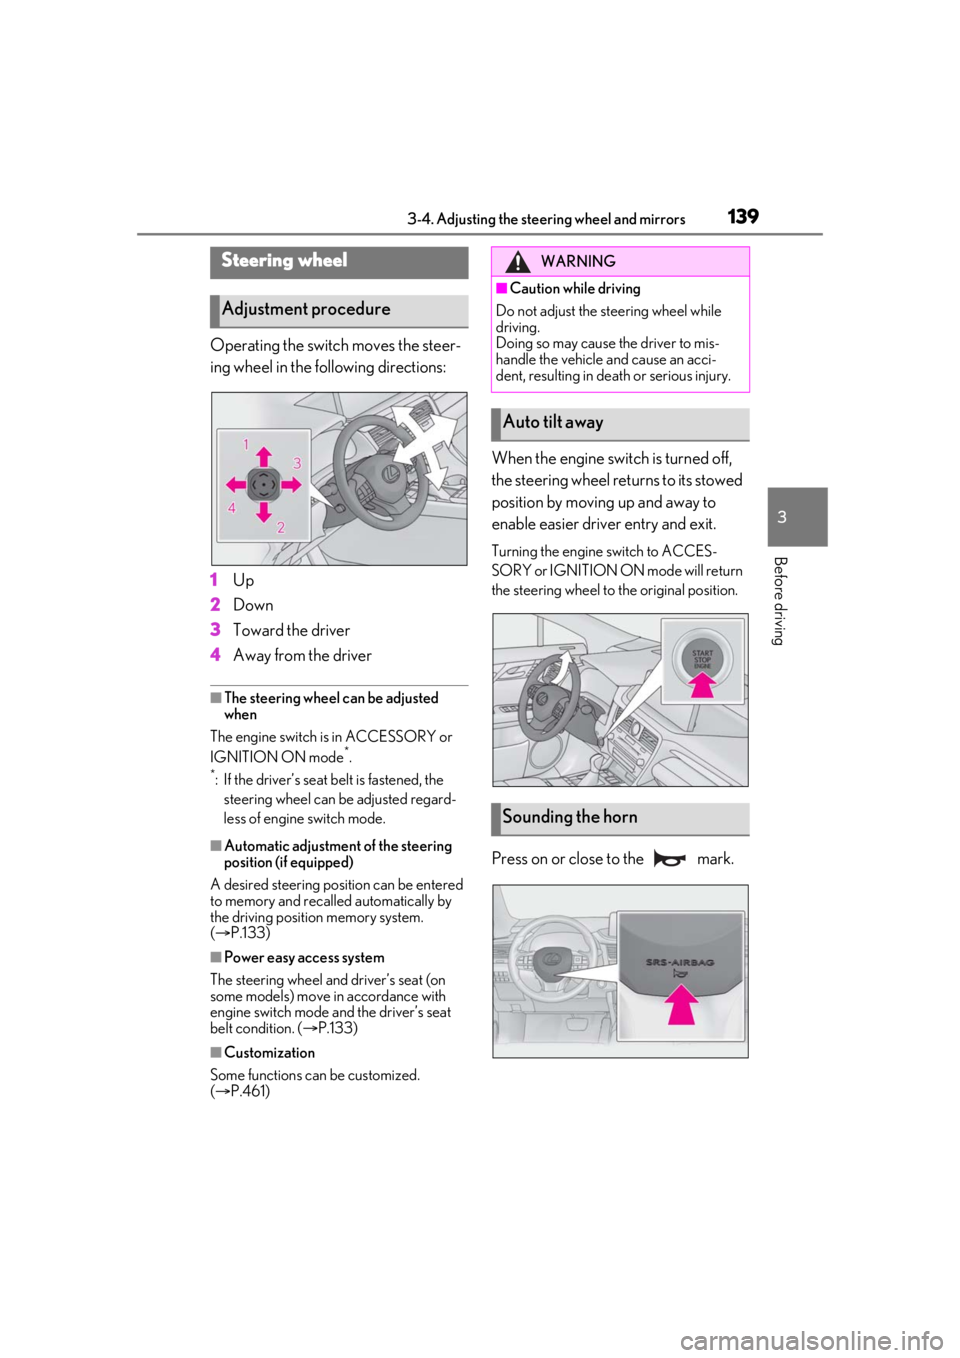
Operating the switch moves the steer-
ing wheel in the following directions:
1Up
2 Down
3 Toward the driver
4 Away from the driver
■The steering wheel can be adjusted
when
The engine switch is in ACCESSORY or
IGNITION ON mode
*.
*: If the driver’s seat belt is fastened, the steering wheel can be adjusted regard-
less of engine switch mode.
■Automatic adjustment of the steering
position (if equipped)
A desired steering position can be entered
to memory and recalled automatically by
the driving position memory system.
( P.133)
■Power easy access system
The steering wheel and driver’s seat (on
some models) move in accordance with
engine switch mode and the driver’s seat
belt condition. ( P.133)
■Customization
Some functions can be customized.
( P.461)
When the engine swit ch is turned off,
the steering wheel returns to its stowed
position by moving up and away to
enable easier driver entry and exit.
Turning the engine switch to ACCES-
SORY or IGNITION ON mode will return
the steering wheel to the original position.
Press on or close to the mark.
Steering wheel
Adjustment procedure
WARNING
■Caution while driving
Do not adjust the steering wheel while
driving.
Doing so may cause the driver to mis-
handle the vehicle and cause an acci-
dent, resulting in death or serious injury.
Auto tilt away
Sounding the horn
Page 141 of 508
1413-4. Adjusting the steering wheel and mirrors
3
Before driving
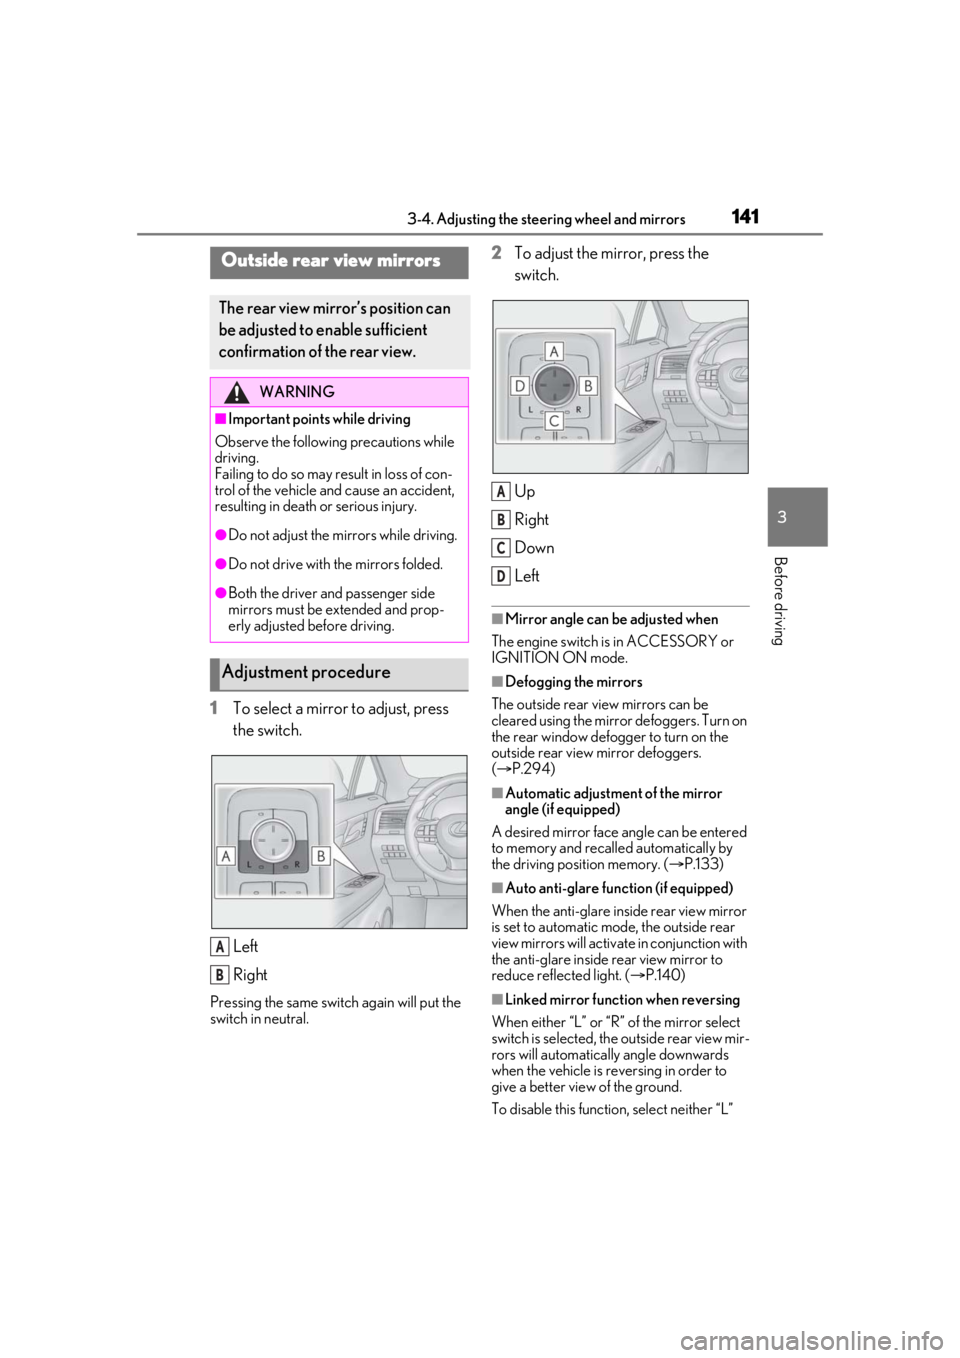
1To select a mirror to adjust, press
the switch.
Left
Right
Pressing the same switch again will put the
switch in neutral.
2To adjust the mirror, press the
switch.
Up
Right
Down
Left
■Mirror angle can be adjusted when
The engine switch is in ACCESSORY or
IGNITION ON mode.
■Defogging the mirrors
The outside rear view mirrors can be
cleared using the mirror defoggers. Turn on
the rear window defogger to turn on the
outside rear view mirror defoggers.
( P.294)
■Automatic adjustment of the mirror
angle (if equipped)
A desired mirror face angle can be entered
to memory and recalled automatically by
the driving position memory. ( P.133)
■Auto anti-glare function (if equipped)
When the anti-glare inside rear view mirror
is set to automatic mode, the outside rear
view mirrors will activate in conjunction with
the anti-glare inside rear view mirror to
reduce reflec ted light. (P.140)
■Linked mirror function when reversing
When either “L” or “R” of the mirror select
switch is selected, the outside rear view mir-
rors will automatically angle downwards
when the vehicle is re versing in order to
give a better view of the ground.
To disable this function, select neither “L”
Outside rear view mirrors
The rear view mirror’s position can
be adjusted to enable sufficient
confirmation of the rear view.
WARNING
■Important points while driving
Observe the following precautions while
driving.
Failing to do so may result in loss of con-
trol of the vehicle and cause an accident,
resulting in death or serious injury.
●Do not adjust the mirrors while driving.
●Do not drive with the mirrors folded.
●Both the driver and passenger side
mirrors must be extended and prop-
erly adjusted before driving.
Adjustment procedure
A
B
A
B
C
D
Page 142 of 508
1423-4. Adjusting the steering wheel and mirrors
nor “R”.
To set the mirror angle used when the vehi-
cle is reversing, adjust the mirror angle at a
desired position with the shift lever in R.
The adjusted angle will be memorized and
the mirror will automatically tilt to the mem-
orized angle whenever the shift lever is
shifted to R from next time.
The memorized downward tilt position of
the mirror is linked to the normal position
(angle adjusted with the shift lever in other
than R). Therefore, if the normal position is
changed after adjustment, the tilt position
will also change.
When the normal position is changed, read-
just the angle in reversing.
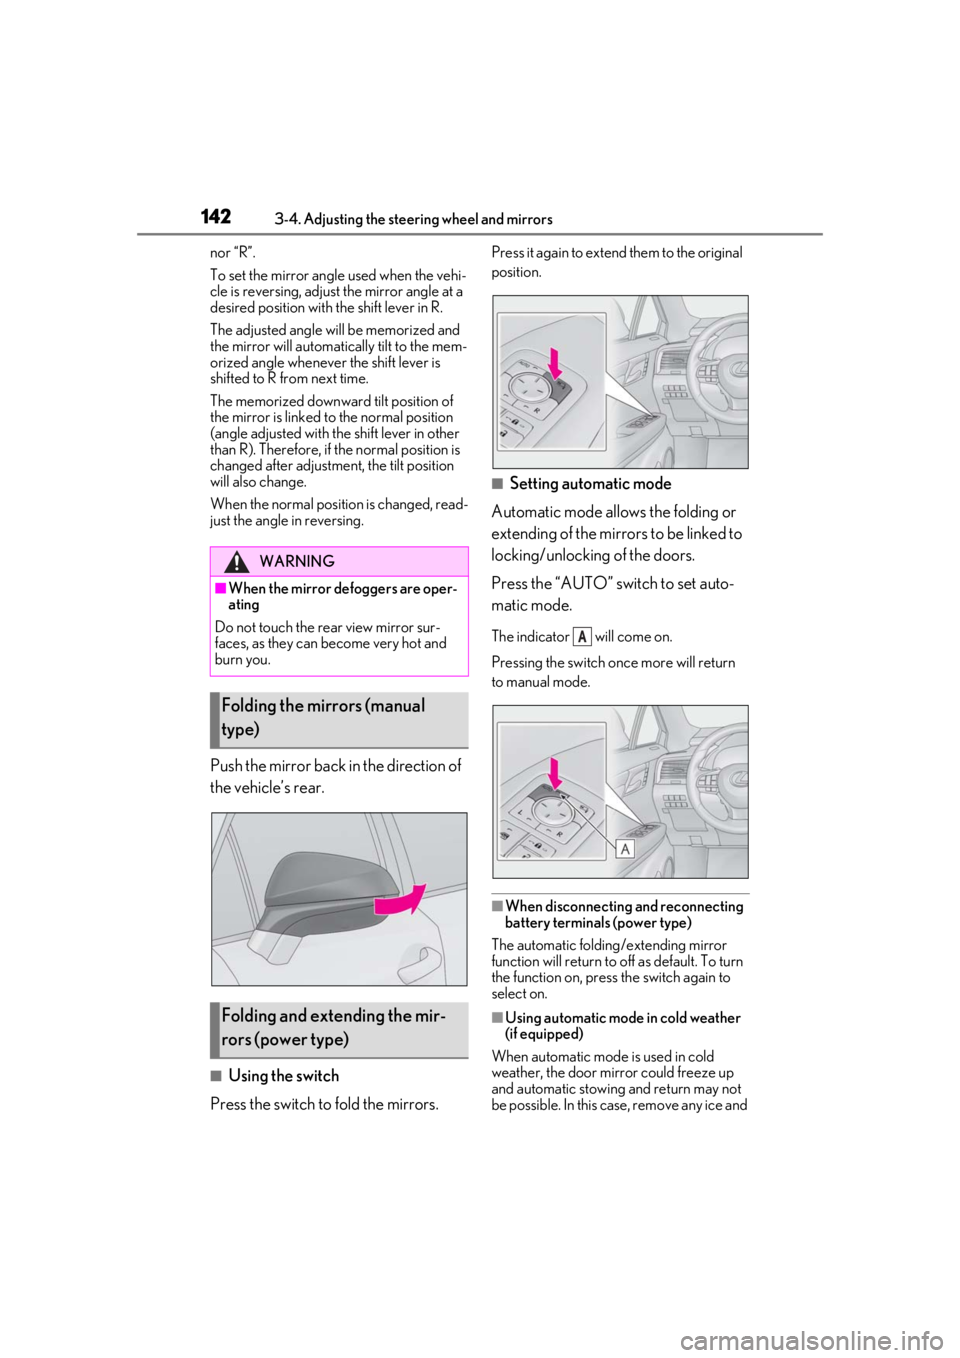
Push the mirror back in the direction of
the vehicle’s rear.
■Using the switch
Press the switch to fold the mirrors.
Press it again to extend them to the original
position.
■Setting automatic mode
Automatic mode allows the folding or
extending of the mirrors to be linked to
locking/unlocking of the doors.
Press the “AUTO” switch to set auto-
matic mode.
The indicator will come on.
Pressing the switch on ce more will return
to manual mode.
■When disconnecting and reconnecting
battery terminals (power type)
The automatic folding/extending mirror
function will return to off as default. To turn
the function on, press the switch again to
select on.
■Using automatic mode in cold weather
(if equipped)
When automatic mode is used in cold
weather, the door mirror could freeze up
and automatic stowing and return may not
be possible. In this case, remove any ice and
WARNING
■When the mirror defoggers are oper-
ating
Do not touch the rear view mirror sur-
faces, as they can become very hot and
burn you.
Folding the mirrors (manual
type)
Folding and extending the mir-
rors (power type)
A
Page 146 of 508
1463-5. Opening, closing the windows and moon roof
This function can be used to prevent
children from accidentally opening or
closing a passenger window.
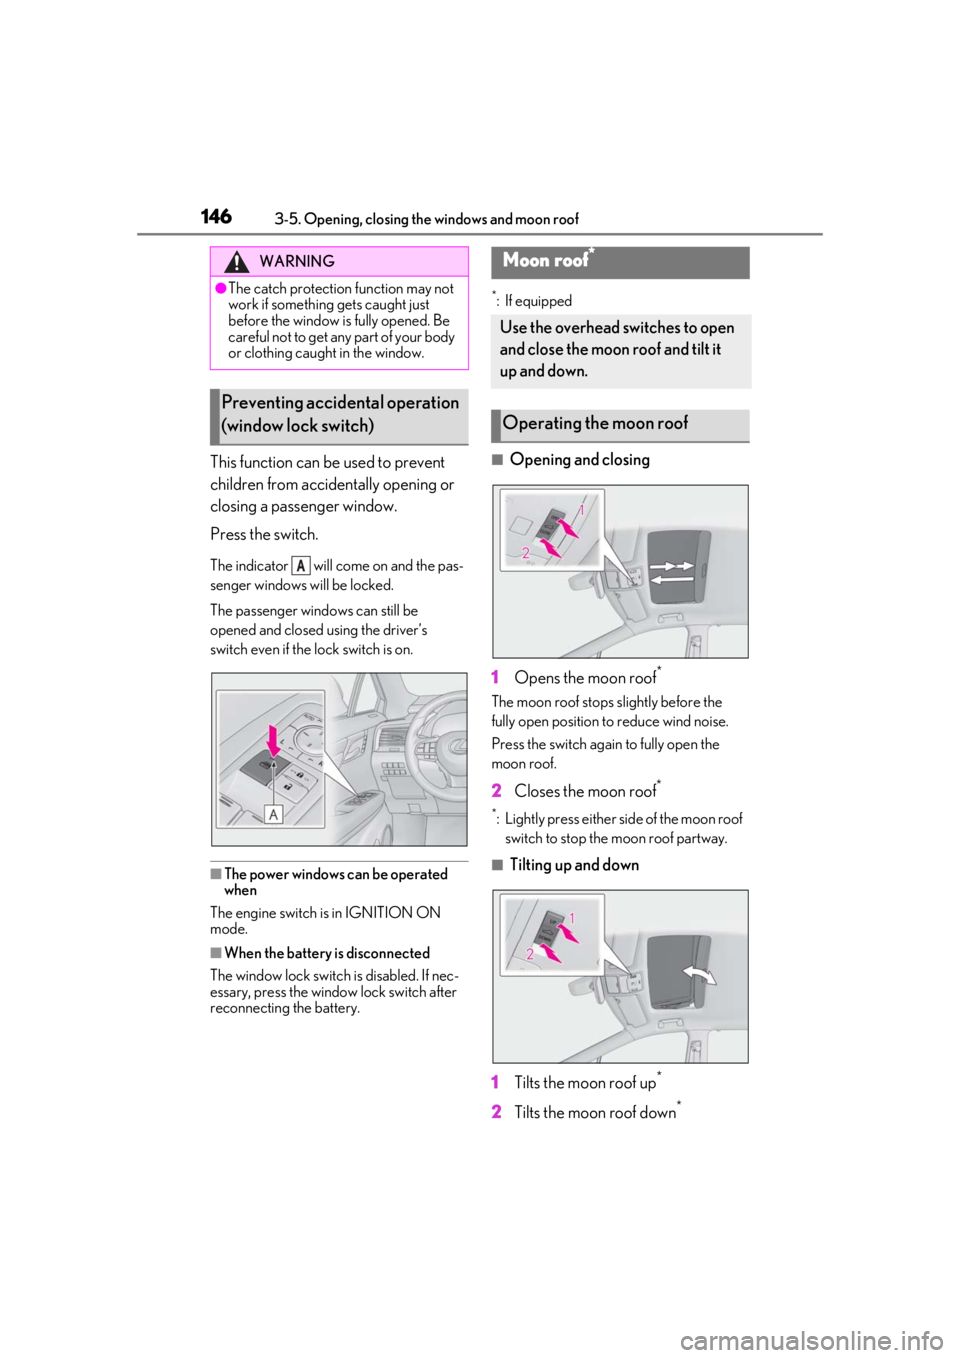
Press the switch.
The indicator will come on and the pas-
senger windows will be locked.
The passenger windows can still be
opened and closed using the driver’s
switch even if the lock switch is on.
■The power windows can be operated
when
The engine switch is in IGNITION ON
mode.
■When the battery is disconnected
The window lock switch is disabled. If nec-
essary, press the window lock switch after
reconnecting the battery.
*: If equipped
■Opening and closing
1 Opens the moon roof
*
The moon roof stops slightly before the
fully open position to reduce wind noise.
Press the switch again to fully open the
moon roof.
2 Closes the moon roof*
*: Lightly press either side of the moon roof
switch to stop the moon roof partway.
■Tilting up and down
1 Tilts the moon roof up
*
2Tilts the moon roof down*
WARNING
●The catch protection function may not
work if something gets caught just
before the window is fully opened. Be
careful not to get any part of your body
or clothing caught in the window.
Preventing accidental operation
(window lock switch)
A
Moon roof*
Use the overhead switches to open
and close the moon roof and tilt it
up and down.
Operating the moon roof
Page 149 of 508
1493-5. Opening, closing the windows and moon roof
3
Before driving
*:If equipped
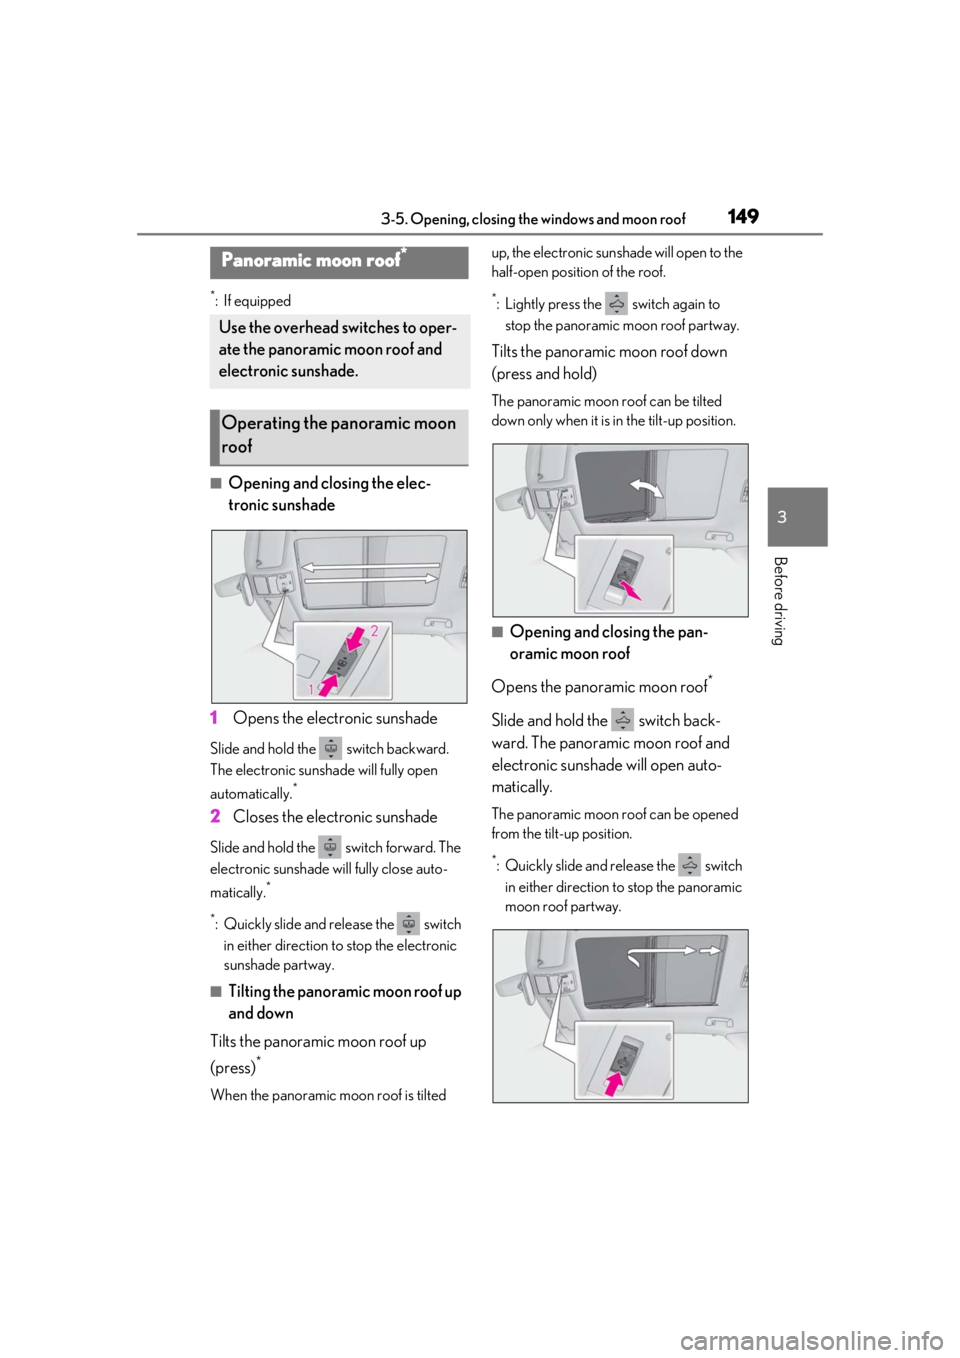
■Opening and closing the elec-
tronic sunshade
1 Opens the electronic sunshade
Slide and hold the switch backward.
The electronic sunshade will fully open
automatically.
*
2Closes the electronic sunshade
Slide and hold the switch forward. The
electronic sunshade will fully close auto-
matically.
*
*
: Quickly slide and release the switch in either direction to stop the electronic
sunshade partway.
■Tilting the panoramic moon roof up
and down
Tilts the panoramic moon roof up
(press)
*
When the panoramic moon roof is tilted up, the electronic sunshade will open to the
half-open position of the roof.
*: Lightly press the switch again to
stop the panoramic moon roof partway.
Tilts the panoramic moon roof down
(press and hold)
The panoramic moon roof can be tilted
down only when it is in the tilt-up position.
■Opening and closing the pan-
oramic moon roof
Opens the panoramic moon roof
*
Slide and hold the switch back-
ward. The panoramic moon roof and
electronic sunshade will open auto-
matically.
The panoramic moon roof can be opened
from the tilt-up position.
*: Quickly slide and release the switch in either direction to stop the panoramic
moon roof partway.
Panoramic moon roof*
Use the overhead switches to oper-
ate the panoramic moon roof and
electronic sunshade.
Operating the panoramic moon
roof
Page 155 of 508

1554-1. Before driving
4
Driving
●When the accelerator pedal is released
●When the brake pedal is depressed while
sport mode is selected
■Restraining the engine output (Brake
Override System)
●When the accelerator and brake pedals
are depressed at the same time, the
engine output may be restrained.
●A warning message is displayed on the
multi-information display and head-up
display (if equipped) while the system is
operating.
■Restraining sudden start (Drive-Start
Control)
●When the following unusual operation is
performed, the engine output may be
restrained.
• When the shift lever is shifted from R to D, D to R, N to R, P to D, or P to R (D
includes M) with the accelerator pedal
depressed, a warning message appears
on the multi-information display and
head-up display (if equipped). If a warn-
ing message is shown on the multi-infor-
mation display and head-up display (if
equipped), read the message and follow
the instructions.
• When the accelerator pedal is depressed
too much while the vehicle is in reverse.
●While Drive-Start Control is being acti-
vated, your vehicle may have trouble
escaping from the mud or fresh snow. In
such case, deactivate TRAC ( P.276) to
cancel Drive-Start Control so that the
vehicle may become able to escape from
the mud or fresh snow.
■Breaking in your new Lexus
To extend the life of the vehicle, observing
the following precautions is recommended:
●For the first 200 miles (300 km):
Avoid sudden stops.
●For the first 500 miles (800 km):
Do not tow a trailer.
●For the first 1000 miles (1600 km):
• Do not drive at extremely high speeds.
• Avoid sudden acceleration.
• Do not drive continuously in low gears.
• Do not drive at a constant speed for extended periods.
■Operating your vehicle in a foreign
country
Comply with the relevant vehicle registra-
tion laws and confirm the availability of the
correct fuel. ( P.444)
■Eco-friendly driving
P.83
WARNING
Observe the following precautions.
Failure to do so may result in death or
serious injury.
■When starting the vehicle
Always keep your foot on the brake
pedal while stopped the engine running.
This prevents the vehicle from creeping.
■When driving the vehicle
●Do not drive if you are unfamiliar with
the location of the brake and accelera-
tor pedals to avoid depressing the
wrong pedal.
• Accidentally depressing the accelera- tor pedal instead of the brake pedal
will result in sudden acceleration that
may lead to an accident.
• When backing up, you may twist your body around, leading to a difficulty in
operating the pedals. Make sure to
operate the pedals properly.
• Make sure to keep a correct driving posture even when moving the vehicle
only slightly. This allows you to depress
the brake and accelerator pedals
properly.
• Depress the brake pedal using your right foot. Depressing the brake pedal
using your left foot may delay
response in an emer gency, resulting in
an accident.
Page 163 of 508
1634-1. Before driving
4
Driving
■Matching trailer ball height to trailer
coupler height
No matter which class of tow hitch applies,
Trailer towing (vehicles with-
out towing package)
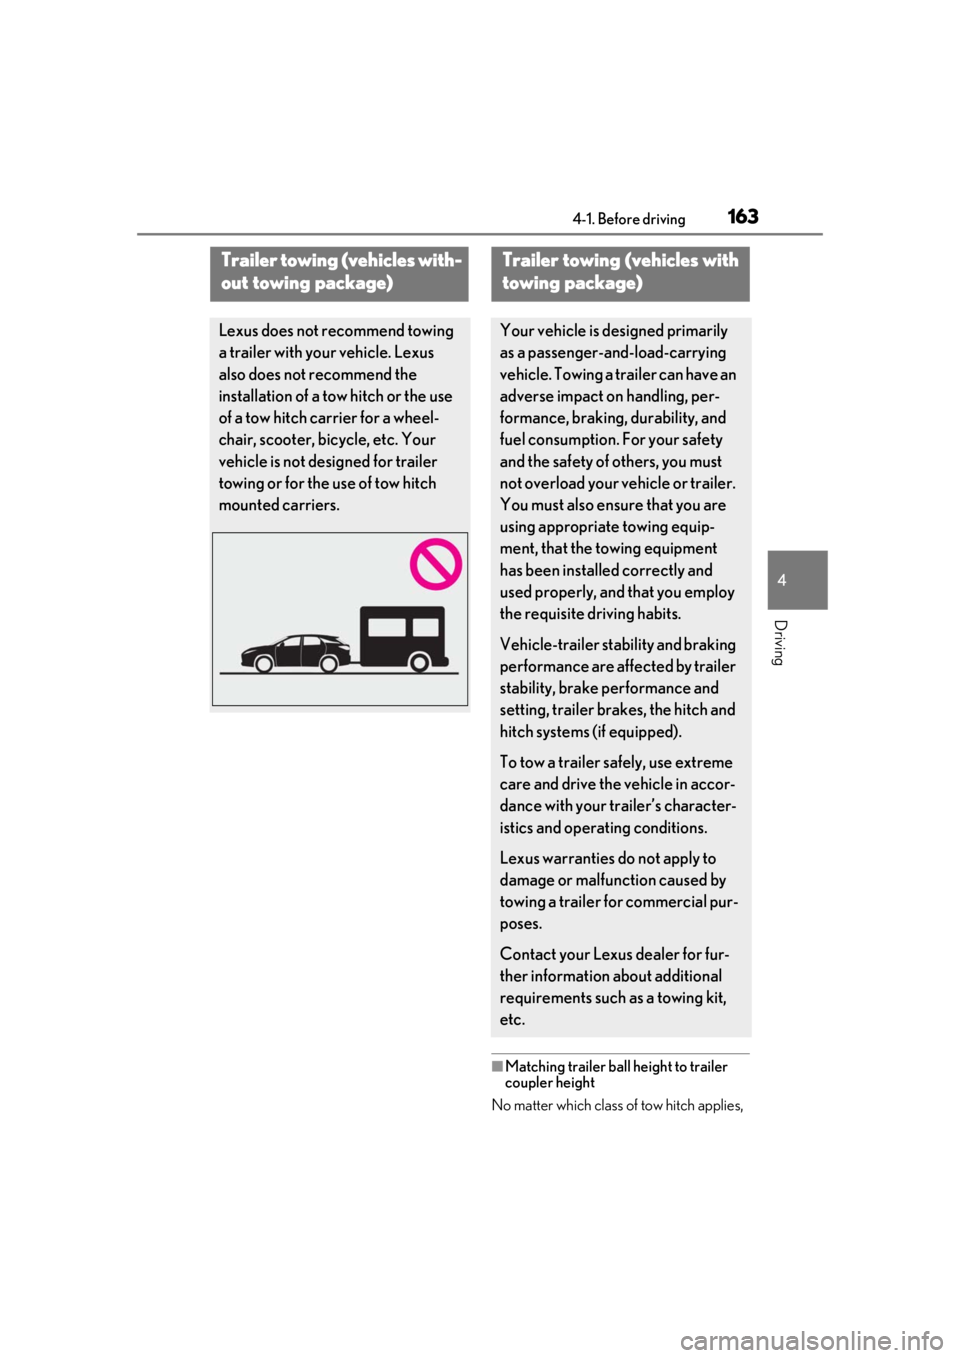
Lexus does not recommend towing
a trailer with your vehicle. Lexus
also does not recommend the
installation of a tow hitch or the use
of a tow hitch carrier for a wheel-
chair, scooter, bicycle, etc. Your
vehicle is not desi gned for trailer
towing or for the use of tow hitch
mounted carriers.
Trailer towing (vehicles with
towing package)
Your vehicle is designed primarily
as a passenger-and-load-carrying
vehicle. Towing a tr ailer can have an
adverse impact on handling, per-
formance, braking, durability, and
fuel consumption. For your safety
and the safety of others, you must
not overload your vehicle or trailer.
You must also ensure that you are
using appropriate towing equip-
ment, that the towing equipment
has been installed correctly and
used properly, and that you employ
the requisite driving habits.
Vehicle-trailer stability and braking
performance are affected by trailer
stability, brake performance and
setting, trailer brakes, the hitch and
hitch systems (if equipped).
To tow a trailer safely, use extreme
care and drive the vehicle in accor-
dance with your trailer’s character-
istics and operating conditions.
Lexus warranties do not apply to
damage or malfunction caused by
towing a trailer for commercial pur-
poses.
Contact your Lexus dealer for fur-
ther information about additional
requirements such as a towing kit,
etc.
Page 164 of 508

1644-1. Before driving
for a more safe trailer hookup, the trailer
ball setup must be the proper height for the
coupler on the trailer.Coupler
Trailer ball
■Before towing
Check that the following conditions are
met:
●Ensure that your vehicle’s tires are prop-
erly inflated. ( P.448)
●Trailer tires are inflated according to the
trailer manufacturer’s recommendation.
●All trailer lights work as required by law.
●All lights work each time you connect
them.
●The trailer ball is set at the proper height
for the coupler on the trailer.
●The trailer is level when it is hitched.
Do not drive if the trailer is not level, and
check for improper tongue weight, over-
loading, worn suspension, or other possi-
ble causes.
●The trailer cargo is securely loaded.
●The rear view mirrors conform to all
applicable federal, state/provincial or local regulations. If they do not, install
rear view mirrors appropriate for towing
purposes.
■Adaptive Variable Suspension System
(if equipped)
The suspension can be switched for
improvement in driveability. ( P.275)
■Break-in schedule
If your vehicle is new or equipped with any
new power train components (such as an
engine, transaxle, transfer [AWD models],
rear differential [AWD models] or wheel
bearing), Lexus recommends that you do
not tow a trailer until the vehicle has been
driven for over 500 miles (800 km).
After the vehicle has been driven for over
500 miles (800 km), you can start towing.
However, for the next 500 miles (800 km),
drive the vehicle at a speed of less than 50
mph (80 km/h) when towing a trailer, and
avoid full throttle acceleration.
■Maintenance
●If you tow a trailer, your vehicle will
require more frequent maintenance due
to the additional load. (See “Warranty
and Services Guide”, “Owner’s Manual
Supplement” or “Scheduled Mainte-
nance”.)
●Retighten the fixing bolts of the towing
ball and bracket after approximately 600
miles (1000 km) of trailer towing.
■If trailer sway occurs
One or more factors (crosswinds, passing
vehicles, rough roads, etc.) can adversely
affect handling of your vehicle and trailer,
causing instability.
●If trailer swaying occurs:
• Firmly grip the steering wheel. Steer straight ahead.
Do not try to control trailer swaying by
turning the steering wheel.
• Begin releasing th e accelerator pedal
immediately but very gradually to reduce
speed.
Do not increase speed. Do not apply
vehicle brakes.
If you make no extreme correction with the
steering or brakes, your vehicle and trailer
should stabilize. (if enabled, Trailer Sway
A
B