2021 LEXUS RX350 equipped
[x] Cancel search: equippedPage 112 of 508

1123-2. Opening, closing and locking the doors
NOTICE
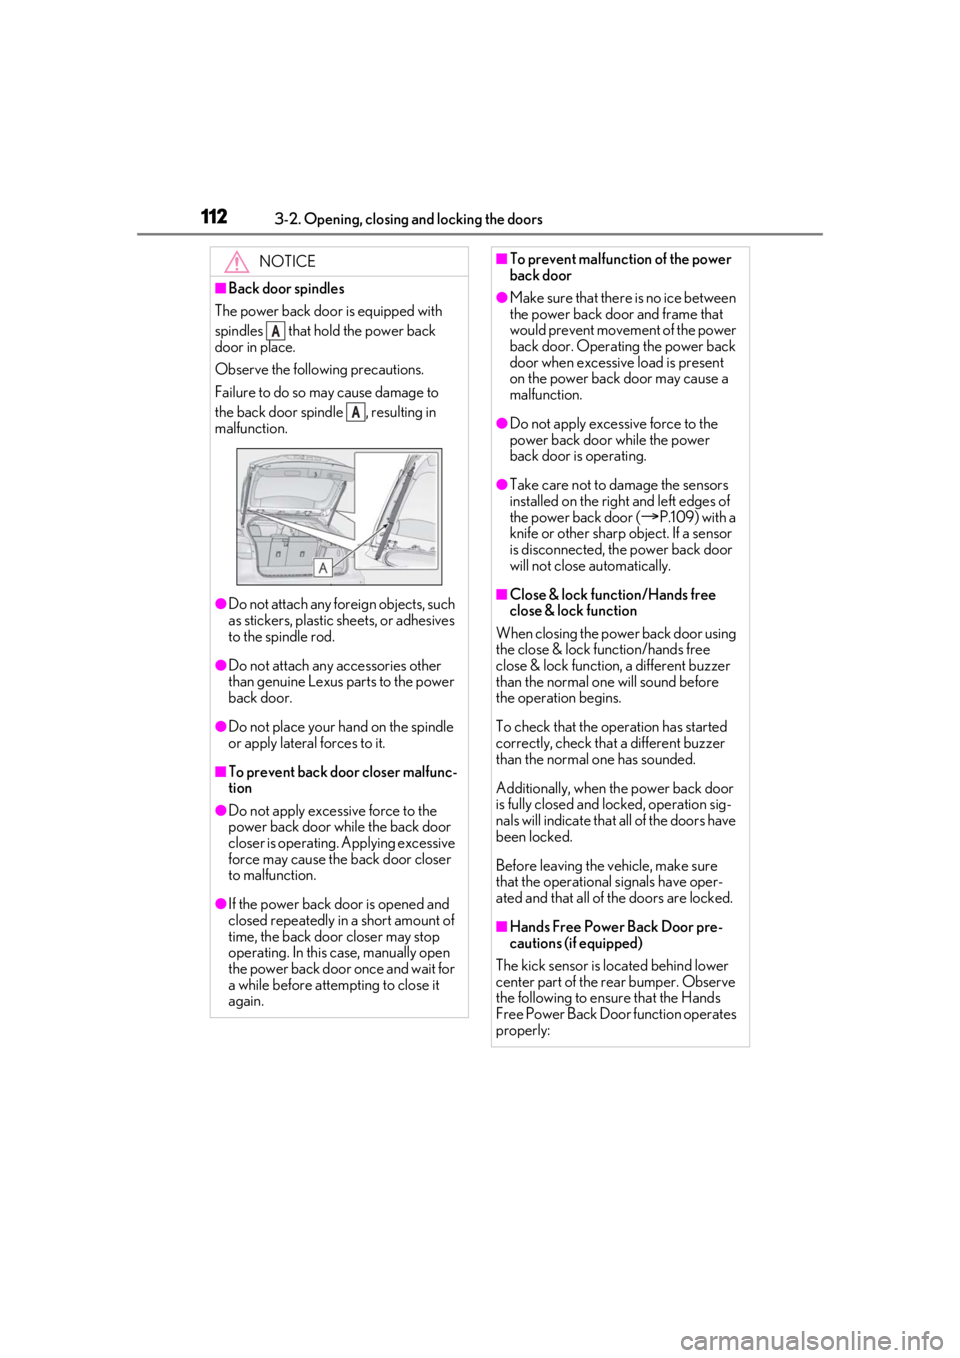
■Back door spindles
The power back door is equipped with
spindles that hold the power back
door in place.
Observe the following precautions.
Failure to do so may cause damage to
the back door spindle , resulting in
malfunction.
●Do not attach any foreign objects, such
as stickers, plastic sheets, or adhesives
to the spindle rod.
●Do not attach any accessories other
than genuine Lexus parts to the power
back door.
●Do not place your ha nd on the spindle
or apply lateral forces to it.
■To prevent back door closer malfunc-
tion
●Do not apply excessive force to the
power back door while the back door
closer is operating. Applying excessive
force may cause the back door closer
to malfunction.
●If the power back door is opened and
closed repeatedly in a short amount of
time, the back door closer may stop
operating. In this case, manually open
the power back door once and wait for
a while before attempting to close it
again.
A
A
■To prevent malfunction of the power
back door
●Make sure that there is no ice between
the power back door and frame that
would prevent movement of the power
back door. Operating the power back
door when excessive load is present
on the power back door may cause a
malfunction.
●Do not apply excessive force to the
power back door while the power
back door is operating.
●Take care not to damage the sensors
installed on the right and left edges of
the power back door (
P.109) with a
knife or other sharp object. If a sensor
is disconnected, the power back door
will not close automatically.
■Close & lock function/Hands free
close & lock function
When closing the power back door using
the close & lock function/hands free
close & lock function, a different buzzer
than the normal one will sound before
the operation begins.
To check that the operation has started
correctly, check that a different buzzer
than the normal one has sounded.
Additionally, when the power back door
is fully closed and locked, operation sig-
nals will indicate that all of the doors have
been locked.
Before leaving the vehicle, make sure
that the operational signals have oper-
ated and that all of the doors are locked.
■Hands Free Power Back Door pre-
cautions (if equipped)
The kick sensor is lo cated behind lower
center part of the rear bumper. Observe
the following to ensure that the Hands
Free Power Back Door function operates
properly:
Page 114 of 508

1143-2. Opening, closing and locking the doors
The Hands Free Power Back Door
(kick sensor) can be enabled/disabled
on the multi-information display.
( P.81)
1 Press or of the meter con-
trol switches and select .
2 Press or of the meter con-
trol switches, select the “Vehicle
Settings” and then press .
3 Press or of the meter con-
trol switches, select and
then press .
4 Press or of the meter con-
trol switches, and then select “Kick
Sensor”.
5 ON and OFF will be switched over
with presses of on the meter
control switches.
When OFF is selected and the operations
of the Hands Free Power Back Door is
made to stop from the of multi-infor-
mation display, unless it is set to ON, the
operation of the Hands Free Power Back
Door will not return. (No return in the
engine switch operation)
The open position of the power back-
door can be adjusted.
1 Stop the power back door at the
desired position. ( P.105) 2
Press and hold the switch on
the lower part of the power back
door for 2 seconds.
When setting is complete, a buzzer
will sound 4 times.
The next time the power back door
is opened, it will stop at that position.
■Returning the power back door opening
position to the default setting
Press and hold the switch on the
lower part of the power back door for 7
seconds.
A buzzer will sound twice. The next time
the power back door is opened, it will open
to the default position.
■Customization
The opening position can be set with the
navigation system or multimedia system.
Priority for the stop position is given to the
last position set by either the switch,
navigation system or multimedia system.
(Customizable features: P.461)
Canceling the Hands Free
Power Back Door (if equipped)
Adjusting the open position of
the power back door
Page 121 of 508

1213-3. Adjusting the seats
3
Before driving
3-3.Adjusting the seats
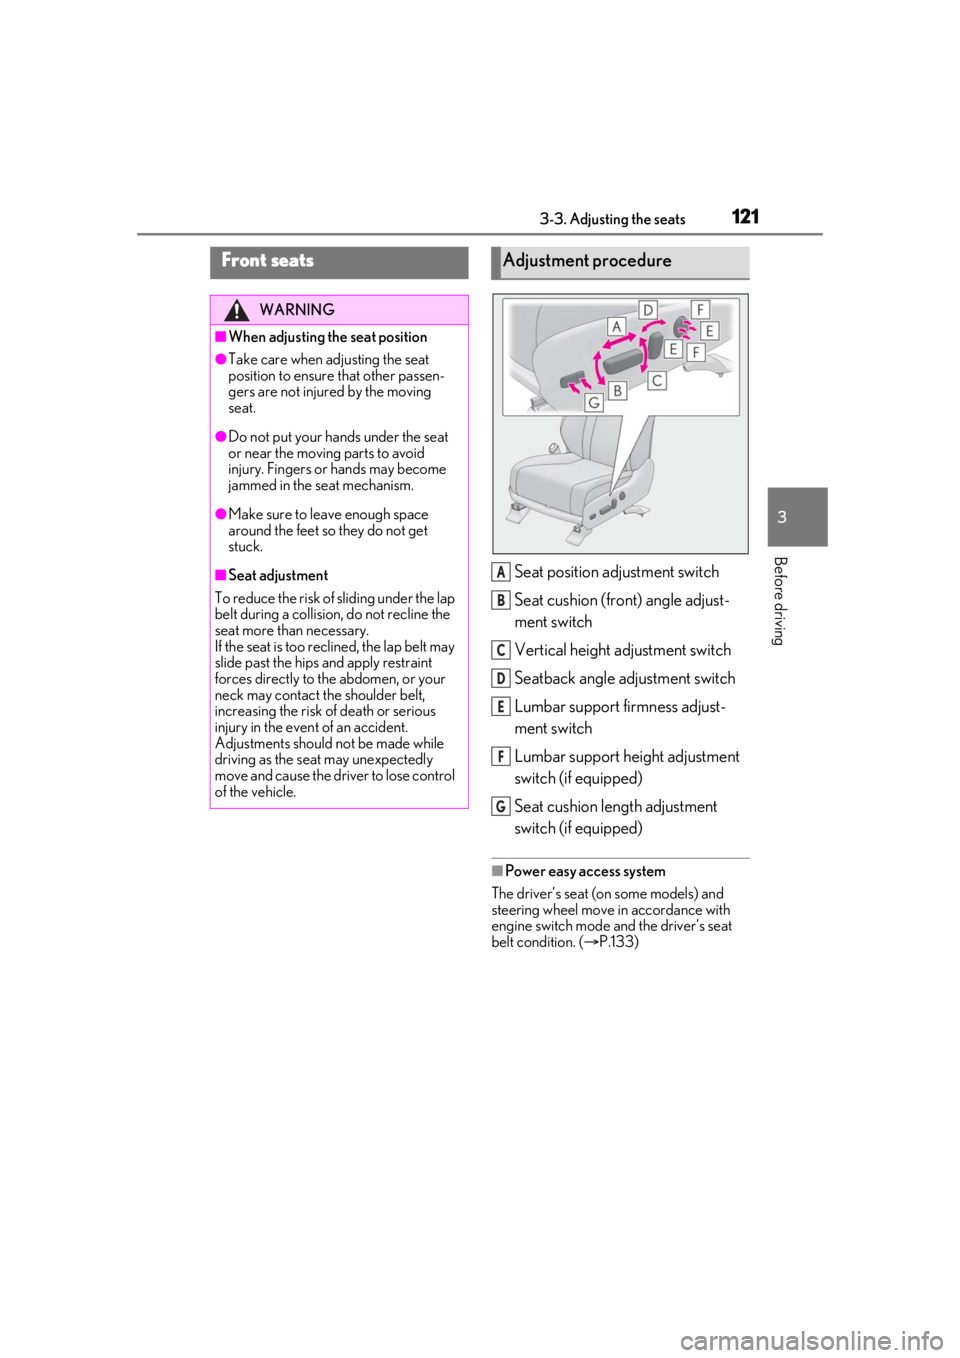
Seat position adjustment switch
Seat cushion (front) angle adjust-
ment switch
Vertical height adjustment switch
Seatback angle adjustment switch
Lumbar support firmness adjust-
ment switch
Lumbar support height adjustment
switch (if equipped)
Seat cushion length adjustment
switch (if equipped)
■Power easy access system
The driver’s seat (on some models) and
steering wheel move in accordance with
engine switch mode and the driver’s seat
belt condition. ( P.133)
Front seats
WARNING
■When adjusting the seat position
●Take care when ad justing the seat
position to ensure that other passen-
gers are not injured by the moving
seat.
●Do not put your hands under the seat
or near the moving parts to avoid
injury. Fingers or hands may become
jammed in the se at mechanism.
●Make sure to leave enough space
around the feet so they do not get
stuck.
■Seat adjustment
To reduce the risk of sliding under the lap
belt during a collision, do not recline the
seat more than necessary.
If the seat is too reclined, the lap belt may
slide past the hips and apply restraint
forces directly to the abdomen, or your
neck may contact the shoulder belt,
increasing the risk of death or serious
injury in the event of an accident.
Adjustments should not be made while
driving as the seat may unexpectedly
move and cause the driver to lose control
of the vehicle.
Adjustment procedure
A
B
C
D
E
F
G
Page 129 of 508

1293-3. Adjusting the seats
3
Before driving
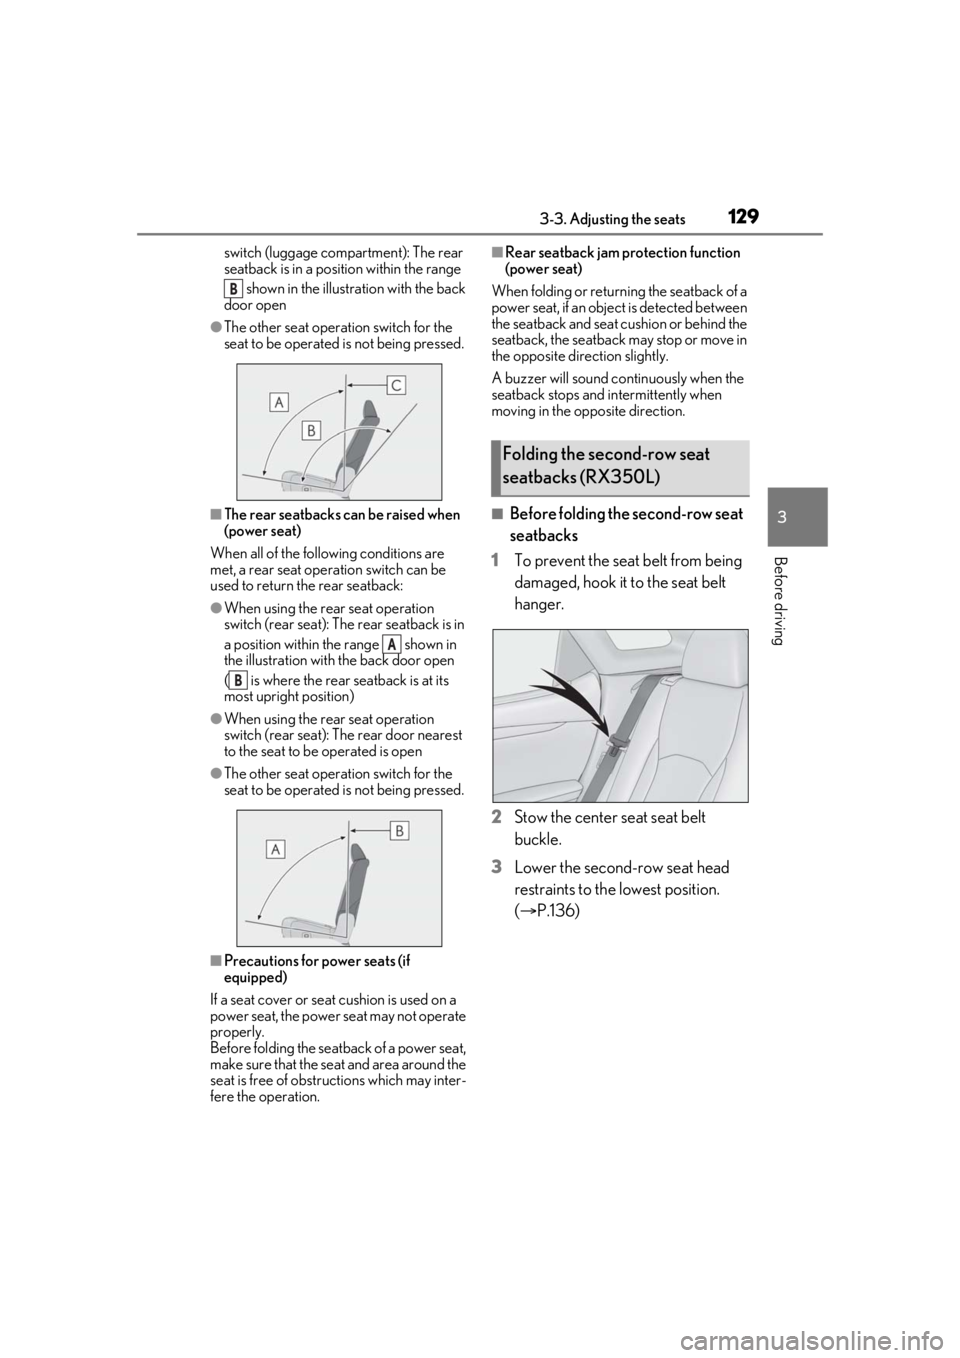
switch (luggage compartment): The rear
seatback is in a position within the range shown in the illustration with the back
door open
●The other seat operation switch for the
seat to be operated is not being pressed.
■The rear seatbacks can be raised when
(power seat)
When all of the following conditions are
met, a rear seat operation switch can be
used to return the rear seatback:
●When using the rear seat operation
switch (rear seat): The rear seatback is in
a position within the range shown in
the illustration with the back door open
( is where the rear seatback is at its
most upright position)
●When using the rear seat operation
switch (rear seat): The rear door nearest
to the seat to be operated is open
●The other seat operation switch for the
seat to be operated is not being pressed.
■Precautions for power seats (if
equipped)
If a seat cover or seat cushion is used on a
power seat, the power seat may not operate
properly.
Before folding the seat back of a power seat,
make sure that the seat and area around the
seat is free of obstru ctions which may inter-
fere the operation.
■Rear seatback jam protection function
(power seat)
When folding or return ing the seatback of a
power seat, if an object is detected between
the seatback and seat cushion or behind the
seatback, the seatback may stop or move in
the opposite direction slightly.
A buzzer will sound continuously when the
seatback stops and in termittently when
moving in the opposite direction.
■Before folding the second-row seat
seatbacks
1 To prevent the seat belt from being
damaged, hook it to the seat belt
hanger.
2 Stow the center seat seat belt
buckle.
3 Lower the second-row seat head
restraints to the lowest position.
(P.136)
B
A
B
Folding the second-row seat
seatbacks (RX350L)
Page 133 of 508

1333-3. Adjusting the seats
3
Before driving
procedure with two people.)
1Check that the seat is free of obstruc-
tions.
2 Press and hold the side switch of
the luggage compartment side switch
for the seat which the buzzer is sound-
ing.
3 Within 10 seconds of the performing
the above step, press the side
switch of the seat side switch 5 times.
4 When a buzzer sounds 3 times, release
the luggage compartment side switch.
5 Press the side switch of the seat
side switch until the seatback is folded
completely.
A buzzer will sound twice when the opera-
tion is complete.
If the buzzer does not stop sounding even
though the above procedure has been per-
formed, have the vehicle inspected by your
Lexus dealer.
*: If equipped
The seat and steering wheel are auto-
matically adjusted to allow the driver to
enter and exit the vehicle easily.
When all of the following have been
performed, the seat and steering
wheel are automatically adjusted to a
position that allows driver to enter and
exit the vehicle easily.
• The shift lever has been shifted to P.
• The engine switch has been turned off.
WARNING
■Precautions for third-row seat
When operating a third-row seat, make
sure to press and hold the switch until the
third-row seat seatba ck is completely
folded/upright. Do not use a third-row
seat in a position other than the com-
pletely upright position, as doing so may
lead to death or serious injury in an acci-
dent. (If the switch is released while the
seatback is still moving, a buzzer will
sound continuously until the seatback is
completely folded/upright.)
NOTICE
■Before returning th e third-row seat
seatbacks to the upright position
If the luggage cover is installed in the lug-
gage compartment, make sure to
remove it before re turning the third-row
seat seatbacks. ( P.318) Otherwise, the
luggage cover may be damaged.
Driving position memory*
This feature automatically adjusts
the driver’s seat (on some models),
steering wheel, outside rear view
mirrors and head-up display (if
equipped) to make entering and
exiting the vehicle easier or to suit
your preferences.
Up to 3 different driving positions
can be recorded.
Each electronic key can be regis-
tered to recall your preferred driv-
ing position.
Power easy access system
(driver’s side only)
Page 134 of 508

1343-3. Adjusting the seats
• The driver’s seat belt has been unfastened.
When any of the following has been
performed, the seat and steering
wheel automatically return to their
original positions.
• The engine switch has been turned to ACCESSORY mode or IGNI-
TION ON mode.
• The driver’s seat belt has been fas- tened.
■Operation of the power easy access sys-
tem
When exiting the vehicle, the power easy
access system may not operate if the seat is
already close to the rearmost position, etc.
■Customization
Some functions can be customized.
( P.461)
1 Check that the shift lever is in P.
2 Turn the engine switch to IGNI-
TION ON mode.
3 Adjust the driver’s seat, steering
wheel, outside rear view mirrors
and head-up display (if equipped)
to the desired positions.
4 While pressing the “SET” button, or
within 3 seconds after the “SET”
button is pressed, press button “1”,
“2” or “3” until the buzzer sounds.
If the selected button has already been
preset, the previously recorded position will be overwritten.
■Seat positions that can be memorized
(
P.121)
The adjusted positions other than the posi-
tion adjusted by lumb ar support switch can
be recorded.
■In order to correctly use the driving
position memory function
If a seat position is already in the furthest
possible position and the seat is operated in
the same direction, the recorded position
may be slightly differen t when it is recalled.
1Check that the shift lever is in P.
2 Turn the engine switch to IGNI-
TION ON mode.
Recording a driving position into
memoryWARNING
■Seat adjustme nt caution
Take care during seat adjustment so that
the seat does not strike the rear passen-
ger or squeeze your body against the
steering wheel.
Recalling a driving position
Page 136 of 508

1363-3. Adjusting the seats
■Recall procedure
1 Make sure that the doors are
locked before recalling the driving
position. Carry the electronic key
that has been registered to the driv-
ing position, and then unlock and
open the driver’s door using the
smart access system with push-but-
ton start or wireless remote control.
The driving position will move to the
recorded position (not including the steer-
ing wheel and head-up display [if
equipped]). However, the seat will move to
a position slightly behind the recorded
position in order to make entering the vehi-
cle easier.
If the driving position is in a position that
has already been recorded, the seat and
outside rear view mirrors will not move.
2Turn the engine switch to ACCES-
SORY mode or IGNITION ON
mode, or fasten a seat belt.
The seat, steering wheel and head-up dis-
play (if equipped) will move to the
recorded position.
■Recalling the driving position using the
memory recall function
●Different driving positions can be regis-
tered for each electronic key. Therefore,
the driving position that is recalled may
be different depending on the key being
carried.
●If a door other than the driver’s door is
unlocked with the smart access system
with push-button start, the driving posi-
tion cannot be recalled. In this case, press
the driving position button which has
been set.
■Customization
Some functions can be customized.
( P.461)
■Front seats
1 Up
Pull the head restraints up.
2Down
Push the head restra int down while press-
ing the lock release button .
Head restraints
Head restraints are provided for all
seats.
WARNING
■Head restraint precautions
Observe the following precautions
regarding the head re straints. Failure to
do so may result in death or serious
injury.
●Use the head restraints designed for
each respective seat.
●Adjust the head restraints to the cor-
rect position at all times.
●After adjusting the head restraints,
push down on them and make sure
they are locked in position.
●Do not drive with the head restraints
removed.
Adjusting a head restraint verti-
cally
A
Page 137 of 508

1373-3. Adjusting the seats
3
Before driving
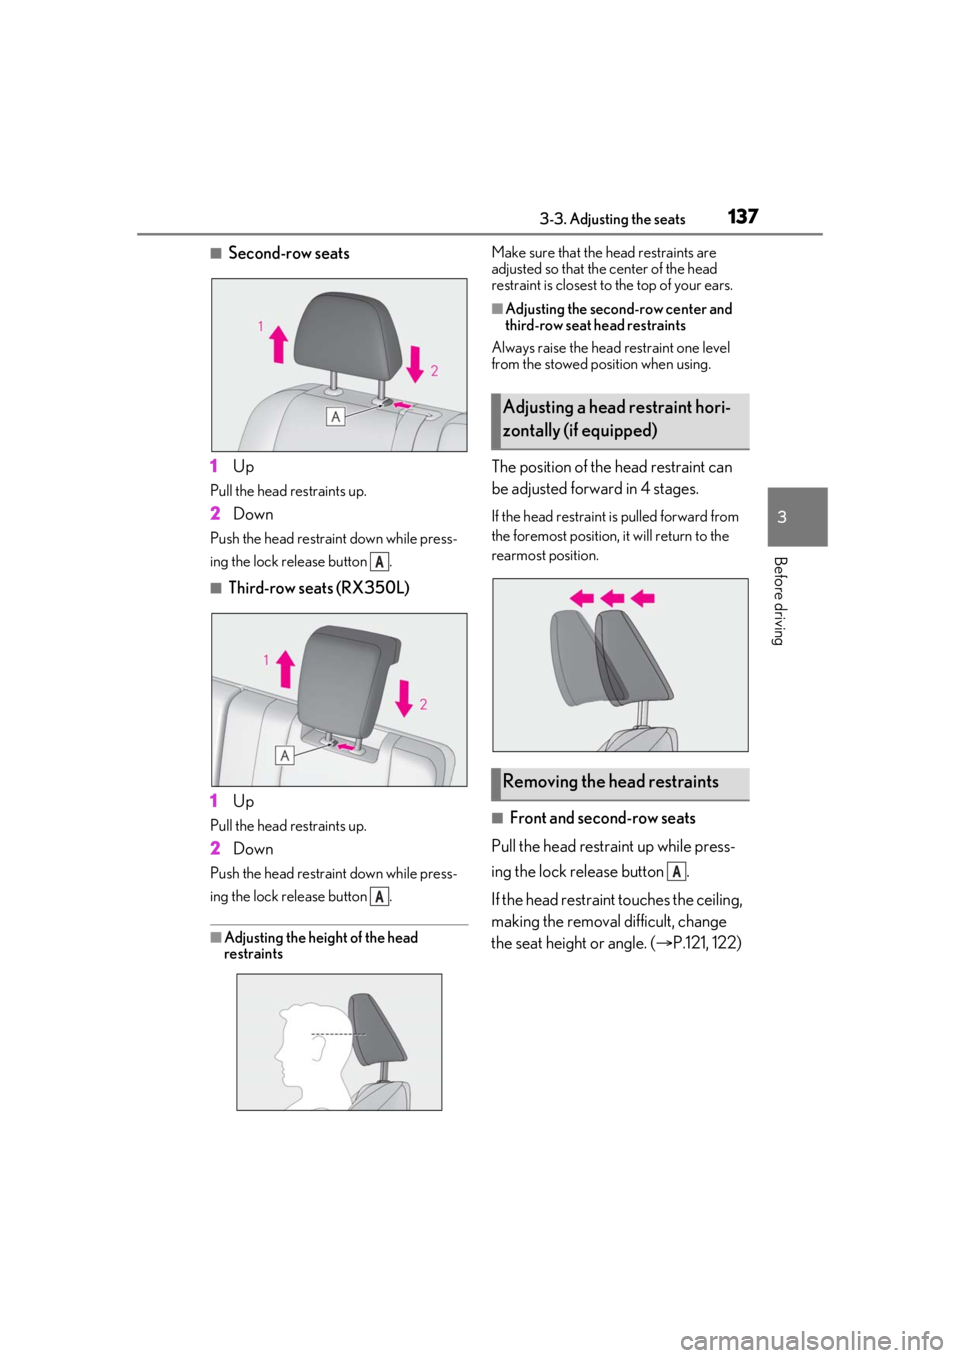
■Second-row seats
1 Up
Pull the head restraints up.
2Down
Push the head restraint down while press-
ing the lock release button .
■Third-row seats (RX350L)
1 Up
Pull the head restraints up.
2Down
Push the head restraint down while press-
ing the lock release button .
■Adjusting the height of the head
restraints Make sure that the head restraints are
adjusted so that the center of the head
restraint is closest to the top of your ears.
■Adjusting the second-row center and
third-row seat head restraints
Always raise the head restraint one level
from the stowed position when using.
The position of the head restraint can
be adjusted forward in 4 stages.
If the head restraint is pulled forward from
the foremost position, it will return to the
rearmost position.
■Front and second-row seats
Pull the head restraint up while press-
ing the lock release button .
If the head restraint touches the ceiling,
making the removal difficult, change
the seat height or angle. ( P.121, 122)
A
A
Adjusting a head restraint hori-
zontally (if equipped)
Removing the head restraints
A