Page 57 of 508

571-2. Child safety
1
For safety and security
■Anchor brackets (for top tether
strap)
Anchor brackets are provided for the
following seats:
Use anchor brackets when fixing the
top tether strap.
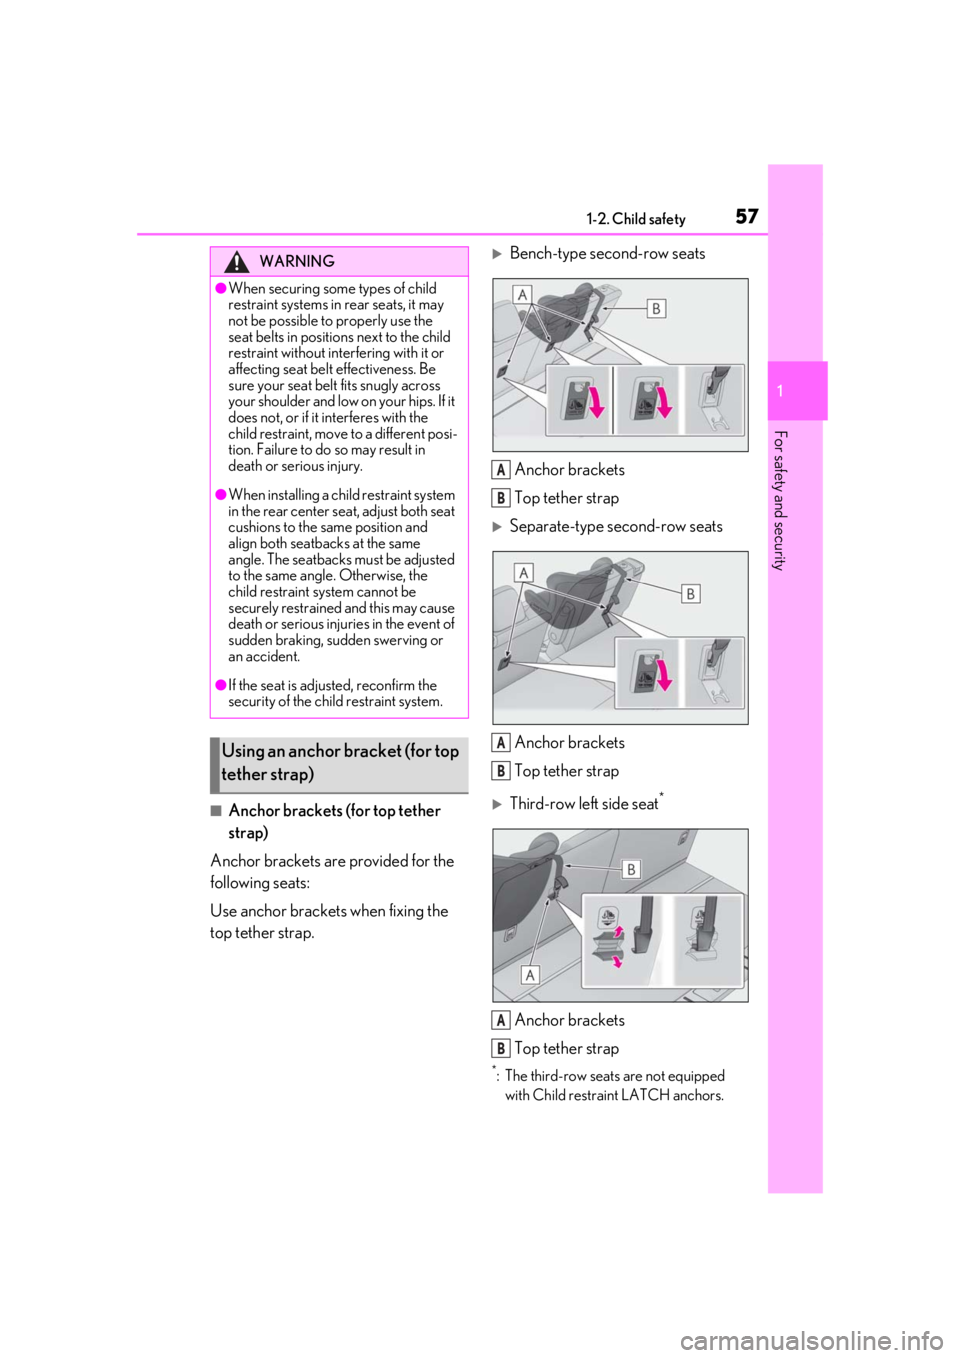
Bench-type second-row seats
Anchor brackets
Top tether strap
Separate-type second-row seats
Anchor brackets
Top tether strap
Third-row left side seat*
Anchor brackets
Top tether strap
*: The third-row seats are not equipped with Child restra int LATCH anchors.
WARNING
●When securing some types of child
restraint systems in rear seats, it may
not be possible to properly use the
seat belts in position s next to the child
restraint without inte rfering with it or
affecting seat belt effectiveness. Be
sure your seat belt fits snugly across
your shoulder and low on your hips. If it
does not, or if it interferes with the
child restraint, move to a different posi-
tion. Failure to do so may result in
death or serious injury.
●When installing a child restraint system
in the rear center seat, adjust both seat
cushions to the same position and
align both seatbacks at the same
angle. The seatbacks must be adjusted
to the same angle. Otherwise, the
child restraint system cannot be
securely restrained and this may cause
death or serious injuri es in the event of
sudden braking, sudden swerving or
an accident.
●If the seat is adju sted, reconfirm the
security of the child restraint system.
Using an anchor bracket (for top
tether strap)
A
B
A
B
A
B
Page 59 of 508

591-2. Child safety
1
For safety and security
■Laws and regulations pertaining to
anchors
The LATCH system conforms to
FMVSS225 or CMVSS210.2.
Child restraint systems conforming to
FMVSS213 or CMVSS213 specifications
can be used.
This vehicle is designed to conform to SAE
J1819.
WARNING
■When installing a child restraint sys-
tem
Observe the following precautions.
Failure to do so may result in death or
serious injury.
●Firmly attach the top tether strap and
make sure that the belt is not twisted.
●Do not attach the top strap to anything
other than the anchor bracket of the
seat the child restraint system is
installed to.
●Follow all installation instructions pro-
vided by the child restraint system
manufacturer.
●When installing the child restraint sys-
tem with the head restraint being
raised, after the head restraint has
been raised and then the anchor
bracket has been fixed, do not lower
the head restraint.
●When installing a child restraint system
in the rear center seat, adjust both seat
cushions to the same position and
align both seatbacks at the same
angle. The seatbacks must be adjusted
to the same angle. Otherwise, the
child restraint system cannot be
securely restrained and this may cause
death or serious injuri es in the event of
sudden braking, sudden swerving or
an accident.
●If the seat is adju sted, reconfirm the
security of the child restraint system.
NOTICE
■Anchor brackets (for top tether
strap)
When not in use, make certain to close
the lid. If it remains open, the lid may be
damaged.
Page 73 of 508

732-1. Instrument cluster
2
Vehicle status information and indicators
Warning lights inform the driver of mal-
functions in the indicated vehicle’s sys-
tems.
Warning lights
(U.S.A.)
Brake system warning light*1
( P.403)
(red)
(Canada)
Brake system warning light*1
( P.403)
(yellow)
Brake system warning light*1
( P.403)
High coolant temperature
warning light
*2 ( P.403)
Charging system warning
light
*3 ( P.404)
Low engine oil pressure warn-
ing light
*2 ( P.404)
(U.S.A.)
Malfunction indicator lamp*1
( P.404)
(Canada)
Malfunction indicator lamp*1
( P.404)
SRS warning light
*1 ( P.404)
(U.S.A.)
ABS warning light*1 ( P.405)
(Canada)
ABS warning light*1 ( P.405)
Brake Override System warn-
ing light/Drive-Start Control
warning light
*2 ( P.405)
(red)
Electric power st eering system
warning light
*1 ( P.405)
(yellow)
Electric power steering system
warning light
*1 ( P.405)
Low fuel level warning light
( P.406)
Driver’s and front passenger’s
seat belt reminder light
( P.406)
(RX350)
Rear passengers’ seat
belt reminder light
*4
( P.406)
(RX350L)
Rear passengers’ seat
belt reminder
light
*4( P.406)
Tire pressure warning light
*1
( P.407)
(orange)
LTA indicator ( P.407)
(flashes)
Intuitive parking assist OFF indi-
cator
*1 (if equipped) ( P.407)
(flashes)
RCTA OFF indicator*1 (if
equipped) ( P.407)
(flashes)
PKSB OFF indicator*1 (if
equipped) ( P.408)
(flashes or
illuminates)PCS warning light*1 ( P.408)
Slip indicator
*1 ( P.408)
(flashes)
(U.S.A.)
Parking brake indicator
( P.409)
(flashes)
(Canada)
Parking brake indicator
( P.409)
Page 121 of 508

1213-3. Adjusting the seats
3
Before driving
3-3.Adjusting the seats
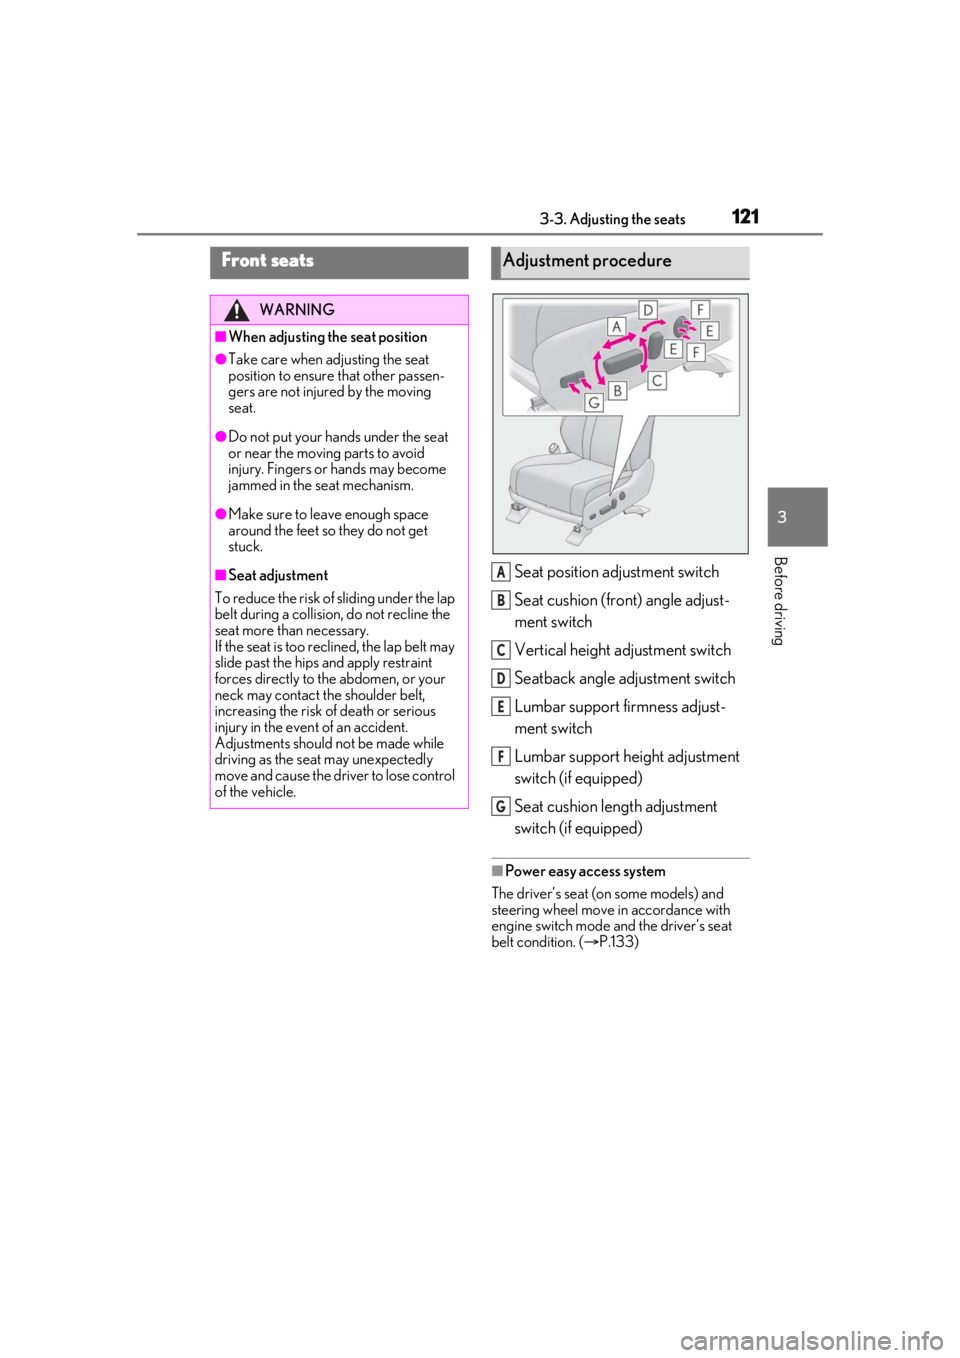
Seat position adjustment switch
Seat cushion (front) angle adjust-
ment switch
Vertical height adjustment switch
Seatback angle adjustment switch
Lumbar support firmness adjust-
ment switch
Lumbar support height adjustment
switch (if equipped)
Seat cushion length adjustment
switch (if equipped)
■Power easy access system
The driver’s seat (on some models) and
steering wheel move in accordance with
engine switch mode and the driver’s seat
belt condition. ( P.133)
Front seats
WARNING
■When adjusting the seat position
●Take care when ad justing the seat
position to ensure that other passen-
gers are not injured by the moving
seat.
●Do not put your hands under the seat
or near the moving parts to avoid
injury. Fingers or hands may become
jammed in the se at mechanism.
●Make sure to leave enough space
around the feet so they do not get
stuck.
■Seat adjustment
To reduce the risk of sliding under the lap
belt during a collision, do not recline the
seat more than necessary.
If the seat is too reclined, the lap belt may
slide past the hips and apply restraint
forces directly to the abdomen, or your
neck may contact the shoulder belt,
increasing the risk of death or serious
injury in the event of an accident.
Adjustments should not be made while
driving as the seat may unexpectedly
move and cause the driver to lose control
of the vehicle.
Adjustment procedure
A
B
C
D
E
F
G
Page 122 of 508

1223-3. Adjusting the seats
Rear seats
WARNING
■When a rear seatback is folded
Observe the following precautions.
Failure to do so may result in death or
serious injury.
●Do not fold down the rear seatbacks
while driving.
●Stop the vehicle on level ground, apply
the parking brake and shift the shift
lever to P.
●Do not allow anyone to sit on a folded
rear seatback or in the luggage com-
partment while driving.
●Do not allow children to enter the lug-
gage compartment.
■When operating the rear seatback
Observe the following precautions.
Failure to do so may result in death or
serious injury.
●Make sure that passengers are clear of
the rear seatback before operating it.
●To prevent hands and other body parts
from being caught, keep them away
from the gaps in the seats and the mov-
ing parts of the seat s when operating a
rear seatback.
●Power seat: Do not let children oper-
ate the rear seatback. Other passen-
gers may get caught in the seat.
●Power seat: Make sure that all passen-
gers are clear of a seat before folding
it. Do not let passeng ers sit in the seat
while it is being folded.
■Seat adjustment
Second-row seats: To reduce the risk of
sliding under the lap belt during a colli-
sion, do not recline the seat more than
necessary.
If the seat is reclin ed excessively, the lap
belt may slide past the hips and apply
restraint forces directly to the abdomen,
or your neck may contact the shoulder
belt, increasing the ri sk of death or seri-
ous injury in the event of an accident.
■After adjusting the rear seats
Observe the following precautions.
Failure to do so may result in death or
serious injury.
●Make sure that the rear seatback is
securely locked in position by lightly
pushing it back and forth.
●Check that the seat belts are not
twisted or caught between or behind
in the rear seatback.
●Arrange the seat belts in the proper
positions for ready use.
■Jam protection function (power seat)
Observe the following precautions.
Failure to do so may result in death or
serious injury.
●Never use any part of your body to
intentionally activa te the jam protec-
tion function.
●The jam protection function may not
operate if something is caught just
before the fully folded position. Be
careful so that finger s, etc. do not get
caught.
●The jam protection function may not
operate depending on the shape or
position of the obstruction. Be careful
so that fingers, etc. do not get caught.
Page 123 of 508
1233-3. Adjusting the seats
3
Before drivingManual seatSeatback angle adjustment lever
Seat position adjustment lever
NOTICE
■Before folding a rear seat seatback
●Second-row seats: Make sure to stow
the center seat seat belt buckle and
armrest before folding the second-row
seat seatbacks. ( P.330)
●Third-row seats: Ma ke sure that the
third-row seats and trays are free of
obstructions before folding the seat-
backs. Otherwise the seat or tray may
be damaged.
Adjustment procedure (RX350)
A
B
Page 126 of 508
1263-3. Adjusting the seats
Third-row seatsRight seat fold switch ( P.132)
Right seat return switch ( P.132)
Left seat fold switch ( P.132)
Left seat return switch ( P.132)
■Before folding the rear seatbacks
1 Stow the center seat seat belt
buckle.
2 Lower the rear seat head restraints
to the lowest position. ( P.136)
■Folding the rear seatbacks (manual
seat)
Using the seatback angle adjust-
ment lever
Pull the lever and fold the rear seat-
back.
Using the lever in the luggage com-
partment
Pull the lever and fold the rear seat-
back.
A
B
C
D
Folding the second-row seat
seatbacks (RX350)
Page 127 of 508

1273-3. Adjusting the seats
3
Before driving
■Folding the rear seatbacks (power
seat)
Press and hold the fold switch until the
rear seatback begins to operate.
A buzzer will sound and then the operation
will start. When th e operation is com-
pleted, the buzzer will sound again.
To stop the operation partway, press either
side of the switch fo r the operating seat.
Any rear seat operation switch for the
operating seat, regardless of location, can
be used to stop the operation. (A buzzer
may sound depending on the position that
the rear seatback is stopped.)
Using the seatback angle adjust-
ment switch
If the rear seatback is reclined, adjust it
to the most upright position and then
press the switch again.
Using the switch in the luggage
compartment
■Returning the rear seatbacks
(manual seat)
1 Lift the rear seatback until it locks in
position.
2 Check that the plate of the seat belt
is on the front side of the seatback.
■Returning the rear seatbacks
(power seat)
1 Press and hold the return switch
until the rear seatback begins to
operate.