2021 LEXUS RX350 warning light
[x] Cancel search: warning lightPage 104 of 508

1043-2. Opening, closing and locking the doors
■Smart access system with
push-button start
Carry the electronic key to enable this
function. 1
Locks all the doors
Check that the door is securely locked.
2Unlocks all the doors
The doors cannot be unlocked for 3 sec-
onds after the doors are locked.
■Wireless remote control
P.97
■Door lock switch
P.101
■Opening/closing the power back
door using the wireless remote
control
Press and hold the switch for approxi-
mately 1 second.
The power back door can be operated
whether it is locked
* or unlocked.
Pressing the switch while the power back
door is opening/closing will stop the oper-
ation.
Pressing and holding the switch again for
approximately 1 second will operate the
power back door in the opposite direction.
WARNING
●When closing the power back door,
take extra care to prevent your fingers,
etc., from being caught.
●When closing the power back door,
make sure to press it lightly on its outer
surface. If the back d oor handle is used
to fully close the power back door, it
may result in hands or arms being
caught.
●Do not pull on the back door spindle
(P.112) to close the power back
door, and do not hang on the back
door spindle.
Doing so may cause hands to be caught
or the back door spindle to break, caus-
ing an accident.
●If a bicycle carrier or similar heavy
object is attached to the power back
door, it may suddenly shut again after
being opened, causing someone’s
hands, arms, head or neck to be
caught and injured. When installing an
accessory part to the power back
door, using a genuine Lexus part is
recommended.
Unlocking and locking the
power back door from the out-
side
Unlocking and locking the
power back door from the inside
Opening/closing the power back
door
Page 110 of 508

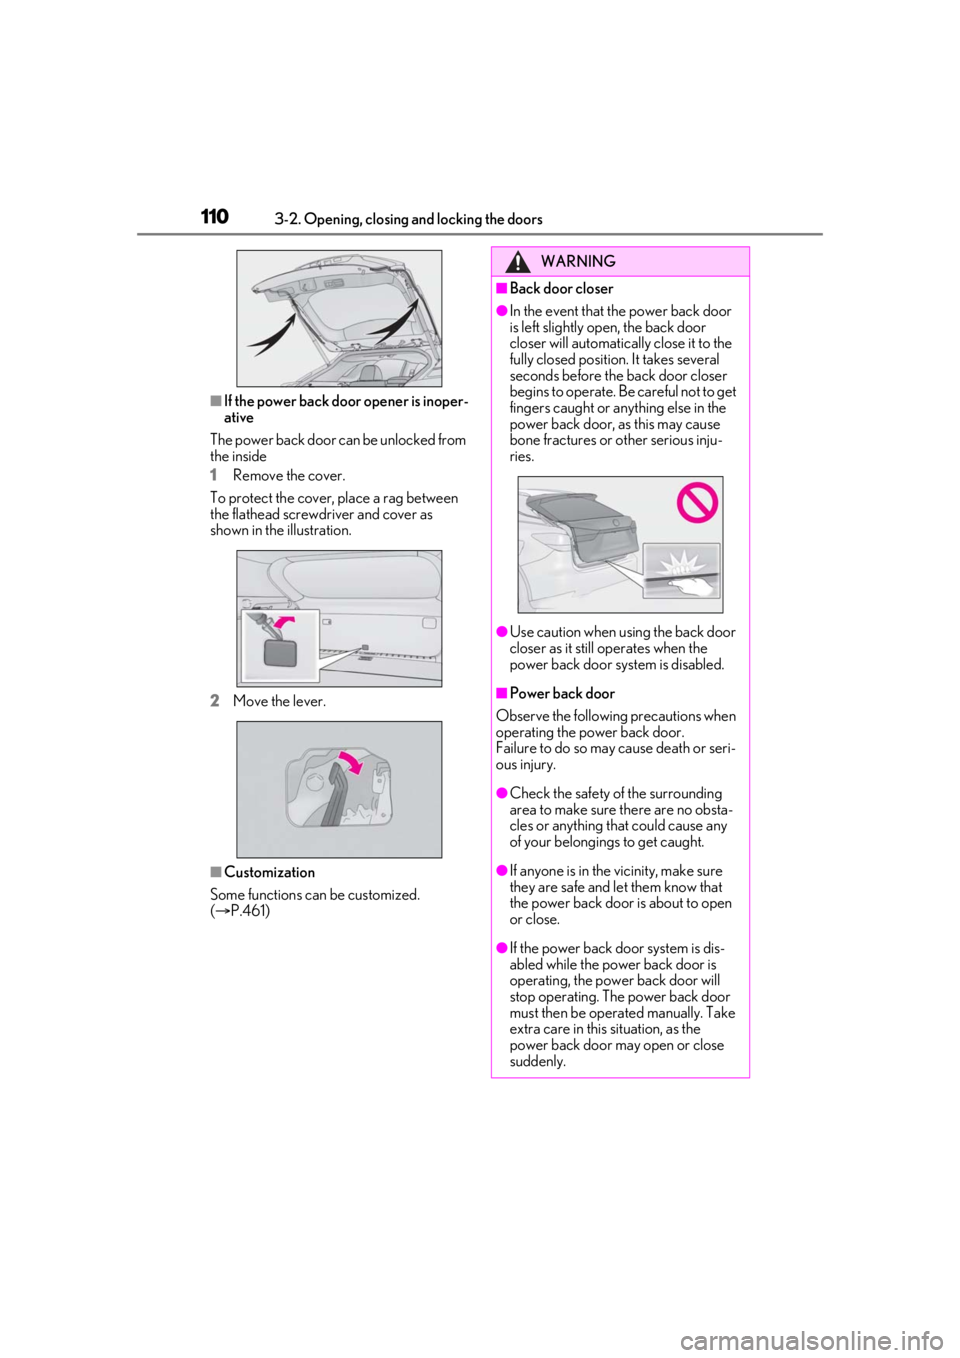
1103-2. Opening, closing and locking the doors
■If the power back door opener is inoper-
ative
The power back door can be unlocked from
the inside
1 Remove the cover.
To protect the cover, place a rag between
the flathead screwdriver and cover as
shown in the illustration.
2 Move the lever.
■Customization
Some functions can be customized.
( P.461)
WARNING
■Back door closer
●In the event that the power back door
is left slightly open, the back door
closer will automatically close it to the
fully closed position. It takes several
seconds before the back door closer
begins to operate. Be careful not to get
fingers caught or anything else in the
power back door, as this may cause
bone fractures or other serious inju-
ries.
●Use caution when using the back door
closer as it still operates when the
power back door system is disabled.
■Power back door
Observe the following precautions when
operating the power back door.
Failure to do so may cause death or seri-
ous injury.
●Check the safety of the surrounding
area to make sure there are no obsta-
cles or anything that could cause any
of your belongings to get caught.
●If anyone is in the vicinity, make sure
they are safe and let them know that
the power back door is about to open
or close.
●If the power back door system is dis-
abled while the powe r back door is
operating, the power back door will
stop operating. The power back door
must then be operated manually. Take
extra care in this situation, as the
power back door may open or close
suddenly.
Page 118 of 508

1183-2. Opening, closing and locking the doors
detection area, it may take slightly longer
to unlock the doors after the door handle
is gripped.
●Fingernails may scrape against the door
during operation of the door handle. Be
careful not to injure fingernails or dam-
age the surface of the door.
■When the vehicle is not driven for
extended periods
●To prevent theft of the vehicle, do not
leave the electronic key within 6 ft. (2 m)
of the vehicle.
●The smart access syst em with push-but-
ton start can be deactivated in advance.
●Setting the electronic key to battery-sav-
ing mode helps to reduce key battery
depletion. ( P.116)
■To operate the system properly
Make sure to carry the electronic key when
operating the system. Do not get the elec-
tronic key too close to the vehicle when
operating the system from the outside of the
vehicle.
Depending on the position and holding
condition of the electronic key, the key may
not be detected correctly and the system
may not operate properly. (The alarm may
go off accidentally, or the door lock preven-
tion may not operate.)
■If the smart access system with
push-button start does not operate
properly
●If the doors cannot be locked or unlocked
and the back door cannot be opened,
perform the following.
• Bring the electronic key close to the door handle and perform a lock or unlock
operation.
• Bring the electronic key close to the but- ton on the back door ( P.104) and press
the button.
• Use the wireless remote control.
If the doors cannot be locked or unlocked
by perform the above, use the mechanical
key. ( P.431) However, if the mechanical
key is used while the al arm system is set, the
warning will sound. ( P.68)
●If the engine cannot be started, refer to
P.432
■Customization
Some functions can be customized.
( P.461)
■If the smart access system with
push-button start has been deactivated
in a customized setting
●Locking and unlockin g the doors: Use
the wireless remote control or mechani-
cal key. ( P.99, 104, 431)
●Starting the engine and changing engine
switch modes: P.432
●Stopping the engine: P.176
Page 122 of 508

1223-3. Adjusting the seats
Rear seats
WARNING
■When a rear seatback is folded
Observe the following precautions.
Failure to do so may result in death or
serious injury.
●Do not fold down the rear seatbacks
while driving.
●Stop the vehicle on level ground, apply
the parking brake and shift the shift
lever to P.
●Do not allow anyone to sit on a folded
rear seatback or in the luggage com-
partment while driving.
●Do not allow children to enter the lug-
gage compartment.
■When operating the rear seatback
Observe the following precautions.
Failure to do so may result in death or
serious injury.
●Make sure that passengers are clear of
the rear seatback before operating it.
●To prevent hands and other body parts
from being caught, keep them away
from the gaps in the seats and the mov-
ing parts of the seat s when operating a
rear seatback.
●Power seat: Do not let children oper-
ate the rear seatback. Other passen-
gers may get caught in the seat.
●Power seat: Make sure that all passen-
gers are clear of a seat before folding
it. Do not let passeng ers sit in the seat
while it is being folded.
■Seat adjustment
Second-row seats: To reduce the risk of
sliding under the lap belt during a colli-
sion, do not recline the seat more than
necessary.
If the seat is reclin ed excessively, the lap
belt may slide past the hips and apply
restraint forces directly to the abdomen,
or your neck may contact the shoulder
belt, increasing the ri sk of death or seri-
ous injury in the event of an accident.
■After adjusting the rear seats
Observe the following precautions.
Failure to do so may result in death or
serious injury.
●Make sure that the rear seatback is
securely locked in position by lightly
pushing it back and forth.
●Check that the seat belts are not
twisted or caught between or behind
in the rear seatback.
●Arrange the seat belts in the proper
positions for ready use.
■Jam protection function (power seat)
Observe the following precautions.
Failure to do so may result in death or
serious injury.
●Never use any part of your body to
intentionally activa te the jam protec-
tion function.
●The jam protection function may not
operate if something is caught just
before the fully folded position. Be
careful so that finger s, etc. do not get
caught.
●The jam protection function may not
operate depending on the shape or
position of the obstruction. Be careful
so that fingers, etc. do not get caught.
Page 134 of 508

1343-3. Adjusting the seats
• The driver’s seat belt has been unfastened.
When any of the following has been
performed, the seat and steering
wheel automatically return to their
original positions.
• The engine switch has been turned to ACCESSORY mode or IGNI-
TION ON mode.
• The driver’s seat belt has been fas- tened.
■Operation of the power easy access sys-
tem
When exiting the vehicle, the power easy
access system may not operate if the seat is
already close to the rearmost position, etc.
■Customization
Some functions can be customized.
( P.461)
1 Check that the shift lever is in P.
2 Turn the engine switch to IGNI-
TION ON mode.
3 Adjust the driver’s seat, steering
wheel, outside rear view mirrors
and head-up display (if equipped)
to the desired positions.
4 While pressing the “SET” button, or
within 3 seconds after the “SET”
button is pressed, press button “1”,
“2” or “3” until the buzzer sounds.
If the selected button has already been
preset, the previously recorded position will be overwritten.
■Seat positions that can be memorized
(
P.121)
The adjusted positions other than the posi-
tion adjusted by lumb ar support switch can
be recorded.
■In order to correctly use the driving
position memory function
If a seat position is already in the furthest
possible position and the seat is operated in
the same direction, the recorded position
may be slightly differen t when it is recalled.
1Check that the shift lever is in P.
2 Turn the engine switch to IGNI-
TION ON mode.
Recording a driving position into
memoryWARNING
■Seat adjustme nt caution
Take care during seat adjustment so that
the seat does not strike the rear passen-
ger or squeeze your body against the
steering wheel.
Recalling a driving position
Page 136 of 508

1363-3. Adjusting the seats
■Recall procedure
1 Make sure that the doors are
locked before recalling the driving
position. Carry the electronic key
that has been registered to the driv-
ing position, and then unlock and
open the driver’s door using the
smart access system with push-but-
ton start or wireless remote control.
The driving position will move to the
recorded position (not including the steer-
ing wheel and head-up display [if
equipped]). However, the seat will move to
a position slightly behind the recorded
position in order to make entering the vehi-
cle easier.
If the driving position is in a position that
has already been recorded, the seat and
outside rear view mirrors will not move.
2Turn the engine switch to ACCES-
SORY mode or IGNITION ON
mode, or fasten a seat belt.
The seat, steering wheel and head-up dis-
play (if equipped) will move to the
recorded position.
■Recalling the driving position using the
memory recall function
●Different driving positions can be regis-
tered for each electronic key. Therefore,
the driving position that is recalled may
be different depending on the key being
carried.
●If a door other than the driver’s door is
unlocked with the smart access system
with push-button start, the driving posi-
tion cannot be recalled. In this case, press
the driving position button which has
been set.
■Customization
Some functions can be customized.
( P.461)
■Front seats
1 Up
Pull the head restraints up.
2Down
Push the head restra int down while press-
ing the lock release button .
Head restraints
Head restraints are provided for all
seats.
WARNING
■Head restraint precautions
Observe the following precautions
regarding the head re straints. Failure to
do so may result in death or serious
injury.
●Use the head restraints designed for
each respective seat.
●Adjust the head restraints to the cor-
rect position at all times.
●After adjusting the head restraints,
push down on them and make sure
they are locked in position.
●Do not drive with the head restraints
removed.
Adjusting a head restraint verti-
cally
A
Page 140 of 508

1403-4. Adjusting the steering wheel and mirrors
The height of the rear view mirror can
be adjusted to suit your driving pos-
ture.
Adjust the height of the rear view mir-
ror by moving it up and down.
Responding to the level of brightness
of the headlights of vehicles behind, the
reflected light is automatically
reduced.
Turn the automatic anti-glare function
mode on/off
When the automatic anti-glare function is
in ON mode, the indicator illuminates.
The function will set to ON mode each
time the engine switch is turned to IGNI-
TION ON mode.
Pressing the button turns the function to
OFF mode. (The indicator also turns
off.)
■To prevent sensor error
To ensure that the sensors operate properly,
do not touch or cover them.
Inside rear view mirror
The rear view mirror’s position can
be adjusted to enable sufficient
confirmation of the rear view.
Adjusting the height of rear view
mirror
WARNING
■Caution while driving
Do not adjust the position of the mirror
while driving.
Doing so may lead to mishandling of the
vehicle and cause an accident, resulting
in death or serious injury.
Anti-glare function
A
A
Page 141 of 508

1413-4. Adjusting the steering wheel and mirrors
3
Before driving
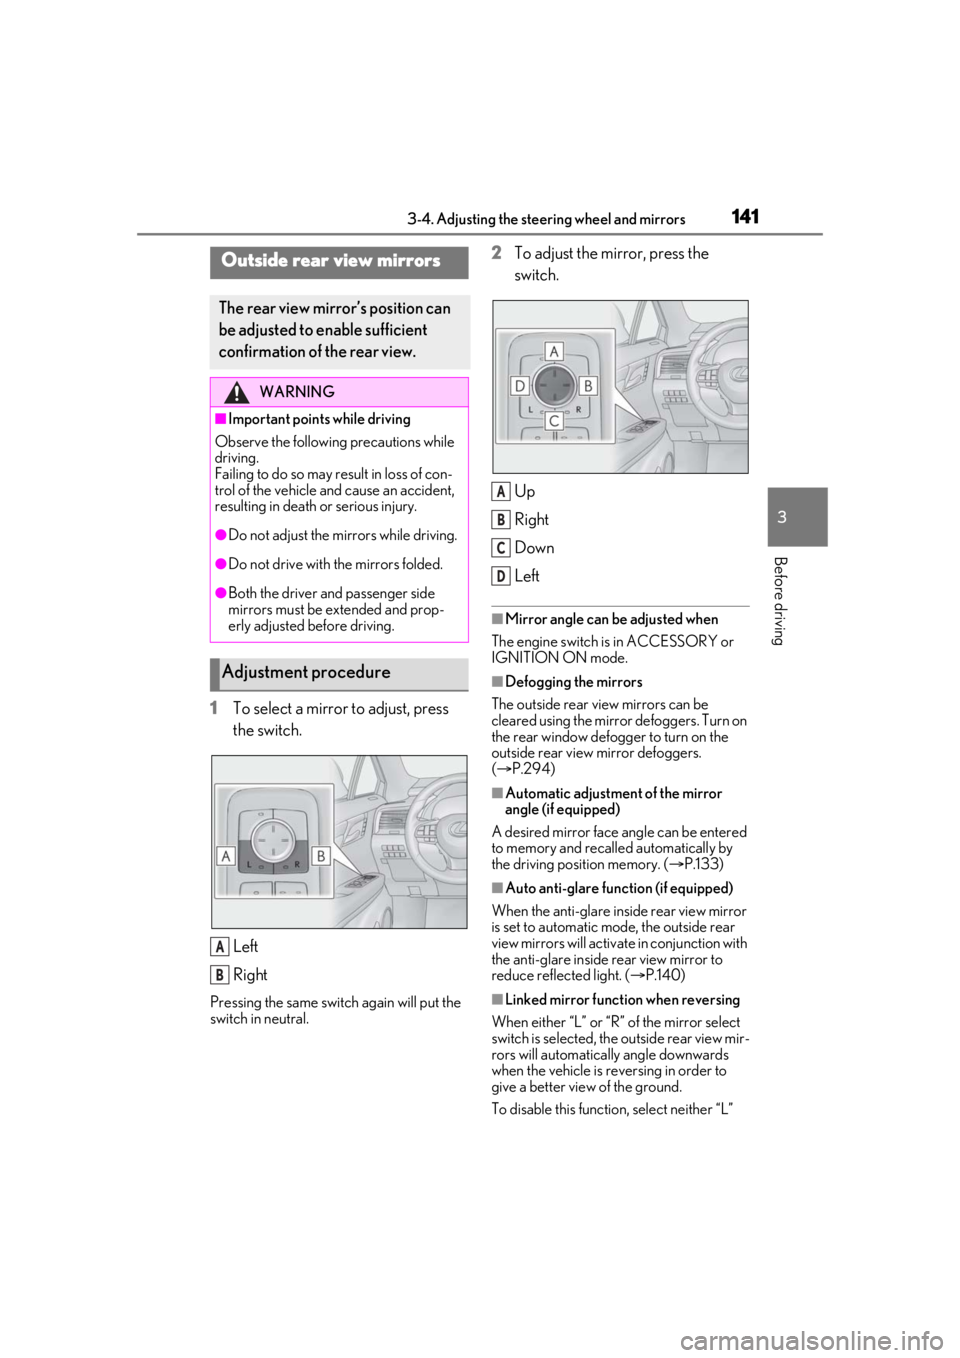
1To select a mirror to adjust, press
the switch.
Left
Right
Pressing the same switch again will put the
switch in neutral.
2To adjust the mirror, press the
switch.
Up
Right
Down
Left
■Mirror angle can be adjusted when
The engine switch is in ACCESSORY or
IGNITION ON mode.
■Defogging the mirrors
The outside rear view mirrors can be
cleared using the mirror defoggers. Turn on
the rear window defogger to turn on the
outside rear view mirror defoggers.
( P.294)
■Automatic adjustment of the mirror
angle (if equipped)
A desired mirror face angle can be entered
to memory and recalled automatically by
the driving position memory. ( P.133)
■Auto anti-glare function (if equipped)
When the anti-glare inside rear view mirror
is set to automatic mode, the outside rear
view mirrors will activate in conjunction with
the anti-glare inside rear view mirror to
reduce reflec ted light. (P.140)
■Linked mirror function when reversing
When either “L” or “R” of the mirror select
switch is selected, the outside rear view mir-
rors will automatically angle downwards
when the vehicle is re versing in order to
give a better view of the ground.
To disable this function, select neither “L”
Outside rear view mirrors
The rear view mirror’s position can
be adjusted to enable sufficient
confirmation of the rear view.
WARNING
■Important points while driving
Observe the following precautions while
driving.
Failing to do so may result in loss of con-
trol of the vehicle and cause an accident,
resulting in death or serious injury.
●Do not adjust the mirrors while driving.
●Do not drive with the mirrors folded.
●Both the driver and passenger side
mirrors must be extended and prop-
erly adjusted before driving.
Adjustment procedure
A
B
A
B
C
D