Page 49 of 70

Your vehicle’s audio system may
differ from that in the illustration.
For")
47
AUDIO SYSTEMS
AUDIO SYSTEMS
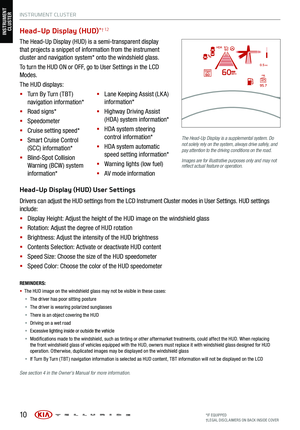
UVO link with Navigation† 1,15 – FM/AM/SiriusXM®†21/Media (USB, Bluetooth® Audio)
Your vehicle’s audio system may
differ from that in the illustration.
For further UVO link operations,
refer to the Car Infotainment
System Quick Reference
Guide. For other audio system
information, refer to pages 43-46 .
To help reduce driver distraction,
some audio system functionalities
have been modified while the
vehicle is in Drive, Reverse or
moved out of Park.
Sound Settings – To adjust the sound settings:
1. Press the SETUP key on the audio head unit. Select the onscreen SOUND
button
2. Select the menu item (Position, Volume, Tone, Priority, Navigation, Advanced,
Reset)
3. Use the onscreen buttons to adjust settings
Radio Presets – You can listen to FM, AM and SiriusXM
® radio and save
frequently used stations. How to Save a Preset – Press and hold the desired
slot. This saves the current station in the selected slot
SiriusXM
® Smart Favorites – For the first ten favorite SiriusXM® channels, you
may play live or repeat from the beginning of a song or a program segment. In
Radio mode, choose SiriusXM
®, then select any of the first ten favorites. During
song or program play, tap the Skip Backward icon to start from the beginning
of the song or program. Tap the Play Live icon to return to the live broadcast.
Custom Key
H: A programmable key to provide quick access to one of several
available system features. To Program the Custom Key: Press and hold the Custom key. Select one of the
available features you would like the Custom key to open.
MAP RADIO
N AV MEDIASEEK<
Page 50 of 70

§ Press button twice for medium setting (2 LEDs lit)
§ Press a thi")
48
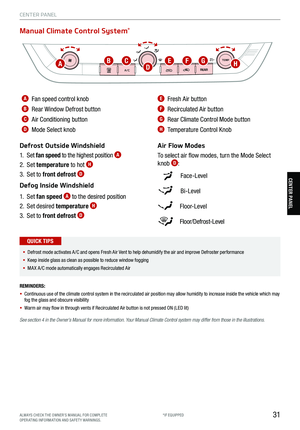
Seat Warmers† 20 / Ventilated Seats
Front Seats
Seat Warmers :
§ Press button
A up once for high setting (3 LEDs lit)
§ Press button twice for medium setting (2 LEDs lit)
§ Press a third time for low setting (1 LED lit) and again to turn OFF
§ Press and hold to turn off
Ventilated Seats :
§ Press button
A down once for high setting (3 LEDs lit)
§ Press twice for medium setting (2 LEDs lit)
§ Press a third time for low setting (1 LED lit) and again to turn OFF
§ Press and hold to turn off
(Buttons are located on center console in front of gear shift)
(Passenger controls shown)
REMINDERS:
§ Use extreme caution when using the seat warmers
to avoid burns. Refer to the Owner’s Manual for more
information
§ If the Auto Climate Control is on, the seat warmers or
ventilated seats may turn on automatically based on the
set temperature and ambient temperature
SEAT WARMERS AND
V ENTIL ATED SE AT S
VIDEO
To view a video on your
mobile device, snap this
QR Code or visit the listed
website. Refer to page 2
for more information.
www.youtube.com/KiaFeatureVideos
QR CODE
§ With the seat warmer switch in the ON position, the heating system
in the seat turns OFF or ON automatically depending on the seat
temperature
§ When the Climate Control System’s temperature is turned up to high
heat, the Seat Warmers turn on automatically
QUICK TIPS
S E AT I N G
A
See section 4 in the Owner’s Manual for more information.
SE ATING
*IF EQUIPPED
†LEG AL DISCL AIMERS ON BACK INSIDE COVER
Page 51 of 70

49
S E AT I N G
SE ATING
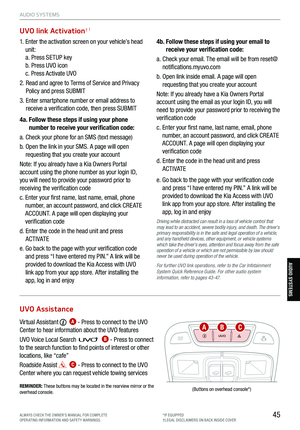
SeatbackLumbar Seat Cushion
Extension
Seat
Seat Cushion
REMINDER: Do not attempt to
adjust the seat while the vehicle is
moving. This could result in loss of
control of the vehicle.
(Located on side of driver’s seat)
REMINDERS:
§ Button may be hard to see if headrest is in its lowest position
§ Do not operate the vehicle with the headrests removed. Headrests can provide
critical neck and head support in an accident
Power Adjustable Driver’s Seat *† 18 , 19
Front Seat Headrest Adjustment *† 10
Move/Press controls to adjust Seat forward/backward, Seat Cushion tilt up/down, Seatback forward/
backward, Lumbar up/down/forward/backward or Seat Cushion Extension forward/backward.
To raise headrest: Pull headrest up.
To lower headrest: Press lock
E, then press the headrest down.
D
A
AABCD
E
B
C
See section 3 in the Owner’s Manual for more information. See
section 3 in the Owner’s Manual
for more information.
ALWAYS CHECK THE OWNER’S MANUAL FOR COMPLE TE
OPERATING INFORMATION AND SAFETY WARNINGS. *IF EQUIPPED
†LEG AL DISCL AIMERS ON BACK INSIDE COVER
Page 52 of 70
50
S E AT I N G
SE ATING
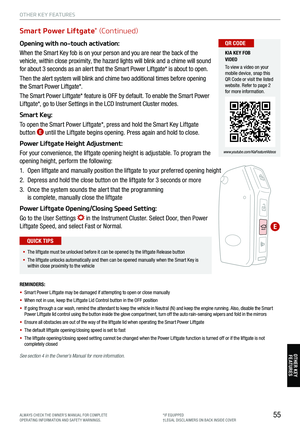
Driver Position Memory System*
The integrated system stores into memory the position of the
driver’s seat, outside rearview mirrors, and steering wheel
positions. To store positions into memory, first place the gear
shift into P (Park) while the Engine Start /Stop button is in the
ON position. Then:
1.
Adjust the driver’s seat, outside rearview mirrors, settings
and steering wheel positions
2.
Press the SET button
A on the control panel. System will
beep once
3.
Press one of the memory buttons 1 or 2
B within 4 seconds.
The system will beep twice when memory has been stored
SET
(Located on driver’s door control panel)
REMINDER: Do not attempt to operate the driver position memory system while the vehicle is moving. This could result in loss of control
of the vehicle.
B
B
A
See section 3 in the Owner’s Manual for more information.
*IF EQUIPPED
Page 53 of 70

51
S E AT I N G
SE ATING
CRUISE
CANCEL
RES
OK SET
This system is not a substitute
for one’s attention and may
not detect all movement within
the vehicle. Always check the
vehicle’s interior before exiting.
Images are for illustrative
purposes only and may not
reflect actual feature or
operation.
See section 4 in the Owner’s
Manual for more information.
Rear Occupant Alert (ROA) with Ultrasonic Sensors *†6
The Rear Occupant Alert (ROA) with Ultrasonic Sensors can help alert the
driver when rear passenger(s) are left in the rear seats using the ultrasonic
sensors and door monitoring. The system is designed to provide three
separate alerts:
§ The 1st alert is a message on the
Instrument Cluster, “Check Rear Seats”
A, and a chime will sound
After the 1st alert, when the doors are
locked and there is movement detected
in the rear seats, the horn will sound for
about 25 seconds. This alert may activate
up to eight times within 24 hours, if
movement is still detected and system has not been disabled
§ If you have installed the Kia Access with UVO Link app on your
smartphone, logged in and activated the Rear Occupant Alert notification,
a third alert (notification) will be sent to your phone
To turn the system on or off, in the Instrument Cluster, go to User Settings,
select Convenience, and then Rear Occupant Alert.
The Rear Occupant with Ultrasonic Sensors system activates under the
following conditions:
§ A rear passenger door is opened and closed
§ The ignition has been turned off
§ The driver’s door has been opened, then closed
§ The doors are locked with the Smart Key or the door lock button on the
door handle
Check rear seats
: Alarm OffOK
A
B
REMINDERS:
§ To avoid false alerts, make sure the vehicle’s windows are
rolled up
§ If objects such as boxes are stacked in front of the ultrasonic
sensors, the system may not detect any movement
§ The ultrasonic Sensors may occasionally detect movement
in the vehicle and cause false alerts, when there are no rear
occupants present. False alerts can occur due to:
§ The presence of insects near the system sensor
§ Rushing air from a window that is rolled down
§ Movement around the exterior of the vehicle
§ Surrounding noise or vibration
§ Vehicle passing through a car wash
§ Movement in the driver or front passenger seat is detected
§ Th e Rear Occupant Alert with Ultrasonic Sensors system may
fail to detect movement and activate an alarm if:
§ Movement is subtle or does not continue
§ A small child sits directly in a seat without a car seat
§ A rear passenger is covered with an object such as a
blanket, obstructing the sensor’s view
REAR OCCUPANT ALERT
VIDEO
To view a video on your
mobile device, snap this
QR Code or visit the listed
website. Refer to page 2
for more information.
www.youtube.com/KiaFeatureVideos
QR CODE
§ The 1st alert message will not display on Instrument Cluster
if the rear doors are never opened. Either rear doors must
be opened after unlocking the vehicle before the system will
activate.
§ To temporarily disable alerts, press the OK button
B on the
Steering Wheel while the message is displayed
§ To turn the alert off while sounding, press the unlock button on
the Smart Key or press the door lock button on the door handle
§ Must be enrolled in UVO services and Kia Access app installed
on the phone to receive ROA alert notifications on your
smartphone
QUICK TIPS
(Button layout on right
of steering wheel)
ALWAYS CHECK THE OWNER’S MANUAL FOR COMPLE TE
OPERATING INFORMATION AND SAFETY WARNINGS. *IF EQUIPPED
†LEG AL DISCL AIMERS ON BACK INSIDE COVER
Page 54 of 70

2nd Row Seat† 18
Folding 2nd Row Seat:
1. Set the front seatback to the most upright position, and slide the seat forward, if needed
2. Lower the 2nd Row Seat Headrest to the lowest position
3. Insert the seatbelt buckle into the pocket between the rear seatback and the cushion
4. Pull up on the Seatback folding lever (2nd Row) or strap (3rd Row) and fold the Seatback down
REMINDERS:
§ The lever must return to its original position for the
Seatback to lock
§ Make sure the heaters are off before folding the seats
down for cargo
2NDR
L
12V180W
2NDR
L
12V180W
52
§
When you return Seatback to its original position,
ensure it locks (clicks) into place
§ It may be necessary to slide the front Seat forward
and adjust the front Seatbacks to fully lower rear seats
§ For specific information on how to use the 2nd and
3rd Row Center Seat Belts, please refer to the Owner’s
Manual
QUICK TIPS
S E AT I N G
SE ATING
One-Touch Slide and Fold
To get in and out of the 3rd Row Seat, adjust the 2nd Row
One-Touch Slide and Fold buttons:
1. Set the front seatback to the most upright position, and
slide the seat forward, if needed
2. Lower the 2nd Row Seat Headrest to the lowest position
3. Insert the seatbelt buckle into the pocket between the
rear seatback and the cushion
4. Press the One-Touch Slide and Fold to slide forward and
fold down the 2nd Row Seat
2ND
R
L
12V180W
2ND
R
L
12V180W
2ND
R
L
12V180W
(Buttons
located on the side of the cargo area)
§ The strap can be used in the back of the 2nd Row Seat to slide and fold
the 2nd Row Seats.
QUICK TIP
See section 3 in the Owner’s Manual for more information.
See
section 3 in the Owner’s Manual for more information.
*IF EQUIPPED
†LEG AL DISCL AIMERS ON BACK INSIDE COVER
Page 55 of 70
53
S E AT I N G
3rd Row Seat – Folding
1. Fully lower headrest A
2. Pull Seat folding strap located in the back of the Seatback B
3. Fold Seats down C
A
B
B
C
See section 3 in the Owner’s Manual for more information.
A
BSE ATING
Images are for illustrative purposes only.
Actual belt buckle/tongue plate may vary.
Unfastening Center Seat Belt
If Seat Belt is buckled, press the release button on the buckle.
To retract the 2nd-Row Center Seatbelt
C into the headliner, press the “release
button” on the buckle by inserting the seat belt tongue plate D in the small slot
on the center buckle E.
UNFASTENING CENTER
SEAT BELT VIDEO
To view a video on your
mobile device, snap this
QR Code or visit the listed
website. Refer to page 2
for more information.
www.youtube.com/KiaFeatureVideos
QR CODE
D
C
C
E
D
E
See section 3 in the Owner’s Manual for more information.
ALWAYS CHECK THE OWNER’S MANUAL FOR COMPLE TE
OPERATING INFORMATION AND SAFETY WARNINGS. *IF EQUIPPED
Page 56 of 70

(located inside Liftgate lid)
The Smart Power Liftgate can be operated from several controls to either")
54
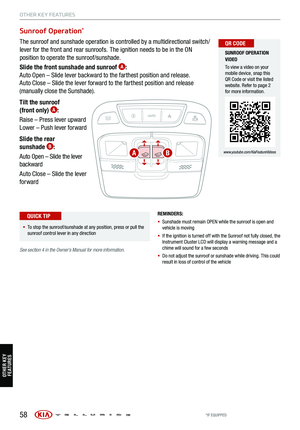
Smart Power Liftgate*† 22
(Button located on driver’s panel, left of the steering wheel)
(located inside Liftgate lid)
The Smart Power Liftgate can be operated from several controls to either
open, close or lock the Liftgate.
To turn the Smart Power Liftgate features ON, go to the User Setting mode in
the LCD Instrument Cluster Modes and set to ON.
The Smart Power Liftgate will close the Liftgate, lock all doors and Liftgate
and then arm the vehicle.
Opening from Inside the Vehicle:
Press and hold the Smart Power Liftgate Open/Close button*
A to automatically
open/close the Liftgate.
Opening from Outside the Vehicle:
To open the Smart Power Liftgate* automatically, press the Liftgate Release
button
B on the exterior of the Liftgate.
Automatically close by pressing the Smart Power Liftgate Close button*
C
located inside the Liftgate lid.
SMART POWER
LIFTGATE VIDEO
To view a video on your
mobile device, snap this
QR Code or visit the listed
website. Refer to page 2
for more information.
www.youtube.com/KiaFeatureVideos
QR CODE
§ To cancel the Smart Power Liftgate while automatically
opening or closing, press any button on the Smart Key fob
QUICK TIPS
REMINDERS:
§ All doors are closed and locked after about 15 seconds
§ The Smart Power Liftgate feature will not operate when the following
occurs:
§ Doors are recently closed and locked
§ The Smart Key is still detected after 15 seconds near the vehicle
or within 60 inches of the door handles
§ A door is not locked or closed
§ The Smart Key is in the vehicle
§
Pulling the Liftgate upward by the handle or pressing the button a
second time will interrupt the automatic opening of the Smart
Power Liftgate
See section 4 in the Owner’s Manual for more information.
OTHER KEY FEATURES
A
B
C
OTHER KEY
FE AT URE S
*IF EQUIPPED
†LEG AL DISCL AIMERS ON BACK INSIDE COVER