Page 25 of 70
†8 /
Traction Control System (TCS)†8
Electronic Stability Control (ESC) is designed to help
stabilize the vehicle during certain cornering")
23
DRIVER’S PANEL
Electronic Stability Control (ESC)†8 /
Traction Control System (TCS)†8
Electronic Stability Control (ESC) is designed to help
stabilize the vehicle during certain cornering maneuvers.
The Traction Control System ( TCS) can help improve traction.
It is a good idea to keep both ESC and TCS turned on
for daily driving whenever possible.
Press the ESC button
B to turn the Traction Control System OFF/ON.
To turn both Electronic Stability Control and the Traction Control System OFF,
press and hold the ESC button for more than 3 seconds. Press again to turn ON.
ELECTRONIC STABILITY
CONTROL (ESC) VIDEO
To view a video on your
mobile device, snap this
QR Code or visit the listed
website. Refer to page 2
for more information.
www.youtube.com/KiaFeatureVideos
QR CODE
REMINDERS:
§ ESC is active by default at vehicle startup. When ignition is cycled, ESC will turn ON again
§ The ESC indicator light in the instrument cluster will be lit momentarily whenever ESC is active
See section 5 in the Owner’s Manual for more information.
Hill-Start Assist Control (HAC)†8
REMINDERS:
§ HAC does not operate when the gear shift is in P (Park) or N
(Neutral) position
§ HAC does not replace the need to apply brakes while the
vehicle is stopped on an incline
§ In the event of HAC system malfunction, see an Authorized
Kia Dealer for service
Hill-Start Assist Control (HAC) is designed to prevent the vehicle from rolling backwards when accelerating from
a stop while on a steep incline.
HAC automatically activates whether ESC is OFF or ON but does NOT activate when ESC has
malfunctioned.
§ When HAC is active (e.g., during initial acceleration from a stop
on an incline), you may notice that the brakes will momentarily
remain engaged after you depress the accelerator
§ HAC provides a two-second delay before the vehicle may start
rolling backwards
QUICK TIPS
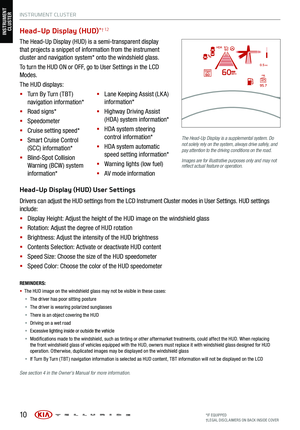
Instrument Cluster Control (Instrument Panel Dimmer)
With the Engine Start /Stop button on or the parking lights/headlights on, press A (+) or (-) to adjust the
brightness of the instrument panel illumination.
(Button located on driver’s panel, left of the steering wheel)
ABSee section 4 in the Owner’s
Manual for more information.
See section 5 in the Owner’s Manual for more information.
DRIVER’S PANEL
ALWAYS CHECK THE OWNER’S MANUAL FOR COMPLE TE
OPERATING INFORMATION AND SAFETY WARNINGS. *IF EQUIPPED
†LEG AL DISCL AIMERS ON BACK INSIDE COVER
Page 26 of 70
 System*†6
The Blind-Spot View Monitor (BVM) system is designed to
display the rear and side of the vehicle blind spot areas in
the Instrument Clus")
24
DRIVER’S PANEL
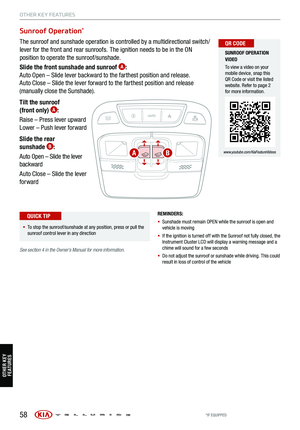
Blind-Spot View Monitor (BVM) System*†6
The Blind-Spot View Monitor (BVM) system is designed to
display the rear and side of the vehicle blind spot areas in
the Instrument Cluster LCD when the system is activated.
To turn the BVM system on, go to User Settings
in the
Instrument Cluster by pressing the Mode button A on
the Steering Wheel. Select Driver Assistance > Blind-Spot
Safety > Blind-Spot View and press the OK button
B.
The BVM system will operate when the Engine Start /Stop
button is on and the turn signal is activated.
The BVM system will not operate when the Engine Start /
Stop button is off, a turn signal is deactivated or another
warning screen comes up on the Instrument Cluster LCD.(Buttons located on right side of the steering wheel)
CRUISE
MODE CRUISE
CANCEL
RES
OK SET
CRUISE
CANCEL
RES
OK SET
MODE CRUISE
CANCEL
RES
OK SET
MODE
CANCEL
RES
OK SET
MODECRUISE
CANCEL
RES
OK SET
CRUISE
CANCEL
RES
OK SET
08
CH
12
3
4
5
67
x1000rpmAUTO
HOLD
16000
20
40
60
200
220
240
260
80
180
100
160
1
20 140
E F
2040
60
80
100
12 0
1 4 0MPH
km/h
Images are for illustrative purposes only and may not reflect
actual feature or operation.
A
B
DRIVER’S PANEL
See section 4 in the Owner’s Manual for more information.
*IF EQUIPPED
†LEG AL DISCL AIMERS ON BACK INSIDE COVER
Page 27 of 70
 and the vehicle is moving backwards, the outside
rearview mirrors will rotate")
25
DRIVER’S PANEL
DRIVER’S PANEL
Reverse Parking Aid Function†6
When the gear shift lever is moved into R (Reverse) and the vehicle is moving backwards, the outside
rearview mirrors will rotate downward to aid in reverse parking.
To turn the Reverse Parking Aid Function ON, move switch
A to either the right or to the left. To turn OFF,
move switch to the center position.
The outside rearview mirrors will automatically return to their original positions when:
§ The Engine Start /Stop button is in the OFF position
§ The gear shift lever is moved out of R (Reverse)
§
The outside rearview mirror switch is in the center position
(Mirror shown is for illustrative purposes only)
REMINDER: When the buttons are not
pressed , the Reverse Parking Aid Function
will not operate and the outside rearview
mirrors will not rotate downward.
R
L
A
See section 4 in the Owner’s Manual for more information.
(Button located on driver’s panel, left of the steering wheel)
REMINDERS:
§ The Engine Start /Stop button needs to be on
§ The Gear Shift needs to be in (P) Park
Power Liftgate Open/Close Button *
Press and hold the Power Liftgate Open/Close button B to open or close the Liftgate automatically.
B
See
section 4 in the Owner’s Manual for more information.
ALWAYS CHECK THE OWNER’S MANUAL FOR COMPLE TE
OPERATING INFORMATION AND SAFETY WARNINGS. *IF EQUIPPED
†LEG AL DISCL AIMERS ON BACK INSIDE COVER
Page 28 of 70

26
REMINDER: When you press C,
the rear window controls for the
Rear Passenger Windows are
disabled .
Button configuration may vary
depending on vehicle model .
See section 4 in the Owner’s
Manual for more information.
A Pull/Press to operate driver and front passenger’s window auto up/down
B Press to unlock /lock all doors
C Press to disable the rear passenger window controls
Power Windows, Window Lock & Central Door Lock
REMINDER: When activated or button is pressed, the rear passenger windows will not operate from the rear controls .
R
L
§ Pull/P ress button A again to stop Auto Up/Down function
§ Auto Door Lock /Unlock* will engage when gear shift is moved into or out of the P (Park) position
§ To turn Auto Door Lock /Unlock* OFF, go to User Settings* in the LCD Instrument Cluster Modes
QUICK TIPS
D Toggle switch D to the L or R to select the left or right mirrors
E Press button arrows left /right or up/down to adjust mirror position
F
Toggle button left /right to unfold/fold the outside rearview mirrors
F Toggle button to center to automatically fold/unfold mirrors when:
§ Smart Key lock /unlock buttons are pressed
§ Outside door handle button is pressed
§ Driver approaches the vehicle with the Smart Key (if activated in User Settings)
REMINDERS:
§ When the mirror toggle button is in the center, press the
lock button twice on the Smart Key to automatically fold
mirrors when exiting vehicle
§ To lock the mirror position , toggle button to the neutral
(center) position
Power Folding Outside Mirrors *
Press C to lock the rear passenger doors. An indicator will illuminate G showing the system is active.
This system is on by default, and then activated once the button
C is pressed. To deactivate, press the
button again.
Electronic Child Safety Lock System
The mirrors will automatically unfold when the Smart Key* is within
close proximity to the vehicle (if activated in User Settings)
QUICK TIP
C
A
B
EDF
B
G
DRIVER’S PANEL
DRIVER’S PANEL
See section 4 in the Owner’s Manual for more information.
See section 4 in the Owner’s Manual for more information.
*IF EQUIPPED
Page 29 of 70

27
DRIVER’S PANEL
DRIVER’S PANEL
Heated Outside Mirrors
Mirror heaters automatically turn ON/OFF at the same time the Rear Window Defroster is turned ON/OFF.
Rear Window Defroster button is located on the climate control system panel.
See section 4 in the Owner’s Manual for more information.
Auto Door Lock/Unlock
Auto Door Lock /Unlock will engage when the gear shift is moved into or out of the P (Park) position. Refer
to the User Settings on how to turn Auto Door Lock /Unlock ON/OFF.
See section 4 in the Owner’s Manual for more information.
REMINDERS:
§ If the Smart Key fob battery is dead, you can still start the engine by pressing the ENGINE START/STOP button with the Lock-button
end of the Smart Key. The Smart Key must contact the ENGINE START/STOP button directly, at a right angle
§ In an emergency situation while the vehicle is in motion, you are able to turn the engine off and to the ACC position by pressing the
ENGINE START/STOP button for more than 2 seconds or 3 times successively within 3 seconds
Engine Start/Stop Button†9
To start the engine:
1. Depress the brake pedal
2.
Press the ENGINE START/STOP button while
the gear shift is in P (Park) or N (Neutral)
To turn the engine OFF, press the ENGINE
START/STOP button while the gear shift is in
P (Park).
To use the ENGINE START/STOP button, you
must have the Smart Key on your person or
inside the vehicle.
§ To use electrical accessories:
§ ACC position
– When in the OFF position and without depressing the brake pedal, press the ENGINE
START/STOP button once
§ ON position
– When already in the ACC position and without depressing the brake pedal, press the
ENGINE START/STOP button again
– When in the OFF position and without depressing the brake pedal, press the ENGINE
START/STOP button twice
§ Keeping the vehicle in the ACC or ON position too long can discharge the vehicle’s battery
QUICK TIPS
ENGINE
START
STOP
ENGINE STA RT/STOP
BUTTON AND
SMART KEY VIDEO
To view a video on your
mobile device, snap this
QR Code or visit the listed
website. Refer to page 2
for more information.
www.youtube.com/KiaFeatureVideos
QR CODE
See section 5 in the Owner’s Manual for more information.
ALWAYS CHECK THE OWNER’S MANUAL FOR COMPLE TE
OPERATING INFORMATION AND SAFETY WARNINGS. *IF EQUIPPED
†LEG AL DISCL AIMERS ON BACK INSIDE COVER
Page 30 of 70

28
CENTER PANEL
Select the SETUP key on audio head unit. Select General, then scroll to and select DATE / TIME, and adjust.
REMINDERS:
§ Daylight Savings must be enabled or disabled o n the Clock Settings screen
§ To access manual date and time setting, turn GPS Time OFF in the Clock Settings (UVO link with Navigation*)
Refer to the Car Infotainment System Quick Reference Guide for more information.
Clock
The AC Inverter supplies 115V/100W electrical power to
operate accessories or equipment. Press the AC Inverter
button to activate.
AC Inverter *
(Located behind center console)
Power Outlets A: Use the power outlets for mobile phones and other devices designed to operate on a
12V (180W max) power outlet.
Multimedia USB Port
B: Use the USB port to connect USB
audio devices and smartphone devices.
USB Charger Ports
C: Devices can be recharged using a
USB cable. The Engine Start /Stop button needs to be in the
ACC/ON/START position to operate the USB Charger.
REMINDERS:
§ Using the power outlets (accessory plugs) for prolonged periods of time with the Engine Start /Stop button in the ACC position (Engine
OFF ) may cause the battery to discharge
§ Only use manufacturer cables that came with your device as third party cables may cause damage to the device
§ The Multimedia USB Port
B in the center panel charges more slowly than the USB Chargers C throughout the vehicle
See section 4 in the Owner’s Manual for more information.
12V180WUSB
(Located in center panel in front of gearshift)
Multimedia USB Ports, Power Outlets & USB Charger Ports
§ The power outlets are inactive when the ignition is in the OFF position
§ The Multimedia USB data port is located next to the Power Outlets
A.
USB Charger does not support data transfer
QUICK TIPS
ABC
See section 4 in the Owner’s Manual for more information.
CENTER PANEL
*IF EQUIPPED
Page 31 of 70
 System
The ISG system is designed to reduce fuel consumption by automatically
shutting down the engine when the vehicle is at a standstill.
When the")
29
CENTER PANEL
CENTER PANEL
Idle, Stop & Go (ISG) System
The ISG system is designed to reduce fuel consumption by automatically
shutting down the engine when the vehicle is at a standstill.
When the ISG system is ON and the vehicle is at a standstill, the engine will
stop, and the green AUTO STOP indicator
A on the instrument cluster will
illuminate.
The engine will restart when the brake pedal is released or the shift lever is
moved from D (Drive) to the R (Reverse) position or to Manual Shift mode.
When the engine restarts, the green AUTO STOP indicator on the instrument
cluster will turn off.
To deactivate the ISG system, press the ISG OFF button
B. If you press it
again, the system will be activated.
REMINDERS:
§ ISG is active by default at vehicle startup. When the ignition is
cycled, ISG will turn ON again
§ Under certain conditions, the engine will restart automatically
even if the brake pedal is still depressed
§ If the AUTO STOP indicator
is continuously blinking yellow and
the ISG button LED is on , please contact an authorized Kia dealer
See section 5 in the Owner’s Manual for more information .
Images are for illustrative purposes only and may not reflect actual
feature or operation.
EPB
AUTO
0 8
CH
12
3
4
5
6
7
x1000rpm
AUTO
HOLD
160
00
20
40
60
200
220
240
260
80
180
100
160
1
20 140
E F
2040
60
80
100
12 0
1 4 0
MPH
km/h
(Type A instrument cluster shown)
OFF
§ The ISG system is disabled when:
§ A seat belt is unfastened
§ The hood or a door is opened
§ Battery condition is poor
§ The front or rear defroster is turned on
§ Engine coolant temperature is low
§ The outside ambient temperature is too low/high
§ Emission control devices activate
§ The vehicle is on a steep slope
QUICK TIPS
IDLE, STOP & GO
VIDEO
To view a video on your
mobile device, snap this
QR Code or visit the listed
website. Refer to page 2
for more information.
www.youtube.com/KiaFeatureVideos
QR CODE
A
B
ALWAYS CHECK THE OWNER’S MANUAL FOR COMPLE TE
OPERATING INFORMATION AND SAFETY WARNINGS. *IF EQUIPPED
Page 32 of 70

30
CENTER PANEL
CENTER PANEL
AUTO
OFFA/C
SYNC888ADS OFFAUTO888AUTO888
Face-Level F lo o r- L evel
Bi-Level Floor/Defrost-Level
Tri-Zone Climate Control
Pressing the SYNC button
J synchronizes all climate
control zones (driver, passenger, and rear) to the driver’s
temperature control. Auto Defogging System (ADS)
Auto defogging is designed to reduce
the fogging up of the inside of the
windshield by automatically sensing the
moisture of the inside of the windshield.
The system will automatically change to
defrost mode when needed.
The ADS is set ON by default. To cancel
ADS, press the Front Defrost button
C for three seconds, when the ignition
is in on (ADS OFF icon will illuminate).
To turn ADS on again, press the Front
Defrost button
for three seconds.
REMINDERS:
§ Continuous use of the climate control system in
the recirculated air position may allow humidity to
increase inside the vehicle which may fog the glass
and obscure visibility
§ When in AUTO m ode, Air Flow Mode and Fan Speed
do not display on the Climate Control Display
§ Cold or warm ambient air may flow in through vents
if Recirculated Air button is not pressed ON (LED lit)
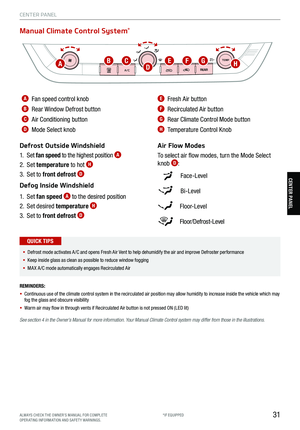
Defrost Outside Windshield
1. Set fan speed to the highest position
D
2. Set temperature to hot A
3. Press the front defrost button C
Defog Inside Windshield
1. Set fan speed to highest position
D
2. Set temperature to highest position A
3. Press the front defrost button C
Climate Control Auto Function
Press AUTO
A to select full auto operation. In AUTO mode
the driver and front passenger have full control of their own
temperature zones. The mode, fan speed, air intake and air
conditioning will activate and adjust accordingly to achieve
the temperature settings for each zone.
To set temperatures:
§ Tu r n
A to set the driver’s zone temperature
§ Tu r n
J to set the front passenger’s zone temperature
A AUTO (Automatic) Climate
Control button
B System OFF button
C Front Windshield Defrost button
D Fan Speed Control buttons
E Rear Control Mode button
F Mode Select button
G Air Conditioning button
H Rear Window Defrost button
I Recirculated Air button
J SYNC (Synchronize All Zones)
Temperature Control button
Front Climate Control
Air Flow Modes
To select air flow modes, press the Mode Select
button
F:
See section 4 in the Owner’s Manual for more information.
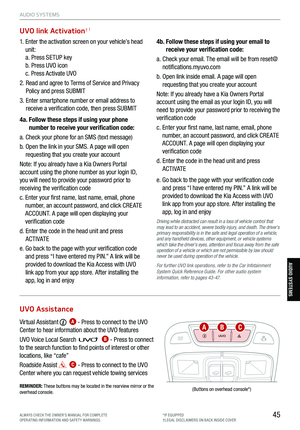
Automatic Climate Control System *
AUTO DEFOGGING
SYSTEM (ADS) VIDEO
To view a video on your
mobile device, snap this
QR Code or visit the listed
website. Refer to page 2
for more information.
www.youtube.com/KiaFeatureVideos
QR CODE
When the Climate Control System’s temperature
is turned up to high heat or low cool, the Seat
Warmers / Ventilated Seats turn on automatically.
QUICK TIPS
A
BCDEFGHI
J
*IF EQUIPPED