Page 475 of 631
6 15
What to do in an emergency
IF YOU HAVE A FLAT TIRE (WITH SPARE TIRE, IF EQUIPPED)
Jack and tools
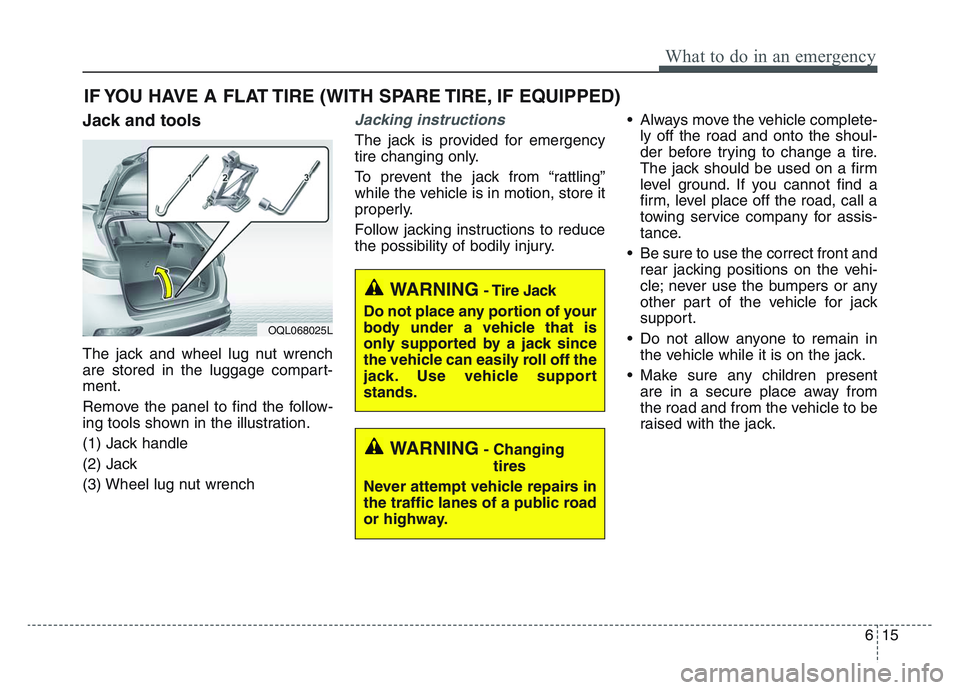
The jack and wheel lug nut wrench
are stored in the luggage compart-
ment.
Remove the panel to find the follow-
ing tools shown in the illustration.
(1) Jack handle
(2) Jack
(3) Wheel lug nut wrench
Jacking instructions
The jack is provided for emergency
tire changing only.
To prevent the jack from “rattling”
while the vehicle is in motion, store it
properly.
Follow jacking instructions to reduce
the possibility of bodily injury.• Always move the vehicle complete-
ly off the road and onto the shoul-
der before trying to change a tire.
The jack should be used on a firm
level ground. If you cannot find a
firm, level place off the road, call a
towing service company for assis-
tance.
• Be sure to use the correct front and rear jacking positions on the vehi-
cle; never use the bumpers or any
other part of the vehicle for jack
support.
• Do not allow anyone to remain in the vehicle while it is on the jack.
• Make sure any children present are in a secure place away from
the road and from the vehicle to be
raised with the jack.
WARNING- Changing
tires
Never attempt vehicle repairs in
the traffic lanes of a public road
or highway.
OQL068025L
WARNING- Tire Jack
Do not place any portion of your
body under a vehicle that is
only supported by a jack since
the vehicle can easily roll off the
jack. Use vehicle support
stands.
Page 480 of 631
What to do in an emergency
206
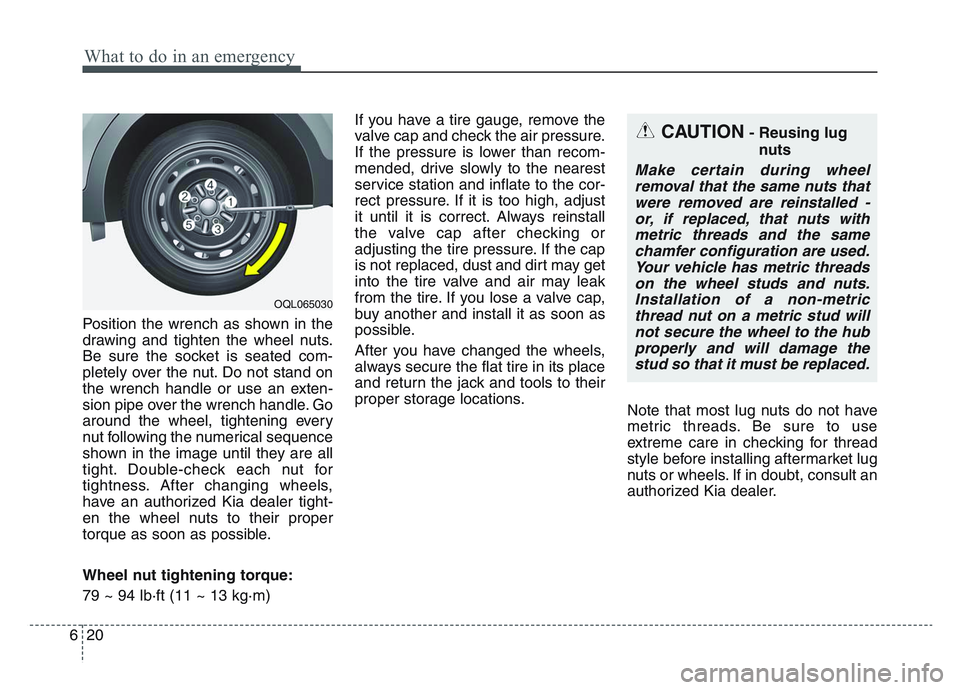
Position the wrench as shown in the
drawing and tighten the wheel nuts.
Be sure the socket is seated com-
pletely over the nut. Do not stand on
the wrench handle or use an exten-
sion pipe over the wrench handle. Go
around the wheel, tightening every
nut following the numerical sequence
shown in the image until they are all
tight. Double-check each nut for
tightness. After changing wheels,
have an authorized Kia dealer tight-
en the wheel nuts to their proper
torque as soon as possible.
Wheel nut tightening torque:
79 ~ 94 lb·ft (11 ~ 13 kg·m)If you have a tire gauge, remove the
valve cap and check the air pressure.
If the pressure is lower than recom-
mended, drive slowly to the nearest
service station and inflate to the cor-
rect pressure. If it is too high, adjust
it until it is correct. Always reinstall
the valve cap after checking or
adjusting the tire pressure. If the cap
is not replaced, dust and dirt may get
into the tire valve and air may leak
from the tire. If you lose a valve cap,
buy another and install it as soon as
possible.
After you have changed the wheels,
always secure the flat tire in its place
and return the jack and tools to their
proper storage locations.
Note that most lug nuts do not have
metric threads. Be sure to use
extreme care in checking for thread
style before installing aftermarket lug
nuts or wheels. If in doubt, consult an
authorized Kia dealer.
CAUTION- Reusing lug
nuts
Make certain during wheelremoval that the same nuts thatwere removed are reinstalled -or, if replaced, that nuts withmetric threads and the samechamfer configuration are used.Your vehicle has metric threadson the wheel studs and nuts.Installation of a non-metricthread nut on a metric stud willnot secure the wheel to the hubproperly and will damage thestud so that it must be replaced.
OQL065030
Page 495 of 631
6 35
What to do in an emergency
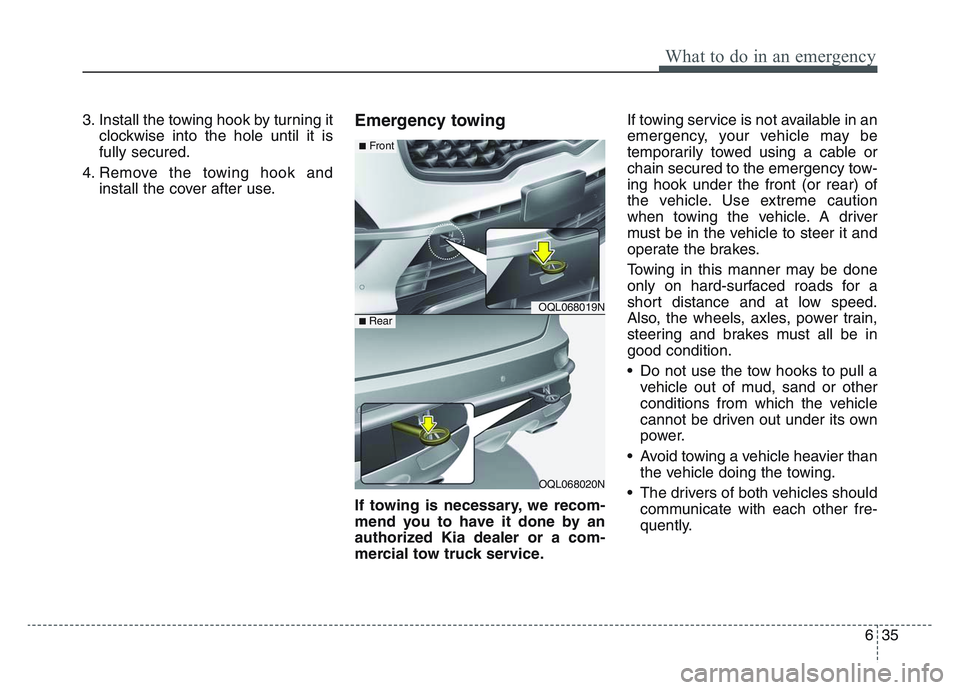
3. Install the towing hook by turning itclockwise into the hole until it is
fully secured.
4. Remove the towing hook and install the cover after use.Emergency towing
If towing is necessary, we recom-
mend you to have it done by an
authorized Kia dealer or a com-
mercial tow truck service. If towing service is not available in an
emergency, your vehicle may be
temporarily towed using a cable or
chain secured to the emergency tow-
ing hook under the front (or rear) of
the vehicle. Use extreme caution
when towing the vehicle. A driver
must be in the vehicle to steer it and
operate the brakes.
Towing in this manner may be done
only on hard-surfaced roads for a
short distance and at low speed.
Also, the wheels, axles, power train,
steering and brakes must all be in
good condition.
• Do not use the tow hooks to pull a
vehicle out of mud, sand or other
conditions from which the vehicle
cannot be driven out under its own
power.
• Avoid towing a vehicle heavier than the vehicle doing the towing.
• The drivers of both vehicles should communicate with each other fre-
quently.
OQL068019N
OQL068020N
■Front
■ Rear
Page 496 of 631
What to do in an emergency
366
• Attach a towing strap to the towhook.
• Use only a cable or chain specifical- ly intended for use in towing vehi-
cles. Securely fasten the cable or
chain to the towing hook provided.
• Accelerate or decelerate the vehi- cle in a slow and gradual manner
while maintaining tension on the
tow rope or chain to start or drive
the vehicle, otherwise tow hooks
and the vehicle may be damaged.
• Before emergency towing, check if the hook is not broken or damaged. • Fasten the towing cable or chain
securely to the hook.
• Do not jerk the hook. Apply it steadily and with even force.
• To avoid damaging the hook, do not pull from the side or at a vertical
angle. Always pull straight ahead.
CAUTION
Using a portion of the vehicleother than the tow hooks fortowing may damage the body ofyour vehicle.
WARNING- Emergency
Towing Precautions
Use extreme caution when tow-
ing the vehicle.
• Avoid sudden starts or erratic driving maneuvers which
would place excessive stress
on the emergency towing hook
and towing cable or chain. The
hook and towing cable or
chain may break and cause
serious injury or damage.
• If the disabled vehicle is unable to be moved, do not
forcibly continue the towing.
We recommend that you con-
tact an authorized Kia dealer
or a commercial tow truck
service for assistance.
• Tow the vehicle as straight ahead as possible.
• Keep away from the vehicle during towing.
Page 519 of 631
Maintenance
227
Vacuum crankcase ventilation
hoses
Inspect the surface of hoses for evi-
dence of heat and/or mechanical
damage. Hard and brittle rubber,
cracking, tears, cuts, abrasions, and
excessive swelling indicate deterio-
ration. Particular attention should be
paid to examine those hose surfaces
nearest to high heat sources, such
as the exhaust manifold.
Inspect the hose routing to assure
that the hoses do not come in con-
tact with any heat source, sharp
edges or moving component which
might cause heat damage or
mechanical wear. Inspect all hose
connections, such as clamps and
couplings, to make sure they are
secure, and that no leaks are pres-
ent. Hoses should be replaced
immediately if there is any evidence
of deterioration or damage.
Air cleaner filter
A Genuine Kia air cleaner filter is
recommended when the filter is
replaced.
Spark plugs
Make sure to install new spark plugs
of the correct heat range.
Valve clearance (if equipped)
Inspect excessive valve noise and/or
engine vibration and adjust if neces-
sary. An authorized Kia dealer
should perform the operation.
Cooling system
Check the cooling system compo-
nents, such as the radiator, coolant
reservoir, hoses and connections for
leakage and damage. Replace any
damaged parts.
Coolant
The coolant should be changed at
the intervals specified in the mainte-
nance schedule.
Page 528 of 631
7 31
Maintenance
✽NOTICE
Make sure the coolant cap is proper-
ly closed after refill of coolant.
Otherwise the engine could be over-
heated while driving.
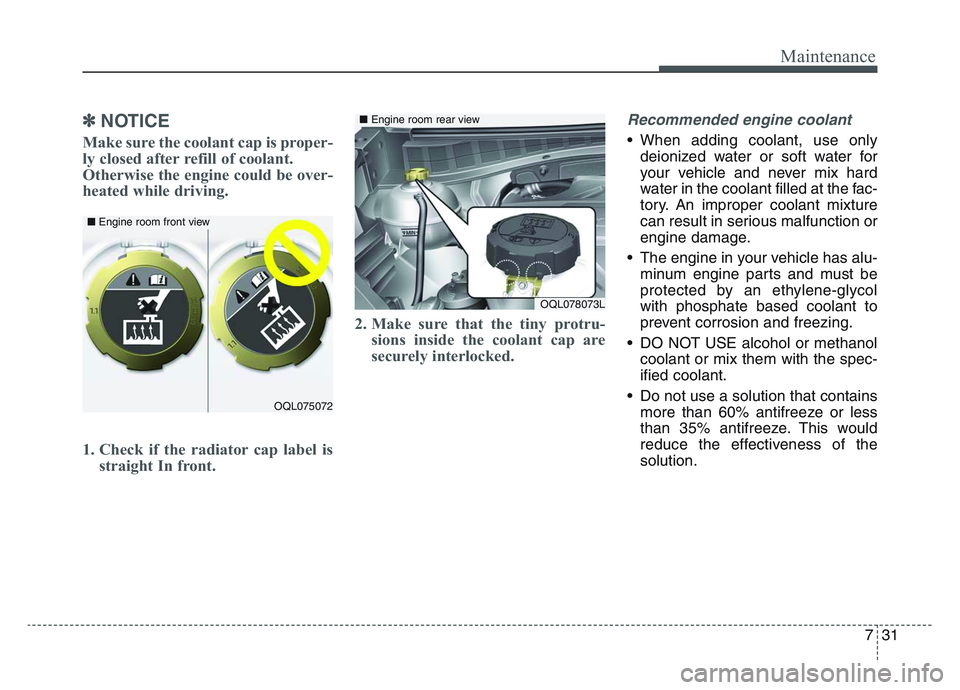
1. Check if the radiator cap label isstraight In front. 2. Make sure that the tiny protru-
sions inside the coolant cap are
securely interlocked.
Recommended engine coolant
• When adding coolant, use only
deionized water or soft water for
your vehicle and never mix hard
water in the coolant filled at the fac-
tory. An improper coolant mixture
can result in serious malfunction or
engine damage.
• The engine in your vehicle has alu- minum engine parts and must be
protected by an ethylene-glycol
with phosphate based coolant to
prevent corrosion and freezing.
• DO NOT USE alcohol or methanol coolant or mix them with the spec-
ified coolant.
• Do not use a solution that contains more than 60% antifreeze or less
than 35% antifreeze. This would
reduce the effectiveness of the
solution.
OQL075072
■ Engine room front view
OQL078073L
■Engine room rear view
Page 532 of 631
7 35
Maintenance
Checking the parking brake
Check whether the stroke is within
specification when the parking brake
pedal is depressed with 44 lbs, 196
N (20 kg) of force. Also, the parking
brake alone should securely hold the
vehicle on a fairly steep grade. If the
stroke is more or less than specified,
have the parking brake adjusted by
an authorized Kia dealer.
Stroke : 4 ~ 5 notch
PARKING BRAKE
OQL075012
Page 534 of 631
7 37
Maintenance
4. Pull up the lever (1) to the LOCKposition.
5. Rise up the cover (2) until the hooks on the cover are securely
fastened into the latches (3).
6. Check if the cover is firmly installed. Replace the filter according to the
Maintenance Schedule.
If the vehicle is operated in extreme-
ly dusty or sandy areas, replace theelement more often than the usualrecommended intervals. (Refer to“Maintenance under severe usageconditions” in this chapter.)
CAUTION - Air filter
maintenance
• Do not drive with the air clean- er removed; this will result inexcessive engine wear.
• When removing the air cleaner filter, be careful that dust ordirt does not enter the airintake, or damage may result.
• Use a Kia genuine part. Use of a non-genuine part coulddamage the air flow sensor.OQL075057