2021 KIA NIRO EV brake
[x] Cancel search: brakePage 32 of 66
*IF EQUIPPED †LEGAL DISCL AIMERS ON BACK INSIDE COVER30NIRO EV FEATURES & FUNCTIONS GUIDE
EA
F
D
B
The Smart Cruise Control with Stop & Go* system is designed to maintain a predetermined distance from vehicles detected ahead
by automatically adjusting the driving speed as needed. When traffic is detected, the vehicle will automatically slow to maintain a
set distance between traffic without depressing the accelerator or brake pedal.
When SCC is on and activated, the vehicle distance set, and the system detects a vehicle slowing or stopping, the system can bring
the vehicle to a complete stop. When the vehicle ahead starts to move forward, the SCC system re-engages. If the vehicle ahead
stops for more than 3 seconds, the accelerator pedal or the RES+ button must be pressed to start moving the vehicle.
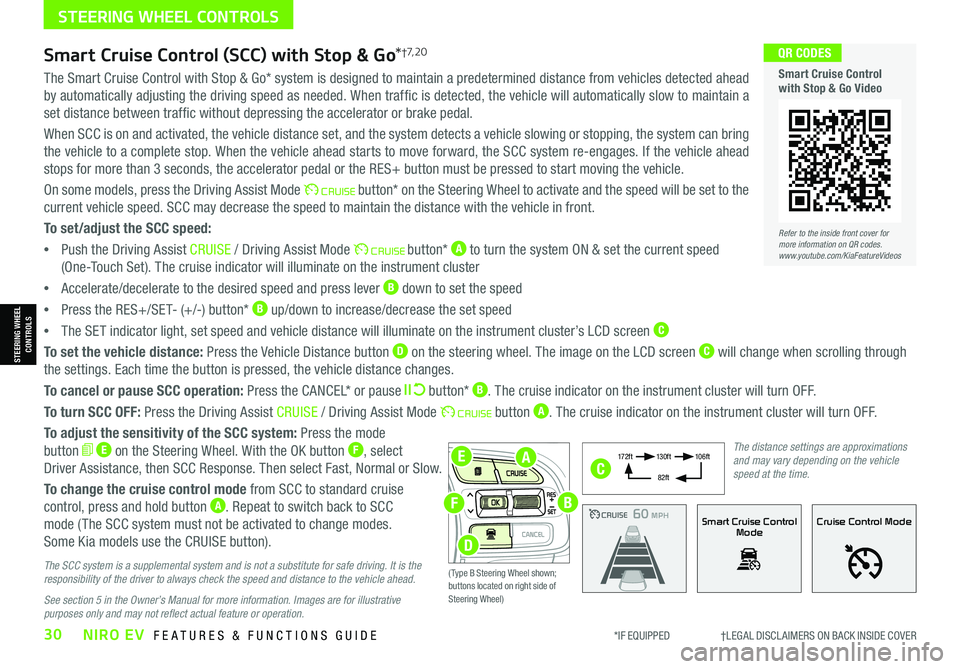
On some models, press the Driving Assist Mode button* on the Steering Wheel to activate and the speed will be set to the
current vehicle speed. SCC may decrease the speed to maintain the distance with the vehicle in front.
To set/adjust the SCC speed:
•Push the Driving Assist CRUISE / Driving Assist Mode button* A to turn the system ON & set the current speed
(One-Touch Set). The cruise indicator will illuminate on the instrument cluster
•Accelerate/decelerate to the desired speed and press lever B down to set the speed
•Press the RES+/SET- (+/-) button* B up/down to increase/decrease the set speed
•The SET indicator light, set speed and vehicle distance will illuminate on the instrument cluster’s LCD screen C
To set the vehicle distance: Press the Vehicle Distance button D on the steering wheel. The image on the LCD screen C will change when scrolling through
the settings. Each time the button is pressed, the vehicle distance changes.
To cancel or pause SCC operation: Press the CANCEL* or pause button* B. The cruise indicator on the instrument cluster will turn OFF.
To turn SCC OFF: Press the Driving Assist CRUISE / Driving Assist Mode button A. The cruise indicator on the instrument cluster will turn OFF.
To adjust the sensitivity of the SCC system: Press the mode
button E on the Steering Wheel. With the OK button F, select
Driver Assistance, then SCC Response. Then select Fast, Normal or Slow.
To change the cruise control mode from SCC to standard cruise
control, press and hold button A. Repeat to switch back to SCC
mode ( The SCC system must not be activated to change modes.
Some Kia models use the CRUISE button).
The SCC system is a supplemental system and is not a substitute for safe driving. It is the responsibility of the driver to always check the speed and distance to the vehicle ahead.
See section 5 in the Owner’s Manual for more information. Images are for illustrative purposes only and may not reflect actual feature or operation.
Smart Cruise Control (SCC) with Stop & Go*†7, 2 0
Refer to the inside front cover for more information on QR codes.www.youtube.com/KiaFeatureVideos
QR CODES
Smart Cruise Control with Stop & Go Video
CRUISE100 MPHCRUISE100 MPH
CRUISE60 MPHCRUISE100 MPHSmart Cruise Control
ModeCruise Control Mode
The distance settings are approximations and may vary depending on the vehicle speed at the time.
17 2 f t13 0 f t
82ft
10 6 f t
( Type B Steering Wheel shown; buttons located on right side of Steering Wheel)
C
STEERING WHEEL CONTROLS
STEERING WHEEL CONTROLS
Page 33 of 66
ALWAYS CHECK THE OWNER’S MANUAL FOR COMPLETE OPER ATING INFORMATION AND SAFET Y WARNINGS. *IF EQUIPPED †LEGAL DISCL AIMERS ON BACK INSIDE COVER31
Navigation-based Smart Cruise Control - Curve (NSCC-C)*†6a
Navigation-based Smart Cruise Control - Curve can automatically adjust the vehicle speed when it detects a curved road
ahead and when it receives road information from the navigation system.
To turn on NSCC-C, go to the User Settings in the instrument cluster or the Vehicle Settings* in the audio head unit, by
selecting Driving Convenience, Highway Auto Speed Change. When SCC is on and operating, the vehicle is driving on limited/
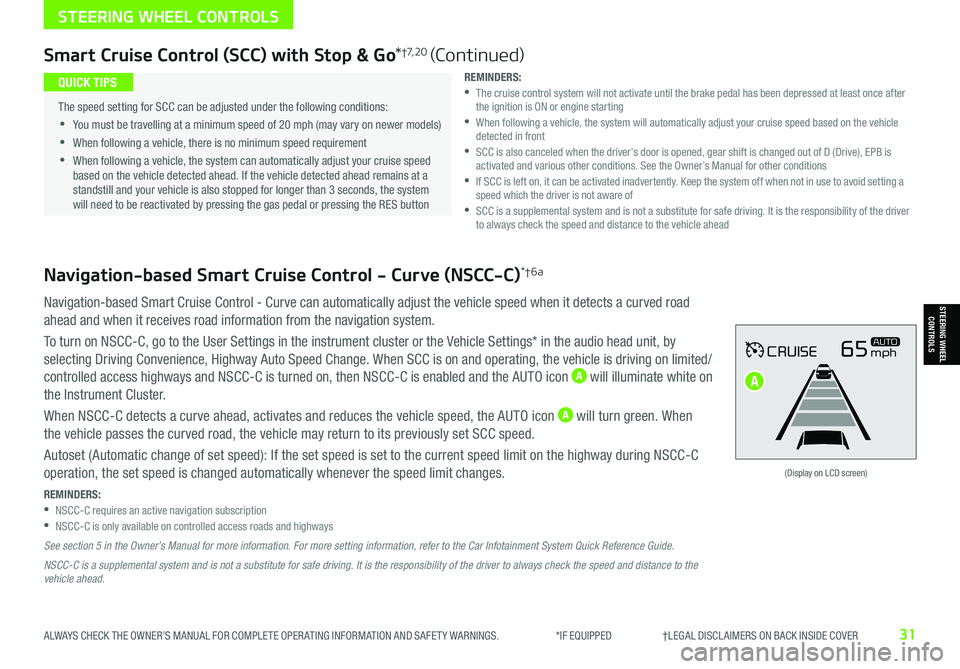
controlled access highways and NSCC-C is turned on, then NSCC-C is enabled and the AUTO icon A will illuminate white on
the Instrument Cluster.
When NSCC-C detects a curve ahead, activates and reduces the vehicle speed, the AUTO icon A will turn green. When
the vehicle passes the curved road, the vehicle may return to its previously set SCC speed.
Autoset (Automatic change of set speed): If the set speed is set to the current speed limit on the highway during NSCC-C
operation, the set speed is changed automatically whenever the speed limit changes.
REMINDERS: •NSCC-C requires an active navigation subscription •NSCC-C is only available on controlled access roads and highways
See section 5 in the Owner’s Manual for more information. For more setting information, refer to the Car Infotainment System Quick Reference Guide.
NSCC-C is a supplemental system and is not a substitute for safe driving. It is the responsibility of the driver to always check the speed and distance to the vehicle ahead.
CRUISE65mphAUTO
(Display on LCD screen)
Smart Cruise Control (SCC) with Stop & Go*†7, 2 0 (Continued)
REMINDERS: •
The cruise control system will not activate until the brake pedal has been depressed at least once after the ignition is ON or engine starting •
When following a vehicle, the system will automatically adjust your cruise speed based on the vehicle detected in front •
SCC is also canceled when the driver’s door is opened, gear shift is changed out of D (Drive), EPB is activated and various other conditions. See the Owner’s Manual for other conditions •
If SCC is left on, it can be activated inadvertently. Keep the system off when not in use to avoid setting a speed which the driver is not aware of •
SCC is a supplemental system and is not a substitute for safe driving. It is the responsibility of the driver to always check the speed and distance to the vehicle ahead
•
The speed setting for SCC can be adjusted under the following conditions:
•You must be travelling at a minimum speed of 20 mph (may vary on newer models)
•
When following a vehicle, there is no minimum speed requirement
•
When following a vehicle, the system can automatically adjust your cruise speed based on the vehicle detected ahead. If the vehicle detected ahead remains at a standstill and your vehicle is also stopped for longer than 3 seconds, the system will need to be reactivated by pressing the gas pedal or pressing the RES button
QUICK TIPS
STEERING WHEEL CONTROLS
STEERING WHEEL CONTROLS
A
Page 34 of 66
*IF EQUIPPED †LEGAL DISCL AIMERS ON BACK INSIDE COVER32NIRO EV FEATURES & FUNCTIONS GUIDE
STEERING WHEEL CONTROLS
STEERING WHEEL CONTROLS
Cruise Control†2 0
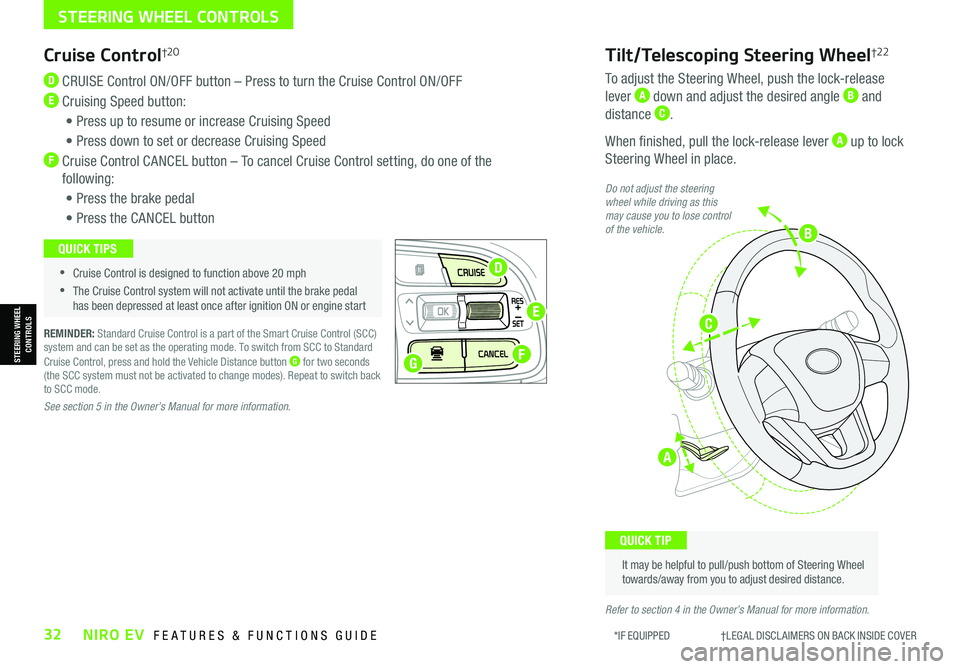
D CRUISE Control ON/OFF button – Press to turn the Cruise Control ON/OFF
E Cruising Speed button:
• Press up to resume or increase Cruising Speed
• Press down to set or decrease Cruising Speed
F Cruise Control CANCEL button – To cancel Cruise Control setting, do one of the
following:
• Press the brake pedal
• Press the CANCEL button
REMINDER: Standard Cruise Control is a part of the Smart Cruise Control (SCC) system and can be set as the operating mode. To switch from SCC to Standard Cruise Control, press and hold the Vehicle Distance button G for two seconds (the SCC system must not be activated to change modes). Repeat to switch back to SCC mode.
See section 5 in the Owner’s Manual for more information.
•
•Cruise Control is designed to function above 20 mph
•The Cruise Control system will not activate until the brake pedal has been depressed at least once after ignition ON or engine start
QUICK TIPS
Tilt/Telescoping Steering Wheel†2 2
To adjust the Steering Wheel, push the lock-release
lever A down and adjust the desired angle B and
distance C.
When finished, pull the lock-release lever A up to lock
Steering Wheel in place.
It may be helpful to pull/push bottom of Steering Wheel towards/away from you to adjust desired distance.
QUICK TIP
Do not adjust the steering wheel while driving as this may cause you to lose control of the vehicle.
Refer to section 4 in the Owner’s Manual for more information.
A
G
D
E
F
B
C
Page 35 of 66
ALWAYS CHECK THE OWNER’S MANUAL FOR COMPLETE OPER ATING INFORMATION AND SAFET Y WARNINGS. *IF EQUIPPED33
STEERING WHEEL CONTROLS
STEERING WHEEL CONTROLS
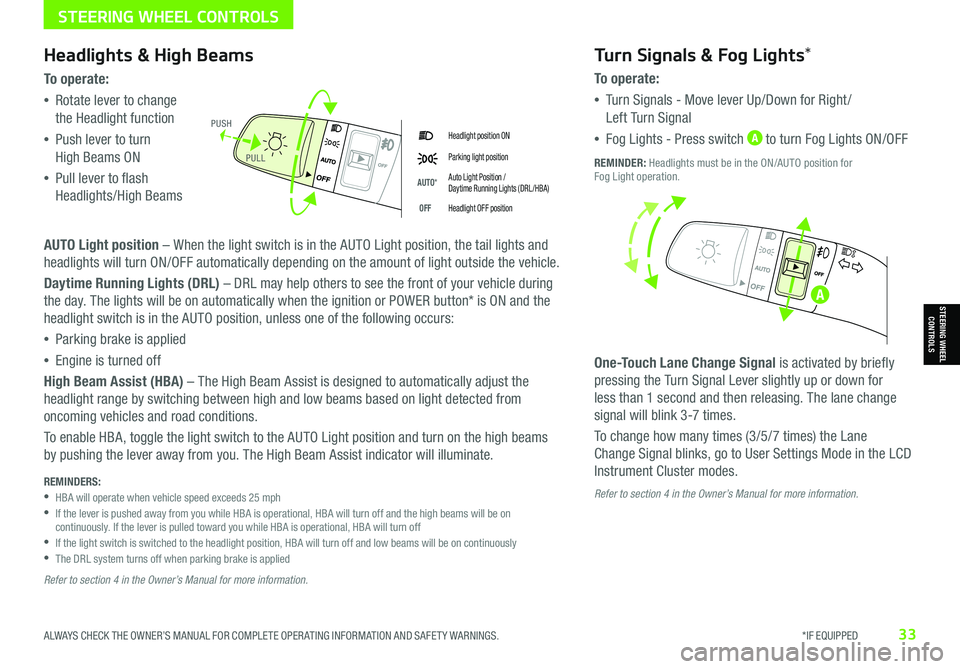
Headlight position ON
Parking light position
AUTO*Auto Light Position / Daytime Running Lights (DRL /HBA)
OFFHeadlight OFF position
Headlights & High Beams
To o p e rate:
•Rotate lever to change
the Headlight function
•Push lever to turn
High Beams ON
•Pull lever to flash
Headlights/High Beams
AUTO Light position – When the light switch is in the AUTO Light position, the tail lights and
headlights will turn ON/OFF automatically depending on the amount of light outside the vehicle.
Daytime Running Lights (DRL) – DRL may help others to see the front of your vehicle during
the day. The lights will be on automatically when the ignition or POWER button* is ON and the
headlight switch is in the AUTO position, unless one of the following occurs:
•Parking brake is applied
•Engine is turned off
High Beam Assist (HBA) – The High Beam Assist is designed to automatically adjust the
headlight range by switching between high and low beams based on light detected from
oncoming vehicles and road conditions.
To enable HBA, toggle the light switch to the AUTO Light position and turn on the high beams
by pushing the lever away from you. The High Beam Assist indicator will illuminate.
Turn Signals & Fog Lights*
To o p e r a t e :
•Tu r n Signals - Move lever Up/Down for Right /
Left Turn Signal
•Fog Lights - Press switch A to turn Fog Lights ON/OFF
One-Touch Lane Change Signal is activated by briefly
pressing the Turn Signal Lever slightly up or down for
less than 1 second and then releasing. The lane change
signal will blink 3-7 times.
To change how many times (3/5/7 times) the Lane
Change Signal blinks, go to User Settings Mode in the LCD
Instrument Cluster modes.
REMINDER: Headlights must be in the ON/AUTO position for Fog Light operation.
PUSH
PULL
Refer to section 4 in the Owner’s Manual for more information. REMINDERS: •
HBA will operate when vehicle speed exceeds 25 mph •
If the lever is pushed away from you while HBA is operational, HBA will turn off and the high beams will be on continuously. If the lever is pulled toward you while HBA is operational, HBA will turn off •
If the light switch is switched to the headlight position, HBA will turn off and low beams will be on continuously •The DRL system turns off when parking brake is applied
Refer to section 4 in the Owner’s Manual for more information.
A
Page 48 of 66
CENTER PANEL
CENTERPANEL
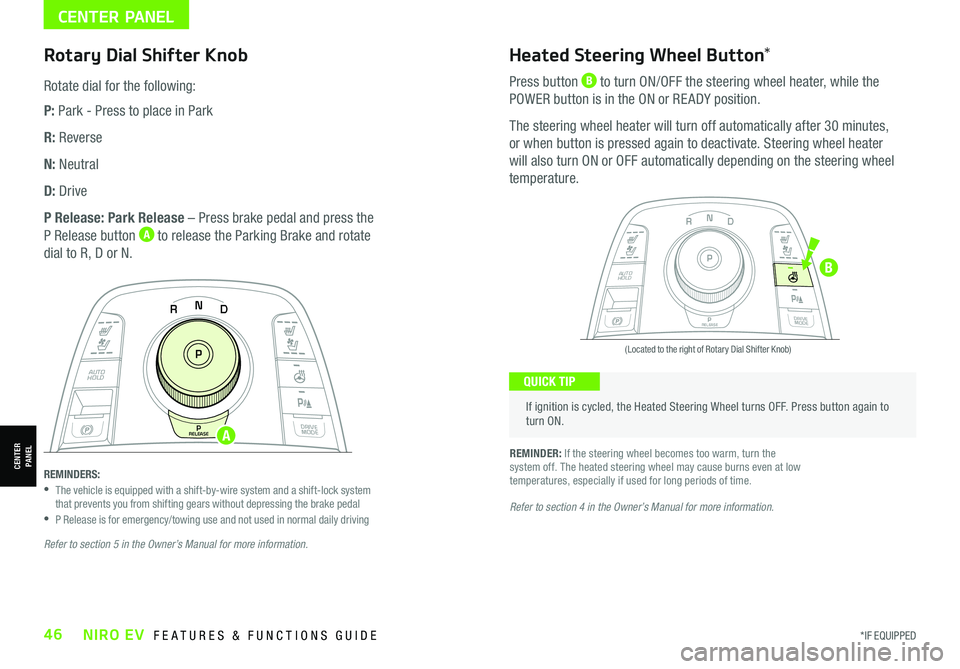
Rotary Dial Shifter Knob
Rotate dial for the following:
P: Park - Press to place in Park
R: Reverse
N: Neutral
D: Drive
P Release: Park Release – Press brake pedal and press the
P Release button A to release the Parking Brake and rotate
dial to R, D or N.
If ignition is cycled, the Heated Steering Wheel turns OFF. Press button again to turn ON.
(Located to the right of Rotary Dial Shifter Knob)
QUICK TIP
Heated Steering Wheel Button*
Press button B to turn ON/OFF the steering wheel heater, while the
POWER button is in the ON or RE ADY position.
The steering wheel heater will turn off automatically after 30 minutes,
or when button is pressed again to deactivate. Steering wheel heater
will also turn ON or OFF automatically depending on the steering wheel
temperature.
REMINDER: If the steering wheel becomes too warm, turn the system off. The heated steering wheel may cause burns even at low temperatures, especially if used for long periods of time.
NP
PRELEASE
AUTO
HOLD
DRIVE
MODE
D
R
N
P
PRELEASE
AUTO
HOLD
DRIVE
MODE
D
R
REMINDERS: • The vehicle is equipped with a shift-by-wire system and a shift-lock system that prevents you from shifting gears without depressing the brake pedal •P Release is for emergency/towing use and not used in normal daily drivingRefer to section 4 in the Owner’s Manual for more information.
Refer to section 5 in the Owner’s Manual for more information.
*IF EQUIPPED46NIRO EV FEATURES & FUNCTIONS GUIDE
A
B
Page 49 of 66

CENTER PANEL
CENTERPANEL
(Located below left of Rotary Dial Shifter Knob)
Electronic Parking Brake (EPB)Auto Hold
The Electronic Parking Brake (EPB) system utilizes an electric
motor to engage the parking brake.
Applying the Parking Brake
Pull up the EPB switch A. Ensure that the indicator light
is illuminated on the instrument cluster.
Releasing the Parking Brake
The EPB will automatically release when the shifter is placed
in Reverse or Drive.
To release EPB manually, depress the brake pedal, then press
the EPB switch A down, with the ignition switch in the ON
position. Ensure that the indicator light i s O F F.
REMINDERS:
•
As a bulb check, the EPB malfunction indicator will illuminate for approximately 3 seconds when the ignition switch is turned ON
•
If the warning light does not illuminate temporarily, or continues to remain lit, take your vehicle to an authorized Kia dealer and have the system checked
•The EPB should not be operated while the vehicle is moving
•
A click or electric brake motor sound may be heard while operating or releasing the EPB, but these conditions are normal and indicate that the EPB is functioning properly
REMINDERS:
•
To reduce the risk of an accident, do not activate Auto Hold while driving downhill, backing up or parking your vehicle
•
Do not solely rely on the Auto Hold system to keep the vehicle stopped. Always pay attention to traf fic and road conditions, and be prepared to depress the brakes
•Auto Hold turns off when ignition is cycled
•
•When leaving your keys with parking lot attendants or valet, make sure to inform them how to operate the EPB
•If parked on a steep incline/decline, pull up the EPB switch for more than 3 seconds for a firmer EPB application
•Pull up and hold EPB switch again to increase brake pressure if parked on a decline or incline
QUICK TIPS
NP
PRELEASE
AUTO
HOLD
DRIVE
MODE
D
R
Auto Hold temporarily maintains the vehicle at a standstill
even if the brake pedal is released. Auto Hold can be
turned ON/OFF using the AUTO HOLD switch B on the
center panel. Before Auto Hold will operate, the driver’s
door, engine hood and trunk must be closed, and the
driver’s seat belt must be fastened.
The Auto Hold indicator has four states:
Standby (white): With vehicle in Park and at a standstill,
and AUTO HOLD switch B turned ON, the indicator will
illuminate white. While driving the vehicle (vehicle is not
at a standstill), the Auto Hold indicator will remain white.
Engaged (green): When coming to a complete stop and depressing the brake pedal, the
Auto Hold indicator changes from white to green.
OFF (not illuminated): The indicator will turn OFF when the AUTO HOLD switch B is
turned OFF or when the EPB is manually turned ON.
Malfunction (yellow): When the indicator is illuminated yellow, there may be a system
malfunction. Take your vehicle to a local Kia dealer.
Refer to the inside front cover for more information on QR codes.www.youtube.com/KiaFeatureVideos
QR CODES
Electronic Parking Brake Video
Refer to section 5 in the Owner’s Manual for more information.
Refer to section 5 in the Owner’s Manual for more information.
ALWAYS CHECK THE OWNER’S MANUAL FOR COMPLETE OPER ATING INFORMATION AND SAFET Y WARNINGS. *IF EQUIPPED47
A
B
Page 66 of 66

*IF EQUIPPED(up to 60,000 miles)AMAINTENANCE INTERVALS (MILES)
MAINTENANCE ITEMS7, 5 0 015,00022,50030,0003 7, 5 0 045,00052,50060,000
Check tire pressure and tread wear; Rotate tires (every 7,500 miles)PPPPPPPP
Climate control air filter‡IRIRIRIR
12V battery conditionIIIIIIII
Steering gear rack, linkage & bootsIIIIIIII
Air conditioner refrigerant/compressor‡IIIIIIII
Brake fluidIIIIIIIR
Brake lines, hoses and connectionsIIIIIIII
Disc brakes and padsIIIIIIII
Brake pedalIIIIIIII
Drive shafts and bootsIIIIIIII
Suspension ball boltsIIIIIIII
Reduction Gear OilIII
Coolant SystemIII
CoolantR
NIRO EV NORMAL MAINTENANCE SCHEDULE P=Perform • R=Replace • I=InspectB
‡ If equipped.A . See the Owner’s Manual for complete maintenance schedule.B. And, if necessary, adjust, correct, clean or replace.See your Owner’s Manual for more details and complete maintenance information, including severe maintenance schedule. Warranty may be voided if maintenance schedule is not followed.
Check your Maintenance Schedule or schedule an appointment with a dealer using your UVO link account by logging into your Kia Access with UVO link App or your account on https://owners.Kia.com (See page 39 for setup information)
QUICK TIP
Part Number: DEEV210-PS-004†LEG AL DISCL AIMERS ON BACK INSIDE COVER© 2021 Kia Motors America, Inc. All rights reserved.Consumer - Roadside Assistance†15: 1-800-333-4KIA (4542)