2021 KIA NIRO EV power steering
[x] Cancel search: power steeringPage 4 of 66

VIDEOS & QR CODES .....Inside Front Cover
INSTRUMENT CLUSTER
Instrument Cluster Overview ................03
Indicators & Warning Lights .................04
Electric Vehicle (EV ) Indicators ...............05
Energy Consumption .......................05
Charge Warning Messages on LCD Display ......06
Tire Pressure Monitoring System ( TPMS) .......08
VEHICLE SETTINGS
LCD Instrument Cluster Modes ...............09
Trip Modes / Trip Computer ..................09
User Settings – Instrument Cluster .............10
Vehicle Settings* – Audio Head Unit ............11
Service Interval Mode .......................11
ELECTRIC VEHICLE (EV) FEATURES
Drive Modes ..............................12
Charging Connector Auto/Lock Mode ...........13
Scheduled Charging* .......................13
Charging Your Electric Vehicle .................14
EV Mode - UVO link with Navigation* ...........16
Regenerative Braking with Paddle Shifters .......18
ADVANCED DRIVER ASSISTANCE
SYSTEMS (ADAS)
Blind-Spot Collision-Avoidance Warning (BCW )* ...19
Rear Cross-Traffic Collision-Avoidance
Assist (RCCA)* ...........................19
Lane Keeping Assist (LK A)* .................20
Lane Following Assist (LFA)* .................22
Forward Collision-Avoidance Assist (FCA) ......23
Highway Driving Assist (HDA)* ...............24
Leading Vehicle Departure Alert (LVDA) ........25
Driver Attention Warning (DAW)* ..............26
DRIVER’S PANEL
Instrument Cluster Control ..................27
Electronic Stability Control (ESC) .............27
Hill-Start Assist Control (HAC) ...............27
Power Button ............................28
Power Windows, Window Lock & Central Door Lock 29
Automatic Door Lock. . . . . . . . . . . . . . . . . . . . . . . 29
Power/Heated Outside Mirrors*. . . . . . . . . . . . . . . 29
Power Folding Outside Mirrors* ..............29
STEERING WHEEL CONTROLS
Smart Cruise Control (SCC) with Stop & Go* .....30
Navigation-based Smart Cruise Control - Curve
(NSCC-C)* .............................31
Cruise Control ............................32
Tilt/ Telescoping Steering Wheel ..............32
Headlights & High Beams ...................33
Turn Signals & Fog Lights* ..................33
Windshield/Rear Wipers & Washers ...........34
AUDIO SYSTEM
Audio Controls ...........................35
Bluetooth® Wireless Technology ..............36
Android Auto™ / Apple CarPlay® Setup .........38
UVO link Activation* .......................39
UVO Assistance* ..........................39
Kia Access with UVO link App Download ........40
Kia Access with UVO link App Features Guide ....40
Standard Audio System - Value* ...............41
UVO link with Navigation* ...................42
CENTER PANEL
Digital Clock .............................43
USB Charger Ports*. . . . . . . . . . . . . . . . . . . . . . . . 43
Multimedia USB Ports & Power Outlets* ........43
Wireless Smartphone Charging System* ........44
CENTER PANEL (CO N T IN U ED)
Automatic Climate Control ..................45
Rotary Dial Shifter Knob ....................46
Heated Steering Wheel Button* ...............46
Electronic Parking Brake (EPB) ...............47
Auto Hold ...............................47
Seat Warmers / Ventilated Seats* .............48
S E AT I N G
Front Seat Headrest Adjustment ..............49
Rear Occupant Alert (ROA) with Door Monitoring .49
Power Adjustable Driver’s Seat* ..............50
6-Way Manual Adjustable Passenger’s Seat* ....50
Folding Rear Seats ........................51
OTHER KEY FEATURES
Hood Release Lever and Latch ...............52
Sunvisor ................................52
Smart Key ...............................53
Double-Turn Lock /Unlock All .................53
Map/Room Lamps. . . . . . . . . . . . . . . . . . . . . . . . . 54
Sunroof Operation* ........................54
Reverse Parking Distance Warning (PDW )* ......55
Rear View Monitor (RVM) ...................55
Liftgate Release Button* ....................56
Child-Protector Rear Door Lock ..............56
Tire Mobility Kit ...........................56
SAFETY FEATURES
Occupant Detection System (ODS) /
Passenger Airbag Off Indicator .............57
Seat Belts ...............................57
MAINTENANCE CHART .........Back Cover
LEGAL DISCLAIMERS ......Inside Back Cover
*IF EQUIPPED2NIRO EV FEATURES & FUNCTIONS GUIDE
TABLE OF CONTENTS
Page 6 of 66

220200
20
20 12 0
1 40
40
10 0
60
80180
40 160
60 140
80 120
100
E
F
mi
RANGE
68
°cCRUISE 60 mi/h
EPB
ECO
MPH
electric
LV .3R ND
L H
2518 mi
*IF EQUIPPED 4NIRO EV FEATURES & FUNCTIONS GUIDE
B
C
Indicators & Warning Lights
High Beam Indicator
Light ON Indicator
Front Fog Light Indicator*
Master Warning Light
FCA / FCW Indicator*
Lane Keeping Assist (LK A) Indicator*
Electronic Brake Force (EBD) System Warning Indicator( Two separate indicators on Instrument Cluster lit at same time)
Immobilizer Indicator*
READY Indicator
ECO Mode Indicator
ECO+ Mode Indicator
SPORT Mode Indicator
E V Service Warning Light
EV Temperature Warning
Charging System Warning Indicator
Seat Belt Warning Indicator
Low Tire Pressure Light / Tire Pressure Monitoring System (TPMS) Malfunction Indicator*Electronic Stability Control (ESC) Indicator / ESC Malfunction Indicator
Electronic Stability Control (ESC) OFF Indicator
Electronic Parking Brake (EPB) & Brake Fluid Warning Indicator
Electronic Power Steering (EPS) Warning Indicator
Airbag Warning Indicator
Anti-lock Braking System (ABS) Warning Indicator
Cruise Indicator*
(red color)
(yellow color)
Regenerative Brake Warning Indicator (Two separate indicators on Instrument Cluster lit at same time)
LED Headlamp Warning Indicator*
Charging Light Indicator
Power Down Warning Light
High Voltage Battery Level Warning Light
12 V B a t ter y
EPBElectric Parking Brake (EPB)
Your vehicle’s instrument cluster & indicator light locations may differ from those in the illustrations. For more information on the instrument cluster, the LCD Warning Messages and the function of all indicator and warning lights, please refer to section 4 of the Owner’s Manual.
This illustration is for demonstration purposes only. Some indicators and warning lights may not appear in illustration. On the vehicle, they may appear in the LCD.
A
INSTRUMENT CLUSTER
INSTRUMENT CLUSTER
Page 30 of 66
*IF EQUIPPED †LEGAL DISCL AIMERS ON BACK INSIDE COVER28NIRO EV FEATURES & FUNCTIONS GUIDE
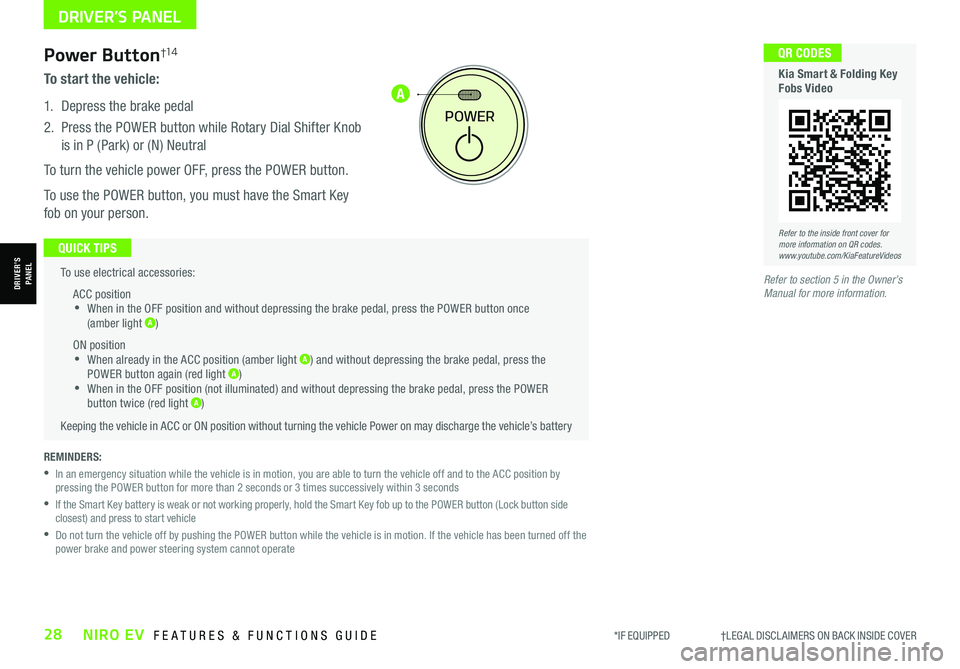
A
To use electrical accessories:
ACC position •When in the OFF position and without depressing the brake pedal, press the POWER button once (amber light A)
ON position •When already in the ACC position (amber light A) and without depressing the brake pedal, press the POWER button again (red light A) •
When in the OFF position (not illuminated) and without depressing the brake pedal, press the POWER button twice (red light A)
Keeping the vehicle in ACC or ON position without turning the vehicle Power on may discharge the vehicle’s battery
QUICK TIPS
POWER
REMINDERS:
•
In an emergency situation while the vehicle is in motion, you are able to turn the vehicle off and to the ACC position by pressing the POWER button for more than 2 seconds or 3 times successively within 3 seconds
•
If the Smart Key battery is weak or not working properly, hold the Smart Key fob up to the POWER button (Lock button side closest) and press to start vehicle
•
Do not turn the vehicle off by pushing the POWER button while the vehicle is in motion. If the vehicle has been turned off the power brake and power steering system cannot operate
Power Button†1 4
To start the vehicle:
1. Depress the brake pedal
2.
Press the POWER button while Rotary Dial Shifter Knob
is in P (Park) or (N) Neutral
To turn the vehicle power OFF, press the POWER button.
To use the POWER button, you must have the Smart Key
fob on your person.
Refer to the inside front cover for more information on QR codes.www.youtube.com/KiaFeatureVideos
QR CODES
Kia Smart & Folding Key Fobs Video
Refer to section 5 in the Owner’s Manual for more information.
DRIVER’S PANEL
DRIVER’SPANEL
Page 35 of 66
ALWAYS CHECK THE OWNER’S MANUAL FOR COMPLETE OPER ATING INFORMATION AND SAFET Y WARNINGS. *IF EQUIPPED33
STEERING WHEEL CONTROLS
STEERING WHEEL CONTROLS
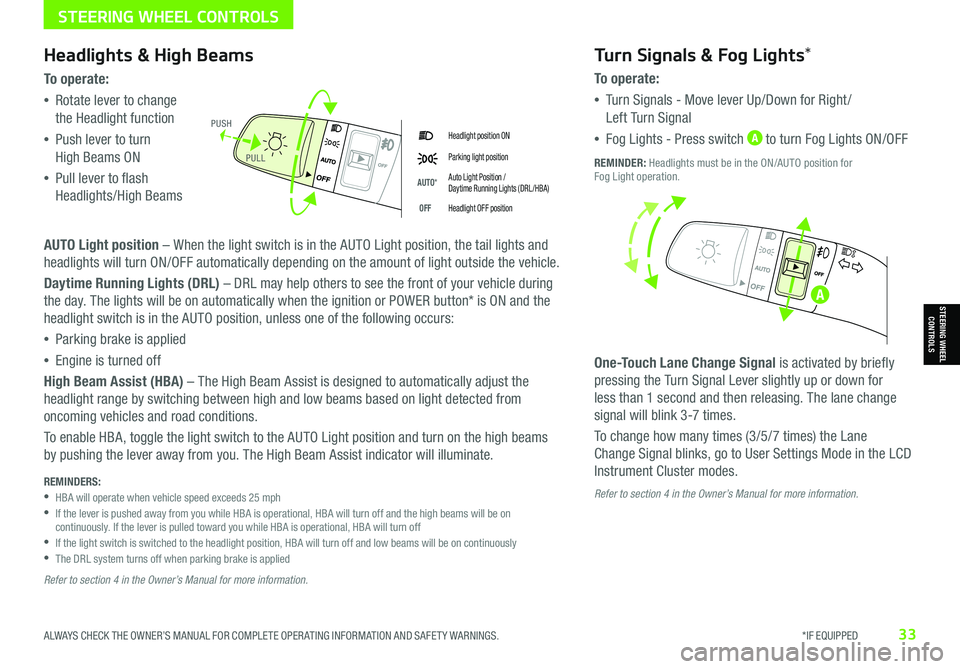
Headlight position ON
Parking light position
AUTO*Auto Light Position / Daytime Running Lights (DRL /HBA)
OFFHeadlight OFF position
Headlights & High Beams
To o p e rate:
•Rotate lever to change
the Headlight function
•Push lever to turn
High Beams ON
•Pull lever to flash
Headlights/High Beams
AUTO Light position – When the light switch is in the AUTO Light position, the tail lights and
headlights will turn ON/OFF automatically depending on the amount of light outside the vehicle.
Daytime Running Lights (DRL) – DRL may help others to see the front of your vehicle during
the day. The lights will be on automatically when the ignition or POWER button* is ON and the
headlight switch is in the AUTO position, unless one of the following occurs:
•Parking brake is applied
•Engine is turned off
High Beam Assist (HBA) – The High Beam Assist is designed to automatically adjust the
headlight range by switching between high and low beams based on light detected from
oncoming vehicles and road conditions.
To enable HBA, toggle the light switch to the AUTO Light position and turn on the high beams
by pushing the lever away from you. The High Beam Assist indicator will illuminate.
Turn Signals & Fog Lights*
To o p e r a t e :
•Tu r n Signals - Move lever Up/Down for Right /
Left Turn Signal
•Fog Lights - Press switch A to turn Fog Lights ON/OFF
One-Touch Lane Change Signal is activated by briefly
pressing the Turn Signal Lever slightly up or down for
less than 1 second and then releasing. The lane change
signal will blink 3-7 times.
To change how many times (3/5/7 times) the Lane
Change Signal blinks, go to User Settings Mode in the LCD
Instrument Cluster modes.
REMINDER: Headlights must be in the ON/AUTO position for Fog Light operation.
PUSH
PULL
Refer to section 4 in the Owner’s Manual for more information. REMINDERS: •
HBA will operate when vehicle speed exceeds 25 mph •
If the lever is pushed away from you while HBA is operational, HBA will turn off and the high beams will be on continuously. If the lever is pulled toward you while HBA is operational, HBA will turn off •
If the light switch is switched to the headlight position, HBA will turn off and low beams will be on continuously •The DRL system turns off when parking brake is applied
Refer to section 4 in the Owner’s Manual for more information.
A
Page 37 of 66
ALWAYS CHECK THE OWNER’S MANUAL FOR COMPLETE OPER ATING INFORMATION AND SAFET Y WARNINGS. *IF EQUIPPED †LEGAL DISCL AIMERS ON BACK INSIDE COVER35
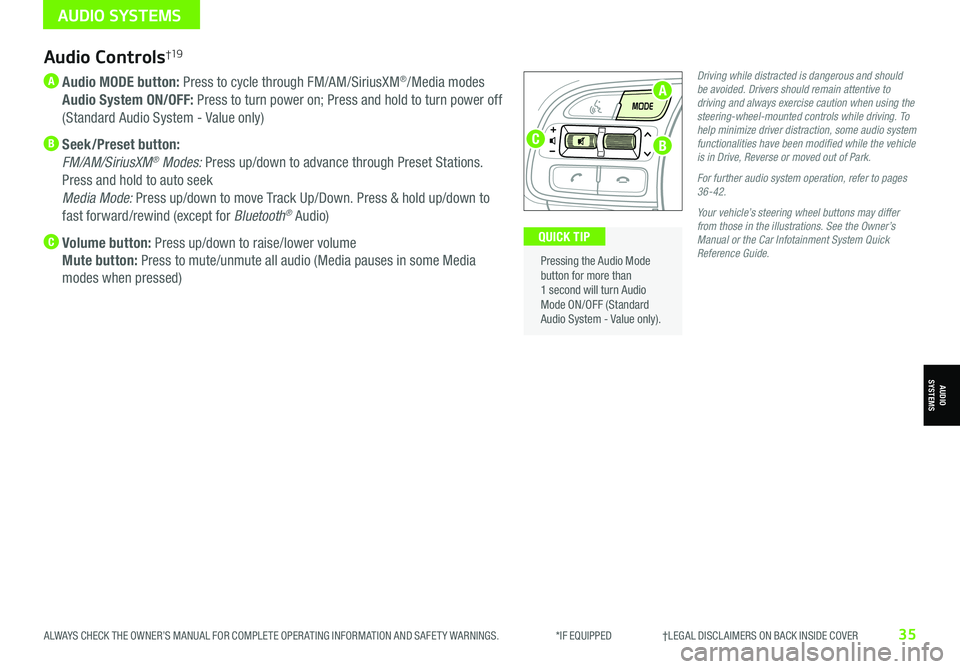
Audio Controls†19
A Audio MODE button: Press to cycle through FM/AM/SiriusXM®/Media modes
Audio System ON/OFF: Press to turn power on; Press and hold to turn power off
(Standard Audio System - Value only)
B Seek/Preset button:
FM/AM/SiriusXM® Modes: Press up/down to advance through Preset Stations.
Press and hold to auto seek
Media Mode: Press up/down to move Track Up/Down. Press & hold up/down to
fast forward/rewind (except for Bluetooth® Audio)
C Volume button: Press up/down to raise/lower volume
Mute button: Press to mute/unmute all audio (Media pauses in some Media
modes when pressed)
Driving while distracted is dangerous and should be avoided. Drivers should remain attentive to driving and always exercise caution when using the steering-wheel-mounted controls while driving. To help minimize driver distraction, some audio system functionalities have been modified while the vehicle is in Drive, Reverse or moved out of Park.
For further audio system operation, refer to pages 36-42.
Your vehicle’s steering wheel buttons may differ from those in the illustrations. See the Owner’s Manual or the Car Infotainment System Quick Reference Guide.
Pressing the Audio Mode button for more than 1 second will turn Audio Mode ON/OFF (Standard Audio System - Value only).
QUICK TIP
AUDIO SYSTEMS
AUDIOSYSTEMS
A
BC
Page 44 of 66
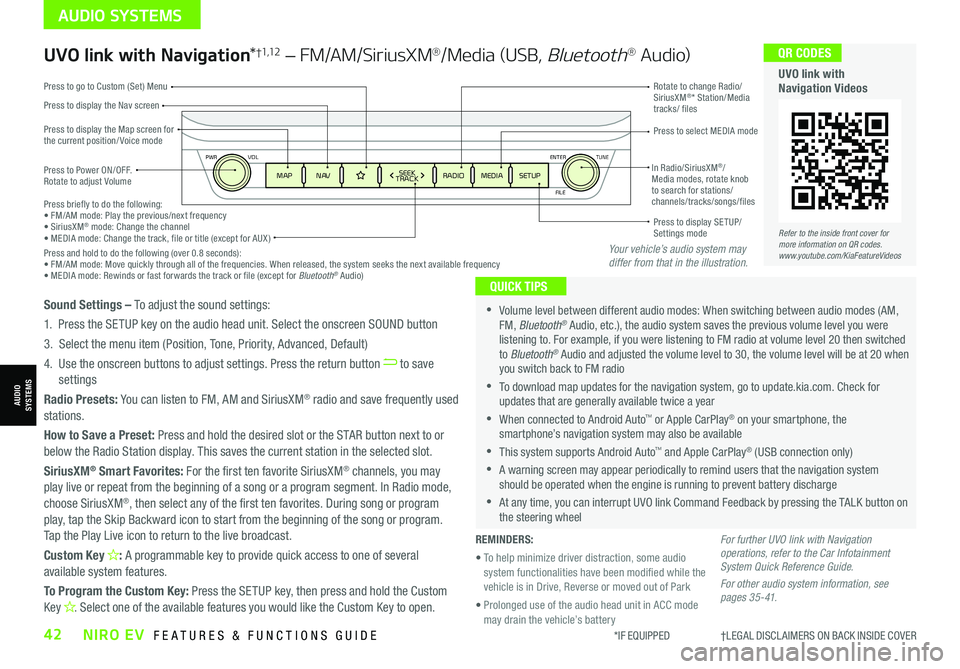
ENTER
PWR VOL
FILE
TUNE
MAPN AV RADIOMEDIA SETUPSEEK
TRACKIn Radio/SiriusXM®/ Media modes, rotate knob to search for stations/ channels/tracks/songs/files Press briefly to do the following:• FM/AM mode: Play the previous/next frequency• SiriusXM® mode: Change the channel• MEDIA mode: Change the track, file or title (except for AUX )Press and hold to do the following (over 0.8 seconds):• FM/AM mode: Move quickly through all of the frequencies. When released, the system seeks the next available frequency• MEDIA mode: Rewinds or fast forwards the track or file (except for Bluetooth® Audio)
Press to Power ON/OFF. Rotate to adjust Volume
Press to display the Nav screen
Press to display the Map screen for the current position/ Voice mode
Press to go to Custom (Set) Menu
Press to display SE TUP/Settings mode
Press to select MEDIA mode
Rotate to change Radio/SiriusXM®* Station/Media tracks/ files
UVO link with Navigation*†1,12 – FM/AM/SiriusXM®/Media (USB, Bluetooth® Au d io)
•Volume level between different audio modes: When switching between audio modes (AM, FM, Bluetooth® Audio, etc.), the audio system saves the previous volume level you were listening to. For example, if you were listening to FM radio at volume level 20 then switched to Bluetooth® Audio and adjusted the volume level to 30, the volume level will be at 20 when you switch back to FM radio
•To download map updates for the navigation system, go to update.kia.com. Check for updates that are generally available twice a year
•When connected to Android Auto™ or Apple CarPlay® on your smartphone, the smartphone’s navigation system may also be available
•This system supports Android Auto™ and Apple CarPlay® (USB connection only)
•A warning screen may appear periodically to remind users that the navigation system should be operated when the engine is running to prevent battery discharge
•At any time, you can interrupt UVO link Command Feedback by pressing the TALK button on the steering wheel
QUICK TIPS
Sound Settings – To adjust the sound settings:
1. Press the SETUP key on the audio head unit. Select the onscreen SOUND button
3. Select the menu item (Position, Tone, Priority, Advanced, Default)
4. Use the onscreen buttons to adjust settings. Press the return button to save settings
Radio Presets: You can listen to FM, AM and SiriusXM® radio and save frequently used stations.
How to Save a Preset: Press and hold the desired slot or the STAR button next to or below the Radio Station display. This saves the current station in the selected slot.
SiriusXM® Smart Favorites: For the first ten favorite SiriusXM® channels, you may play live or repeat from the beginning of a song or a program segment. In Radio mode,
choose SiriusXM®, then select any of the first ten favorites. During song or program play, tap the Skip Backward icon to start from the beginning of the song or program. Tap the Play Live icon to return to the live broadcast.
Custom Key H: A programmable key to provide quick access to one of several available system features.
To Program the Custom Key: Press the SETUP key, then press and hold the Custom Key H. Select one of the available features you would like the Custom Key to open.
For further UVO link with Navigation operations, refer to the Car Infotainment System Quick Reference Guide.
For other audio system information, see pages 35-41.
Refer to the inside front cover for more information on QR codes.www.youtube.com/KiaFeatureVideos
QR CODES
UVO link with Navigation Videos
REMINDERS:
• To help minimize driver distraction, some audio system functionalities have been modified while the vehicle is in Drive, Reverse or moved out of Park
• Prolonged use of the audio head unit in ACC mode may drain the vehicle’s battery
Your vehicle’s audio system may differ from that in the illustration.
*IF EQUIPPED †LEGAL DISCL AIMERS ON BACK INSIDE COVER42NIRO EV FEATURES & FUNCTIONS GUIDE
AUDIO SYSTEMS
AUDIOSYSTEMS
Page 48 of 66
CENTER PANEL
CENTERPANEL
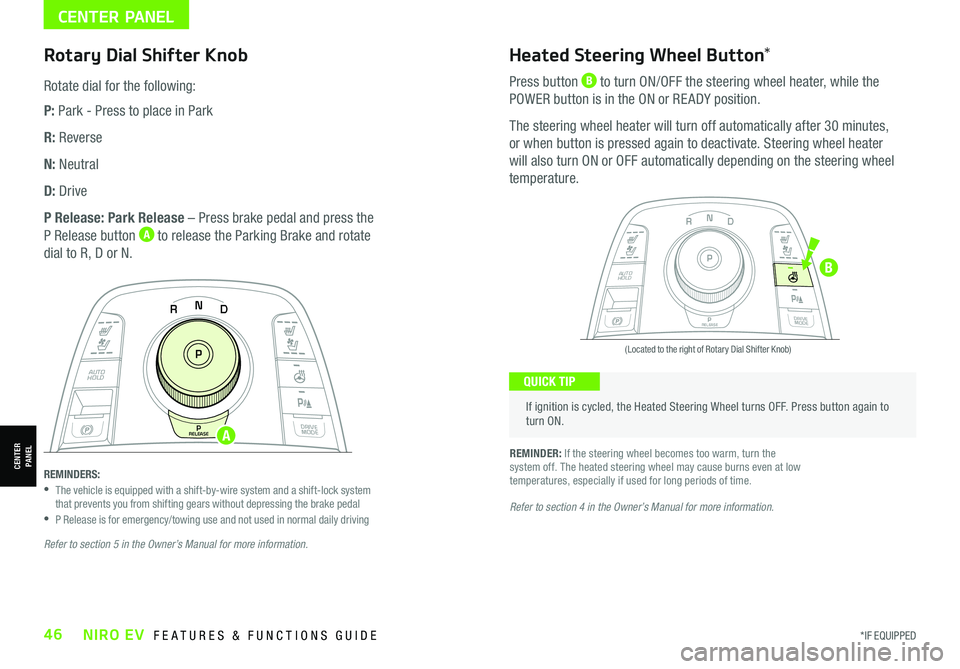
Rotary Dial Shifter Knob
Rotate dial for the following:
P: Park - Press to place in Park
R: Reverse
N: Neutral
D: Drive
P Release: Park Release – Press brake pedal and press the
P Release button A to release the Parking Brake and rotate
dial to R, D or N.
If ignition is cycled, the Heated Steering Wheel turns OFF. Press button again to turn ON.
(Located to the right of Rotary Dial Shifter Knob)
QUICK TIP
Heated Steering Wheel Button*
Press button B to turn ON/OFF the steering wheel heater, while the
POWER button is in the ON or RE ADY position.
The steering wheel heater will turn off automatically after 30 minutes,
or when button is pressed again to deactivate. Steering wheel heater
will also turn ON or OFF automatically depending on the steering wheel
temperature.
REMINDER: If the steering wheel becomes too warm, turn the system off. The heated steering wheel may cause burns even at low temperatures, especially if used for long periods of time.
NP
PRELEASE
AUTO
HOLD
DRIVE
MODE
D
R
N
P
PRELEASE
AUTO
HOLD
DRIVE
MODE
D
R
REMINDERS: • The vehicle is equipped with a shift-by-wire system and a shift-lock system that prevents you from shifting gears without depressing the brake pedal •P Release is for emergency/towing use and not used in normal daily drivingRefer to section 4 in the Owner’s Manual for more information.
Refer to section 5 in the Owner’s Manual for more information.
*IF EQUIPPED46NIRO EV FEATURES & FUNCTIONS GUIDE
A
B
Page 57 of 66

ALWAYS CHECK THE OWNER’S MANUAL FOR COMPLETE OPER ATING INFORMATION AND SAFET Y WARNINGS. *IF EQUIPPED †LEGAL DISCL AIMERS ON BACK INSIDE COVER55
N
PRELEASE
AUTO
HOLD
D
R
DRIVE
MODE
P
Reverse Parking Distance Warning (PDW)*†7
Reverse Parking Distance Warning (PDW ) is a supplemental system that is
designed to assist the driver by chiming if any object is detected within the
sensing area to the front and rear of the vehicle when moving forward or
backing up.
PDW is activated when the ignition is ON/RE ADY and the vehicle is
in R (Reverse). To deactivate PDW, press the PDW button A (LED
illuminated), when vehicle
is in D (Drive) or R (Reverse).
To activate, press button A
again (LED not illuminated).
REMINDERS:
•If the vehicle is moving at speeds over 3 mph, the system may not activate correctly
•
When more than two objects are sensed at the same time, the closest one will be recognized first
•
The above images are for illustration purposes only. Operational details may vary
Reverse Parking Distance Warning (PDW) is not a substitute for proper and safe parking and backing-up procedures. Always drive safely and use caution when backing up. Reverse Parking Distance Warning (PDW) may not detect every object in front of or behind the vehicle.
Refer to section 4 in the Owner’s Manual for more information.
Rear View Monitor (RVM)†7
Rear View Monitor is a supplemental system
that displays the view behind the vehicle
through the audio system screens while the
vehicle is in Reverse.
The Rear View Monitor activates when the:
•POWER button is in the ON/RE ADY position
•Rotary Dial Shifter Knob is in the R
(Reverse) position
REMINDERS:
•
The images shown are for illustration purposes only and may not reflect actual operation
•
UVO link – While camera is active, only the audio controls on the Audio System can be operated
•
UVO link with Navigation* – While camera is active, only the Audio System can be operated on the Steering Wheel and Audio Head Unit. All other features are disabled
•
Rear View Monitor may not display every object behind the vehicle
Rear View Monitor is not a substitute for proper and safe backing-up procedures. Rear View Monitor may not display every object behind the vehicle. Always drive safely and use caution when backing up.
N
P
PRELEASE
AUTO
HOLD
DRIVE
MODE
D
R
Refer to the inside front cover for more information on QR codes.www.youtube.com/KiaFeatureVideos
QR CODES
Forward/Reverse Parking Distance Warning (PDW) Video
Refer to section 4 in the Owner’s Manual for more information.
OTHER KEY FEATURES
OTHER KEY FEATURES
A