2021 HYUNDAI TUCSON HYBRID charging
[x] Cancel search: chargingPage 279 of 630
Convenient features
5-122
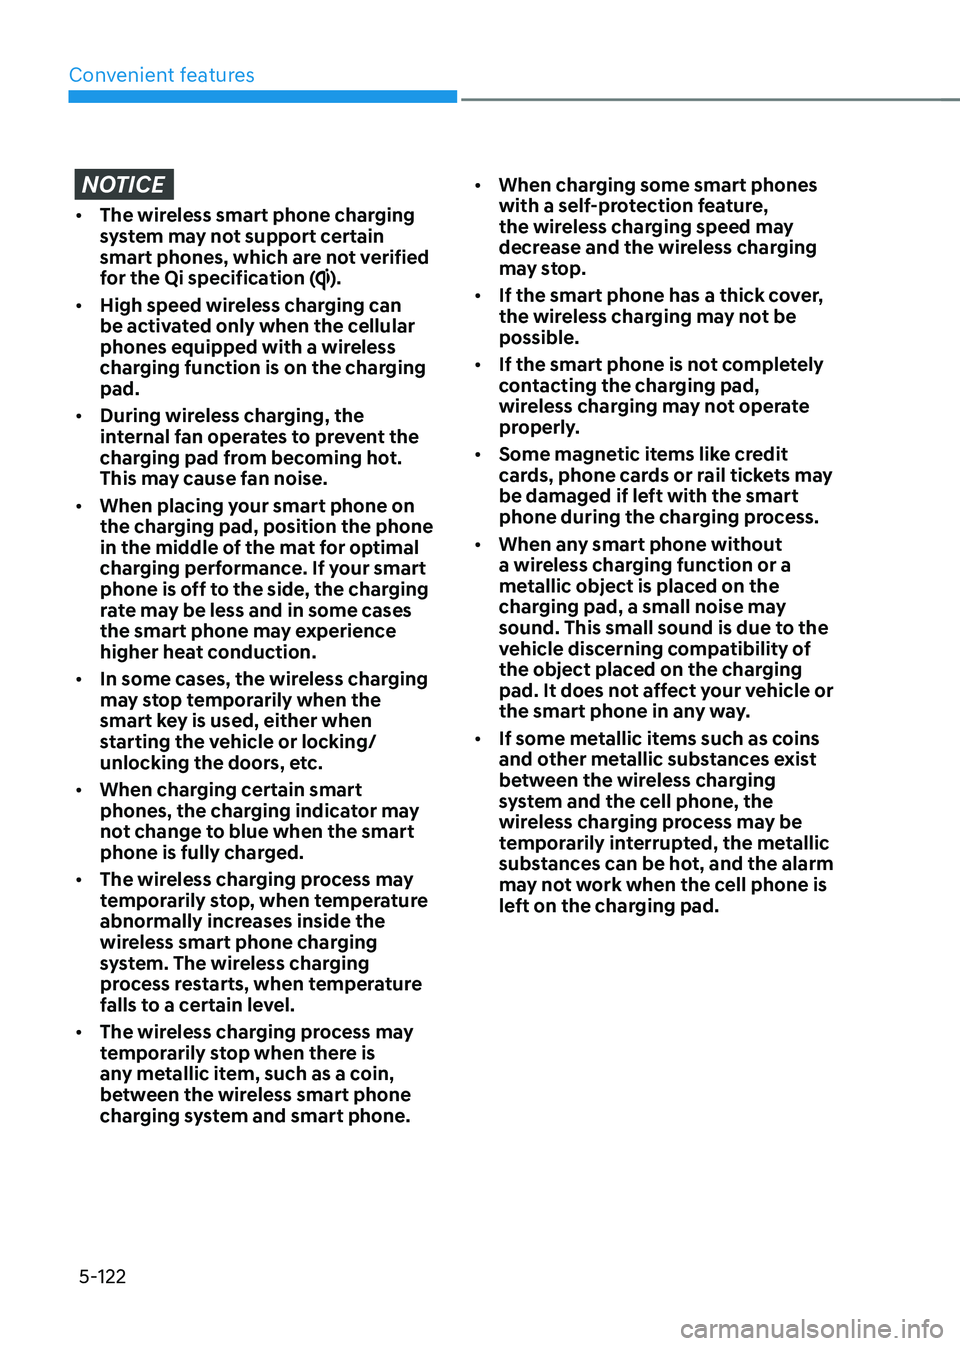
NOTICE
• The wireless smart phone charging
system may not support certain
smart phones, which are not verified
for the Qi specification (
).
• High speed wireless charging can
be activated only when the cellular
phones equipped with a wireless
charging function is on the charging
pad.
• During wireless charging, the
internal fan operates to prevent the
charging pad from becoming hot.
This may cause fan noise.
• When placing your smart phone on
the charging pad, position the phone
in the middle of the mat for optimal
charging performance. If your smart
phone is off to the side, the charging
rate may be less and in some cases
the smart phone may experience
higher heat conduction.
• In some cases, the wireless charging
may stop temporarily when the
smart key is used, either when
starting the vehicle or locking/
unlocking the doors, etc.
• When charging certain smart
phones, the charging indicator may
not change to blue when the smart
phone is fully charged.
• The wireless charging process may
temporarily stop, when temperature
abnormally increases inside the
wireless smart phone charging
system. The wireless charging
process restarts, when temperature
falls to a certain level.
• The wireless charging process may
temporarily stop when there is
any metallic item, such as a coin,
between the wireless smart phone
charging system and smart phone. •
When charging some smart phones
with a self-protection feature,
the wireless charging speed may
decrease and the wireless charging
may stop.
• If the smart phone has a thick cover,
the wireless charging may not be
possible.
• If the smart phone is not completely
contacting the charging pad,
wireless charging may not operate
properly.
• Some magnetic items like credit
cards, phone cards or rail tickets may
be damaged if left with the smart
phone during the charging process.
• When any smart phone without
a wireless charging function or a
metallic object is placed on the
charging pad, a small noise may
sound. This small sound is due to the
vehicle discerning compatibility of
the object placed on the charging
pad. It does not affect your vehicle or
the smart phone in any way.
• If some metallic items such as coins
and other metallic substances exist
between the wireless charging
system and the cell phone, the
wireless charging process may be
temporarily interrupted, the metallic
substances can be hot, and the alarm
may not work when the cell phone is
left on the charging pad.
Page 280 of 630
05
5-123
Information
If the Ignition switch is in the OFF
position, the charging also stops.
Information
This device complies with part 15 of the
FCC Rules.
Operation is subject to the following two
conditions:
1.
This device may not cause harmful
interference, and
2.
This device must accept any
interference r
eceived, including
interference that may cause undesired
operation.
Clock
The clock can be set from the
infotainment system.
For detailed information, refer to the
separately supplied infotainment
system manual.
WARNING
Do not attempt to adjust the clock
while driving. Doing so may result in
distracted driving which may lead to
an accident involving personal injury or
death.
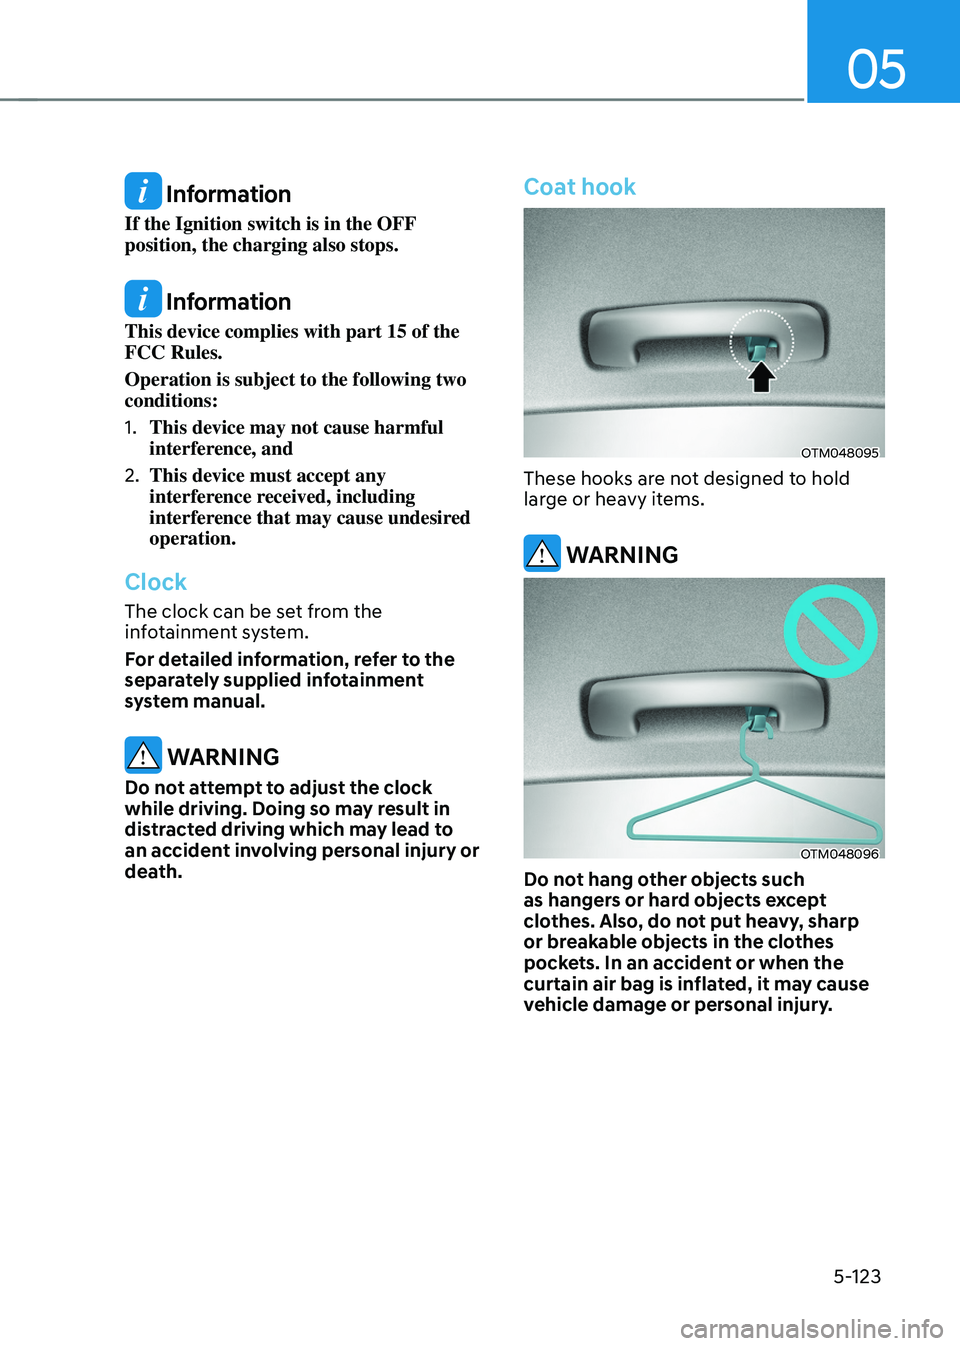
Coat hook
OTM048095
These hooks are not designed to hold
large or heavy items.
WARNING
OTM048096
Do not hang other objects such
as hangers or hard objects except
clothes. Also, do not put heavy, sharp
or breakable objects in the clothes
pockets. In an accident or when the
curtain air bag is inflated, it may cause
vehicle damage or personal injury.
Page 293 of 630
Driving your vehicle
6-6
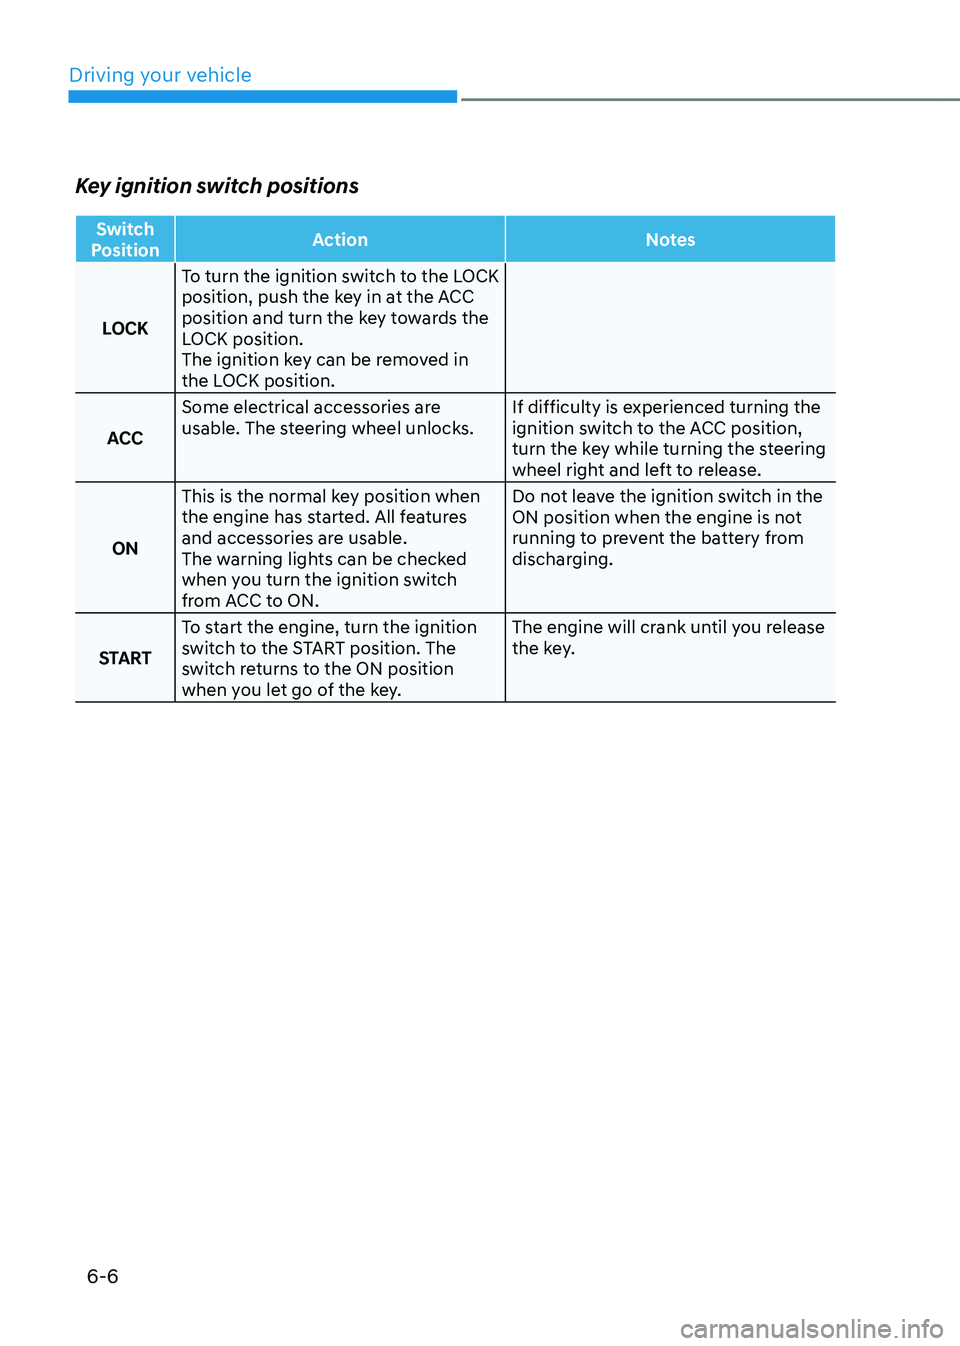
Key ignition switch positions
Switch
Position Action
Notes
LOCK To turn the ignition switch to the LOCK
position, push the key in at the ACC
position and turn the key towards the
LOCK position.
The ignition key can be removed in
the LOCK position.
ACC Some electrical accessories are
usable. The steering wheel unlocks.
If difficulty is experienced turning the
ignition switch to the ACC position,
turn the key while turning the steering
wheel right and left to release.
ON This is the normal key position when
the engine has started. All features
and accessories are usable.
The warning lights can be checked
when you turn the ignition switch
from ACC to ON. Do not leave the ignition switch in the
ON position when the engine is not
running to prevent the battery from
discharging.
START To start the engine, turn the ignition
switch to the START position. The
switch returns to the ON position
when you let go of the key. The engine will crank until you release
the key.
Page 296 of 630
06
6-9
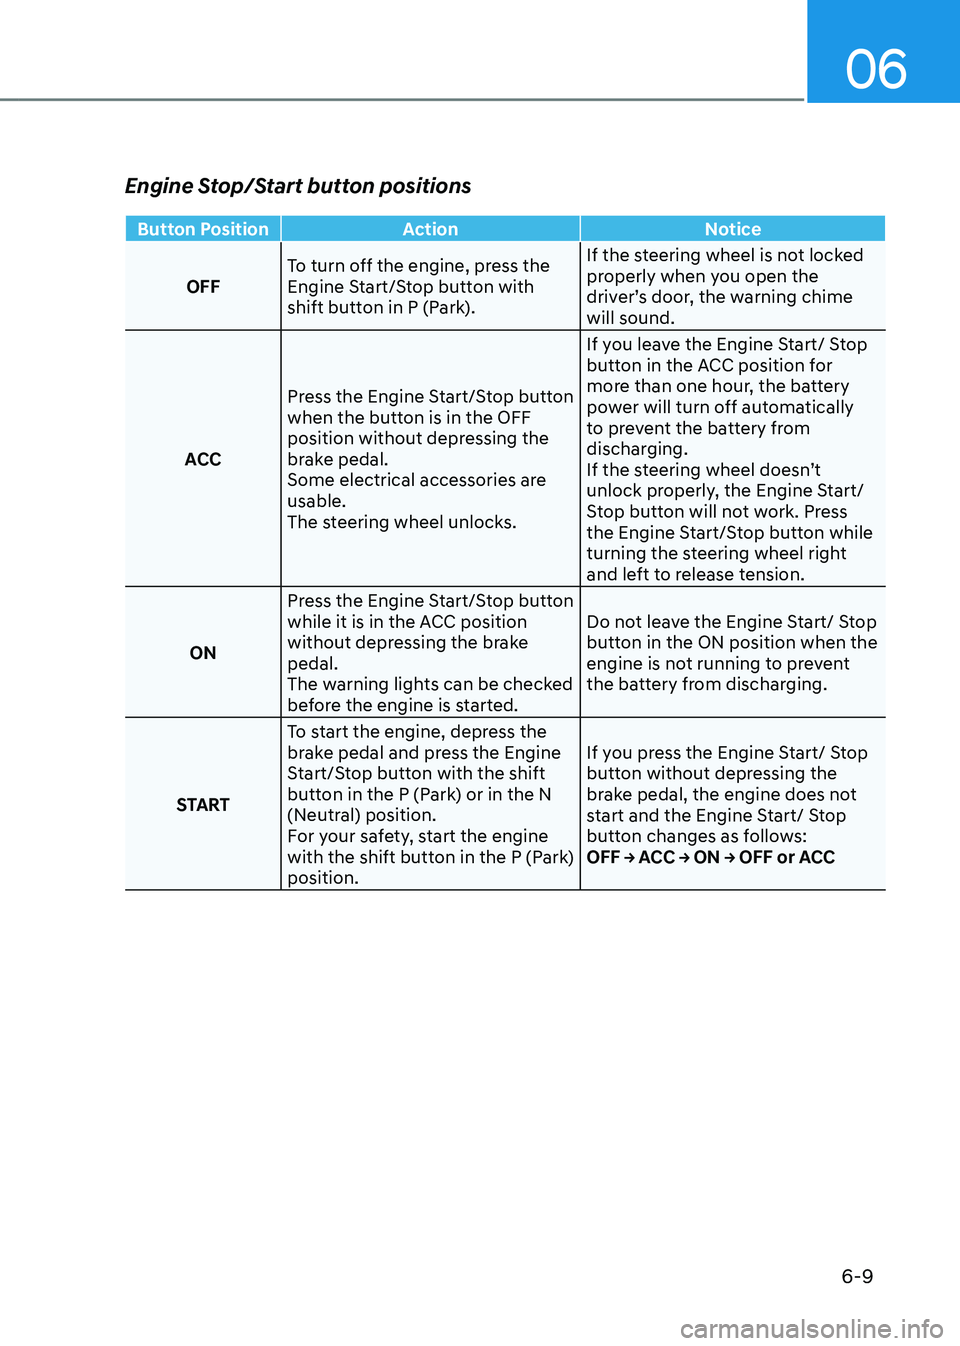
Engine Stop/Start button positions
Button PositionAction Notice
OFF To turn off the engine, press the
Engine Start/Stop button with
shift button in P (Park). If the steering wheel is not locked
properly when you open the
driver’s door, the warning chime
will sound.
ACC Press the Engine Start/Stop button
when the button is in the OFF
position without depressing the
brake pedal.
Some electrical accessories are
usable.
The steering wheel unlocks. If you leave the Engine Start/ Stop
button in the ACC position for
more than one hour, the battery
power will turn off automatically
to prevent the battery from
discharging.
If the steering wheel doesn’t
unlock properly, the Engine Start/
Stop button will not work. Press
the Engine Start/Stop button while
turning the steering wheel right
and left to release tension.
ON Press the Engine Start/Stop button
while it is in the ACC position
without depressing the brake
pedal.
The warning lights can be checked
before the engine is started. Do not leave the Engine Start/ Stop
button in the ON position when the
engine is not running to prevent
the battery from discharging.
START To start the engine, depress the
brake pedal and press the Engine
Start/Stop button with the shift
button in the P (Park) or in the N
(Neutral) position.
For your safety, start the engine
with the shift button in the P (Park)
position. If you press the Engine Start/ Stop
button without depressing the
brake pedal, the engine does not
start and the Engine Start/ Stop
button changes as follows:
OFF → ACC → ON → OFF or ACC
Page 344 of 630

06
6-57
Winter precautions
Use high quality ethylene glycol coolant
Your vehicle is delivered with high
quality ethylene glycol coolant in the
cooling system. It is the only type of
coolant that should be used because it
helps prevent corrosion in the cooling
system, lubricates the water pump and
prevents freezing. Be sure to replace or
replenish your coolant in accordance
with the maintenance schedule in
chapter 9. Before winter, have your
coolant tested to assure that its freezing
point is sufficient for the temperatures
anticipated during the winter.
Check battery and cables
Winter temperatures affect battery
performance. Inspect the battery and
cables, as specified in chapter 9. The
battery charging level can be checked
by an authorized HYUNDAI dealer or in a
service station.
Change to “winter weight” oil if
necessary
In some regions during winter, it is
recommended to use the “winter
weight” oil with lower viscosity In
addition, replace the engine oil and filter
if it is close to the next maintenance
interval. Fresh engine oil ensures
optimum engine operation during the
winter months. For further information,
refer to chapter 2. When you are not
sure about a type of winter weight oil,
we recommend that you consult an
authorized HYUNDAI dealer.Check spark plugs and ignition system
Inspect the spark plugs, as specified in
chapter 9. If necessary, replace them.
Also check all ignition wirings and
components for any cracks, wear-out,
and damage.
To prevent locks from freezing
To prevent the locks from being frozen,
spray approved de-icing fluid or glycerin
into key holes. When a lock opening is
already covered with ice, spray approved
de-icing fluid over the ice to remove it.
When an internal part of a lock freezes,
try to thaw it with a heated key. Carefully
use the heated key to avoid an injury.
Use approved window washer anti-
freeze solution in system
To prevent the window washer from
being frozen, add authorized window
washer anti-freeze solution, as specified
on the window washer container.
Window washer anti-freeze solution is
available from an authorized HYUNDAI
dealer, and most vehicle accessory
outlets. Do not use engine coolant or
other types of anti-freeze solution, to
prevent any damage to the vehicle paint.
Page 527 of 630
08
8 -7
ONX4HQ010015
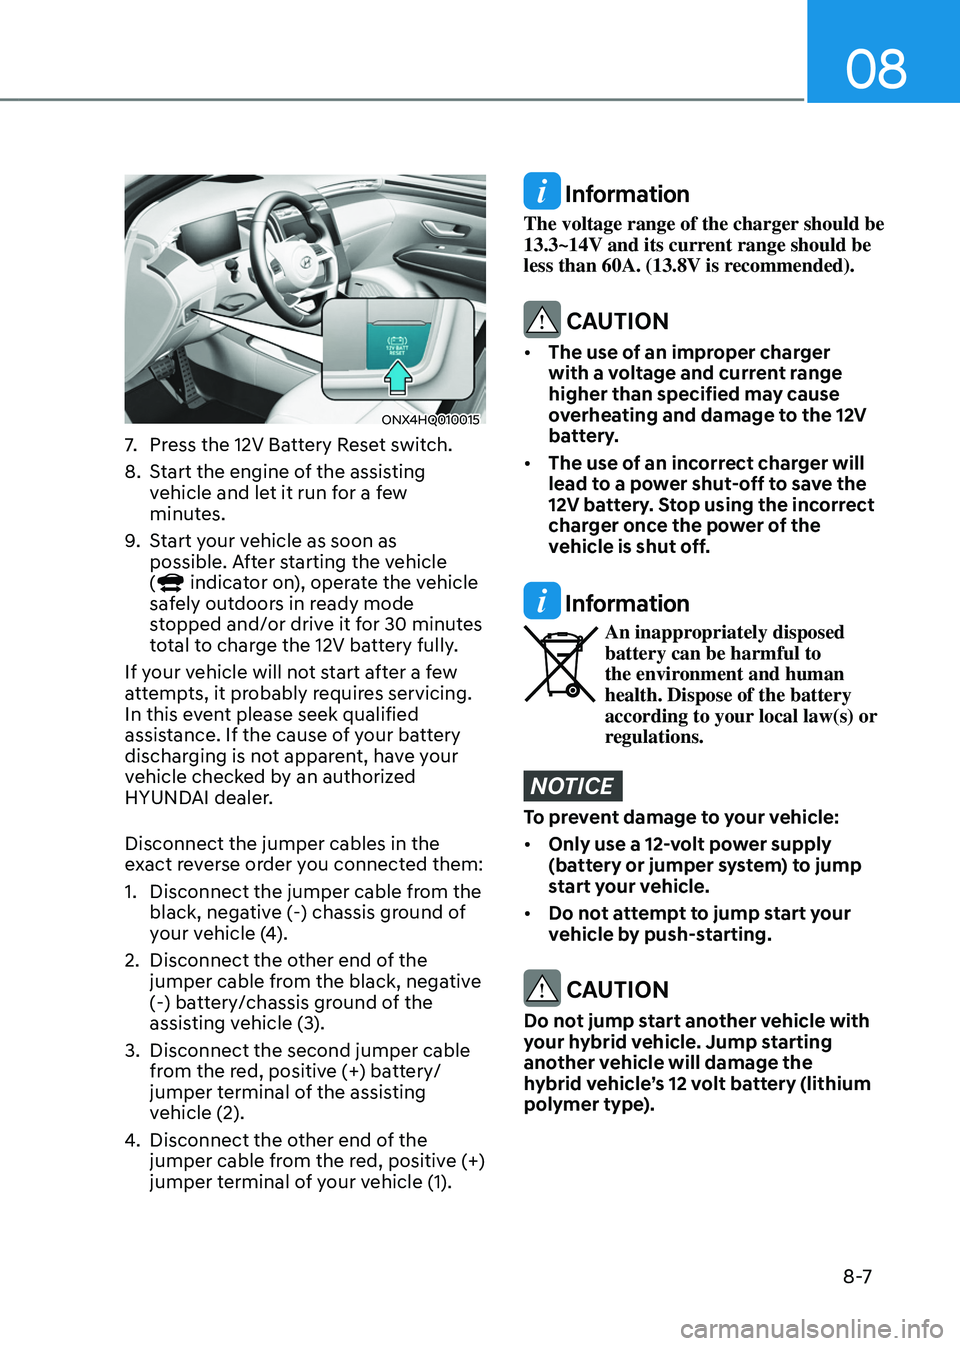
7. Press the 12V Battery Reset switch.
8.
Start the engine o
f the assisting
vehicle and let it run for a few
minutes.
9.
Start y
our vehicle as soon as
possible. After starting the vehicle
(
indicator on), operate the vehicle
safely outdoors in ready mode
stopped and/or drive it for 30 minutes
total to charge the 12V battery fully.
If your vehicle will not start after a few
attempts, it probably requires servicing.
In this event please seek qualified
assistance. If the cause of your battery
discharging is not apparent, have your
vehicle checked by an authorized
HYUNDAI dealer.
Disconnect the jumper cables in the
exact reverse order you connected them:
1.
Disconnect the jumper cable from the
black, nega
tive (-) chassis ground of
your vehicle (4).
2.
Disconnect the other end o
f the
jumper cable from the black, negative
(-) battery/chassis ground of the
assisting vehicle (3).
3.
Disconnect the second jumper cable
from the r
ed, positive (+) battery/
jumper terminal of the assisting
vehicle (2).
4.
Disconnect the other end o
f the
jumper cable from the red, positive (+)
jumper terminal of your vehicle (1).
Information
The voltage range of the charger should be
13.3~14V and its current range should be
less than 60A. (13.8V is recommended).
CAUTION
• The use of an improper charger
with a voltage and current range
higher than specified may cause
overheating and damage to the 12V
battery.
• The use of an incorrect charger will
lead to a power shut-off to save the
12V battery. Stop using the incorrect
charger once the power of the
vehicle is shut off.
Information
An inappropriately disposed
battery can be harmful to
the environment and human
health. Dispose of the battery
according to your local law(s) or
regulations.
NOTICE
To prevent damage to your vehicle:
• Only use a 12-volt power supply
(battery or jumper system) to jump
start your vehicle.
• Do not attempt to jump start your
vehicle by push-starting.
CAUTION
Do not jump start another vehicle with
your hybrid vehicle. Jump starting
another vehicle will damage the
hybrid vehicle’s 12 volt battery (lithium
polymer type).
Page 548 of 630
9. Maintenance
Engine compartment ........................................................................\
................9-3
Main tenance services
........................................................................\
............... 9-4
Owner’s responsibility ........................................................................\
........................ 9-4
Owner maint enance precautions........................................................................\
....... 9-4
Owner maintenance ........................................................................\
................. 9-5Owner maintenance schedule ........................................................................\
............9-5
Scheduled maintenance services .....................................................................9 -7Normal Maintenance Schedule ........................................................................\
.......... 9-8
Maint enance under severe usage conditions .......................................................... 9-
11
Explanation of scheduled maintenance items ..............................................9-13
E ngine oil
........................................................................\
.................................. 9-
15
Checking the engine oil level ........................................................................\
............9-15
Checking the engine oil and filt er ........................................................................\
..... 9-
16
Engine coolant/inverter coolant .....................................................................9-17Checking the coolant level ........................................................................\
................. 9-17
Changing coolan t ........................................................................\
............................... 9-
19
Hybrid Starter & Generator (HSG) belt ..........................................................9-20Checking the Hybrid Starter & Generator (HSG) belt .............................................9-20
Brake fluid ........................................................................\
............................... 9-20Checking the brake fluid level ........................................................................\
..........9-20
Washer fluid ........................................................................\
............................. 9-21Checking the washer fluid level ........................................................................\
........9-21
Air cleaner ........................................................................\
............................... 9-22Filter replacement ........................................................................\
..............................9-22
Cabin air filter ........................................................................\
..........................9-23Filter inspection ........................................................................\
.................................. 9-23
Filt er replacement ........................................................................\
.............................. 9-
23
Wiper blades ........................................................................\
...........................9-2 4Blade inspection ........................................................................\
.................................9-2 4
Blade replacement ........................................................................\
............................. 9
-24
Battery ........................................................................\
.....................................9-28Battery capacity label ........................................................................\
........................9-29
Ba ttery recharging ........................................................................\
............................. 9-
29
Reset items
........................................................................\
........................................ 9-
30
Maintenance
9
Page 576 of 630
09
9-29
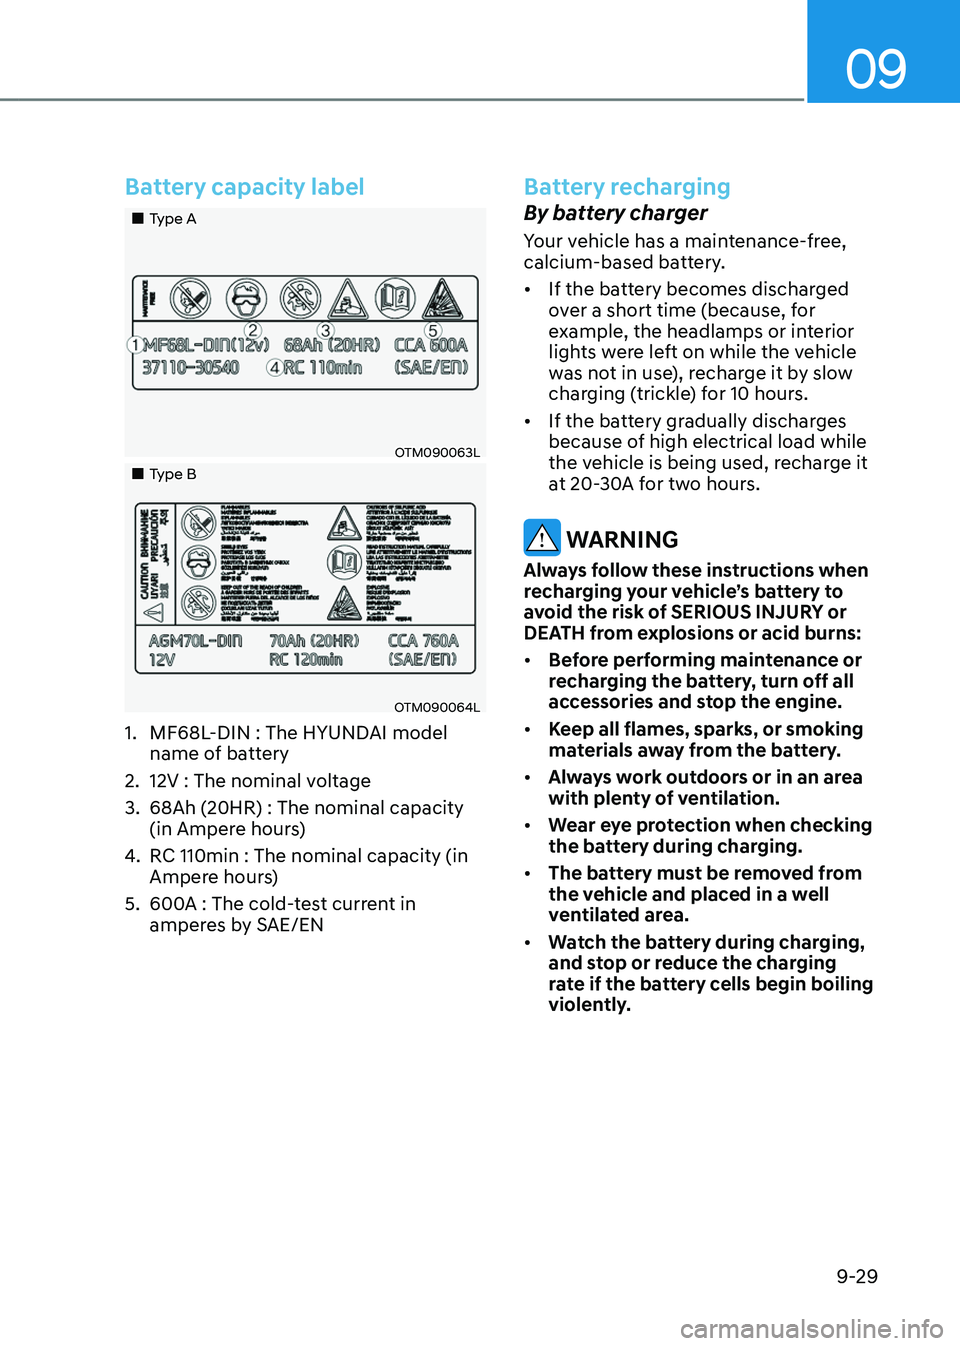
Battery capacity label
„„Type A
OTM090063L
„„Type B
OTM090064L
1. MF68L-DIN : The HYUNDAI model
name of battery
2.
12V : The nominal voltage
3.
68Ah (20HR) : The nominal capacity
(in Ampere hour
s)
4.
RC 110min : The nominal capacity (in
Amper
e hours)
5.
600A : The cold-
test current in
amperes by SAE/EN
Battery recharging
By battery charger
Your vehicle has a maintenance-free,
calcium-based battery.
• If the battery becomes discharged
over a short time (because, for
example, the headlamps or interior
lights were left on while the vehicle
was not in use), recharge it by slow
charging (trickle) for 10 hours.
• If the battery gradually discharges
because of high electrical load while
the vehicle is being used, recharge it
at 20-30A for two hours.
WARNING
Always follow these instructions when
recharging your vehicle’s battery to
avoid the risk of SERIOUS INJURY or
DEATH from explosions or acid burns:
• Before performing maintenance or
recharging the battery, turn off all
accessories and stop the engine.
• Keep all flames, sparks, or smoking
materials away from the battery.
• Always work outdoors or in an area
with plenty of ventilation.
• Wear eye protection when checking
the battery during charging.
• The battery must be removed from
the vehicle and placed in a well
ventilated area.
• Watch the battery during charging,
and stop or reduce the charging
rate if the battery cells begin boiling
violently.