2021 HYUNDAI TUCSON HYBRID change time
[x] Cancel search: change timePage 1 of 630

All information in this Owner’s Manual is current at the time
of publication. However, HYUNDAI reserves the right to make
changes at any time so that our policy of continual product
improvement may be carried out.
This manual applies to all models of this vehicle and includes
descriptions and explanations of optional as well as standard
equipment.
As a result, you may find material in this manual that does not
apply to your specific vehicle.
OWNER’S MANUAL
Operation
Maintenance
Specifications
Introduction
1
Page 53 of 630
03
3 -7
Reclining seatback
Sitting in a reclined position when the
vehicle is in motion can be dangerous.
Even when buckled up, the protections
of your restraint system (seat belts
and/or air bags) is greatly reduced by
reclining your seatback.
WARNING
NEVER ride with a reclined seatback
when the vehicle is moving.
Riding with a reclined seatback
increases your chance of serious or fatal
injuries in the event of a collision or
sudden stop.
Drivers and passengers should ALWAYS
sit well back in their seats, properly
belted, and with the seatbacks upright.
Seat belts must be snug against your
hips and chest to work properly. When
the seatback is reclined, the shoulder
belt cannot do its job because it will not
be snug against your chest. Instead,
it will be in front of you. During an
accident, you could be thrown into the
seat belt, causing neck or other injuries.
The more the seatback is reclined,
the greater chance the passenger’s
hips will slide under the lap belt or the
passenger’s neck will strike the shoulder
belt.ONX4030004
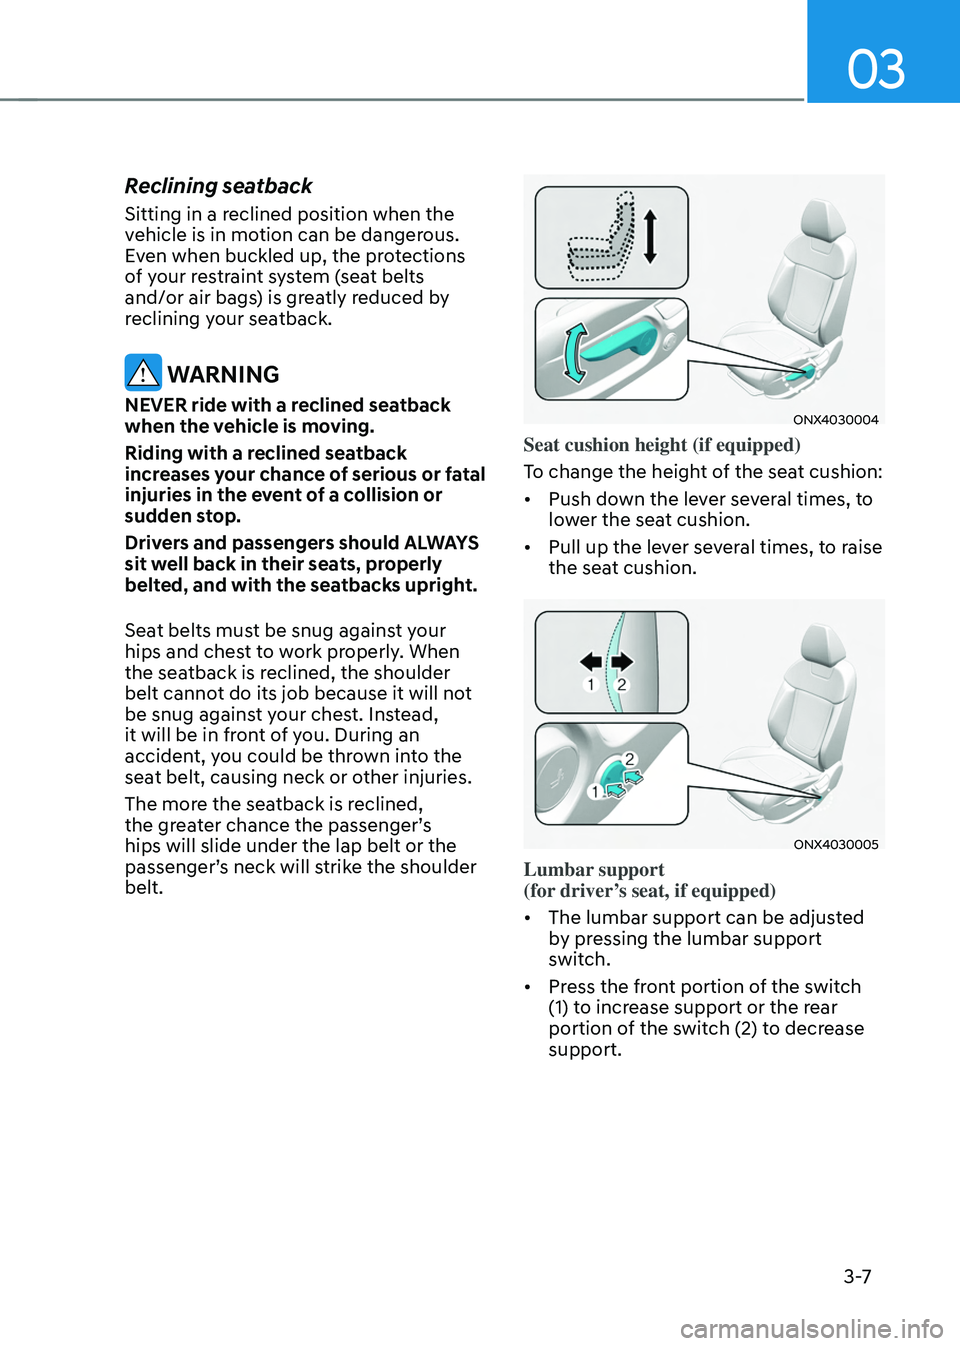
Seat cushion height (if equipped)
To change the height of the seat cushion:
• Push down the lever several times, to
lower the seat cushion.
• Pull up the lever several times, to raise
the seat cushion.
ONX4030005
Lumbar support
(for driver’s seat, if equipped)
• The lumbar support can be adjusted
by pressing the lumbar support
switch.
• Press the front portion of the switch
(1) to increase support or the rear
portion of the switch (2) to decrease
support.
Page 64 of 630
Seats & Safety System
3-18
Seat warmers (if equipped)
Seat warmers are provided to warm the
seats during cold weather.
During mild weather or under conditions
where the operation of the seat warmer
is not needed, keep the seat warmers
OFF.
WARNING
The seat warmers can cause a SERIOUS
BURN, even at low temperatures and
especially if used for long periods of
time.
Passengers must be able to feel if the
seat is becoming too warm so they can
turn it off, if needed.
People who cannot detect temperature
change or pain to the skin should
use extreme caution, especially the
following types of passengers:
• Infants, children, elderly or disabled
persons, or hospital outpatients.
• People with sensitive skin or who
burn easily.
• Fatigued individuals.
• Intoxicated individuals.
• People taking medication that can
cause drowsiness or sleepiness.
WARNING
NEVER place anything on the seat
that insulates against heat when the
seat warmer is in operation, such as a
blanket or seat cushion. This may cause
the seat warmer to overheat, causing a
burn or damage to the seat.
NOTICE
To prevent damage to the seat warmers
and seats:
• Never use a solvent such as paint
thinner, benzene, alcohol or gasoline
to clean the seats.
• Do not place heavy or sharp objects
on seats equipped with seat
warmers.
• Do not change the seat cover. It may
damage the seat warmer.
Page 65 of 630
03
3-19
„„Front seat
ONX4030025
„„Rear seat
ONX4030026
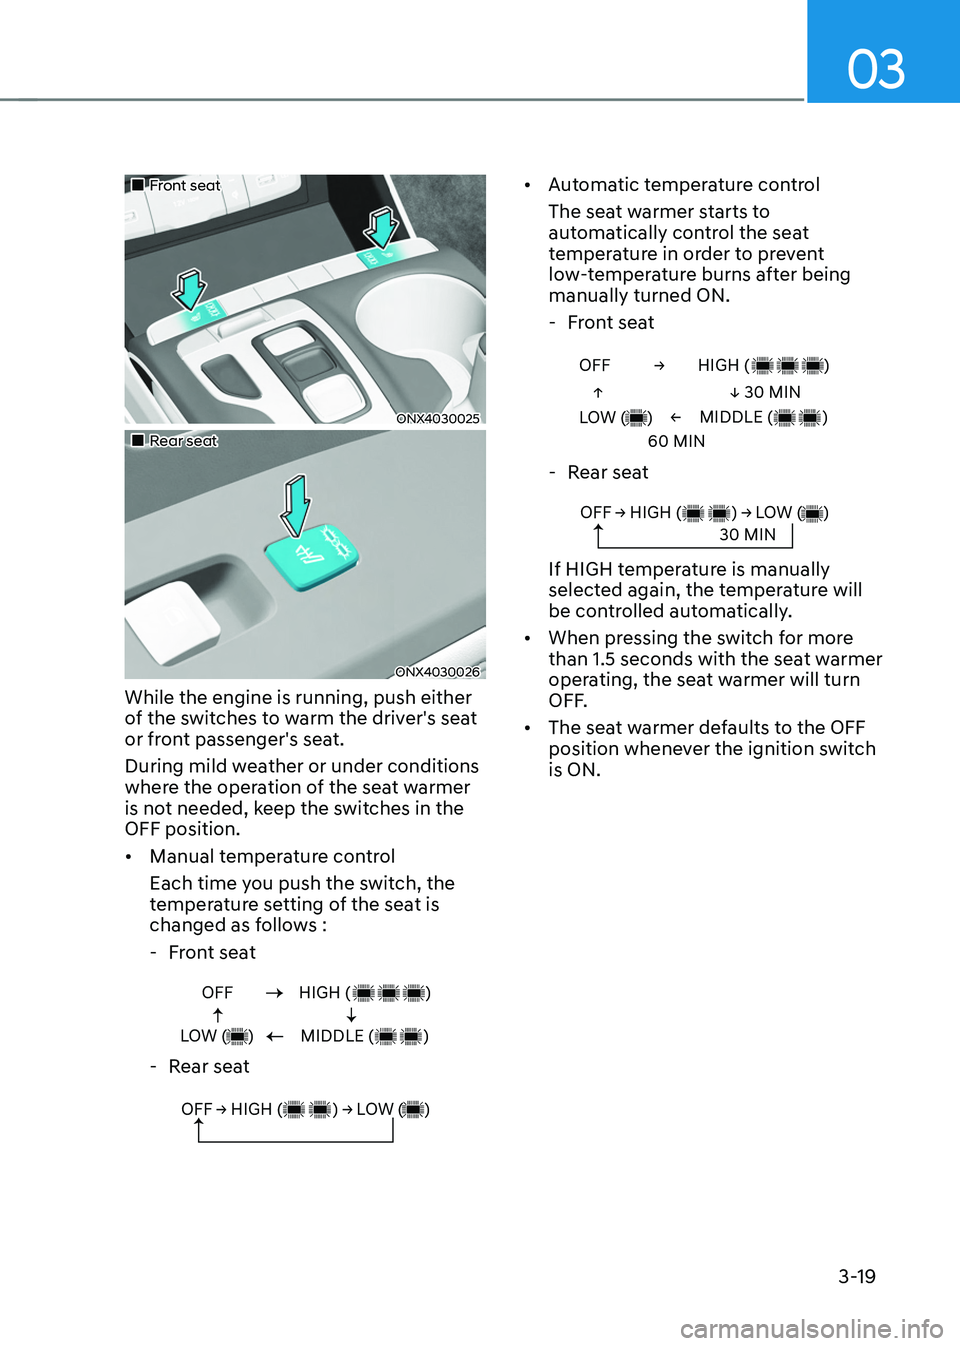
While the engine is running, push either
of the switches to warm the driver's seat
or front passenger's seat.
During mild weather or under conditions
where the operation of the seat warmer
is not needed, keep the switches in the
OFF position.
• Manual temperature control
Each time you push the switch, the
temperature setting of the seat is
changed as follows :
- Fr
ont seat
OFF
LOW ( )HIGH ( )
MIDDLE ( )
- Rear seat
OFF → HIGH ( ) → LOW ( )
• Automatic temperature control
The seat warmer starts to
automatically control the seat
temperature in order to prevent
low-temperature burns after being
manually turned ON.
- Fr
ont seat
OFF →
←
↑
↓ 30 MIN
60 MIN
LOW ( )
HIGH ( )
MIDDLE ( )
- Rear seat
OFF → HIGH ( ) → LOW ( )30 MIN
If HIGH temperature is manually
selected again, the temperature will
be controlled automatically.
• When pressing the switch for more
than 1.5 seconds with the seat warmer
operating, the seat warmer will turn
OFF.
• The seat warmer defaults to the OFF
position whenever the ignition switch
is ON.
Page 67 of 630

03
3-21
• Each time you push the switch, the
airflow changes as follows:
OFF
LOW ( )HIGH ( )
MIDDLE ( )
• When pressing the switch for
more than 1.5 seconds with the
air ventilation seat operating, the
operation will turn OFF.
• The air ventilation seat defaults to the
OFF position whenever the ignition
switch is placed to the ON position.
• Auto Comfort Control (for driver’s
seat) (if equipped)
- The air ven
tilation seat
automatically controls the seat
temperature depending on the
ambient temperature and the set
climate control temperature when
the engine is running. If the air
ventilation seat switch is pushed,
the air ventilation seat will have to
be controlled manually.
To use this function, it must be
activated from the Settings menu in
the AV/AVN system screen.
- The air ven
tilation seat defaults
to the OFF position whenever the
ignition switch is ON. However, if
the Auto Comfort Control function
is ON, the air ventilation seat will
turn on and off depending on the
ambient temperature and the set
climate control temperature.
For more details, refer to the separately
supplied Infotainment manual with
your vehicle.
Rear Occupant Alert (ROA) (if
equipped)
Rear Occupant Alert is provided to
prevent a driver from leaving a vehicle
with the rear passenger left in the
vehicle.
System setting
To use Rear Occupant Alert, it must be
enabled from the Settings menu in the
infotainment system screen. Select:
- Setup → V
ehicle
Se
ttings
→ Conv
enience
→ R
ear
Occupan
t
Alert
F
or detailed information, scan the QR
code in the separately supplied simple
manual.
System operation
• First alert
When you turn off the engine and
open the driver’s door after opening
and closing the rear door or liftgate,
the ‘Check rear seats’ warning
message appears on the cluster.
• Second alert
After the first alert, the second alert
operates when any movement is
detected in the vehicle after the
driver’s door is closed and all the
doors are locked. The horn will sound
for approximately 25 seconds. If
the system continues to detect a
movement, the alert operates up to 8
times.
Unlock the doors with the smart key
to stop the alert.
• The system detects movement in the
vehicle for 8 hours after the door is
locked.
• The second alert is activated only after
the prior activation of the first alert.
Page 135 of 630
04
4-23
Press brake pedal to start engine (if
equipped)
This message is displayed if the Engine
Start/Stop button changes to the ACC
position twice by pressing the button
repeatedly without depressing the brake
pedal.
You can start the vehicle by depressing
the brake pedal and then pressing the
Engine Start/Stop button.
Key not in vehicle (if equipped)
This message is displayed if the smart
key is not in the vehicle when you press
the Engine Start/ Stop button.
When attempting to start the vehicle,
always have the smart key with you.
Key not detected (if equipped)
This message is displayed if the smart
key is not detected when you press the
Engine Start/Stop button.
Press START button again (if
equipped)
This message is displayed if you were
unable to start the vehicle when the
Engine Start/Stop button was pressed.
If this occurs, attempt to start the engine
by pressing the Engine Start/ Stop button
again.
If the warning message appears each
time you press the Engine Start/Stop
button, we recommend that you have
the vehicle inspected by an authorized
HYUNDAI dealer.
Press START button with key (if
equipped)
This message is displayed if you press
the Engine Start/Stop button while the
warning message “Key not detected” is
displayed.
At this time, the immobilizer indicator
light blinks.
Check BRAKE SWITCH fuse (if
equipped)
This message is displayed if the brake
switch fuse is disconnected.
You need to replace the fuse with a new
one before starting the engine.
If that is not possible, you can start the
engine by pressing the Engine Start/
Stop button for 10 seconds in the ACC
position.
12V battery discharging due to
additional electrical devices (if
equipped)
This message is displayed if the 12V
battery voltage is weak due to any
non-factory electrical accessories (ex.
dashboard camera) while parking. Be
careful that the battery is not discharged.
If the message appears after removing
the non-factory electrical accessories,
we recommend that you have the vehicle
inspected by an authorized HYUNDAI
dealer.
Page 148 of 630
Instrument cluster
4-36
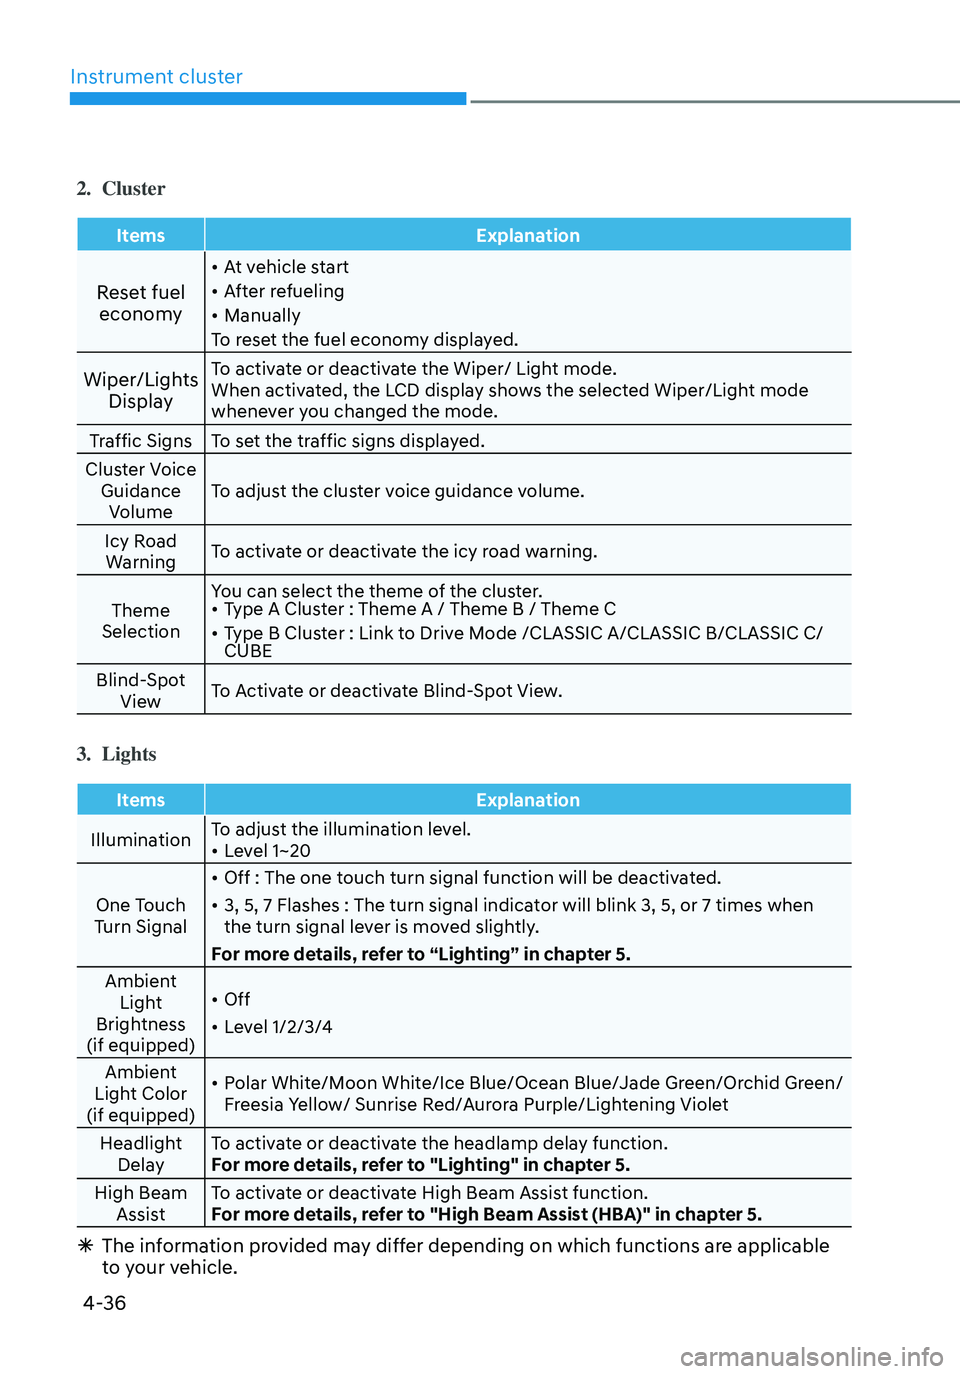
2. Cluster
ItemsExplanation
Reset fuel
economy
• At vehicle start
• After refueling
• Manually
To reset the fuel economy displayed.
Wiper/Lights DisplayTo activate or deactivate the Wiper/ Light mode.
When activated, the LCD display shows the selected Wiper/Light mode
whenever you changed the mode.
Traffic Signs To set the traffic signs displayed.
Cluster Voice Guidance Volume To adjust the cluster voice guidance volume.
Icy Road Warning To activate or deactivate the icy road warning.
Theme
Selection You can select the theme of the cluster.
• Type A Cluster : Theme A / Theme B / Theme C
• Type B Cluster : Link to Drive Mode /CLASSIC A/CLASSIC B/CLASSIC C/
CUBE
Blind-Spot View To Activate or deactivate Blind-Spot View.
3. Lights
Items
Explanation
Illumination To adjust the illumination level.
• Level 1~20
One Touch
Turn Signal
• Off : The one touch turn signal function will be deactivated.
• 3, 5, 7 Flashes : The turn signal indicator will blink 3, 5, or 7 times when
the turn signal lever is moved slightly.
For more details, refer to “Lighting” in chapter 5.
Ambient Light
Brightness
(if equipped)
• Off
• Level 1/2/3/4
Ambient
Light Color
(if equipped)
• Polar White/Moon White/Ice Blue/Ocean Blue/Jade Green/Orchid Green/
Freesia Yellow/ Sunrise Red/Aurora Purple/Lightening Violet
Headlight Delay To activate or deactivate the headlamp delay function.
For more details, refer to "Lighting" in chapter 5.
High Beam Assist To activate or deactivate High Beam Assist function.
For more details, refer to "High Beam Assist (HBA)" in chapter 5.
Ã
The information provided may differ depending on which functions are applicable
to your vehicle.
Page 167 of 630
Convenient features
5-10
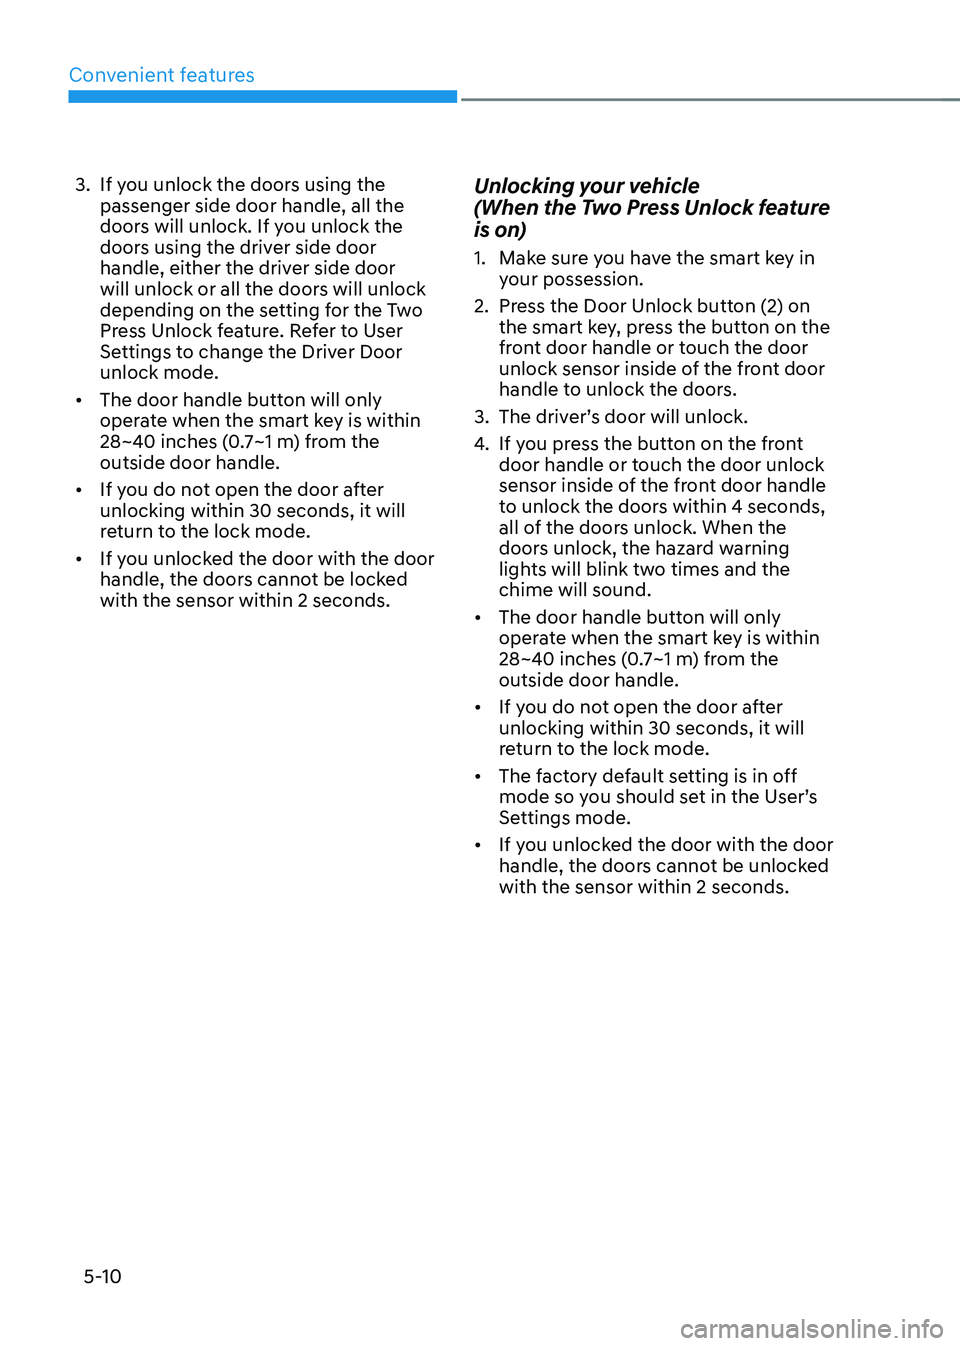
3. If you unlock the doors using the
passenger side door handle, all the
doors will unlock. If you unlock the
doors using the driver side door
handle, either the driver side door
will unlock or all the doors will unlock
depending on the setting for the Two
Press Unlock feature. Refer to User
Settings to change the Driver Door
unlock mode.
• The door handle button will only
operate when the smart key is within
28~40 inches (0.7~1 m) from the
outside door handle.
• If you do not open the door after
unlocking within 30 seconds, it will
return to the lock mode.
• If you unlocked the door with the door
handle, the doors cannot be locked
with the sensor within 2 seconds.Unlocking your vehicle
(When the Two Press Unlock feature
is on)
1. Make sure you have the smart key in
y
our possession.
2.
Press the Door Unlock butt
on (2) on
the smart key, press the button on the
front door handle or touch the door
unlock sensor inside of the front door
handle to unlock the doors.
3.
The driver’
s door will unlock.
4.
If you pr
ess the button on the front
door handle or touch the door unlock
sensor inside of the front door handle
to unlock the doors within 4 seconds,
all of the doors unlock. When the
doors unlock, the hazard warning
lights will blink two times and the
chime will sound.
• The door handle button will only
operate when the smart key is within
28~40 inches (0.7~1 m) from the
outside door handle.
• If you do not open the door after
unlocking within 30 seconds, it will
return to the lock mode.
• The factory default setting is in off
mode so you should set in the User’s
Settings mode.
• If you unlocked the door with the door
handle, the doors cannot be unlocked
with the sensor within 2 seconds.