2021 HYUNDAI SANTA FE CALLIGRAPHY latch
[x] Cancel search: latchPage 75 of 636
03
3-43
OHI038146
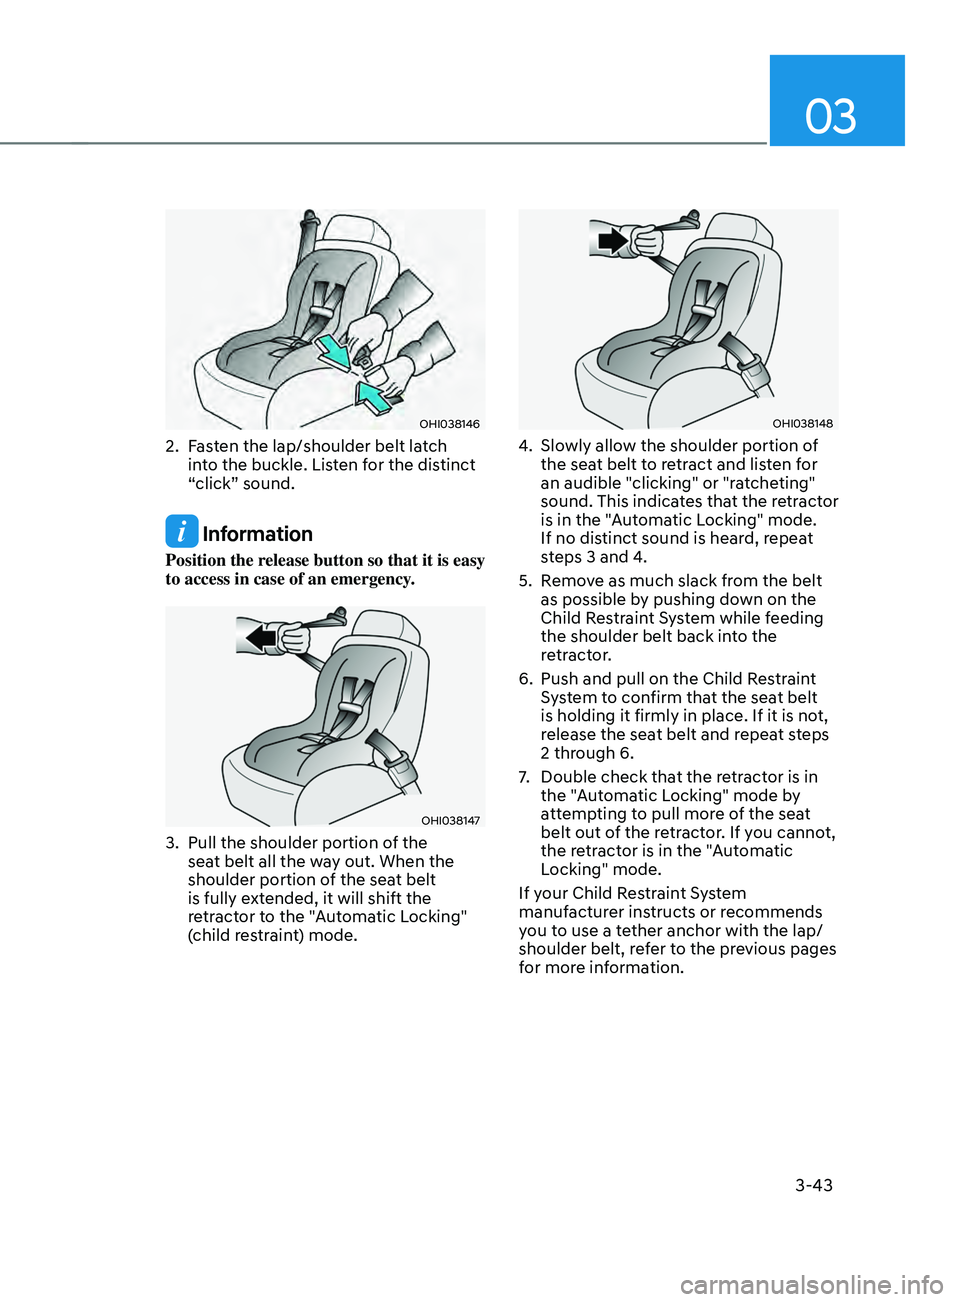
2. Fasten the lap/shoulder belt latch
into the buckle. Listen for the distinct
“click” sound.
Information
Position the release button so that it is easy
to access in case of an emergency.
OHI038147
3. Pull the shoulder portion of the
sea t belt all the way out. When the
shoulder portion of the seat belt
is fully extended, it will shift the
retractor to the "Automatic Locking"
(child restraint) mode.
OHI038148
4. Slowly allow the shoulder portion of
the sea t belt to retract and listen for
an audible "clicking" or "ratcheting"
sound. This indicates that the retractor
is in the "Automatic Locking" mode.
If no distinct sound is heard, repeat
steps 3 and 4.
5.
Remo
ve as much slack from the belt
as possible by pushing down on the
Child Restraint System while feeding
the shoulder belt back into the
retractor.
6.
Push and pull on the Child Res
traint
System to confirm that the seat belt
is holding it firmly in place. If it is not,
release the seat belt and repeat steps
2 through 6.
7.
Double check that the r
etractor is in
the "Automatic Locking" mode by
attempting to pull more of the seat
belt out of the retractor. If you cannot,
the retractor is in the "Automatic
Locking" mode.
If your Child Restraint System
manufacturer instructs or recommends
you to use a tether anchor with the lap/
shoulder belt, refer to the previous pages
for more information.
Page 211 of 636
05
5-67
Hood
Opening the hood
OTM050032
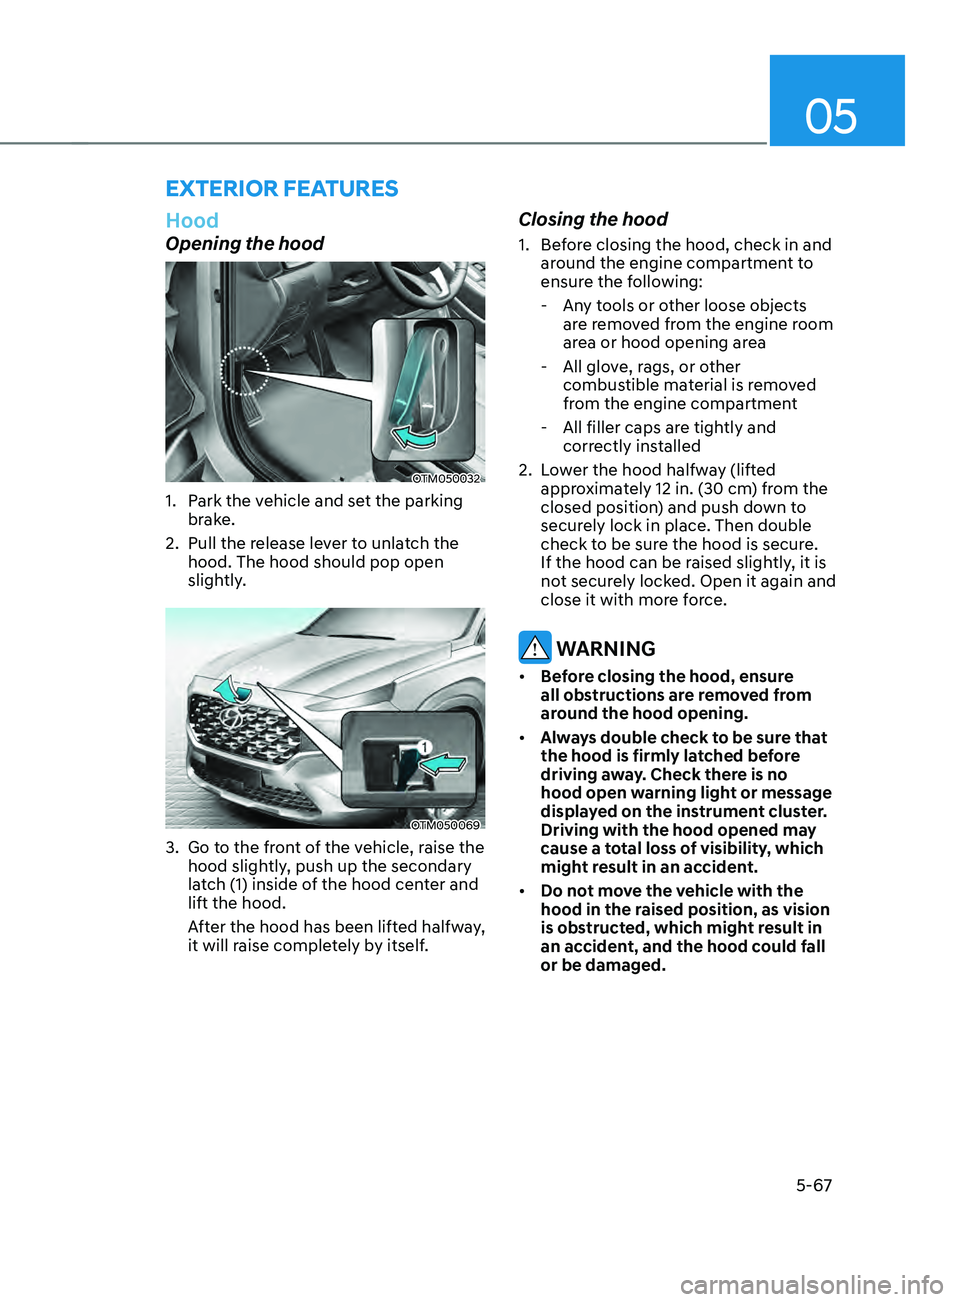
1. Park the vehicle and set the parking
brake.
2.
Pull the release le
ver to unlatch the
hood. The hood should pop open
slightly.
OTM050069
3. Go to the front of the vehicle, raise the
hood sligh tly, push up the secondary
latch (1) inside of the hood center and
lift the hood.
After the hood has been lifted halfway,
it will raise completely by itself.
Closing the hood
1. Before closing the hood, check in and
ar ound the engine compartment to
ensure the following:
- Any t
ools or other loose objects
are removed from the engine room
area or hood opening area
- All glov
e, rags, or other
combustible material is removed
from the engine compartment
- All filler caps are tigh
tly and
correctly installed
2.
Lo
wer the hood halfway (lifted
approximately 12 in. (30 cm) from the
closed position) and push down to
securely lock in place. Then double
check to be sure the hood is secure.
If the hood can be raised slightly, it is
not securely locked. Open it again and
close it with more force.
WARNING
• Before closing the hood, ensure
all obstructions are removed from
around the hood opening.
• Always double check to be sure that
the hood is firmly latched before
driving away. Check there is no
hood open warning light or message
displayed on the instrument cluster.
Driving with the hood opened may
cause a total loss of visibility, which
might result in an accident.
• Do not move the vehicle with the
hood in the raised position, as vision
is obstructed, which might result in
an accident, and the hood could fall
or be damaged.
ExTERIOR FEATURES
Page 213 of 636
05
5-69
WARNING
OTM050041
Do not hold the part (gas lifter) that
supports the liftgate. Be aware that
the deformation of the part may cause
vehicle damage and a risk of injury.
WARNING
• NEVER allow anyone to occupy the
luggage compartment of the vehicle
at any time. If the liftgate is partially
or totally latched and the person
is unable to get out, serious injury
or death could occur due to lack
of ventilation, exhaust fumes and
rapid heat build-up, or because of
exposure to cold weather conditions.
The luggage compartment is also
a highly dangerous location in the
event of a crash because it is not a
protected occupant space but is a
part of the vehicle’s crush zone.
• Your vehicle should be kept locked
and keys should be kept out of
the reach of children. Parents
should teach their children about
the dangers of playing in luggage
compartments.
Emergency liftgate safety release
OTM050042
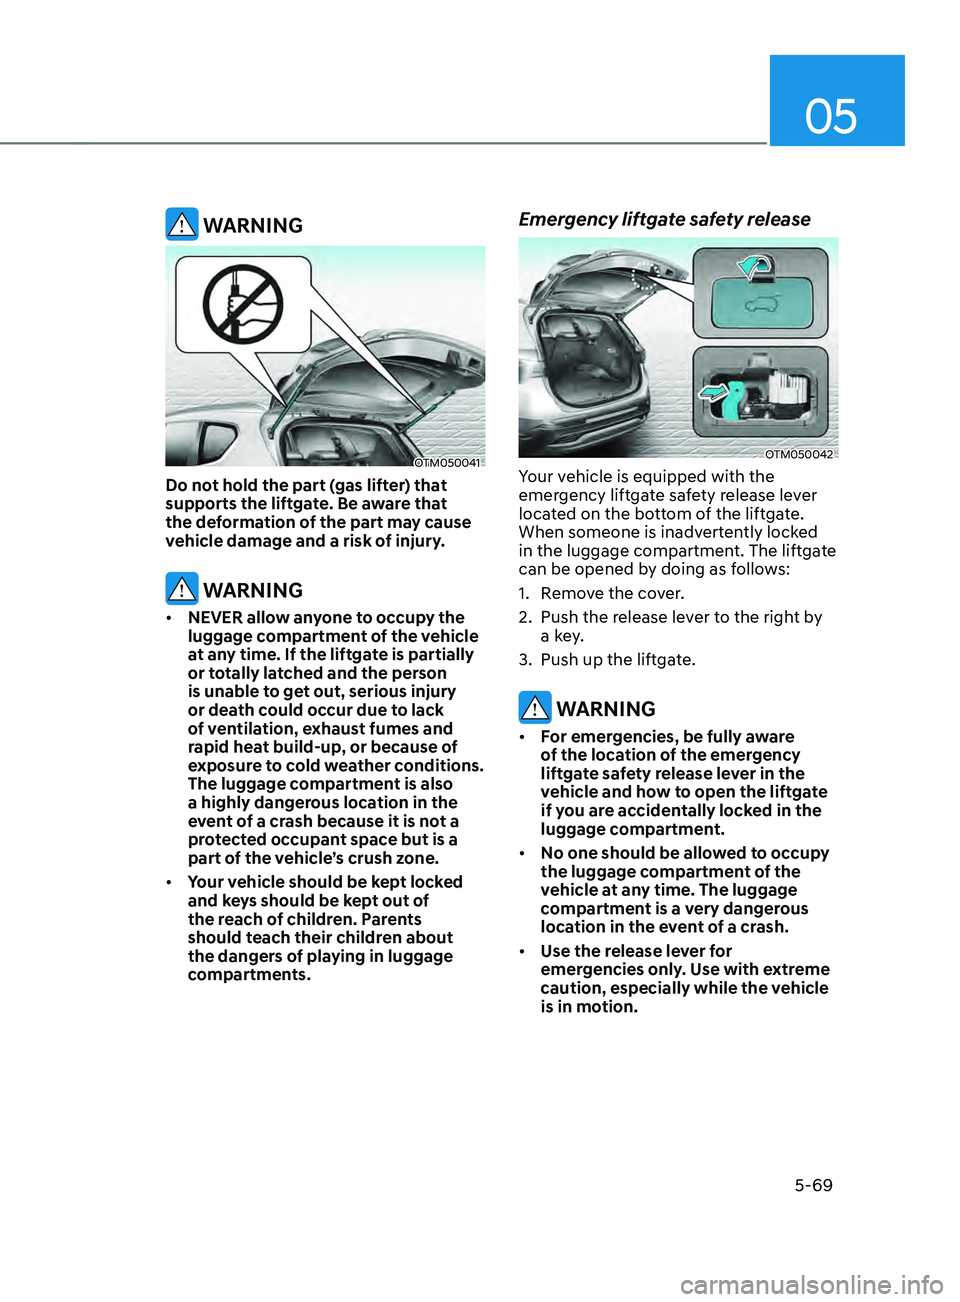
Your vehicle is equipped with the
emergency liftgate safety release lever
located on the bottom of the liftgate.
When someone is inadvertently locked
in the luggage compartment. The liftgate
can be opened by doing as follows:
1.
Remo
ve the cover.
2.
Push the release le
ver to the right by
a key.
3.
Push up the liftga
te.
WARNING
• For emergencies, be fully aware
of the location of the emergency
liftgate safety release lever in the
vehicle and how to open the liftgate
if you are accidentally locked in the
luggage compartment.
• No one should be allowed to occupy
the luggage compartment of the
vehicle at any time. The luggage
compartment is a very dangerous
location in the event of a crash.
• Use the release lever for
emergencies only. Use with extreme
caution, especially while the vehicle
is in motion.
Page 216 of 636
Convenient features
5-72
Automatic reverse
OTM050053
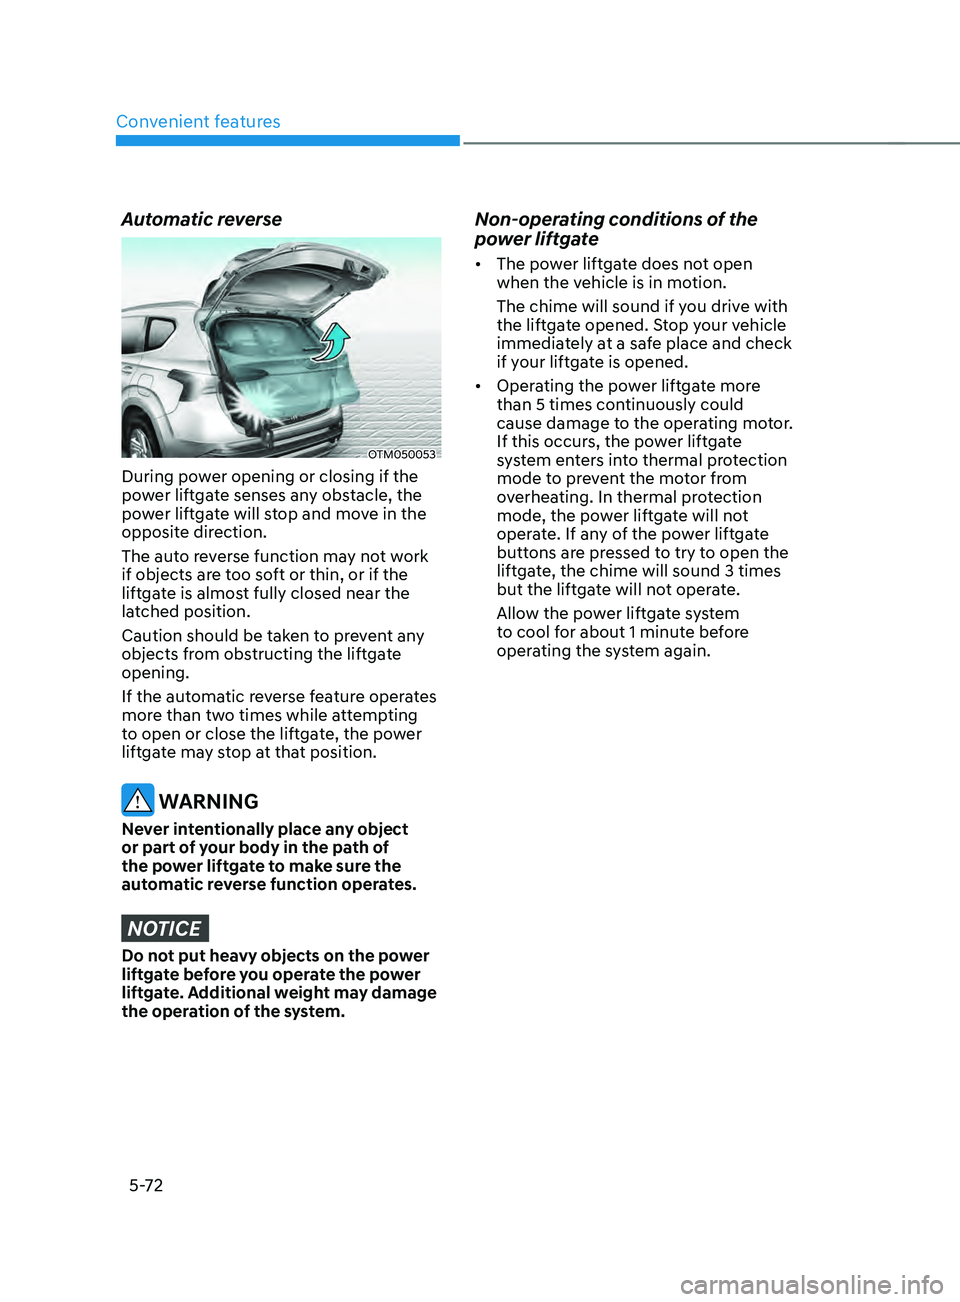
During power opening or closing if the
power liftgate senses any obstacle, the
power liftgate will stop and move in the
opposite direction.
The auto reverse function may not work
if objects are too soft or thin, or if the
liftgate is almost fully closed near the
latched position.
Caution should be taken to prevent any
objects from obstructing the liftgate
opening.
If the automatic reverse feature operates
more than two times while attempting
to open or close the liftgate, the power
liftgate may stop at that position.
WARNING
Never intentionally place any object
or part of your body in the path of
the power liftgate to make sure the
automatic reverse function operates.
NOTICE
Do not put heavy objects on the power
liftgate before you operate the power
liftgate. Additional weight may damage
the operation of the system.
Non-operating conditions of the
power liftgate
• The power liftgate does not open
when the vehicle is in motion.
The chime will sound if you drive with
the liftgate opened. Stop your vehicle
immediately at a safe place and check
if your liftgate is opened.
• Operating the power liftgate more
than 5 times continuously could
cause damage to the operating motor.
If this occurs, the power liftgate
system enters into thermal protection
mode to prevent the motor from
overheating. In thermal protection
mode, the power liftgate will not
operate. If any of the power liftgate
buttons are pressed to try to open the
liftgate, the chime will sound 3 times
but the liftgate will not operate.
Allow the power liftgate system
to cool for about 1 minute before
operating the system again.
Page 556 of 636
Maintenance
9-6
Owner maintenance schedule
When you stop for fuel:
• Check the engine oil level.
• Check the coolant level in the engine
coolant reservoir or the water-cooled
intercooler coolant reservoir.
• Check the windshield washer fluid
level.
• Check for low or under-inflated tires.
WARNING
Be careful when checking your coolant
level when the engine is hot. This may
result in coolant being blown out of the
opening and cause serious burns and
other injuries.
While operating your vehicle:
• Note any changes in the sound of the
exhaust or any smell of exhaust fumes
in the vehicle.
• Check for vibrations in the steering
wheel. Notice if there is any increased
steering effort or looseness in the
steering wheel, or change in its
straight-ahead position.
• Notice if your vehicle constantly turns
slightly or “pulls” to one side when
traveling on smooth, level road.
• When stopping, listen and check for
unusual sounds, pulling to one side,
increased brake pedal travel or “hard-
to-push” brake pedal.
• If any slipping or changes in the
operation of your transmission occurs,
check the transmission fluid level.
• Check the automatic transmission P
(Park) function.
• Check the parking brake.
• Check for fluid leaks under your
vehicle (water dripping from the air
conditioning system during or after
use is normal).
At least monthly:
• Check coolant level in the engine
coolant reservoir.
• Check the operation of all exterior
lights, including the stoplights, turn
signals and hazard warning flashers.
• Check the inflation pressures of all
tires including the spare for tires that
are worn, show uneven wear, or are
damaged.
• Check for loose wheel lug nuts.
At least twice a year: (i.e., every
Spring and Autumn)
• Check radiator, heater and air
conditioning hoses for leaks or
damage.
• Check windshield washer spray and
wiper operation. Clean wiper blades
with a clean cloth dampened with
washer fluid.
• Check headlamp alignment.
• Check muffler, exhaust pipes, shields
and clamps.
• Check the seat belts for wear and
function.
At least once a year:
• Clean body and door drain holes.
• Lubricate door hinges and hood
hinges.
• Lubricate door and hood locks and
latches.
• Lubricate door rubber weather strips.
• Check the air conditioning system.
• Inspect and lubricate automatic
transmission linkage and controls.
• Clean the battery and terminals.
• Check the brake fluid level.
Page 593 of 636
09
9-43
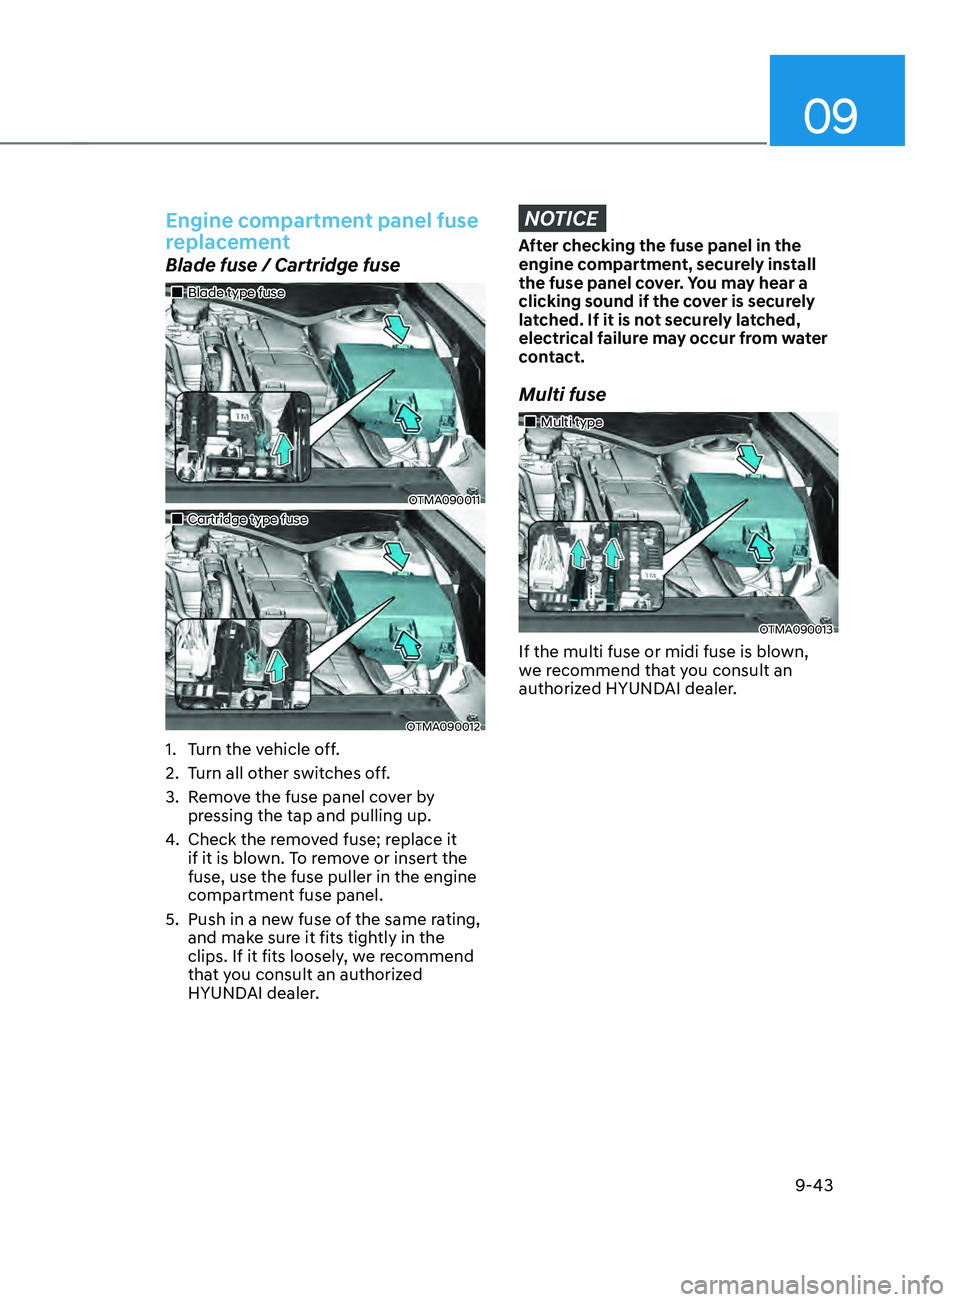
Engine compartment panel fuse
replacement
Blade fuse / Cartridge fuse
„„Blade type fuse
OTMA090011
„„Cartridge type fuse
OTMA090012
1. Turn the vehicle off.
2.
Turn all o
ther switches off.
3.
Remo
ve the fuse panel cover by
pressing the tap and pulling up.
4.
Check the remo
ved fuse; replace it
if it is blown. To remove or insert the
fuse, use the fuse puller in the engine
compartment fuse panel.
5.
Push in a new fuse o
f the same rating,
and make sure it fits tightly in the
clips. If it fits loosely, we recommend
that you consult an authorized
HYUNDAI dealer.
NOTICE
After checking the fuse panel in the
engine compartment, securely install
the fuse panel cover. You may hear a
clicking sound if the cover is securely
latched. If it is not securely latched,
electrical failure may occur from water
contact.
Multi fuse
„„Multi type
OTMA090013
If the multi fuse or midi fuse is blown,
we recommend that you consult an
authorized HYUNDAI dealer.
Page 599 of 636
09
9-49
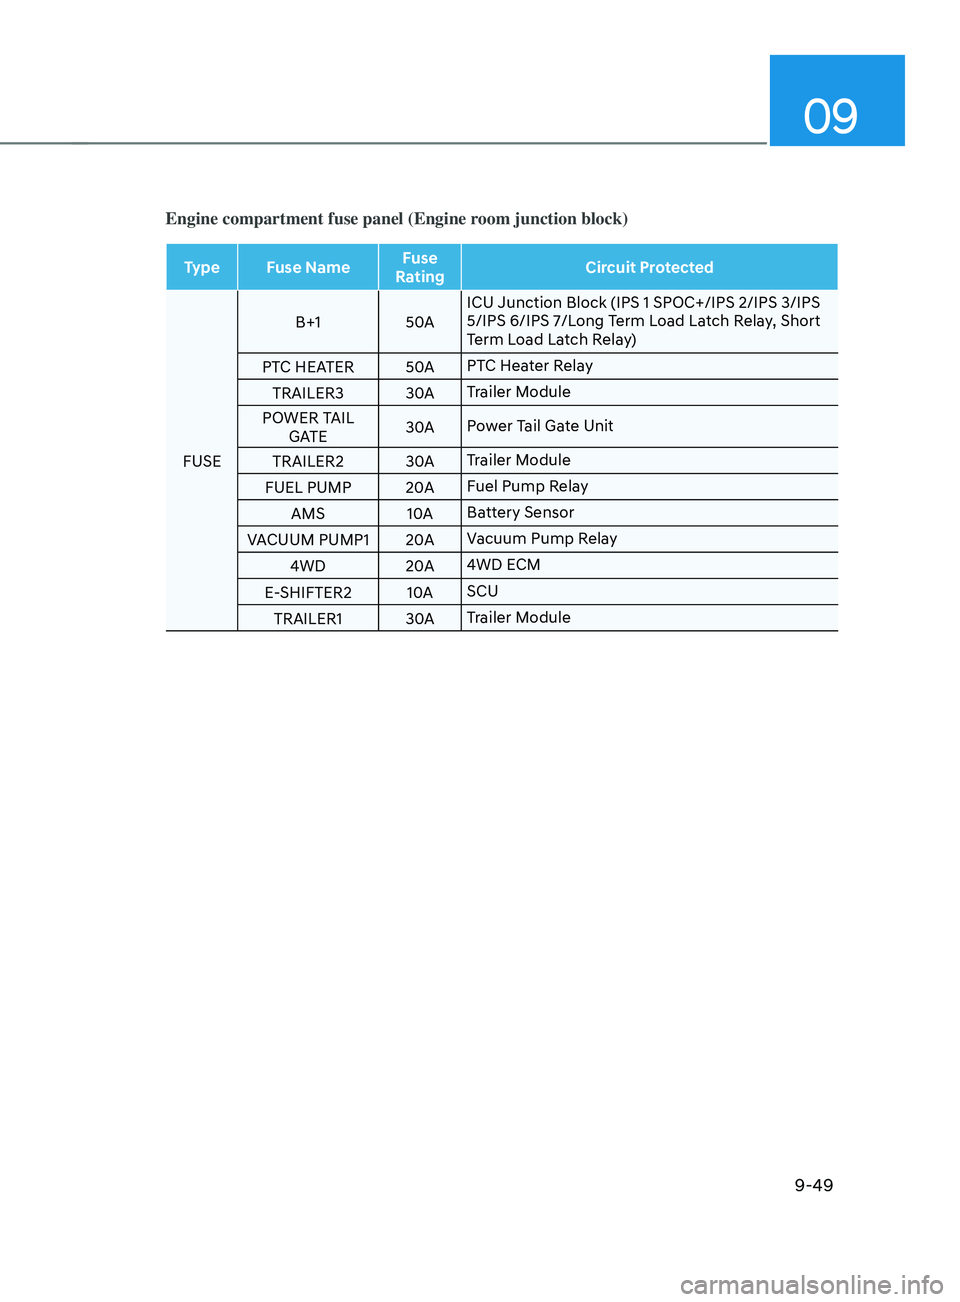
Engine compartment fuse panel (Engine room junction block)
Type Fuse NameFuse
Rating Circuit Protected
FUSE B+1
50AICU Junction Block (IPS 1 SPOC+/IPS 2/IPS 3/IPS
5/IPS 6/IPS 7/Long Term Load Latch Relay, Short
Term Load Latch Relay)
PTC HEATER 50APTC Heater Relay
TRAILER3 30ATrailer Module
POWER TAIL GATE 30A
Power Tail Gate Unit
TRAILER2 30ATrailer Module
FUEL PUMP 20AFuel Pump Relay
AMS 10ABattery Sensor
VACUUM PUMP1 20AVacuum Pump Relay
4WD 20A4WD ECM
E-SHIFTER2 10ASCU
TRAILER1 30ATrailer Module