2021 HYUNDAI SANTA FE CALLIGRAPHY clock
[x] Cancel search: clockPage 36 of 636

Seats & Safety System
3-4
Safety precautions
Adjusting the seats so that you are sitting
in a safe and comfortable position plays
an important role for the safety of the
driver and passengers, along with seat
belts and air bags when in an accident.
WARNING
Do not use a cushion that reduces
friction between the seat and the
passenger. The passenger’s hips may
slide under the lap portion of the seat
belt during an accident or a sudden
stop.
Serious or fatal internal injuries could
result because the seat belt cannot
operate properly.
Air bags
You can take steps to reduce the risk
of being injured by an inflating air bag.
Sitting too close to an air bag greatly
increases the risk of injury in the event
the air bag inflates.
The National Highway Traffic Safety
Administration (NHTSA) recommends
that drivers allow at least 10 inches
(25cm) between the center of the
steering wheel and their chest.
WARNING
To reduce the risk of serious injury or
death from an inflating air bag, take the
following precautions:
• Adjust the driver’s seat as far to the
rear as possible maintaining the
ability to control the vehicle.
• Adjust the front passenger seat as far
to the rear as possible.
• Hold the steering wheel by the rim
with hands at the 9 o’clock and 3
o’clock positions to minimize the risk
of injuries to your hands and arms.
• NEVER place anything or anyone
between you and the air bag.
• Do not allow the front passenger to
place feet or legs on the dashboard
to minimize the risk of leg injuries.
Seat belts
Always fasten your seat belt before
starting any trip. At all times, passengers
should sit upright and be properly
restrained. Infants and small children
must be restrained in appropriate Child
Restraint Systems. Children who have
outgrown a booster seat and adults must
be restrained using the seat belts.
WARNING
Take the following precautions when
adjusting your seat belt:
• NEVER use one seat belt for more
than one occupant.
• Always position the seatback upright
with the lap portion of the seat belt
snug and low across the hips.
• NEVER allow children or small infants
to ride on a passenger’s lap.
• Do not route the seat belt across your
neck, across sharp edges, or reroute
the shoulder strap away from your
body.
• Do not allow the seat belt to become
caught or jammed.
Page 80 of 636

Seats & Safety System
3-48
Side air bags
„„Side air bag
OTM030029
OTM030030
Your vehicle is equipped with a side air
bag in each front seat. The purpose of
the air bag is to provide the vehicle’s
driver and the front passenger with
additional protection than that offered by
the seat belt alone.
The side air bags are designed to deploy
during certain side impact collisions,
depending on the crash severity, angle,
speed and point of impact.
The side air bags on both sides of the
vehicle are designed to deploy when a
rollover is detected by a rollover sensor.
(if equipped with rollover sensor)
The side air bags are not designed to
deploy in all side impact or rollover
situations.
WARNING
To reduce the risk of serious injury or
death from an inflating side air bag and
front center air bag, take the following
precautions:
• Seat belts must be worn at all times
to help keep occupants positioned
properly.
• Do not allow passengers to lean their
heads or bodies onto doors, put their
arms on the doors, stretch their arms
out of the window, or place objects
between the doors and seats.
• Hold the steering wheel at the 9
o’clock and 3 o’clock positions, to
minimize the risk of injuries to your
hands and arms.
• Do not use any accessory seat
covers. This could reduce or prevent
the effectiveness of the system.
• Do not hang other objects except
clothes. In an accident it may cause
vehicle damage or personal injury
especially when air bag is inflated.
• Do not place any objects over the
air bag or between the air bag and
yourself. Also, do not attach any
objects around the area the air bag
inflates such as the door, side door
glass, front and rear pillar.
• Do not place any objects between
the door and the seat. They may
become dangerous projectiles if the
side air bag inflates.
• Do not install any accessories on the
side or near the side air bags.
• Do not cause impact to the doors
when the Engine Start/Stop button
is in the ON or START position as this
may cause the side air bags to inflate.
• If the seat or seat cover is damaged,
we recommend that the system be
serviced by an authorized HYUNDAI
dealer.
Page 84 of 636
Seats & Safety System
3-52
WARNING
To reduce the risk of serious injury or
death from an inflating air bag, take the
following precautions:
• NEVER place a child restraint in the
front passenger seat.
Always properly restrain children
under age 13 in the rear seats of the
vehicle.
• Adjust the front passenger’s and
driver's seats as far to the rear as
possible while allowing you to
maintain full control of the vehicle.
• Hold the steering wheel with
hands at the 9 o'clock and 3 o'clock
positions.
• Never place anything or anyone
between the air bag and the seat
occupant.
• Do not allow the front passenger
to place their feet or legs on the
dashboard.
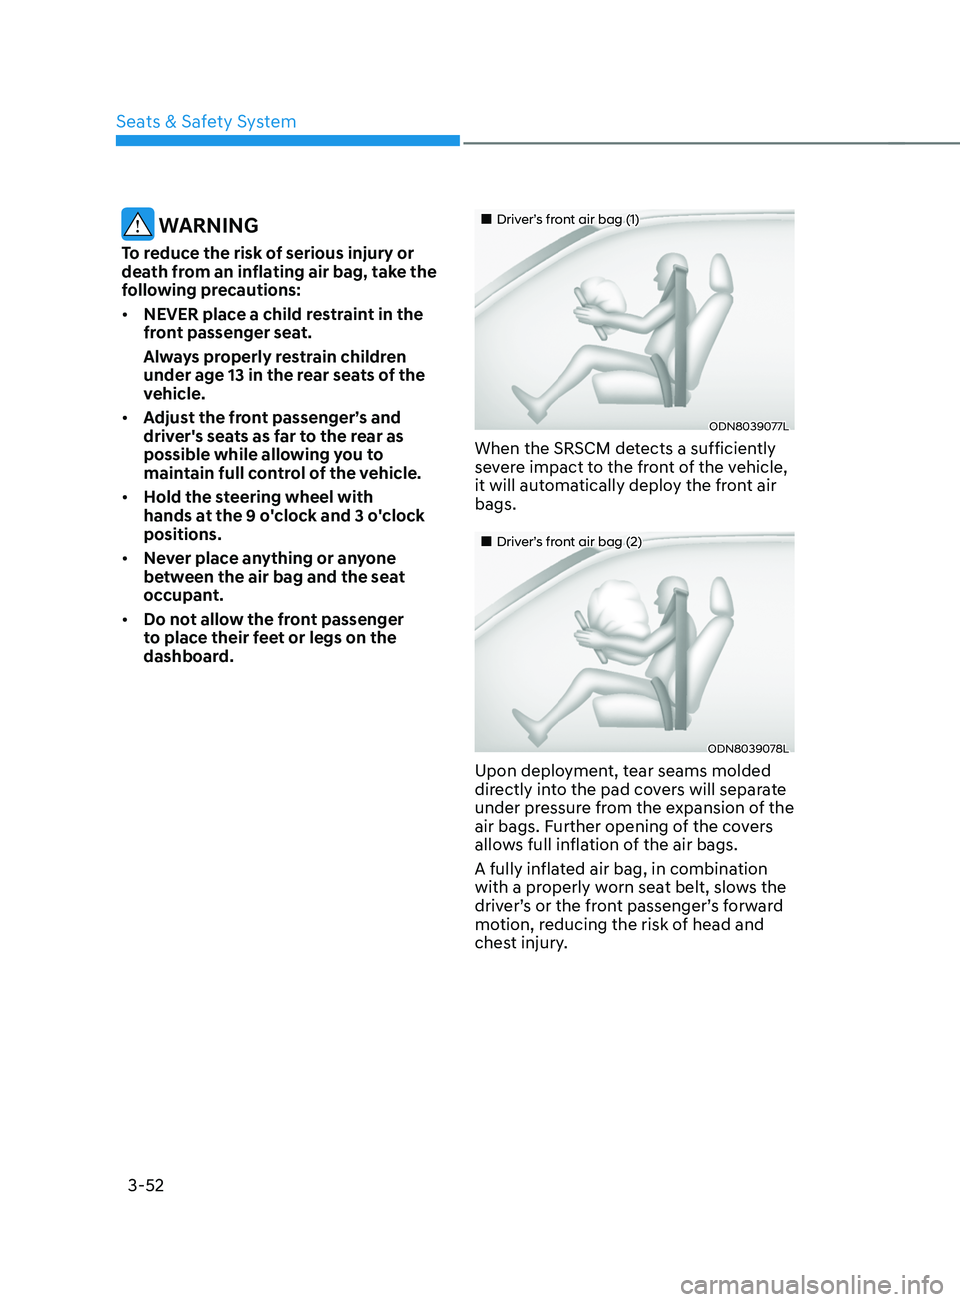
„„Driver’s front air bag (1)
ODN8039077L
When the SRSCM detects a sufficiently
severe impact to the front of the vehicle,
it will automatically deploy the front air
bags.
„„Driver’s front air bag (2)
ODN8039078L
Upon deployment, tear seams molded
directly into the pad covers will separate
under pressure from the expansion of the
air bags. Further opening of the covers
allows full inflation of the air bags.
A fully inflated air bag, in combination
with a properly worn seat belt, slows the
driver’s or the front passenger’s forward
motion, reducing the risk of head and
chest injury.
Page 147 of 636

Windshield defrosting and defogging ...........................................................5-115Manual climate control system ........................................................................\
........ 5-115
A utomatic climate control system ........................................................................\
... 5-116
A
uto defogging system (only for automatic climate control system)
................... 5-
117
Rear window defroster
........................................................................\
..................... 5-
118
Climate control additional features ...............................................................5-119Auto defogging system ........................................................................\
..................... 5-119
A uto dehumidify ........................................................................\
............................... 5-
120
Recirculating air when washer fluid is used
............................................................ 5-
121
Sunroof inside air recirculation
........................................................................\
........ 5-
121
Auto. Controls That Use Climate Control Settings (for driver’s seat)
.................... 5-
121
Storage compartment ........................................................................\
...........5-122Center console storage ........................................................................\
..................... 5-122
Glo ve box ........................................................................\
........................................... 5-
122
Tr a y
........................................................................\
..................................................... 5-
123
Luggage tray
........................................................................\
...................................... 5-
123
Interior features ........................................................................\
.....................5-12 4Cup holder ........................................................................\
........................................5-12 4
Ashtray ........................................................................\
..................................... ..........5-125
Sunvisor
........................................................................\
............................................. 5-
125
Power outlet
........................................................................\
..................................... 5-
126
USB charger
........................................................................\
....................................... 5-
127
AC Inverter
........................................................................\
.....................................
....5-127
Wireless smart phone charging system
.................................................................. 5-
129
Clock
........................................................................\
.................................................. 5-
131
Coat hook
........................................................................\
........................................... 5-
131
Floor mat anchor(s)
........................................................................\
........................... 5-
132
Side curtain
........................................................................\
.....................................
..5-133
Luggage net holder
........................................................................\
.......................... 5-
133
Cargo security screen
........................................................................\
...................... 5-
134
Exterior features ........................................................................\
.....................5-136Roof side rails ........................................................................\
................................... 5-136
5. Convenient features
5
Page 157 of 636
05
5-13
Information
This device complies with Part 15 of the
FCC rules.
Operation is subject to the following three
conditions:
1.
This device may not cause harmful
interference.
2.
This device must accept any
interference r
eceived, including
interference that may cause undesired
operation.
3.
Changes or modifications not expr
essly
approved by the party responsible
for compliance could void the user’s
authority to operate the device.
NOTICE
• Keep the smart key away from
electromagnetic materials that
blocks electromagnetic waves to the
key surface.
• Always have the smart key with
you when leaving the vehicle. If the
smart key is left near the vehicle, the
vehicle battery may be discharged.
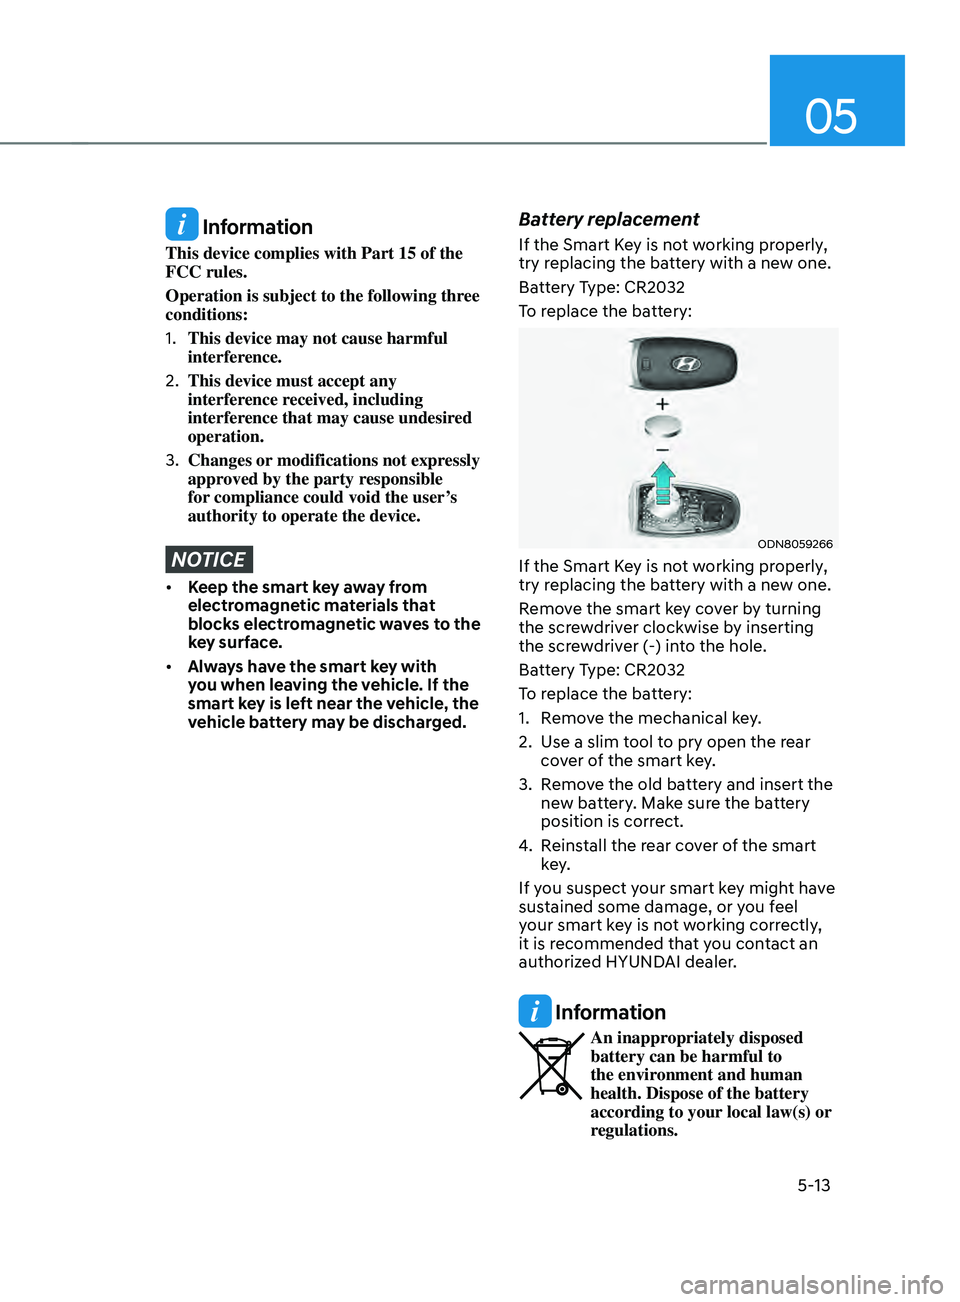
Battery replacement
If the Smart Key is not working properly,
try replacing the battery with a new one.
Battery Type: CR2032
To replace the battery:
ODN8059266
If the Smart Key is not working properly,
try replacing the battery with a new one.
Remove the smart key cover by turning
the screwdriver clockwise by inserting
the screwdriver (-) into the hole.
Battery Type: CR2032
To replace the battery:
1.
Remo
ve the mechanical key.
2.
Use a slim t
ool to pry open the rear
cover of the smart key.
3.
Remo
ve the old battery and insert the
new battery. Make sure the battery
position is correct.
4.
Reins
tall the rear cover of the smart
key.
If you suspect your smart key might have
sustained some damage, or you feel
your smart key is not working correctly,
it is recommended that you contact an
authorized HYUNDAI dealer.
Information
An inappropriately disposed
battery can be harmful to
the environment and human
health. Dispose of the battery
according to your local law(s) or
regulations.
Page 221 of 636
05
5-77
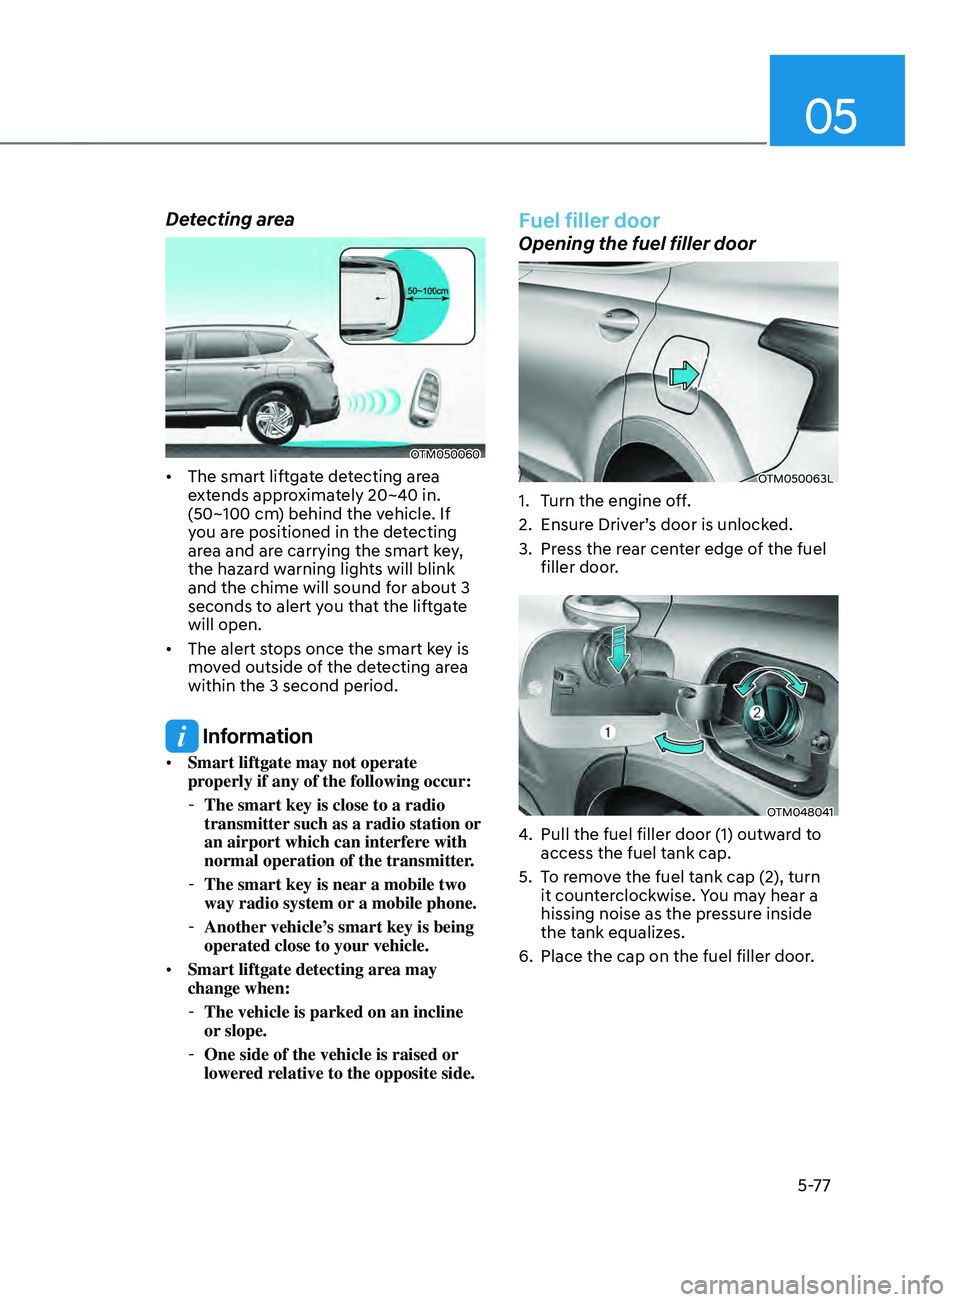
Detecting area
OTM050060
• The smart liftgate detecting area
extends approximately 20~40 in.
(50~100 cm) behind the vehicle. If
you are positioned in the detecting
area and are carrying the smart key,
the hazard warning lights will blink
and the chime will sound for about 3
seconds to alert you that the liftgate
will open.
• The alert stops once the smart key is
moved outside of the detecting area
within the 3 second period.
Information
• Smart liftgate may not operate
properly if any of the following occur:
-The smart key is close to a radio
transmitter such as a radio station or
an airport which can interfere with
normal operation of the transmitter.
- The smart key is near a mobile two
way radio system or
a mobile phone.
-Another vehicle’
s smart key is being
operated close to your vehicle.
• Smart liftgate detecting area may
change when:
-The vehicle is parked on an incline
or slope.
-One side of the vehicle is raised or
lower
ed relative to the opposite side.
Fuel filler door
Opening the fuel filler door
OTM050063L
1. Turn the engine off.
2.
Ensur
e Driver’s door is unlocked.
3.
Press the r
ear center edge of the fuel
filler door.
OTM048041
4. Pull the fuel filler door (1) outwar d to
access the fuel tank cap.
5.
To r
emove the fuel tank cap (2), turn
it counterclockwise. You may hear a
hissing noise as the pressure inside
the tank equalizes.
6.
Place the cap on the fuel filler door.
Page 222 of 636
Convenient features
5-78
Information
The fuel filler door will unlock when
Driver’s door is unlocked.
To unlock fuel filler door:
• Press the unlock button on your smart
key
• Press the Central Door unlock button
on armrest trim of driver’s door
The fuel filler door will lock when Driver’s
door is locked.
To lock fuel filler door:
• Press the lock button on your smart key
• Press the Central Door lock button on
armrest trim of driver’s door
ÃAll doors will automatically lock after
the vehicle speed exceeds 9 mph. Fuel
filler
door is also locked when vehicle
speed exceeds 9 mph.
Information
If the fuel filler door does not open
because ice has formed around it, tap
lightly or push on the door to break the
ice and release the door. Do not pry on the
door. If necessary, spray around the door
with an approved deicer fluid (do not use
radiator antifreeze) or move the vehicle to
a warm place and allow the ice to melt.
Closing the fuel filler door
1. To install the fuel tank cap, turn it
clockwise un til it “clicks” one time.
2.
Close the fuel filler door until it is
la
tched securely.
Information
Make the vehicle door to LOCK position
and the fuel filler door completely closed
in order to lock the fuel filler door.
If the fuel filler door is not completely
closed, the fuel filler door will not be
locked.
CAUTION
Keep the door into LOCK position when
the vehicle is being washed (i.e. high
pressure washer, automatic car washer,
etc.)
WARNING
Automotive fuel is highly flammable
and explosive. Failure to follow these
guidelines may result in SERIOUS
INJURY or DEATH:
• Read and follow all warnings posted
at the gas station.
• Before refueling, note the location
of the Emergency Fuel Shut-Off, if
available, at the gas station.
• Before touching the fuel nozzle, you
should eliminate the potential build-
up of static electricity by touching
a metal part of the vehicle, a safe
distance away from the fuel filler
neck, nozzle, or other gas source,
with your bare hand.
• Do not use mobile phones while
refueling. Electric current and/or
electronic interference from cellular
phones can potentially ignite fuel
vapors and cause a fire.
Page 269 of 636
05
5-125
Ashtray (if equipped)
OPDE046419
To use the ashtray, open the cover.
To clean the ashtray:
The plastic receptacle should be
removed by lifting the plastic ashtray
receptacle upward after turning the
cover counterclockwise and pulling it
out.
WARNING
Putting lit cigarettes or matches in
an ashtray with other combustible
materials may cause a fire.
Sunvisor
OTM048089
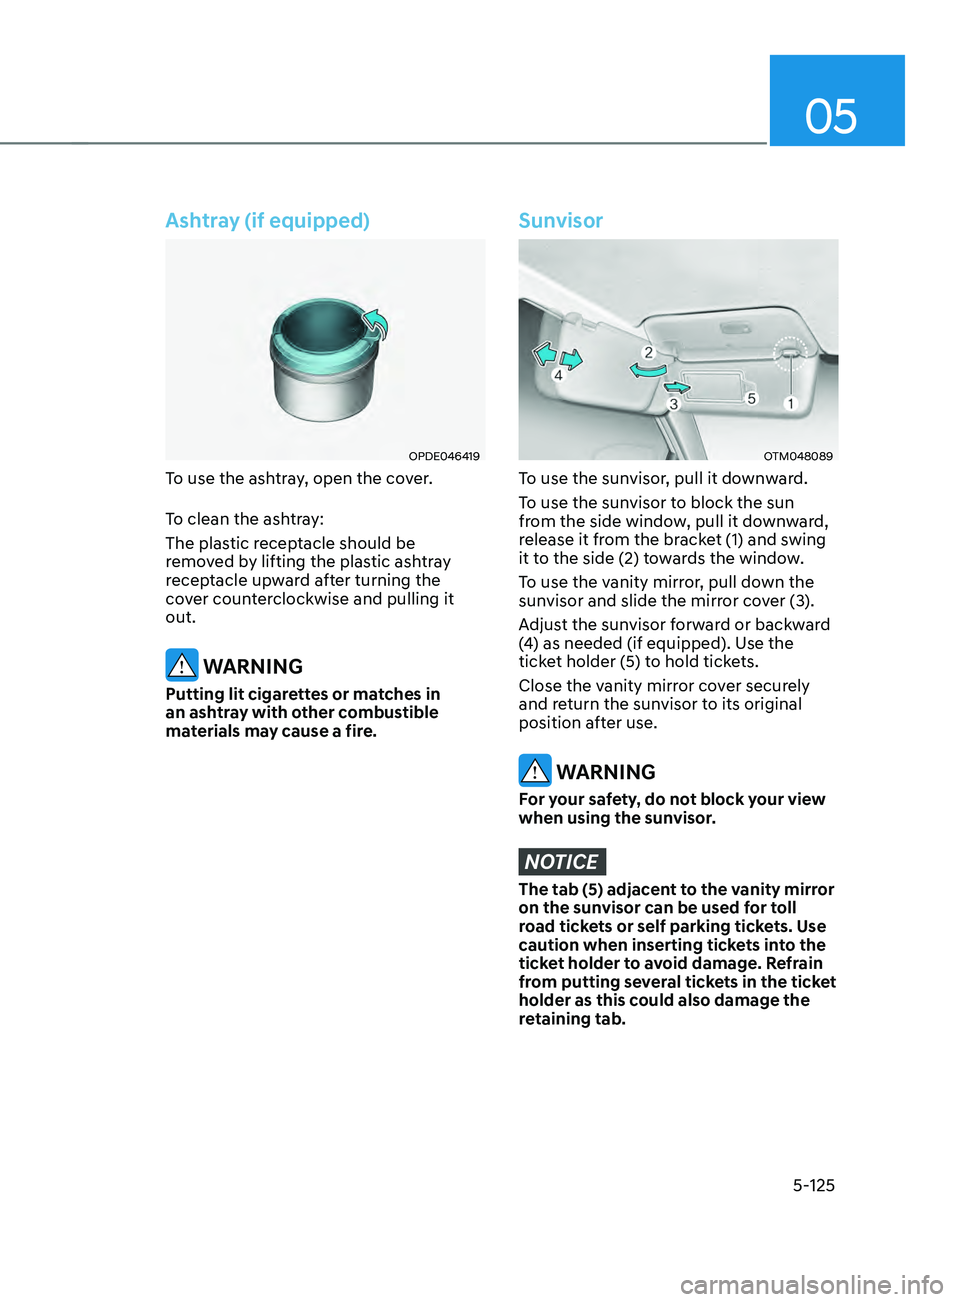
To use the sunvisor, pull it downward.
To use the sunvisor to block the sun
from the side window, pull it downward,
release it from the bracket (1) and swing
it to the side (2) towards the window.
To use the vanity mirror, pull down the
sunvisor and slide the mirror cover (3).
Adjust the sunvisor forward or backward
(4) as needed (if equipped). Use the
ticket holder (5) to hold tickets.
Close the vanity mirror cover securely
and return the sunvisor to its original
position after use.
WARNING
For your safety, do not block your view
when using the sunvisor.
NOTICE
The tab (5) adjacent to the vanity mirror
on the sunvisor can be used for toll
road tickets or self parking tickets. Use
caution when inserting tickets into the
ticket holder to avoid damage. Refrain
from putting several tickets in the ticket
holder as this could also damage the
retaining tab.