2021 HYUNDAI PALISADE shift
[x] Cancel search: shiftPage 16 of 612

I IN
NS
ST
TR
RU
UM
ME
EN
NT
T
P
PA
AN
NE
EL
L
O
OV
VE
ER
RV
VI
IE
EW
W
(
(I
I)
)
The actual shape may differ from the illustration.
1-5
Your vehicle at a glance
1
OLX2019004N
1. Instrument cluster......................................3-69
2. Driver's front air bag ..................................2-59
3. Key ignition switch/ ......................................5-7
Engine Start/Stop button ..........................5-10
4. Hazard warning flasher switch ....................6-2
5. Audio/Video/Navigation System ..................4-4
6. Manual climate control system/ ..............3-159
Automatic climate control system............3-171
7. Automatic transmission shift button ..........5-15
8. Auto Hold ..................................................5-29
9. Drive mode knob ......................................5-55
10. DBC button ..............................................5-39
11. Forward/Reverse Parking Distance
Warning button ......................................3-156
12. Idle stop and go (ISG) OFF button ........5-51
13. Surround view monitor ..........................3-149
14. Air ventilation seat ..................................2-27
15. Seat warmer ............................................2-26
16. Heated steering wheel ............................3-32
17. Air ventilation seat (2
ndrow) ....................2-27
18. Seat warmer (2ndrow) ............................2-26
19. Climate control system (rear) ................3-164
20. Power outlet ..........................................3-197
21. AC inverter ............................................3-198
22. Passenger's front air bag ........................2-59
23. Glove box ..............................................3-192
24. Light control/Turn signals ......................3-132
25. Wiper/Washer ........................................3-144
26. Steering wheel audio controls ..................4-3
27. Smart Cruise Controls ..........................5-129
28. Wireless cellular phone charging
system ..................................................3-201
Page 34 of 612

2-17
Safety system of your vehicle
2
5. To use the rear seat, lift and unfold
the seatback to the upright posi-
tion by pulling up the recline lever.
Push the seatback firmly until it
clicks into place. Make sure the
seatback is locked in place.
6. Return the rear seat belt to the
proper position.Do not place objects in the rear
seats, since they cannot be
properly secured and may hit
vehicle occupants in a collision
causing serious injury or death.
WARNING
When returning the rear seat-
back from a folded to an upright
position, hold the seatback and
return it slowly. Ensure that the
seatback is completely locked
into its upright position by
pushing on the top of the seat-
back. In an accident or sudden
stop, the unlocked seatback
could allow cargo to move for-
ward with great force and enter
the passenger compartment,
which could result in serious
injury or death.
WARNING
OLX2039024N
■2nd row seat
OLX2039096N
■3rd row seat
Make sure the vehicle is off, the
shift button is in P (Park), and the
parking brake is securely applied
whenever loading or unloading
cargo. Failure to take these steps
may allow the vehicle to move if
the shift button is inadvertently
shifted to another position.
WARNING
Be careful when loading
cargo through the rear pas-
senger seats to prevent dam-
age to the vehicle interior.
When cargo is loaded through
the rear passenger seats,
ensure the cargo is properly
secured to prevent it from
moving while driving.
Unsecured cargo in the pas-
senger compartment can
cause damage to the vehicle
or injury to it's occupants.
CAUTION
Page 35 of 612

2-18
Safety system of your vehicle
2nd row seat folding
(from outside)
Push the 2nd row seat back folding
switch (1) located on the left side of
the cargo area. (L : Left seatback
folding, R : Right seatback folding)
3rd row seat remote
folding/unfolding (if equipped)
Push the 3rd row seat back folding
switch (1) located on the left side of
the cargo area. (L : Left seatback
folding/unfolding, R : Right seatback
folding/unfolding)
You can also fold or unfold the left or
right seatback of the 3rd row seat by
touching the menu (All menus →
Setup →Vehicle in the Infotainment
system).
For more details, refer to the sep-
arately supplied Multimedia manu-
al with your vehicle.The 3rd row seat that is remotely
folded or unfolded, is controlled only
when the shift button is in “P” with
Start ON, or the shift button is in “N”
and the parking brake is in “ON.”
However, the seat is controlled at
any condition in Start OFF state.
When the vehicle moves or shifts
while the seat is being controlled, the
seat may stop operation.
When you press the switch once
more while folding and unfolding the
seat, operation stops. When you
press the switch again, the operation
resumes.
With the seat folded, when you press
the angle adjusting switch, the seat
is unfolded.
OLX2039026NOLX2039030N
Rear seat folding
Do not fold the rear seats(2nd &
3rd row seats), if passengers,
pets or luggage are on the rear
seats.
It may cause injury or damage
to passengers, pets, luggage.
WARNING
Page 63 of 612

2-46
Safety system of your vehicle
Child restraint system (CRS)
Infants and younger children must be
restrained in an appropriate rear-fac-
ing or forward-facing CRS that has
first been properly secured to the
rear seat of the vehicle. Read and
comply with the instructions for
installation and use provided by the
manufacturer of the child restraint.Always properly restrain your
child in the child restraint.
If the vehicle head restraint
prevents proper installation of
a child seat (as described in
the child restraint system
manual), the head restraint of
the respective seating posi-
tion shall be readjusted or
entirely removed.
Do not use an infant carrier or
a child safety seat that
"hooks" over a seatback, it
may not provide adequate
protection in an accident.
After an accident, have a
HYUNDAI dealer check the
child restraint system, seat
belts, lower anchors and
upper tether anchors.
An improperly secured child
restraint can increase the risk
of SERIOUS INJURY or DEATH
in an accident. Always take the
following precautions when
using a child restraint system:
NEVER install a child or infant
restraint in the front passen-
ger's seat.
Always properly secure the
child restraint to a rear seat of
the vehicle.
Always follow the child
restraint system manufactur-
er's instructions for installa-
tion and use.
WARNING
Be especially careful when
installing a child restraint on
the center seating position in
the second row as it is narrow-
er than the outboard positions.
A wide child restraint installed
on the center seat may cover
the safety belt buckles for the
other seating positions. Do not
allow someone to ride in a
seating position where the
safety belt buckle is covered by
a child restraint.
A child restraint in the center
seating position may also con-
tact or push up against the
safety belt buckles, which can
damage the buckles and make
them unusable or unsafe.
Always check that the child
restraint does not contact any
of the safety belt buckles.
Check the placement of the
child restraint regularly to
make sure that it has not shift-
ed and come into contact with
any of the safety belt buckles.
WARNING
Page 70 of 612

2-53
Safety system of your vehicle
2
To install the tether anchor:
1. Route the child restraint tether
strap over the child restraint seat-
back. Route the tether strap under
the head restraint and between
the head restraint posts, or route
the tether strap over the top of the
vehicle seatback. Make sure the
strap is not twisted.
2. Connect the tether strap hook to
the tether anchor, then tighten the
tether strap according to the child
seat manufacturer's instructions to
firmly secure the child restraint to
the seat.
3. Check that the child restraint is
securely attached to the seat by
pushing and pulling the seat for-
ward-and-back and side-to-side.
Securing a child restraint with
lap/shoulder belt
When not using the LATCH system,
all child restraints must be secured to
a vehicle rear seat with the lap part
of a lap/shoulder belt.
Automatic locking mode
Since all passenger seat belts move
freely under normal conditions and
only lock under extreme or emer-
gency conditions (emergency locking
mode), you must manually pull the
seat belt all the way out to shift the
retractor to the "Automatic Locking"
mode to secure a child restraint.
The "Automatic Locking" mode will
help prevent the normal movement
of the child in the vehicle from caus-
ing the seat belt to loosen and com-
promise the child restraint system. To
secure a child restraint system, use
the following procedure. ALWAYS place a rear-facing
child restraint in the rear seat of
the vehicle.
Placing a rear-facing child
restraint in the front seat can
result in serious injury or death
if the child restraint is struck by
an inflating air bag.
WARNING
OLX2039038NOLMB033044
Page 71 of 612

2-54
Safety system of your vehicle
To install a child restraint system on
the rear seats, do the following:
1. Place the child restraint system on
a rear seat and route the lap/ shoul-
der belt around or through the child
restraint, following the restraint
manufacturer's instructions.
Be sure the seat belt webbing is not
twisted.
When using the rear center seat
belt, you should also refer to the
"Rear Seat Belt – Passenger's 3-
point system" section in this
chapter.2. Fasten the lap/shoulder belt latch
into the buckle. Listen for the dis-
tinct "click" sound.
Information
Position the release button so that it is
easy to access in case of an emergency.3. Pull the shoulder portion of the seat
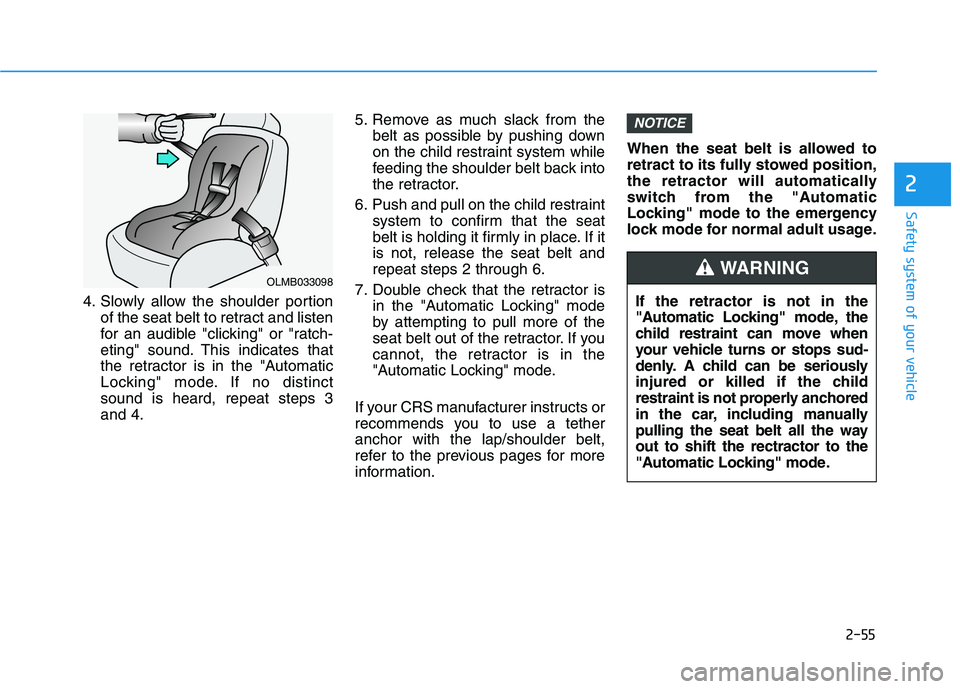
belt all the way out. When the
shoulder portion of the seat belt is
fully extended, it will shift the retrac-
tor to the "Automatic Locking" (child
restraint) mode.
i
NOTICEOLMB033045OLMB033097
Page 72 of 612

2-55
Safety system of your vehicle
2
4. Slowly allow the shoulder portion
of the seat belt to retract and listen
for an audible "clicking" or "ratch-
eting" sound. This indicates that
the retractor is in the "Automatic
Locking" mode. If no distinct
sound is heard, repeat steps 3
and 4.5. Remove as much slack from the
belt as possible by pushing down
on the child restraint system while
feeding the shoulder belt back into
the retractor.
6. Push and pull on the child restraint
system to confirm that the seat
belt is holding it firmly in place. If it
is not, release the seat belt and
repeat steps 2 through 6.
7. Double check that the retractor is
in the "Automatic Locking" mode
by attempting to pull more of the
seat belt out of the retractor. If you
cannot, the retractor is in the
"Automatic Locking" mode.
If your CRS manufacturer instructs or
recommends you to use a tether
anchor with the lap/shoulder belt,
refer to the previous pages for more
information.When the seat belt is allowed to
retract to its fully stowed position,
the retractor will automatically
switch from the "Automatic
Locking" mode to the emergency
lock mode for normal adult usage.
NOTICE
OLMB033098
If the retractor is not in the
"Automatic Locking" mode, the
child restraint can move when
your vehicle turns or stops sud-
denly. A child can be seriously
injured or killed if the child
restraint is not properly anchored
in the car, including manually
pulling the seat belt all the way
out to shift the rectractor to the
"Automatic Locking" mode.
WARNING
Page 87 of 612

2-70
Safety system of your vehicle
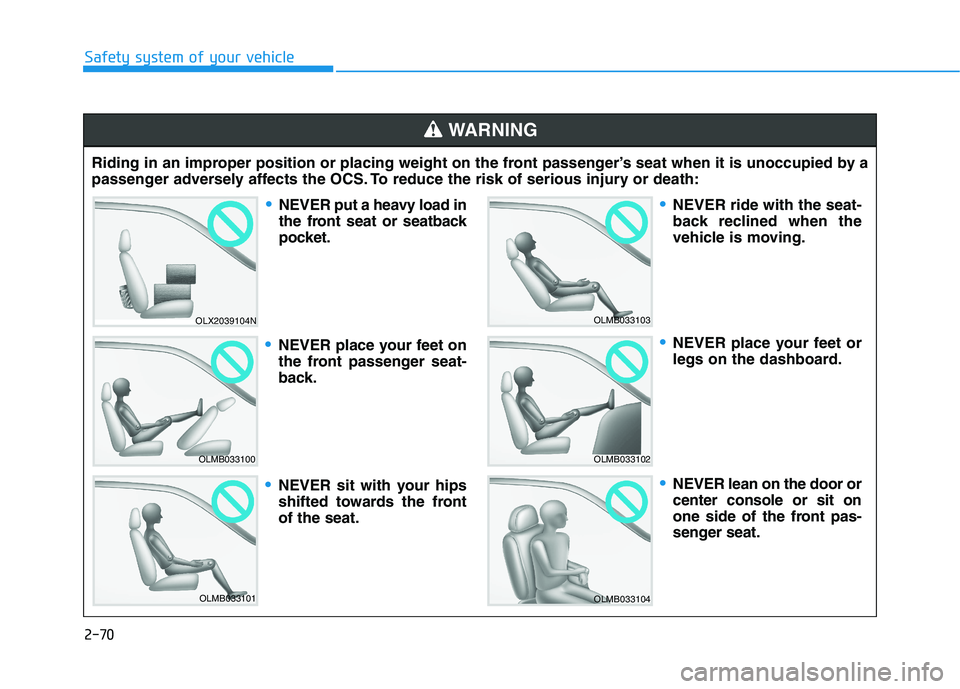
Riding in an improper position or placing weight on the front passenger’s seat when it is unoccupied by a
passenger adversely affects the OCS. To reduce the risk of serious injury or death:
WARNING
OLX2039104N
OLMB033100
OLMB033101
OLMB033103
OLMB033102
OLMB033104
NEVER put a heavy load in
the front seat or seatback
pocket.
NEVER place your feet on
the front passenger seat-
back.
NEVER sit with your hips
shifted towards the front
of the seat.
NEVER ride with the seat-
back reclined when the
vehicle is moving.
NEVER place your feet or
legs on the dashboard.
NEVER lean on the door or
center console or sit on
one side of the front pas-
senger seat.