2021 HYUNDAI PALISADE shift
[x] Cancel search: shiftPage 253 of 612

3-157
Convenient features of your vehicle
Non-operational conditions of
Forward/Reverse Parking
Distance Warning system
The Forward/Reverse Parking
Distance Warning system may not
operate normally when any of the
following occur:
Moisture is frozen to the sensor.
Sensor is covered with foreign mat-
ter, such as snow or water, or the
sensor cover is blocked.
The Forward/Reverse Parking
Distance Warning system may
experience a malfunction when the
following occurs:
Driving on uneven road surfaces
such as unpaved roads, gravel,
bumps, or gradient.
Objects generating excessive noise
such as vehicle horns, loud motor-
cycle engines, or truck air brakes
can interfere with the sensor.
Heavy rain or water spray is present.
Wireless transmitters or mobile
phones are present near the sensor.
The sensor is covered with snow.
3
Distance
from object
Inches (cm)Warning indicator
Warning soundWhen driving
forwardWhen driving
rearward
24 ~ 39
(61 ~ 100)Front-Buzzer beeps
intermittently
24 ~ 47
(61 ~ 120)Rear-Buzzer beeps
intermittently
12 ~ 24
(31 ~ 60)FrontBuzzer beeps
frequently
Rear-Buzzer beeps
frequently
12
(30)FrontBuzzer sounds
continuously
Rear-Buzzer sounds
continuously
Types of warning sound and indicator
Information
• The indicator may differ from the illustration depending on objects or sensors
status. If the indicator blinks, have your vehicle checked by an authorized
HYUNDAI dealer.
• If the audible warning does not sound or if the buzzer sounds intermittently
when shifting into R (Reverse) position, this may indicate a malfunction with
the Forward/Reverse Parking Distance Warning system. If this occurs, have
your vehicle checked by an authorized HYUNDAI dealer as soon as possible.
i
Page 301 of 612

3-205
Convenient features of your vehicle
3
Luggage Net Holder
(if equipped)
To keep items from shifting in the lug-
gage compartment, you can use the
4 holders located in the luggage
board to attach the luggage net.
Make sure the luggage net is secure-
ly attached to the holders in the lug-
gage board.
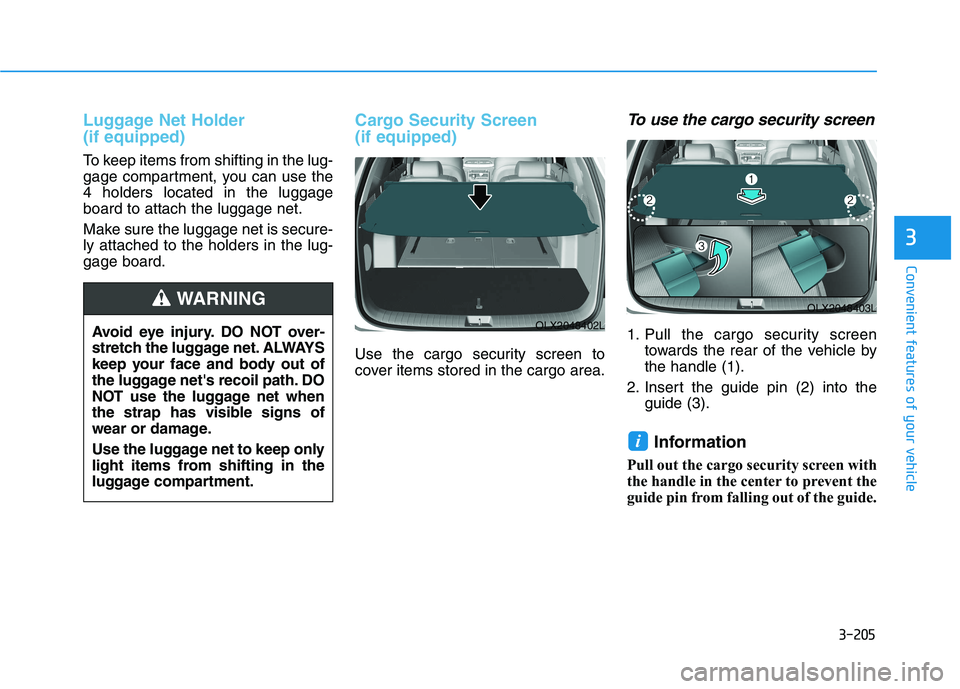
Cargo Security Screen
(if equipped)
Use the cargo security screen to
cover items stored in the cargo area.
To use the cargo security screen
1. Pull the cargo security screen
towards the rear of the vehicle by
the handle (1).
2. Insert the guide pin (2) into the
guide (3).
Information
Pull out the cargo security screen with
the handle in the center to prevent the
guide pin from falling out of the guide.
i
OLX2048403L
OLX2048402LAvoid eye injury. DO NOT over-
stretch the luggage net. ALWAYS
keep your face and body out of
the luggage net's recoil path. DO
NOT use the luggage net when
the strap has visible signs of
wear or damage.
Use the luggage net to keep only
light items from shifting in the
luggage compartment.
WARNING
Page 310 of 612

Driving your vehicle
5
Before Driving ........................................................5-5
Before Entering the Vehicle ...........................................5-5
Before Starting ..................................................................5-5
Ignition Switch ........................................................5-7
Key Ignition Switch ...........................................................5-7
Engine Start/Stop Button .............................................5-10
Automatic Transmission ......................................5-15
Automatic transmission operation ..............................5-15
Parking ...............................................................................5-18
LCD display message ......................................................5-19
Good driving practices ...................................................5-20
Paddle Shifter (Manual Shift Mode) ..........................5-22
Braking system.....................................................5-23
Power Brakes ...................................................................5-23
Disc Brakes Wear Indicator ..........................................5-24
Electronic Parking Brake (EPB)...................................5-24
Auto Hold ..........................................................................5-29
Anti-lock Brake System (ABS) ....................................5-33
Electronic Stability Control (ESC)................................5-35
Vehicle Stability Management (VSM).........................5-38
Hill-Start Assist Control (HAC) ....................................5-39
Downhill Brake Control (DBC) ......................................5-39
Trailer Stability Assist (TSA) .........................................5-42
Good Braking Practices .................................................5-42
All Wheel Drive (AWD) ........................................5-43
AWD Operation ................................................................5-44
LCD display message ......................................................5-47
Emergency Precautions.................................................5-48
ISG (Idle Stop and Go) system ...........................5-50
To Activate the ISG System ..........................................5-50
To Deactivate the ISG System......................................5-53
ISG System Malfunction ................................................5-53
Battery Sensor Deactivation ........................................5-54
Drive Mode Integrated Control system
(2WD) .....................................................................5-55
Drive Mode .......................................................................5-55
Drive Mode Integrated Control system
(AWD) ....................................................................5-59
Drive Mode .......................................................................5-59
Forward Collision-Avoidance Assist (FCA)
system....................................................................5-63
System Setting and Operation .....................................5-63
FCA Warning Message and Brake Control ...............5-66
FCA Sensor (Front Radar/Front Camera) .................5-68
System Malfunction .......................................................5-70
Limitations of the System .............................................5-72
Page 317 of 612

5-8
Driving your vehicle
Key ignition switch positions
Switch
PositionActionNotice
LOCK
To turn the ignition switch to the LOCK position, put the
key in at the ACC position and turn the key towards the
LOCK position.
The ignition key can be removed in the LOCK position.
The shift lever must be in the P (Park) position.
ACCSome of the electrical accessories are usable.
ON
This is the normal key position when the engine has
started.
All features and accessories are usable.
The warning lights can be checked when you turn the
ignition switch from ACC to ON.Do not leave the ignition switch in the ON position when
the engine is not running in order to prevent the battery
from discharging.
START
To start the engine, turn the ignition switch to the START
position. The switch returns to the ON position when you
let go of the key.The engine will crank until you release the key.
Page 318 of 612

5-9
Driving your vehicle
5
Starting the engine 1. Make sure the parking brake is
applied.
2. Make sure the gear is in P (Park).
3. Depress the brake pedal.
4. Turn the ignition switch to the
START position. Hold the key
(maximum of 10 seconds) until the
engine starts and release it.
Information
• It is best to maintain a moderate
engine speed until the vehicle engine
comes up to normal operating tem-
perature. Avoid harsh or abrupt
acceleration or deceleration while
the engine is still cold.
• Whether the engine is cold or warm,
always start the vehicle with your
foot on the brake pedal. Do not
depress the accelerator while start-
ing the vehicle. Do not rev the
engine while warming it up.To prevent damage to the vehicle:
Do not hold the ignition key in
the START position for more
than 10 seconds. Wait 5 to 10
seconds before trying again.
Do not push or tow your vehicle
to start the engine.Turning off the engine
1. Stop the vehicle and depress the
brake pedal fully.
2. Shift the gear to P (Park).
3. Turn the ignition switch to the off
position and apply the parking
brake.
NOTICE
i
Always wear appropriate shoes
when operating your vehicle.
Unsuitable shoes, such as high
heels, ski boots, sandals, flip-
flops, etc., may interfere with
your ability to use the brake and
accelerator pedals.
WARNING
Page 323 of 612

5-14
Driving your vehicle
To prevent damage to the vehicle:
If the engine stalls while you are
in motion, do not attempt to shift
the gear to the P (Park) position.
If traffic and road conditions
permit, you may put the gear in
the N (Neutral) position while the
vehicle is still moving and press
the Engine Start/Stop button in
an attempt to restart the engine.
Do not push or tow your vehicle
to start the engine.To prevent damage to the vehicle:
When the stop lamp switch fuse is
blown, you can't start the engine
normally. Replace the fuse with a
new one. If you are not able to
replace the fuse, you can start the
engine by pressing and holding
the Engine Start/Stop button for
10 seconds with the Engine Start/
Stop button in the ACC position.
Do not press the Engine Start/Stop
button for more than 10 seconds
except when the stop lamp switch
fuse is blown.
For your safety always depress
the brake pedal before starting the
engine.
Information
If the smart key battery is weak or the
smart key does not work correctly,
you can start the engine by pressing
the Engine Start/Stop button with the
smart key in the direction of the pic-
ture above.
Turning off the engine
1. Stop the vehicle and depress the
brake pedal fully.
2. Shift the gear to P (Park).
3. Press the Engine Start/Stop but-
ton to the off position and apply
the parking brake.
i
NOTICENOTICE
OLX2058001
Page 324 of 612

5-15
Driving your vehicle
5
Automatic transmission opera-
tion
The automatic transmission has
eight forward speeds and one
reverse speed.
The individual speeds are selected
automatically in the D (Drive) posi-
tion.
A AU
UT
TO
OM
MA
AT
TI
IC
C
T
TR
RA
AN
NS
SM
MI
IS
SS
SI
IO
ON
N
OLX2058003
The automatic transmission
shift button or interior parts
might get hot when a vehicle is
parked outside during hot
weather. Always be careful
when the vehicle is hot.
WARNING
Page 325 of 612

Driving your vehicle
Transmission ranges
The indicator in the instrument cluster
displays the gear position when the
ignition switch is in the ON position.
P (Park)
Always come to a complete stop
before shifting into P (Park).
To shift from P (Park), you must
depress firmly on the brake pedal
and make sure your foot is off the
accelerator pedal.
The gear must be in P (Park) before
turning the engine off.
R (Reverse)
Use this position to drive the vehicle
backward.
Always come to a complete stop
before shifting into or out of R
(Reverse); you may damage the
transmission if you shift into R
(Reverse) while the vehicle is in
motion.
When the vehicle is stopped in R
(Reverse) position, if you open the
driver's door with the seat belt unfas-
tened, the gear is shifted to P (Park)
position automatically.
However when the vehicle moves in
R (Reverse) position, if you open the
driver's door with the seat belt unfas-
tened, the gear may be not shifted to
P (Park) position automatically for
protecting the automatic transmis-
sion.
NOTICE
To reduce the risk of serious
injury or death:
ALWAYS check the surround-
ing areas near your vehicle for
people, especially children,
before shifting a vehicle into
D (Drive) or R (Reverse).
Before leaving the driver’s
seat, always make sure the
gear is in the P (Park) posi-
tion, then set the parking
brake, and place the ignition
switch in the LOCK/OFF posi-
tion. Unexpected and sudden
vehicle movement can occur
if these precautions are not
followed.
Do not use the engine brake
(shifting from a high gear to
lower gear) rapidly on slip-
pery roads. The vehicle may
slip causing an accident.
WARNING
Shifting into P (Park) while the
vehicle is in motion may
cause you to lose control of
the vehicle.
After the vehicle has stopped,
always make sure the gear is
in P (Park), apply the parking
brake, and turn the engine
off.
Do not use the P (Park) posi-
tion in place of the parking
brake.
WARNING
5-16