2021 HYUNDAI ELANTRA HYBRID wheel
[x] Cancel search: wheelPage 439 of 555
Driver assistance system
7-118
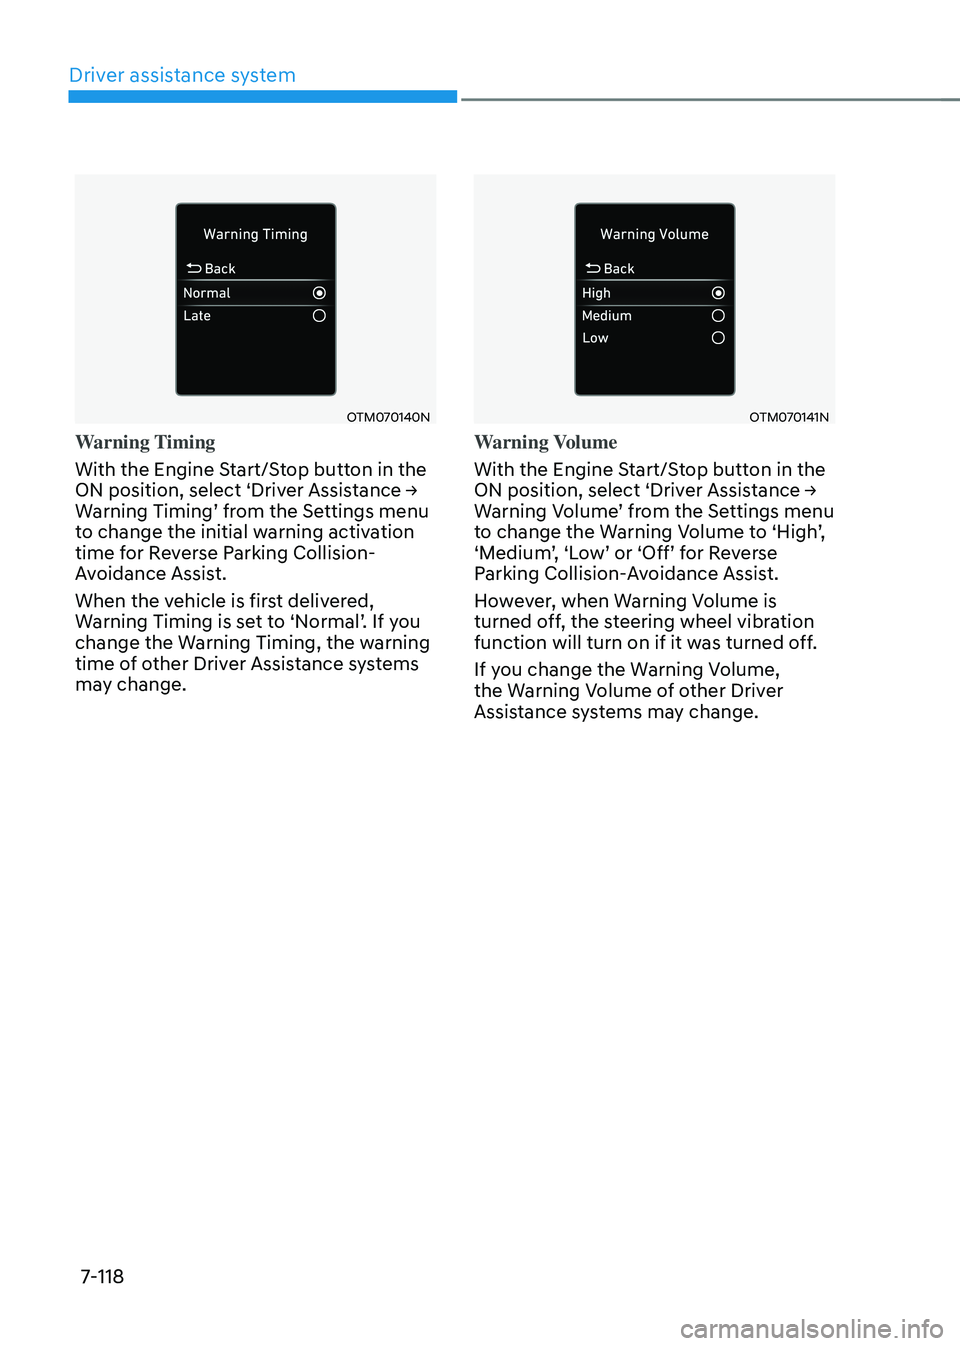
OTM070140N
Warning Timing
With the Engine Start/Stop button in the
ON position, select ‘Driver Assistance → Warning Timing’ from the Settings menu to change the initial warning activation
time for Reverse Parking Collision-
Avoidance Assist.
When the vehicle is first delivered,
Warning Timing is set to ‘Normal’. If you change the Warning Timing, the warning
time of other Driver Assistance systems
may change.
OTM070141N
Warning Volume
With the Engine Start/Stop button in the
ON position, select ‘Driver Assistance → Warning Volume’ from the Settings menu to change the Warning Volume to ‘High’, ‘Medium’, ‘Low’ or ‘Off’ for Reverse Parking Collision-Avoidance Assist.
However, when Warning Volume is
turned off, the steering wheel vibration
function will turn on if it was turned off.
If you change the Warning Volume,
the Warning Volume of other Driver
Assistance systems may change.
Page 440 of 555

07
7-119
Function operation
Operating conditions
If ‘Active Assist’ or ‘Warning Only’ is set from the Settings menu, Reverse Parking
Collision-Avoidance Assist will be in
the ready status when the following
conditions are satisfied:
-The tailgate is closed
-The gear is shifted to R (Reverse)
-Vehicle speed is below 6 mph (10 km/h)
-System components such as the rear
view camera and the rear ultrasonic
sensors are in normal conditions
Warning Only
• If the function detects a risk of
collision with a pedestrian or an
object, the system will warn the driver
with an audible warning, steering
wheel vibration and warning message
on the cluster. When Rear View
Monitor is operating, a warning will
appear on the infotainment system
screen.
•
‘If ‘Warning Only’ is selected, braking will not be assisted.
• The warning will turn off when the
gear is shifted to P (Park), N (Neutral)
or D (Drive). Active Assist
•
If the function detects a risk of
collision with a pedestrian or an
object, the system will warn the driver
with an audible warning, steering
wheel vibration and warning message
on the cluster. When Rear View
Monitor is operating, a warning will
appear on the infotainment system
screen.
• If the function detects imminent
collision with a pedestrian or an
object behind the vehicle, the system
will assist you with braking. The driver
needs to pay attention as the brake
assist will end within 2 seconds. The
driver must immediately depress
the brake pedal and check vehicle
surroundings.
• Brake control will end when:
-The gear is shifted to P (Park) or D
(Drive).
-The driver depresses the brake
pedal with sufficient power
-Braking assist has last for
approximately 2 seconds
• The warning will turn off when:
-The driver shifts the gear to P (Park),
N (Neutral), or D (Drive)
• The brake control may not operate
properly depending on the status of
ESC (Electronic Stability Control).
There will only be a warning when:
-The ESC (Electronic Stability
Control) warning light is on
-ESC (Electronic Stability Control) is
engaged in a different function
Page 448 of 555
08
8-3
If you Have a Flat Tire While
Driving
If a tire goes flat while you are driving:
• Take your foot off the accelerator
pedal and let the vehicle slow down
while driving straight ahead. Do not
apply the brakes immediately or
attempt to pull off the road as this
may cause loss of vehicle control
resulting in an accident. When the
vehicle has slowed to such a speed
that it is safe to do so, brake carefully
and pull off the road. Drive off the
road as far as possible and park on
firm, level ground. If you are on a
divided highway, do not park in the
median area between the two traffic
lanes.
• When the vehicle is stopped, press the
hazard warning flasher button, move
the shift button into P (Park), and
apply the parking brake, and place
the ignition switch in the LOCK/OFF
position.
• Have all passengers get out of the
vehicle. Be sure they all get out on the
side of the vehicle that is away from
traffic.
• When changing a flat tire, follow the
instructions provided later in this
chapter.• Be sure to shift the gear to P (Park).
The vehicle starts only when the gear
is in P (Park).
• This vehicle does not have a regular
12V battery that needs periodic
replacement. It is lithium ion polymer
type integrated into the HEV high
voltage battery. The vehicle has a
12V battery protection system that
cuts 12V battery from vehicle draw
to prevent full discharge. If vehicle
will not start, first try pressing the
12V Battery Reset switch (left side of
the steering wheel near the fuel door
open switch) to reconnect the 12V
battery, but you must start vehicle
within 15 seconds of pressing the 12V
Battery Reset switch. After starting
the vehicle (
indicator ON ), operate the vehicle safely outdoors in
ready mode stopped and/or drive it
for 30 minutes total to charge the 12V
battery fully.
• Check the fuel level and add fuel if
necessary.
If the vehicle still does not start, call
an authorized HYUNDAI dealer for
assistance.
NOTICE
Push or pull starting the vehicle may
cause the catalytic converter to
overload which can lead to damage to
the emission control system.
IF THE ENGINE WILL NOT
S TA RT
Page 455 of 555
Emergency Situations
8-10
Tire pressure monitoring system
WARNING
Over-inflation or under-inflation can
reduce tire life, adversely affect vehicle
handling, and lead to sudden tire failure
that may cause loss of vehicle control
resulting in an accident.
Each tire, including the spare (if
provided), should be checked monthly
when cold and inflated to the inflation
pressure recommended by the vehicle
manufacturer on the vehicle placard
or tire inflation pressure label. (If your
vehicle has tires of a different size than
the size indicated on the vehicle placard
or tire inflation pressure label, you should
determine the proper tire inflation
pressure for those tires.)
As an added safety feature, your
vehicle has been equipped with a tire
pressure monitoring system (TPMS)
that illuminates a low tire pressure
telltale when one or more of your tires is
significantly under-inflated. Accordingly,
when the low tire pressure telltale
illuminates, you should stop and check
your tires as soon as possible, and inflate
them to the proper pressure. Driving on
a significantly underinflated tire causes
the tire to overheat and can lead to tire
failure.
Under-inflation also reduces fuel
efficiency and tire tread life, and may
affect the vehicle’s handling and
stopping ability.Please note that the TPMS is not a
substitute for proper tire maintenance,
and it is the driver’s responsibility to
maintain correct tire pressure, even if
under-inflation has not reached the level
to trigger illumination of the TPMS low
tire pressure telltale.
Your vehicle has also been equipped with
a TPMS malfunction indicator to indicate
when the system is not operating
properly. The TPMS malfunction
indicator is combined with the low
tire pressure telltale. When the system
detects a malfunction, the telltale will
flash for approximately one minute and
then remain continuously illuminated.
This sequence will continue upon
subsequent vehicle start-ups as long as
the malfunction exists.
When the malfunction indicator is
illuminated, the system may not be able
to detect or signal low tire pressure as
intended. TPMS malfunctions may occur
for a variety of reasons, including the
installation of replacement or alternate
tires or wheels on the vehicle that
prevent the TPMS from functioning
properly.
Always check the TPMS malfunction
telltale after replacing one or more tires
or wheels on your vehicle to ensure that
the replacement or alternate tires and
wheels allow the TPMS to continue to
function properly.
Page 459 of 555

Emergency Situations
8-14
Each wheel is equipped with a tire
pressure sensor mounted inside the tire
behind the valve stem (except for the
spare tire). You must use TPMS specific
wheels. It is recommended that you
always have your tires serviced by an
authorized HYUNDAI dealer.
You may not be able to identify a tire
with low pressure by simply looking at it.
Always use a good quality tire pressure
gauge to measure the tire’s inflation
pressure. Please note that a tire that is
hot (from being driven) will have a higher
pressure measurement than a tire that is
cold.
A cold tire means the vehicle has been
sitting for 3 hours and driven for less
than 1 mile (1.6 km) in that 3 hour period.
Allow the tire to cool before measuring
the inflation pressure. Always be sure
the tire is cold before inflating to the
recommended pressure.
WARNING
• The TPMS cannot alert you to severe
and sudden tire damage caused by
external factors such as nails or road
debris.
• If you feel any vehicle instability,
immediately take your foot off
the accelerator, apply the brakes
gradually with light force, and slowly
move to a safe position off the road.
WARNING
Tampering with, modifying, or disabling
the Tire Pressure Monitoring System
(TPMS) components may interfere
with the system’s ability to warn the
driver of low tire pressure conditions
and/or TPMS malfunctions. Tampering
with, modifying, or disabling the Tire
Pressure Monitoring System (TPMS)
components may void the warranty for
that portion of the vehicle.
Information
This device complies with Part 15 of the
FCC rules.
Operation is subject to the following three
conditions:
1. This device may not cause harmful
interference.
2. This device must accept any
interference received, including
interference that may cause undesired
operation.
3. Changes or modifications not expressly
approved by the party responsible
for compliance could void the user’s
authority to operate the equipment.
Page 460 of 555
08
8-15
IF YOU HAVE A FLAT TIRE (WITH SPARE TIRE)
WARNING
Changing a tire can be dangerous.
Follow the instructions in this section
when changing a tire to reduce the risk
of serious injury or death.
CAUTION
Be careful as you use the jack handle to
stay clear of the flat end. The flat end
has sharp edges that could cause cuts.
Jack and Tools
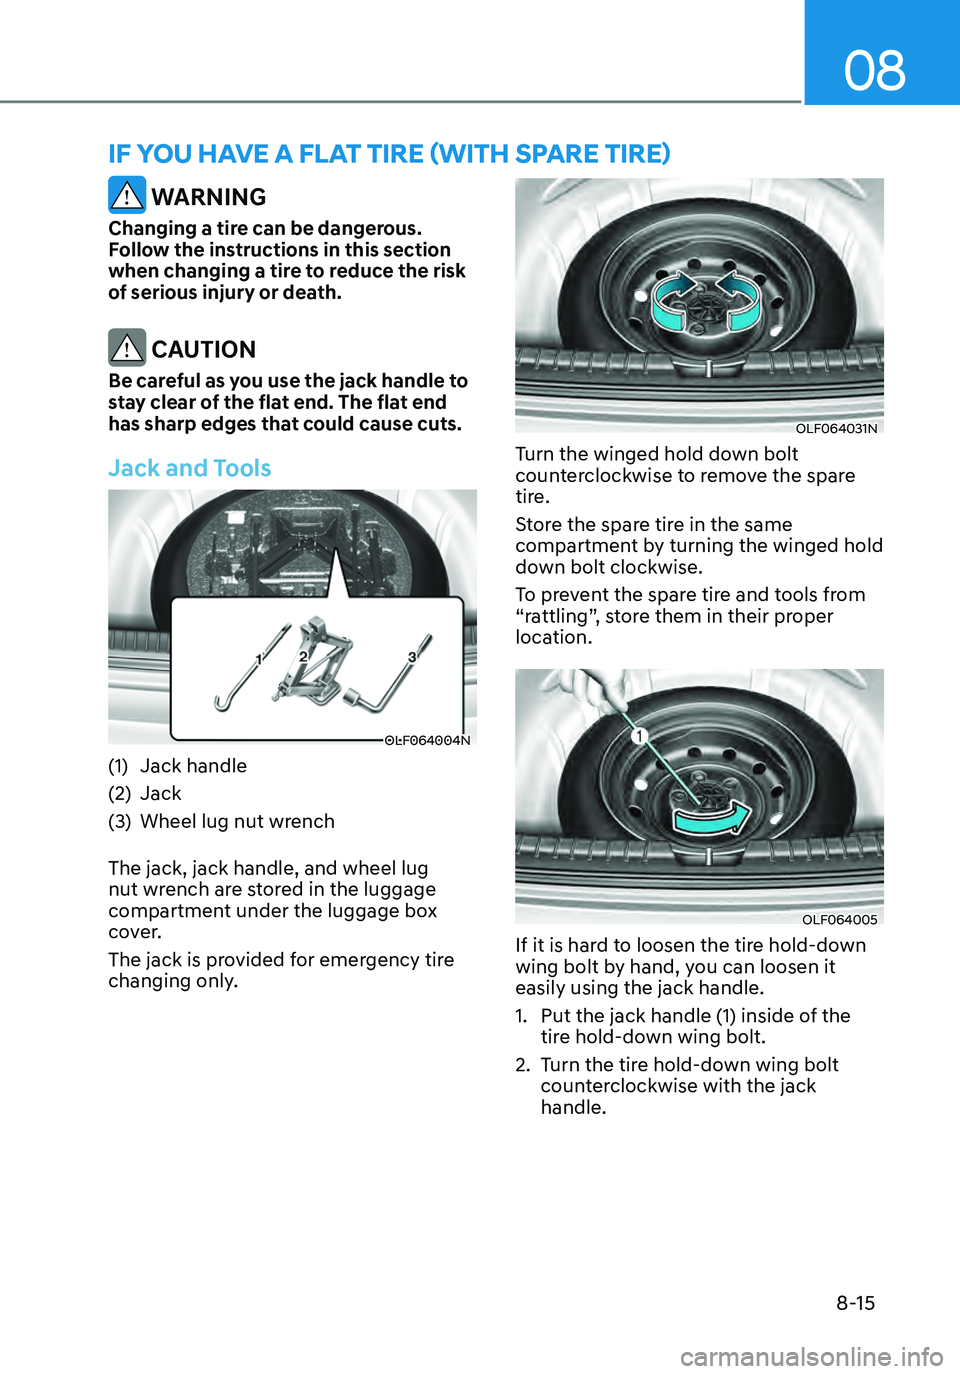
OLF064004N
(1) Jack handle
(2) Jack
(3) Wheel lug nut wrench
The jack, jack handle, and wheel lug
nut wrench are stored in the luggage
compartment under the luggage box
cover.
The jack is provided for emergency tire
changing only.
OLF064031N
Turn the winged hold down bolt
counterclockwise to remove the spare
tire.
Store the spare tire in the same
compartment by turning the winged hold
down bolt clockwise.
To prevent the spare tire and tools from
“rattling”, store them in their proper
location.
OLF064005
If it is hard to loosen the tire hold-down
wing bolt by hand, you can loosen it
easily using the jack handle.
1. Put the jack handle (1) inside of the
tire hold-down wing bolt.
2. Turn the tire hold-down wing bolt
counterclockwise with the jack
handle.
Page 461 of 555
Emergency Situations
8-16
Changing Tires
WARNING
A vehicle can slip or roll off of a jack
causing serious injury or death to you or
those nearby. Take the following safety
precautions:
• Never place any portion of your body
under a vehicle that is supported by
a jack.
• NEVER attempt to change a tire in
the lane of traffic. ALWAYS move the
vehicle completely off the road on
level, firm ground away from traffic
before trying to change a tire. If you
cannot find a level, firm place off
the road, call a towing service for
assistance.
• Be sure to use the jack provided with
the vehicle.
• ALWAYS place the jack on the
designated jacking positions on the
vehicle and NEVER on the bumpers
or any other part of the vehicle for
jacking support.
• Do not start or run the engine while
the vehicle is on the jack.
• Do not allow anyone to remain in the
vehicle while it is on the jack.
• Keep children away from the road
and the vehicle. Follow these steps to change your
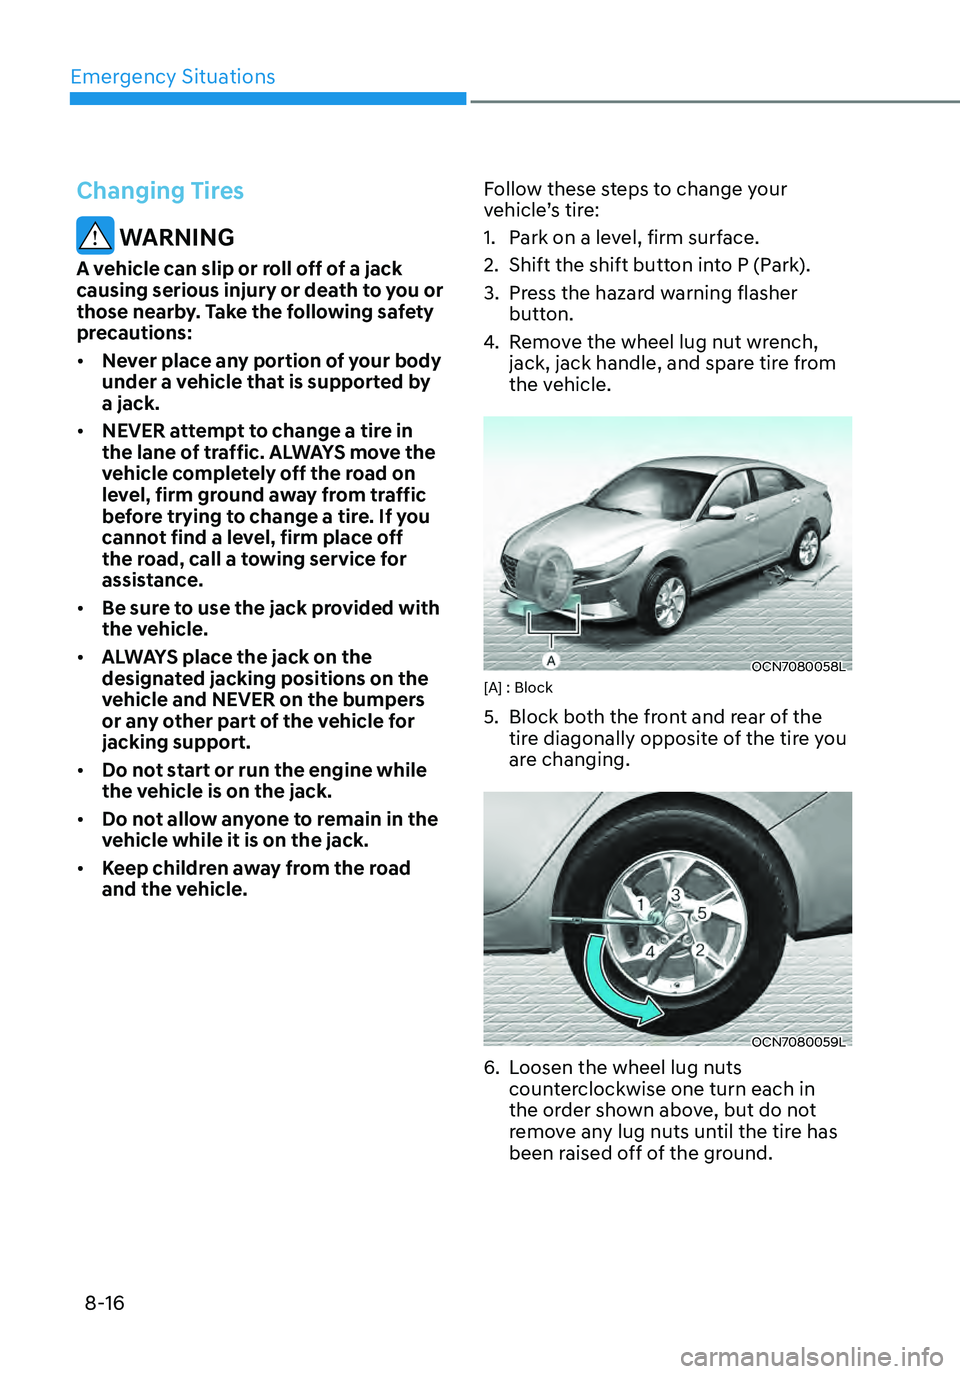
vehicle’s tire:
1. Park on a level, firm surface.
2. Shift the shift button into P (Park).
3. Press the hazard warning flasher
button.
4. Remove the wheel lug nut wrench,
jack, jack handle, and spare tire from
the vehicle.
OCN7080058L[A] : Block
5. Block both the front and rear of the
tire diagonally opposite of the tire you
are changing.
OCN7080059L
6. Loosen the wheel lug nuts
counterclockwise one turn each in
the order shown above, but do not
remove any lug nuts until the tire has
been raised off of the ground.
Page 462 of 555
08
8-17
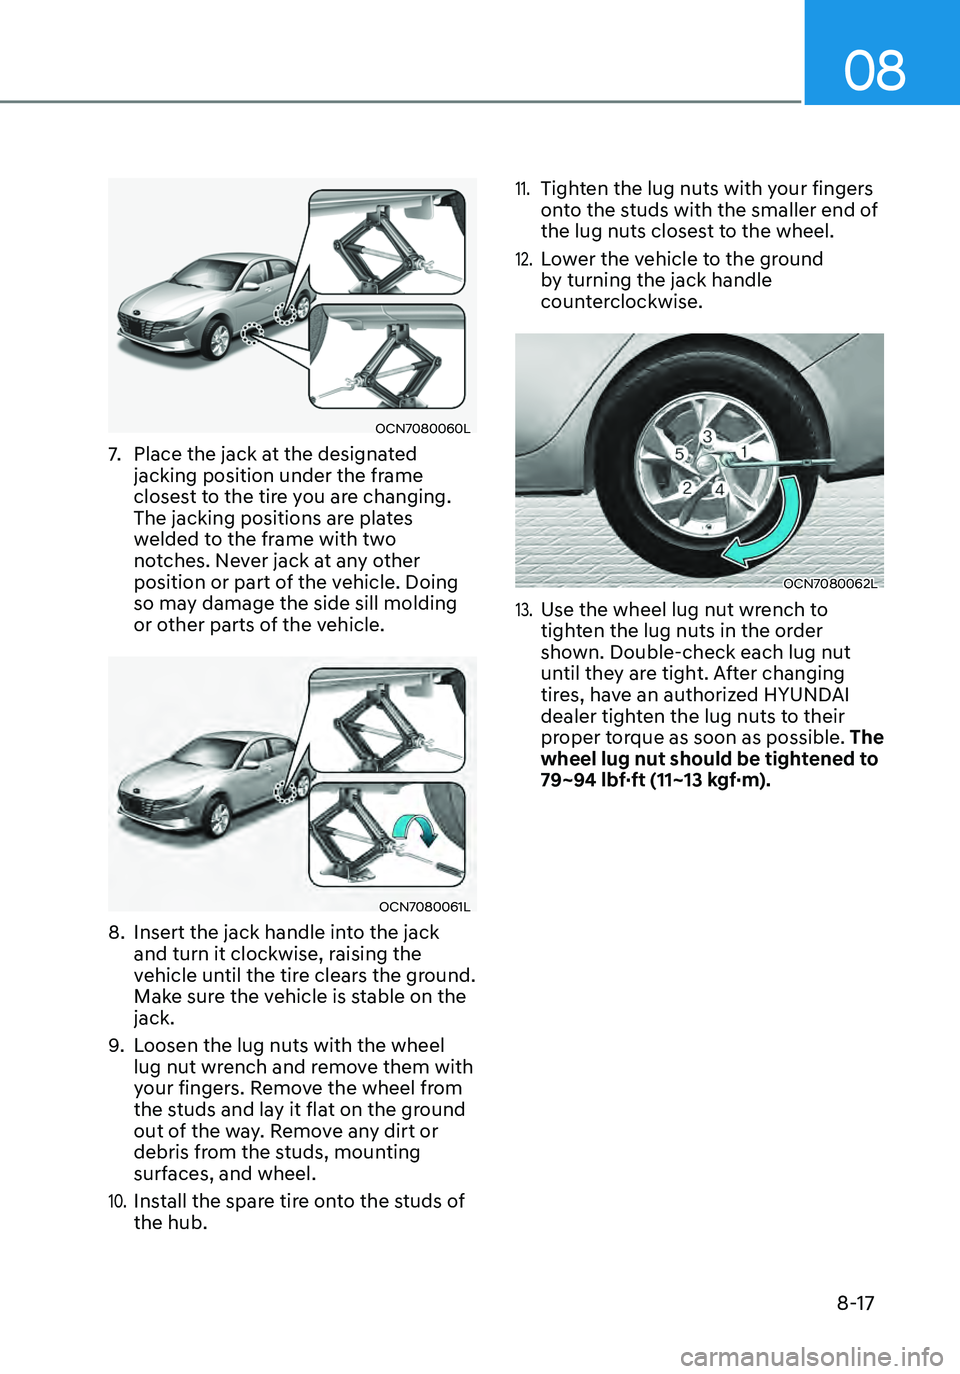
OCN7080060L
7. Place the jack at the designated
jacking position under the frame
closest to the tire you are changing.
The jacking positions are plates
welded to the frame with two
notches. Never jack at any other
position or part of the vehicle. Doing
so may damage the side sill molding
or other parts of the vehicle.
OCN7080061L
8. Insert the jack handle into the jack
and turn it clockwise, raising the
vehicle until the tire clears the ground.
Make sure the vehicle is stable on the
jack.
9. Loosen the lug nuts with the wheel
lug nut wrench and remove them with
your fingers. Remove the wheel from
the studs and lay it flat on the ground
out of the way. Remove any dirt or
debris from the studs, mounting
surfaces, and wheel.
10. Install the spare tire onto the studs of
the hub.
11. Tighten the lug nuts with your fingers
onto the studs with the smaller end of
the lug nuts closest to the wheel.
12. Lower the vehicle to the ground
by turning the jack handle
counterclockwise.
OCN7080062L
13. Use the wheel lug nut wrench to
tighten the lug nuts in the order
shown. Double-check each lug nut
until they are tight. After changing
tires, have an authorized HYUNDAI
dealer tighten the lug nuts to their
proper torque as soon as possible. The
wheel lug nut should be tightened to
79~94 lbf·ft (11~13 kgf·m).