Page 195 of 555
Convenient Features
5-42
Tilt Steering / Telescope Steering
When adjusting the steering wheel to a
comfortable position, adjust the steering
wheel so that it points toward your chest,
not toward your face. Make sure you can
see the instrument cluster warning lights
and gauges. After locking the lever, push
the steering wheel both up and down to
be certain it is locked in position. Always
adjust the position of the steering wheel
before driving.
WARNING
NEVER adjust the steering wheel while
driving. This may cause loss of vehicle
control resulting in an accident.
OCN7050013
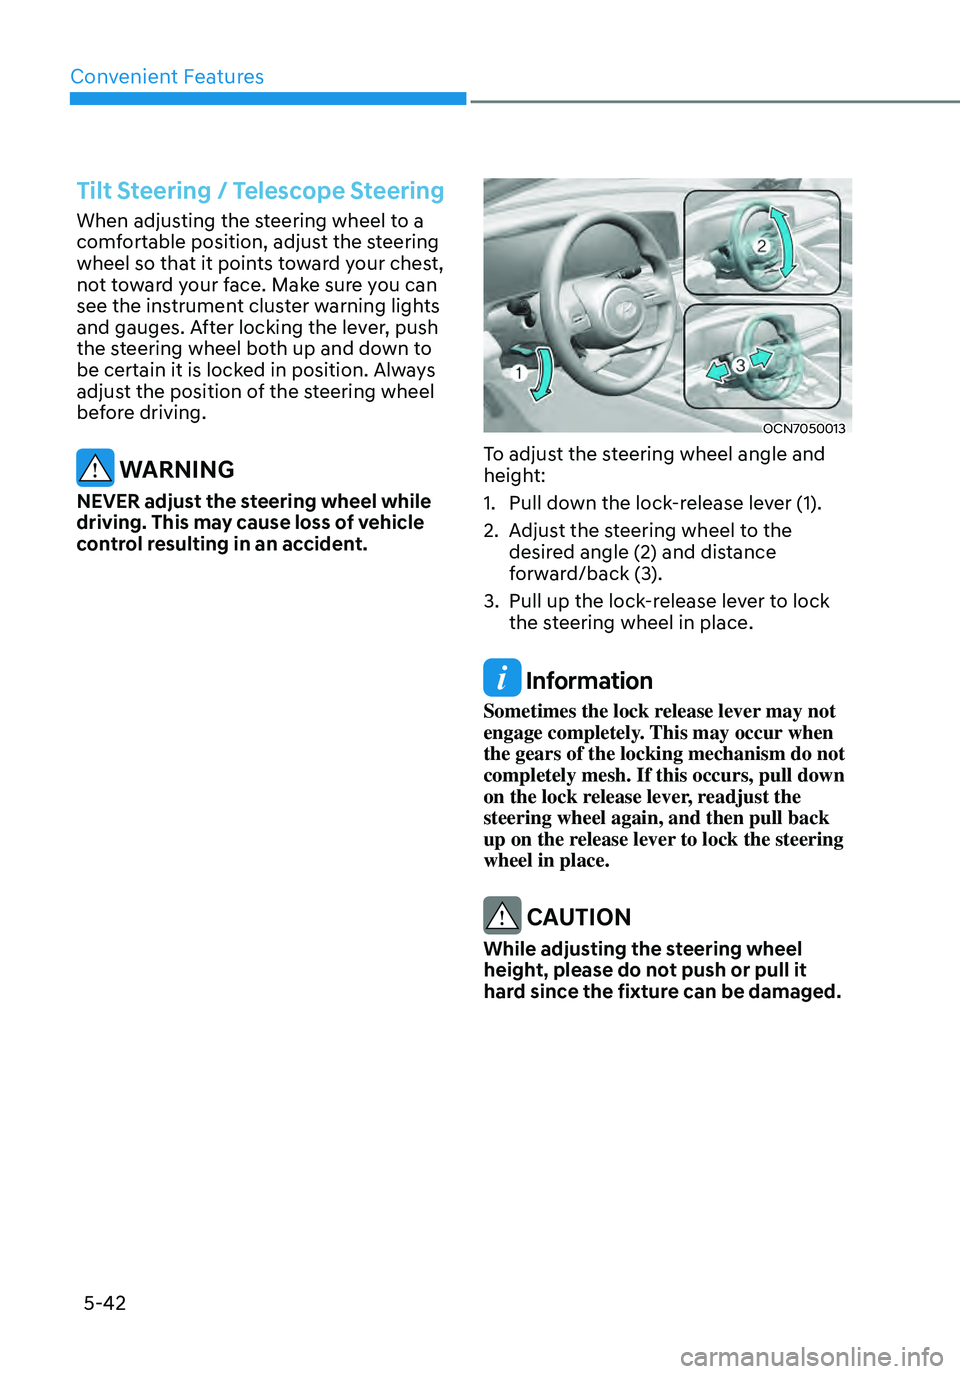
To adjust the steering wheel angle and
height:
1. Pull down the lock-release lever (1).
2. Adjust the steering wheel to the
desired angle (2) and distance
forward/back (3).
3. Pull up the lock-release lever to lock
the steering wheel in place.
Information
Sometimes the lock release lever may not
engage completely. This may occur when
the gears of the locking mechanism do not
completely mesh. If this occurs, pull down
on the lock release lever, readjust the
steering wheel again, and then pull back
up on the release lever to lock the steering
wheel in place.
CAUTION
While adjusting the steering wheel
height, please do not push or pull it
hard since the fixture can be damaged.
Page 208 of 555
05
5-55
Power Windows
The ignition switch must be in the
ON position to be able to raise or
lower the windows. Each door has a
Power Window switch to control that
door’s window. The driver has a Power
Window Lock switch which can block
the operation of passenger windows.
The power windows will operate for
approximately 30 seconds after the
ignition switch is placed in the ACC or
LOCK/OFF position. However, if the front
doors are opened, the Power Windows
will not operate even within the 30
second period.
WARNING
To avoid serious injury or death, do not
extend your head, arms or body outside
the windows while driving.
Information
• In cold and wet climates, power
windows may not work properly due to
freezing conditions.
• While driving with the rear windows
down or with the sunroof (if equipped)
opened (or partially opened), your
vehicle may demonstrate a wind
buffeting or pulsation noise. This
noise is normal and can be reduced
or eliminated by taking the following
actions. If the noise occurs with one
or both of the rear windows down,
partially lower both front windows
approximately one inch. If you
experience the noise with the sunroof
open, slightly close the sunroof.
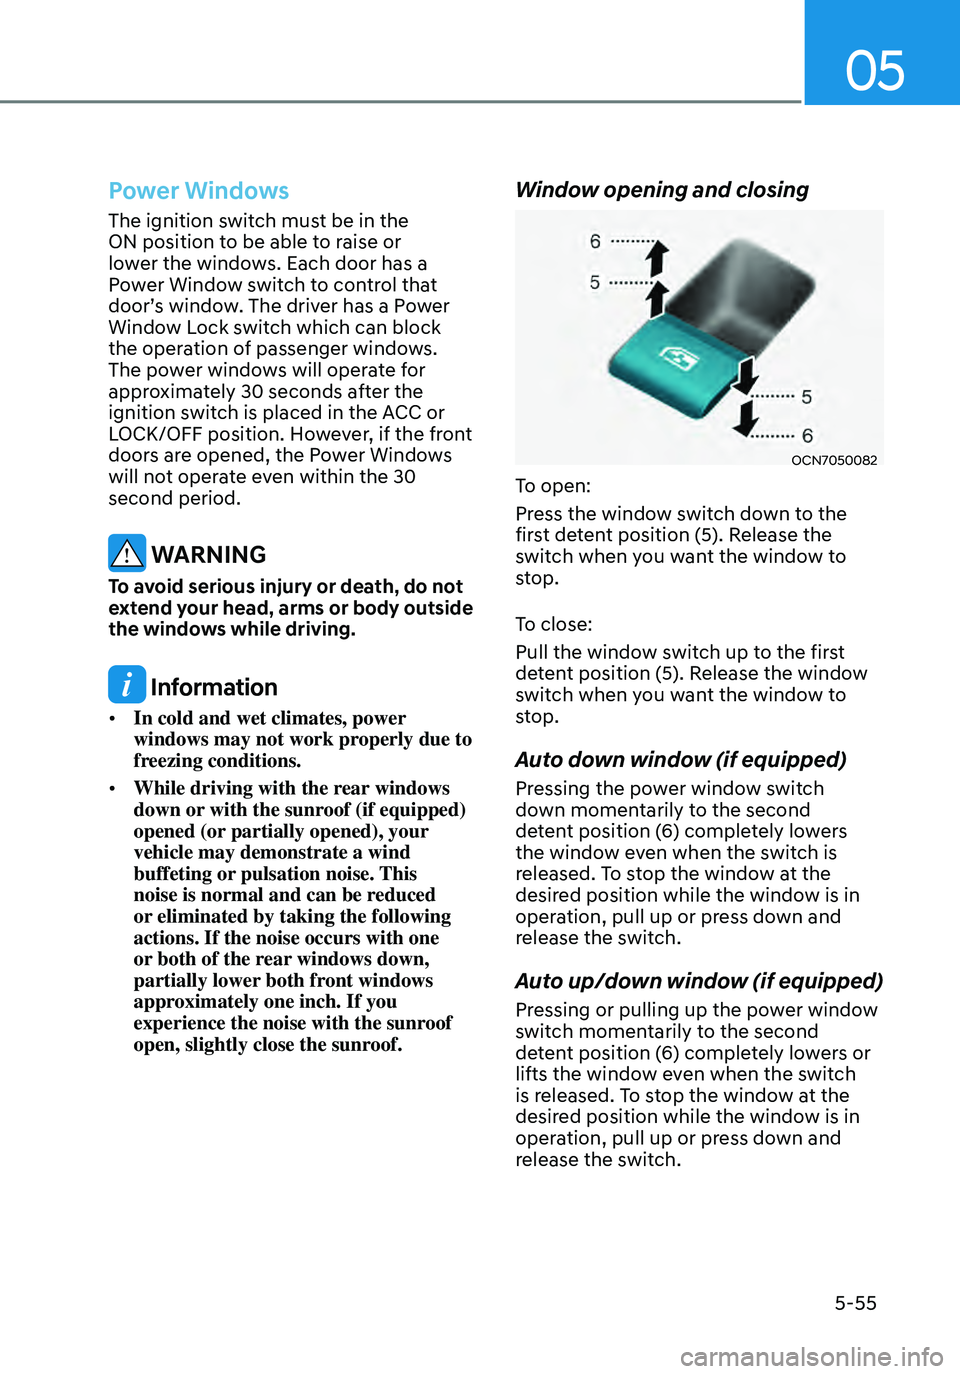
Window opening and closing
OCN7050082
To open:
Press the window switch down to the
first detent position (5). Release the
switch when you want the window to
stop.
To close:
Pull the window switch up to the first
detent position (5). Release the window
switch when you want the window to
stop.
Auto down window (if equipped)
Pressing the power window switch
down momentarily to the second
detent position (6) completely lowers
the window even when the switch is
released. To stop the window at the
desired position while the window is in
operation, pull up or press down and
release the switch.
Auto up/down window (if equipped)
Pressing or pulling up the power window
switch momentarily to the second
detent position (6) completely lowers or
lifts the window even when the switch
is released. To stop the window at the
desired position while the window is in
operation, pull up or press down and
release the switch.
Page 215 of 555
Convenient Features5-62
HOOD
Opening the hood
OCN7050033
1. Park the vehicle and set the parking
brake.
2. Pull the release lever to unlatch the
hood. The hood should pop open
slightly.
OCN7H050008
3. Go to the front of the vehicle, raise
the hood slightly, push the secondary
latch up (1) inside of the hood center
and lift the hood (2).
4. Pull out the support rod.
OCN7050035
5. Hold the hood open with the support
rod (3).
WARNING
Support rod
• After driving, the engine
compartment and support rod will
be hot. Grasp the support rod in the
area wrapped in rubber to prevent
burns.
• The support rod must be inserted
completely into the hole provided
whenever you inspect the engine
compartment. This will prevent
the hood from falling and possibly
injuring you.
Page 216 of 555
05
5-63
Closing the hood
1. Before closing the hood, check the
following:• All filler caps in engine
compartment must be correctly
installed.
• Gloves, rags or any other
combustible material must
be removed from the engine
compartment.
2. Return the support rod to its clip to
prevent it from rattling.
3. Lower the hood halfway (lifted approximately 30 cm from the closed position) and push down to securely
lock in place. Then double check to be
sure the hood is secure.
If the hood can be raised slightly,
it is not securely locked. Open it
again and close it with more force.
WARNING
• Before closing the hood, ensure
all obstructions are removed from
around the hood opening.
• Always double check to be sure that
the hood is firmly latched before
driving away. Check there is no
hood open warning light or message
displayed on the instrument cluster.
Driving with the hood opened may
cause a total loss of visibility, which
might result in an accident.
• Do not move the vehicle with the
hood in the raised position, as vision
is obstructed, which might result in
an accident, and the hood could fall
or be damaged.
Page 219 of 555
Convenient Features
5-66
Smart Trunk release
(if equipped)
OCN7H050011
On a vehicle equipped with a smart key,
the trunk can be opened using the Smart
Trunk release system.
How to use the Smart Trunk release
The trunk can be opened with no touch
activation satisfying all the conditions
below.
• After 15 seconds when all doors are
closed and locked
• Positioned in the detecting area for
more than 3 seconds
Information
The Smart Trunk release does not operate
when:
• The smart key is detected within 15
seconds after the doors are closed and
locked, and is continuously detected.
• The smart key is detected within 15
seconds after the doors are closed and
locked, and 1.5 m from the front door
handles. (for vehicles equipped with
Welcome Light)
• A door is not locked or closed.
• The smart key is in the vehicle.
1. Setting
To activate the Smart Trunk release, go
to User Settings Mode and select Smart
Trunk on the LCD display.
For more details, refer to “LCD Display”
in this chapter. If your vehicle is
equipped with additional navigation,
please refer to the infotainment system
manual separately supplied.
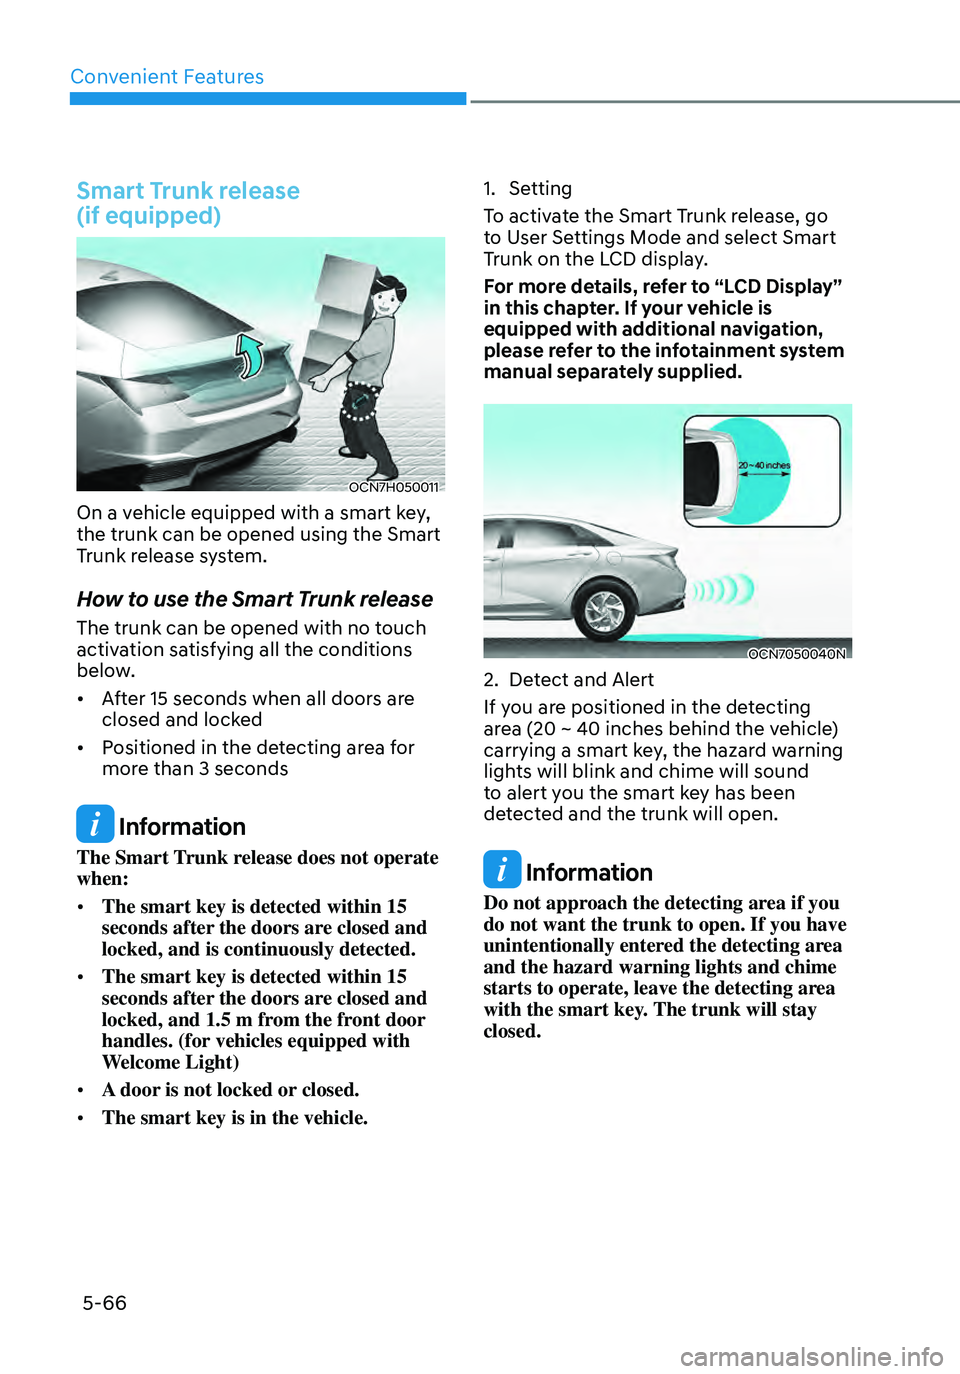
OCN7050040N
2. Detect and Alert
If you are positioned in the detecting
area (20 ~ 40 inches behind the vehicle)
carrying a smart key, the hazard warning
lights will blink and chime will sound
to alert you the smart key has been
detected and the trunk will open.
Information
Do not approach the detecting area if you
do not want the trunk to open. If you have
unintentionally entered the detecting area
and the hazard warning lights and chime
starts to operate, leave the detecting area
with the smart key. The trunk will stay
closed.
Page 220 of 555
05
5-67
OCN7H050005
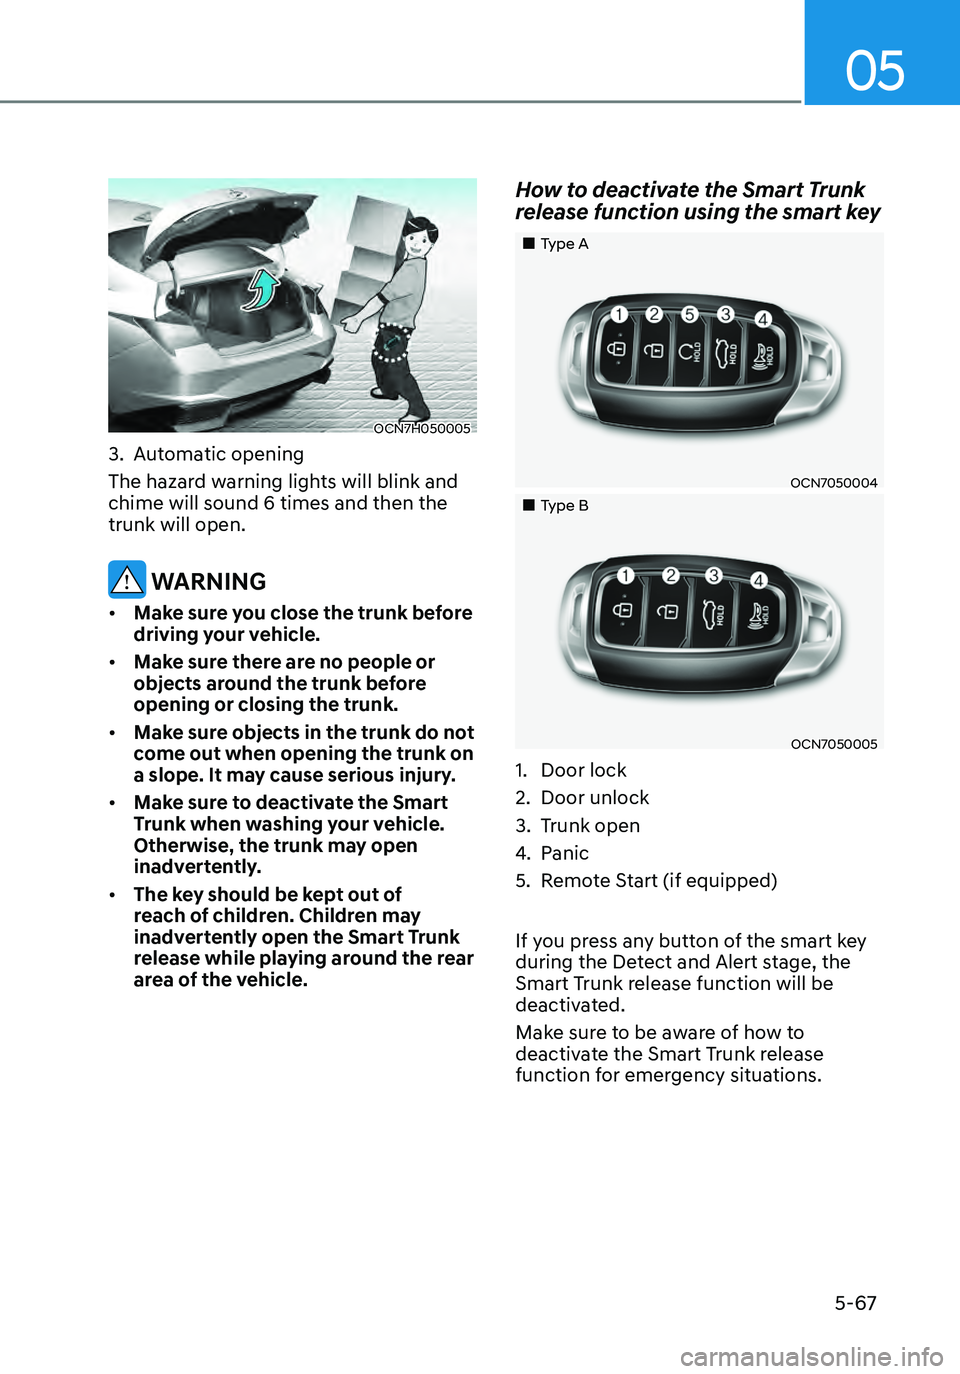
3. Automatic opening
The hazard warning lights will blink and
chime will sound 6 times and then the
trunk will open.
WARNING
• Make sure you close the trunk before
driving your vehicle.
• Make sure there are no people or
objects around the trunk before
opening or closing the trunk.
• Make sure objects in the trunk do not
come out when opening the trunk on
a slope. It may cause serious injury.
• Make sure to deactivate the Smart
Trunk when washing your vehicle.
Otherwise, the trunk may open
inadvertently.
• The key should be kept out of
reach of children. Children may
inadvertently open the Smart Trunk
release while playing around the rear
area of the vehicle.
How to deactivate the Smart Trunk
release function using the smart key
„„Type A
OCN7050004
„„Type B
OCN7050005
1. Door lock
2. Door unlock
3. Trunk open
4. Panic
5. Remote Start (if equipped)
If you press any button of the smart key
during the Detect and Alert stage, the
Smart Trunk release function will be
deactivated.
Make sure to be aware of how to
deactivate the Smart Trunk release
function for emergency situations.
Page 223 of 555
Convenient Features
5-70
Closing the fuel filler door
1. To install the fuel tank cap, turn it
clockwise until it “Clicks”.
2. Close the fuel filler door until it is
latched securely.
Tighten the cap until it clicks one time,
otherwise the Check Engine (
) light will illuminate.
NOTICE
There may be an intermittent noise
near the refueling hole while the engine
is idling if the fuel cap is not closed
securely. This occurs normally with the
OBD system.
NOTICE
When refueling on unlevel ground,
the fuel gauge may not point to the F
position.
It is not a malfunction. If you move your
vehicle to a level ground, the fuel gauge
will move to the full position.
WARNING
Gasoline is highly flammable and
explosive. Failure to follow these
guidelines may result in SERIOUS
INJURY or DEATH:
• Read and follow all warnings posted
at the gas station.
• Before refueling, note the location of
the Emergency Gasoline Shut-Off, if
available, at the gas station.
• Before touching the fuel nozzle, you
should eliminate the potential build-
up of static electricity by touching
a metal part of the vehicle, a safe
distance away from the fuel filler
neck, nozzle, or other gas source,
with your bare hand.
• Do not use cellular phones while
refueling. Electric current and/or
electronic interference from cellular
phones can potentially ignite fuel
vapors and cause a fire.
• Do not get back into a vehicle
once you have begun refueling.
You can generate a build-up of
static electricity by touching,
rubbing or sliding against any item
or fabric capable of producing
static electricity. Static electricity
discharge can ignite fuel vapors
causing a fire. If you must re-enter
the vehicle, you should once again
eliminate potentially dangerous
static electricity discharge by
touching a metal part of the vehicle,
away from the fuel filler neck, nozzle
or other gasoline source, with your
bare hand.
Page 226 of 555
05
5-73
ODN8A059202
Parking lamp position ()
The parking lamp, license plate lamp and
instrument panel lamp are turned ON.
ODN8A059203
Headlamp position ()
The headlamp, parking lamp, license
plate lamp and instrument panel lamp
are turned ON.
Information
The ignition switch must be in the ON
position to turn on the headlamp.
High beam operation
ODN8A059205
To turn on the high beam headlamp,
push the lever away from you. The lever
will return to its original position.
The high beam indicator will light when
the headlamp high beams are switched
on.
To turn off the high beam headlamp, pull
the lever towards you. The low beams
will turn on.
WARNING
Do not use high beam when there are
other vehicles approaching you. Using
high beam could obstruct the other
driver’s vision.