Page 422 of 687

420
Features
Bluetooth® HandsFreeLink ®
Bluetooth® HandsFreeLink ® (HFL) allows you to place and receive phone calls using
your vehicle’s audio system, without handling your cell phone.
Using HFL
■HFL Buttons
1 Bluetooth ® HandsFreeLink ®
Place your phone where y ou can get good reception.
To use HFL, you need a Bluetooth-compatible cell
phone. For a list of compatible phones, pairing
procedures, and special feature capabilities:
•U.S.: Visit automobiles.honda.com /handsfreelink/,
or call 1-888-528-7876.
•Canada: For more info rmation on smartphone
compatibility, call 1-855-490-7351.
To use the system, the Bluetooth setting must be
ON .
2 Phone Setup P. 425
Voice control tips
•Aim the vents away from the ceiling and close the
windows, as noise coming from them may interfere
with the microphones.
•Press the button when you want to call a
number using a phonebook name or a number.
Speak clearly and naturally after a beep.
•If the microphone picks up vo ices other than yours,
the command may be misinterpreted.
•To change the volume level, select the audio
system’s VOL (Volume) or use the remote audio
controls on the steering wheel.
If there is no Favorite Contact entry in the system, the
pop-up notification appears on the screen. 2 Favorite Contacts P. 430
Models with Display Audio
(Talk) Button
Microphone
(Hang-up) Button
(Pick-up) Button
(Back) Button
(home) Button
VOL( +/VOL(- (Volume) Buttons
Left Selector Wheel
21 INSIGHT-31TXM6200.book 420 ページ 2020年2月5日 水曜日 午前10時0分
Page 428 of 687

uuBluetooth ® HandsFreeLink ®u HFL Menus
426
Features
■To pair a cell phone (when there is no
phone paired to the system)
1. Press the button.
2. Select Phone .
3. Select Connect Phone .
4. Make sure your phone is in search or
discoverable mode, then select + Connect
New Device .
u HFL automatically searches for a
Bluetooth ® device.
5. Select your phone when it appears on the
list.
u If your phone still does not appear,
search for Bluetooth® devices using your
phone.
From your phone, search for
HandsFreeLink .
6. The system gives you a pairing code on the
audio/information screen.
u Confirm if the pairing code on the screen
and your phone match.
This may vary by phone.
7. Select desired functions and then select
Save.1Phone Setup
Your Bluetooth -compatible phone must be paired to
the system before you ca n make and receive hands-
free calls.
Phone Pairing Tips:
•You cannot pair your phone while the vehicle is
moving.
•Up to six phones can be paired.
•Your phone’s battery may dr ain faster when it is
paired to the system.
Once you have paired a phone, you can see it
displayed on the screen with one or more icons on
the right side.
These icons indicate the following: : The phone is compatible with Bluetooth ® Audio.
: The phone can be used with HFL.
If there is an active c onnection to Apple CarPlay
pairing of addition al Bluetooth compat ible devices is
unavailable.
21 INSIGHT-31TXM6200.book 426 ページ 2020年2月5日 水曜日 午前10時0分
Page 623 of 687

621
uuIf a Tire Goes Flat uTemporarily Repairing a Flat Tire
Continued
Handling the Unexpected
Temporarily Repairing a Flat Tire
If the tire has a large cut or is otherwise severely damaged, you will need to have the
vehicle towed. If the tire only has a small puncture, from a nail for instance, you can
use the temporary tire repair kit so that you can drive to the nearest service station
for a more permanent repair.
If a tire goes flat while driving, grasp the steering wheel firmly, and brake gradually
to reduce speed. Then stop in a safe place.
1. Park the vehicle on a firm, level, and n on-slippery surface, and apply the parking
brake.
2. Put the transmission into
(P.
3. Turn on the hazard warning lights an d set the power mode to VEHICLE OFF
(LOCK).
1 Temporarily Repairing a Flat Tire
The kit should not be used in the following situations.
Instead, contact a dealer or roadside assistance to
have the vehicle towed.
•The tire sealant has expired.
•More than one tire is punctured.
•The puncture or cut is larger than 3/16 inch (4 mm).•The tire side wall is da maged or the puncture is
outside the contact area.
•Damage has been caused by driving with the tires
extremely under inflated.
•The tire bead is no longer seated.
•The rim is damaged.
Do not remove a nail or screw that punctured the
tire. If you remove it from the tire, you may not be
able to repair the puncture using the kit.
When the puncture is:Use Kit
Smaller than 3/16 inch (4 mm)Yes
Larger than 3/16 inch (4 mm)No
Contact
Area
21 INSIGHT-31TXM6200.book 621 ページ 2020年2月5日 水曜日 午前10時0分
Page 624 of 687
uuIf a Tire Goes Flat uTemporarily Repairing a Flat Tire
622
Handling the Unexpected
■Getting Ready to Temporarily Repair the Flat Tire1Getting Ready to Temporarily Repair the Flat Tire
Repair notificati on label and speed restriction label
are applied to the side of temporary tire repair kit.
When making a temporary repair, carefully read the
instruction manual provided with the kit.
U.S. Canada
U.S. Canada
Air Only Side
Selector Knob Sealant/Air Side
Pressure Gauge
Pressure Relief Button
Repair Notification Label Power Plug
Instruction Manual
Sealant/Air Hose
Inflator Switch
Speed Restriction Label
21 INSIGHT-31TXM6200.book 622 ページ 2020年2月5日 水曜日 午前10時0分
Page 625 of 687
623
uuIf a Tire Goes Flat uTemporarily Repairing a Flat Tire
Continued
Handling the Unexpected
1. Open the trunk floor lid.
2. Take the kit out of the case.
3. Place the kit face up, on flat ground near
the flat tire, and away from traffic. Do not
place the kit on its side.
Tire Repair Kit
21 INSIGHT-31TXM6200.book 623 ページ 2020年2月5日 水曜日 午前10時0分
Page 626 of 687
uuIf a Tire Goes Flat uTemporarily Repairing a Flat Tire
624
Handling the Unexpected
1. Remove the valve cap from the tire valve
stem.
2. Remove the sealant/air hose from the
packaging.
3. Attach the sealant/air hose onto the tire
valve stem. Screw it until it is tight.
■Injecting Sealant and Air1Injecting Sealant and Air
In cold temperatures, the sealant may not flow easily.
In this situation, warm it up for five minutes before
using.
The sealant can permanentl y stain clothing and other
materials. Be careful duri ng handling and wipe away
any spills immediately.
3WARNING
Tire sealant contains substances that are
harmful and can be fatal if swallowed.
If accidentally swallowed, do not induce
vomiting. Drink plenty of water and get
medical attention immediately.
For skin or eye contact, flush with cool
water and get medical attention if
necessary.
Valve Stem
Valve Cap
Sealant/Air Hose
Valve Stem
Sealant/Air Hose
21 INSIGHT-31TXM6200.book 624 ページ 2020年2月5日 水曜日 午前10時0分
Page 627 of 687

Continued625
uuIf a Tire Goes Flat uTemporarily Repairing a Flat Tire
Handling the Unexpected
4. Plug in the compressor to the accessory
power socket.
u Be careful not to pinch the cord in a
door or window.
5. Turn the power system on.
u Keep the power system on while
injecting sealant and air.
2 Carbon Monoxide Gas P. 81
6.Turn the selector knob to REPAIR*1,
SEALANT/AIR*2, PRODUIT ANTIFUITE/
AIR*2.
*1: U.S. models
*2: Canadian models
1 Injecting Sealant and Air
NOTICE
Do not operate the temporary tire repair kit
compressor for more than 15 minutes. The
compressor can overheat and become permanently
damaged.
Until the sealant injection is complete, the pressure
shown on the pressure gauge will appear higher than
actual. After the sealant injection is complete the
pressure will drop and then begin to rise again as the
tire is inflated with air. This is normal. To accurately
measure the air pressure usin g the gauge, turn the air
compressor off only after the sealant injection is
complete.
3WARNING
Running the engine with the vehicle in an
enclosed or even partly enclosed area can
cause a rapid build-up of toxic carbon
monoxide.
Breathing this colorless, odorless gas can
cause unconsciousness and even death.
Only run the engine to power the air
compressor with th e vehicle outdoors.
U.S.
Canada
21 INSIGHT-31TXM6200.book 625 ページ 2020年2月5日 水曜日 午前10時0分
Page 628 of 687
uuIf a Tire Goes Flat uTemporarily Repairing a Flat Tire
626
Handling the Unexpected
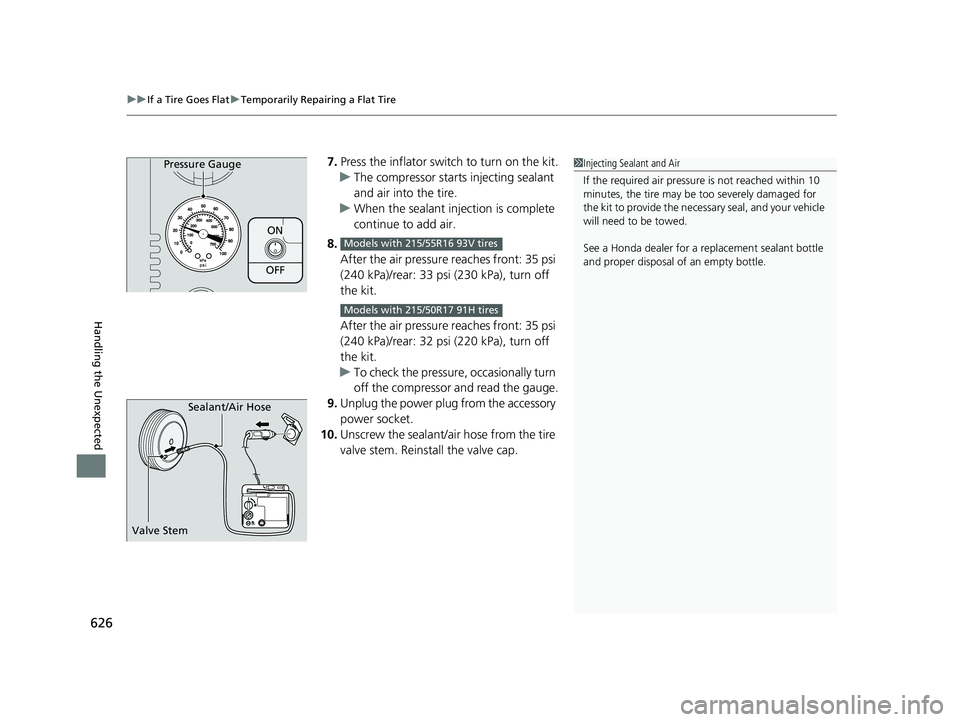
7. Press the inflator swit ch to turn on the kit.
u The compressor starts injecting sealant
and air into the tire.
u When the sealant injection is complete
continue to add air.
8. After the air pressure reaches front: 35 psi
(240 kPa)/rear: 33 psi (230 kPa), turn off
the kit.
After the air pressure reaches front: 35 psi
(240 kPa)/rear: 32 psi (220 kPa), turn off
the kit.
u To check the pressure, occasionally turn
off the compressor and read the gauge.
9. Unplug the power plug from the accessory
power socket.
10. Unscrew the sealant/air hose from the tire
valve stem. Reinstall the valve cap.
ON
OFF
Pressure Gauge
Models with 215/55R16 93V tires
Models with 215/50R17 91H tires
1Injecting Sealant and Air
If the required air pressure is not reached within 10
minutes, the tire may be too severely damaged for
the kit to provide the necessa ry seal, and your vehicle
will need to be towed.
See a Honda dealer for a replacement sealant bottle
and proper disposal of an empty bottle.
Sealant/Air Hose
Valve Stem
21 INSIGHT-31TXM6200.book 626 ページ 2020年2月5日 水曜日 午前10時0分


