Page 203 of 659
201
uuOperating the Switches Around the Steering Wheel uAuto High-Beam
Controls
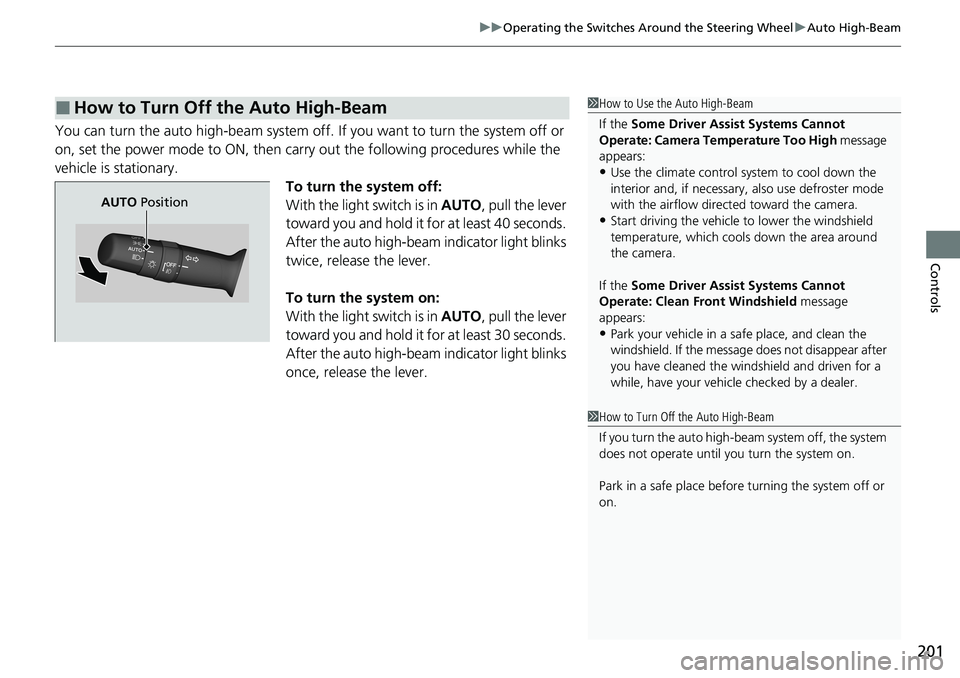
You can turn the auto high-beam system off. If you want to turn the system off or
on, set the power mode to ON, then carry out the following procedures while the
vehicle is stationary. To turn the system off:
With the light switch is in AUTO, pull the lever
toward you and hold it for at least 40 seconds.
After the auto high-beam indicator light blinks
twice, release the lever.
To turn the system on:
With the light switch is in AUTO, pull the lever
toward you and hold it for at least 30 seconds.
After the auto high-beam indicator light blinks
once, release the lever.
■How to Turn Off the Auto High-Beam1 How to Use the Auto High-Beam
If the Some Driver Assist Systems Cannot
Operate: Camera Temperature Too High message
appears:
•Use the climate control system to cool down the
interior and, if necessary, also use defroster mode
with the airflow directed toward the camera.
•Start driving the vehicle to lower the windshield
temperature, which cool s down the area around
the camera.
If the Some Driver Assist Systems Cannot
Operate: Clean Front Windshield message
appears:
•Park your vehicle in a sa fe place, and clean the
windshield. If the message does not disappear after
you have cleaned the windshield and driven for a
while, have your vehicle checked by a dealer.
1 How to Turn Off the Auto High-Beam
If you turn the au to high-beam system off, the system
does not operate until you turn the system on.
Park in a safe place before turning the system off or
on.
AUTO Position
Page 204 of 659
202
uuOperating the Switches Around the Steering Wheel uWipers and Washers
Controls
Wipers and Washers
The windshield wipers and washers can be
used when the power mode is in ON.
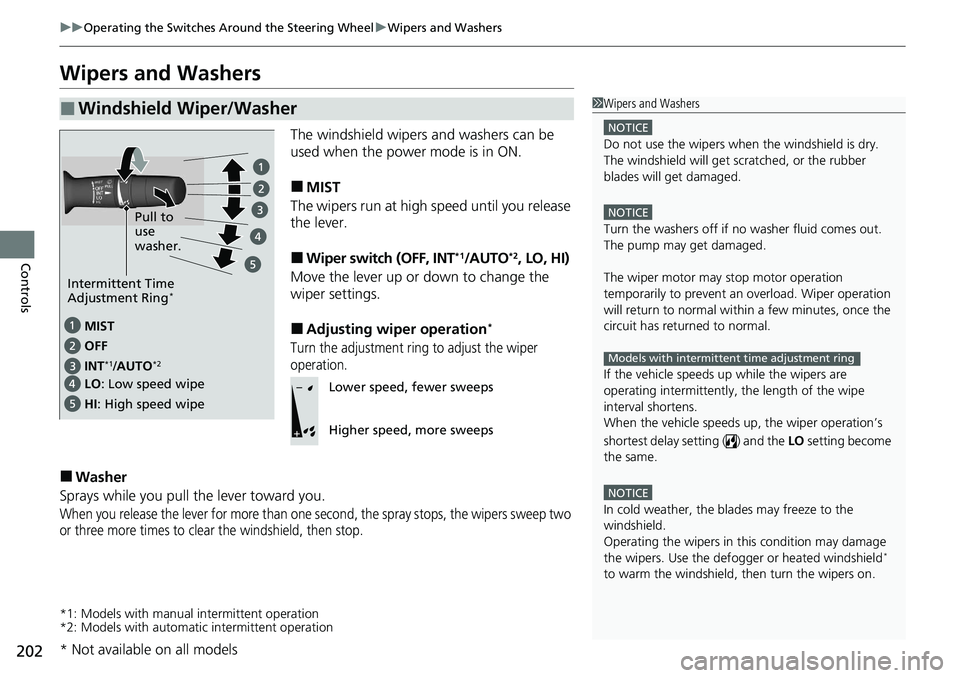
■MIST
The wipers run at high speed until you release
the lever.
■Wiper switch (OFF, INT*1/AUTO*2, LO, HI)
Move the lever up or down to change the
wiper settings.
■Adjusting wiper operation*
Turn the adjustment ring to adjust the wiper
operation.
■Washer
Sprays while you pull the lever toward you.
When you release the lever for more than one second, the spray stops, the wipers sweep two
or three more times to clear the windshield, then stop.
*1: Models with manual intermittent operation
*2: Models with automati c intermittent operation
■Windshield Wiper/Washer1Wipers and Washers
NOTICE
Do not use the wipers when the windshield is dry.
The windshield will get sc ratched, or the rubber
blades will get damaged.
NOTICE
Turn the washers off if no washer fluid comes out.
The pump may get damaged.
The wiper motor may stop motor operation
temporarily to prevent an overload. Wiper operation
will return to normal within a few minutes, once the
circuit has returned to normal.
If the vehicle speeds up while the wipers are
operating intermittently, the length of the wipe
interval shortens.
When the vehicle speeds up, the wiper operation’s
shortest delay se tting ( ) and the LO setting become
the same.
NOTICE
In cold weather, the blades may freeze to the
windshield.
Operating the wipers in th is condition may damage
the wipers. Use the defogge r or heated windshield
*
to warm the windshield, then turn the wipers on.
Models with intermittent time adjustment ring
MIST
INT
*1/AUTO*2OFF
LO: Low speed wipe
HI : High speed wipe Pull to
use
washer.
Intermittent Time
Adjustment Ring*
Lower speed, fewer sweeps
Higher speed, more sweeps
* Not available on all models
Page 207 of 659
205
uuOperating the Switches Around the Steering Wheel uBrightness Control
Continued
Controls
Brightness Control
When the power mode is in ON, you can use
the brightness control dial to adjust
instrument panel brightness.
To brighten: Turn the dial up.
To dim: Turn the dial down.
You will hear a beep when the brightness
reaches minimum or maximum. Several
seconds after adjusting the brightness, you
will be returned to the previous screen.
■Brightness level indicator
The brightness level is shown on the driver
information interface while you are adjusting
it.
■Adjusting the Instrument Panel Brightness1 Brightness Control
The brightness of the in strument panel will be
reduced when the following conditions:
•The power mode is in ON.•The light switch is in any position other than off
and it is da rk outside.
The brightness can be set differently for when the
exterior lights are on, and when they are off.
Control Dial
Page 208 of 659
206
uuOperating the Switches Around the Steering Wheel uBrightness Control
Controls
When the head-up display is on, press and
hold the HUD button until its brightness level
indicator on the driver information interface.
To brighten: Press the button.
To dim: Press the button.
The driver information interface will return to
its original state several seconds after you
adjust the brightness.
■Brightness level indicator
The brightness level is shown on the driver
information interface wh ile you are adjusting
it.
■Adjusting the Head-Up Display Brightness*
/ Button34
HUD Button
3
4
* Not available on all models
Page 210 of 659
uuOperating the Switches Around the Steering Wheel uDriving Position Memory System*
208
Controls
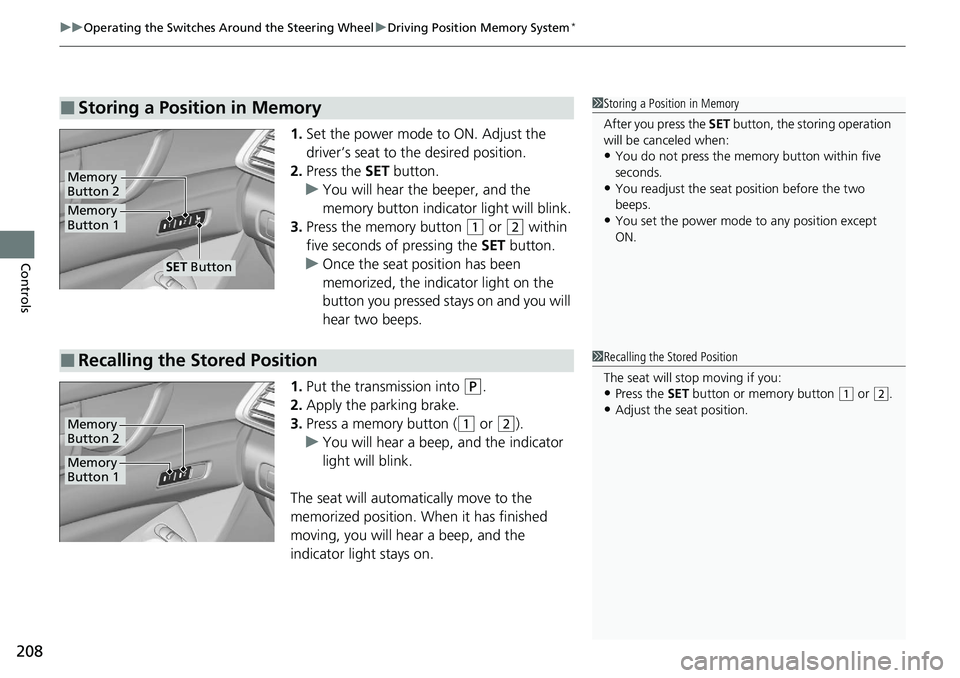
1. Set the power mode to ON. Adjust the
driver’s seat to the desired position.
2. Press the SET button.
u You will hear the beeper, and the
memory button indicator light will blink.
3. Press the memory button
(1 or (2 within
five seconds of pressing the SET button.
u Once the seat position has been
memorized, the indicator light on the
button you pressed stays on and you will
hear two beeps.
1. Put the transmission into
(P.
2. Apply the parking brake.
3. Press a memory button (
(1 or (2).
u You will hear a beep, and the indicator
light will blink.
The seat will automatically move to the
memorized position. When it has finished
moving, you will hear a beep, and the
indicator light stays on.
■Storing a Position in Memory1 Storing a Position in Memory
After you press the SET button, the storing operation
will be canceled when:
•You do not press the memory button within five
seconds.
•You readjust the seat position before the two
beeps.
•You set the power mode to any position except
ON.Memory
Button 1
Memory
Button 2
SET Button
■Recalling the Stored Position1 Recalling the Stored Position
The seat will st op moving if you:
•Press the SET button or memory button (1 or (2.
•Adjust the seat position.
Memory
Button 1
Memory
Button 2
Page 214 of 659

212
Controls
Seats
Front Seats
Adjust the driver’s seat as far back as possible
while allowing you to maintain full control of
the vehicle. You should be able to sit upright,
well back in the seat and be able to
adequately press the pedals without leaning
forward, and grip the steering wheel
comfortably. The passenger’s seat should be
adjusted in a similar manner, so that it is as far
back from the front airbag in the dashboard
as possible.
■Adjusting the front power seat(s)*
1Seats
Always make seat adjustments before driving.
1Front Seats
The National Highway Traffic Safety Administration
and Transport Cana da recommend that drivers allow
at least 10 inches (25 cm) between the center of the
steering wheel and the chest.
3WARNING
Sitting too close to a front airbag can result
in serious injury or death if the front
airbags inflate.
Always sit as far back from the front
airbags as possible while maintaining
control of the vehicle.
Move back.
Allow sufficient
space.
■Adjusting the Seat Positions
Horizontal Position
Adjustment
Height Adjustment
(Driver’s seat only)
Seat-back Angle
Adjustment
Driver’s seat is shown
* Not available on all models
Page 225 of 659
223Continued
Controls
Interior Convenience Items
Interior Lights
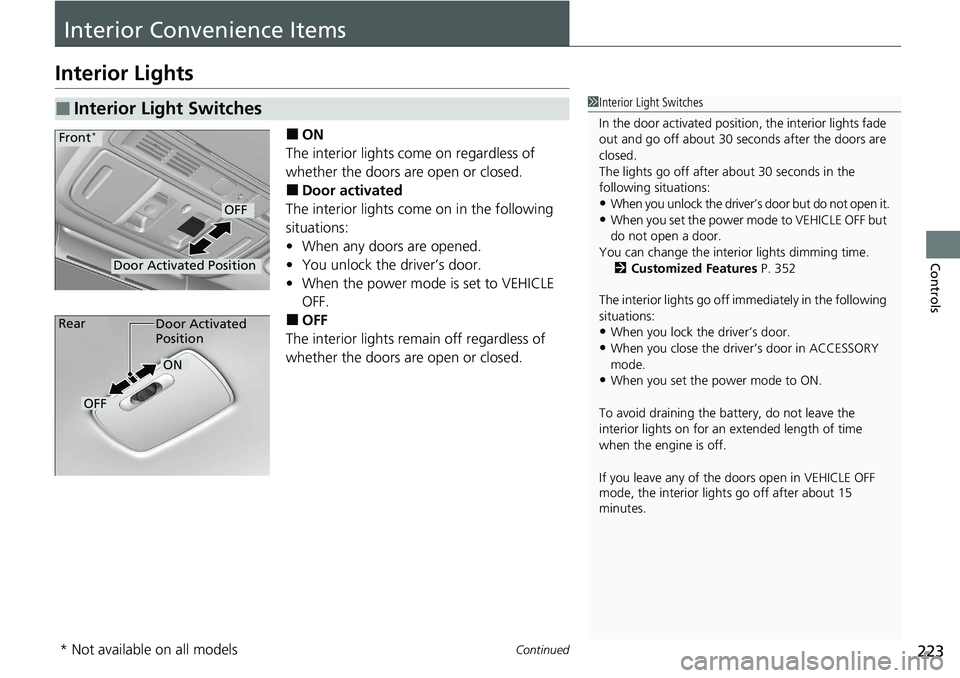
■ON
The interior lights come on regardless of
whether the doors are open or closed.
■Door activated
The interior lights come on in the following
situations:
• When any doors are opened.
• You unlock the driver’s door.
• When the power mode is set to VEHICLE
OFF.
■OFF
The interior lights remain off regardless of
whether the doors are open or closed.
■Interior Light Switches1 Interior Light Switches
In the door activated position, the interior lights fade
out and go off about 30 se conds after the doors are
closed.
The lights go off after about 30 seconds in the
following situations:
•When you unlock the driver’s door but do not open it.
•When you set the power mode to VEHICLE OFF but
do not open a door.
You can change the interi or lights dimming time.
2 Customized Features P. 352
The interior lights go off im mediately in the following
situations:
•When you lock the driver’s door.
•When you close the driver’s door in ACCESSORY
mode.
•When you set the power mode to ON.
To avoid draining the ba ttery, do not leave the
interior lights on for an extended length of time
when the engine is off.
If you leave any of the doors open in VEHICLE OFF
mode, the interior light s go off after about 15
minutes.
Door Activated Position
OFF
Front*
Door Activated
Position
ON
OFF
Rear
* Not available on all models
Page 234 of 659
uuInterior Convenience Items uOther Interior Convenience Items
232
Controls
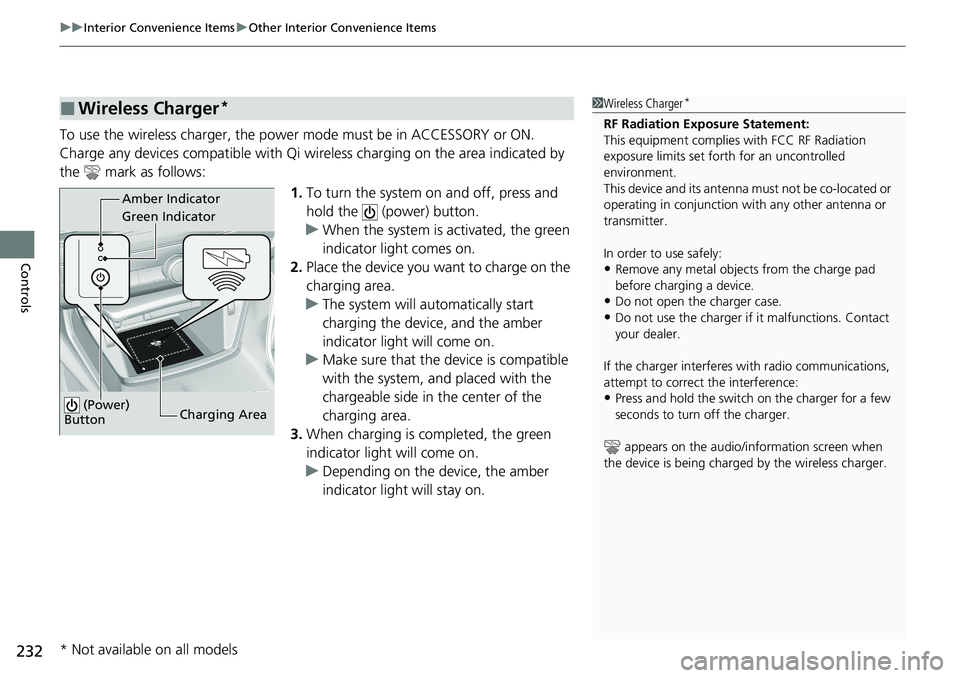
To use the wireless charger, the powe r mode must be in ACCESSORY or ON.
Charge any devices compatible with Qi wi reless charging on the area indicated by
the mark as follows:
1.To turn the system on and off, press and
hold the (power) button.
u When the system is activated, the green
indicator light comes on.
2. Place the device you want to charge on the
charging area.
u The system will automatically start
charging the device, and the amber
indicator light will come on.
u Make sure that the device is compatible
with the system, a nd placed with the
chargeable side in the center of the
charging area.
3. When charging is completed, the green
indicator light will come on.
u Depending on the device, the amber
indicator light will stay on.
■Wireless Charger*1Wireless Charger*
RF Radiation Exposure Statement:
This equipment complies with FCC RF Radiation
exposure limits set forth for an uncontrolled
environment.
This device and its antenna must not be co-located or
operating in conjunction with any other antenna or
transmitter.
In order to use safely:
•Remove any metal objects from the charge pad
before charging a device.
•Do not open the charger case.
•Do not use the charger if it malfunctions. Contact
your dealer.
If the charger interferes with radio communications,
attempt to correct the interference:
•Press and hold the switch on the charger for a few
seconds to turn off the charger.
appears on the audio/information screen when
the device is being charge d by the wireless charger.
Green Indicator Amber Indicator
Charging Area
(Power)
Button
* Not available on all models