2021 HONDA ACCORD SEDAN display
[x] Cancel search: displayPage 424 of 659

422
uuWhen Driving uShifting
Driving
Shifting
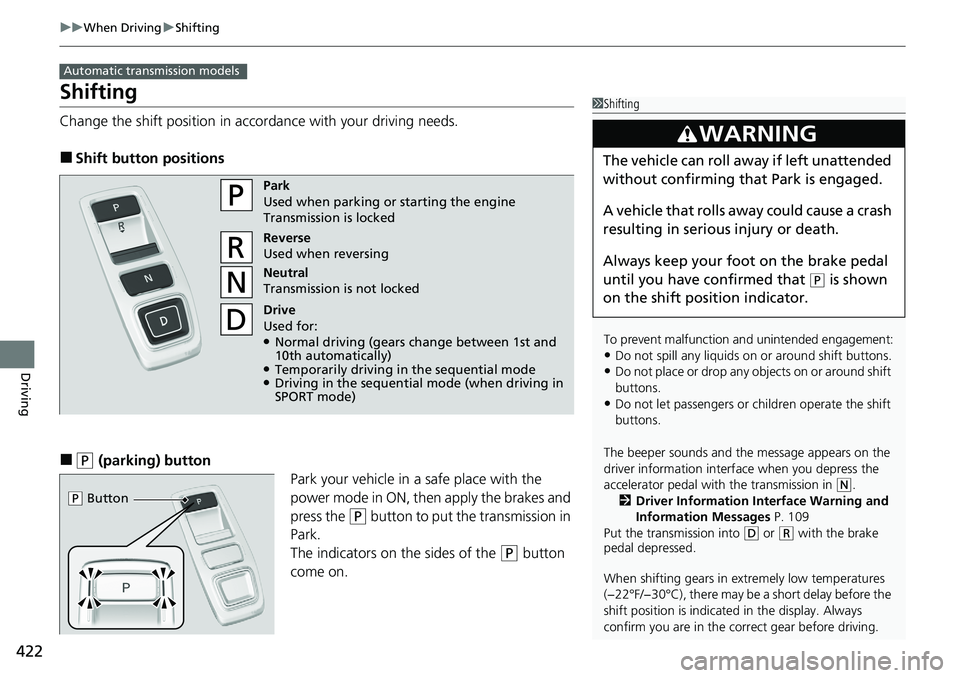
Change the shift positi on in accordance with your driving needs.
■Shift button positions
■(P (parking) button
Park your vehicle in a safe place with the
power mode in ON, then apply the brakes and
press the
(P button to put the transmission in
Park.
The indicators on the sides of the
(P button
come on.
Automatic transmission models
1 Shifting
To prevent malfunction an d unintended engagement:
•Do not spill any liquids on or around shift buttons.
•Do not place or drop any objects on or around shift
buttons.
•Do not let passengers or ch ildren operate the shift
buttons.
The beeper sounds and the message appears on the
driver information interf ace when you depress the
accelerator pedal with the transmission in
( N.
2 Driver Information Interface Warning and
Information Messages P. 109
Put the transmission into
( D or (R with the brake
pedal depressed.
When shifting gears in extremely low temperatures
(−22°F/−30°C), there may be a short delay before the
shift position is indicated in the display. Always
confirm you are in the corr ect gear before driving.
3WARNING
The vehicle can roll away if left unattended
without confirming that Park is engaged.
A vehicle that rolls away could cause a crash
resulting in seriou s injury or death.
Always keep your foot on the brake pedal
until you have confirmed that
( P is shown
on the shift posi tion indicator.
Park
Used when parking or starting the engine
Transmission is locked
Reverse
Used when reversing
Neutral
Transmission is not locked
Drive
Used for:
●Normal driving (gears change between 1st and
10th automatically)
●Temporarily driving in the sequential mode●Driving in the sequential mode (when driving in
SPORT mode)
( P Button
Page 427 of 659
![HONDA ACCORD SEDAN 2021 Owners Manual (in English) Continued425
uuWhen Driving uShifting
Driving
■If you want to keep the transmission in (N position [car wash mode]
With the engine running:
1. Press and hold the brake pedal.
2. Select
(N, then rel HONDA ACCORD SEDAN 2021 Owners Manual (in English) Continued425
uuWhen Driving uShifting
Driving
■If you want to keep the transmission in (N position [car wash mode]
With the engine running:
1. Press and hold the brake pedal.
2. Select
(N, then rel](/manual-img/13/34431/w960_34431-426.png)
Continued425
uuWhen Driving uShifting
Driving
■If you want to keep the transmission in (N position [car wash mode]
With the engine running:
1. Press and hold the brake pedal.
2. Select
(N, then release the button to display (N (Neutral) hold mode on the driver
information interface.
3. Press and hold
(N again for two seconds.
u This puts the vehicle in car wash mode which must be used when your vehicle
is pulled through a conveyor type automatic car wash where you or an
attendant do not remain in the vehicle.
If the ENGINE STOP/START button is pressed
after car wash mode has been activated, the
power mode will change to ACCESSORY and
a message will be displayed on the driver
information interface. u For 15 minutes the transmission remains
in
(N with the power mode in
ACCESSORY. After that, the
transmission automatically changes to
(P and the power mode changes to OFF.
u Manually changing to
(P cancels
ACCESSORY mode. The
(P indicator
comes on and the power mode changes
to OFF. You must always put the
transmission into
(P when car wash
mode is no longer needed.
1 If you want to keep the transmission in (N position [car wash
mode]
Note that the transmiss ion may not stay in
(N
position while any of the following indicators is on:
•Transmission system indicator.•Malfunction indicator lamp.
•Charging system indicator.
Page 432 of 659

uuWhen Driving uShifting
430
Driving
■Shift Lever Operation1Shift Lever Operation
NOTICE
When you change the shift position from (D to ( R
and vice versa, come to a complete stop and keep the
brake pedal depressed.
Operating the shift lever be fore the vehicle has come
to a complete standstill can damage the transmission.
Use the shift position indicator to check the lever
position before pulling away.
If the transmission system indicator blinks when
driving, in any shift positi on, there is a problem with
the transmission.
Avoid sudden acceleration and have the transmission
checked by a dealer as soon as possible.
The fuel supply may be cut of f if you drive at engine
speeds in or over the tac hometer’s red zone (engine
speed limit). If this happe ns, you may experience a
slight jolt.
It may not be possible to operate the shift lever if the
brake pedal is applied while the shift lever release
button is held down.
Depress the brake pedal first.
When shifting positions in extremely low
temperatures (-22°F/-30°C), there may be a short
delay before the shift posit ion is displayed. Always
confirm you are in the corr ect shift position before
driving.
Depress the brake pedal and press the shift lever release
button to shift.
Shift without pres sing the shift lever release button.
Press the shift lever release button and shift.
Shift Position Indicator
(Transmission System Indicator)
Tachometer’s red zone
Page 434 of 659

uuWhen Driving uShifting
432
Driving
■Shift Lever Operation1Shift Lever Operation
NOTICE
When you change the shift position from (D to ( R
and vice versa, come to a complete stop and keep the
brake pedal depressed.
Operating the shift lever be fore the vehicle has come
to a complete standstill can damage the transmission.
Use the shift position indicator to check the lever
position before pulling away.
If the transmission system indicator blinks when
driving, in any shift positi on, there is a problem with
the transmission.
Avoid sudden acceleration and have the transmission
checked by a dealer as soon as possible.
The fuel supply may be cut of f if you drive at engine
speeds in or over the tac hometer’s red zone (engine
speed limit). If this happe ns, you may experience a
slight jolt.
It may not be possible to operate the shift lever if the
brake pedal is applied while the shift lever release
button is held down.
Depress the brake pedal first.
When shifting positions in extremely low
temperatures (-22°F/-30°C), there may be a short
delay before the shift posit ion is displayed. Always
confirm you are in the corr ect shift position before
driving.
Depress the brake pedal and press the shift lever release
button to shift.
Shift without pressing the shift lever release button. Press the shift lever re lease button and shift.
Shift Position Indicator
(Transmission System Indicator)
Tachometer’s red zone
M
(7-Speed Manual Shift Mode)
Indicator
Gear Selection Indicator
Page 435 of 659

Continued433
uuWhen Driving uShifting
Driving
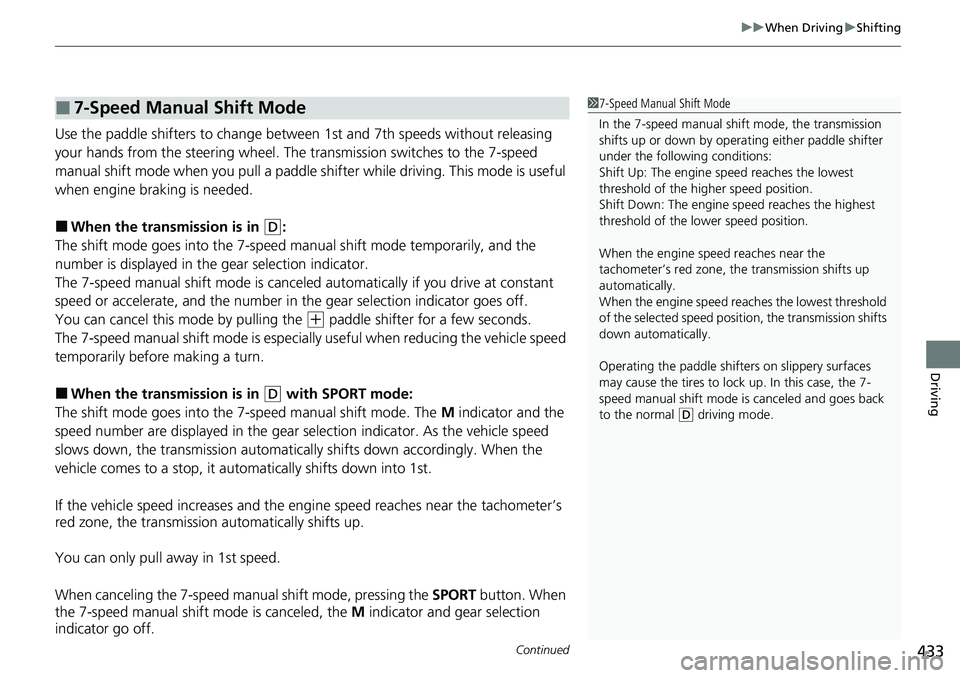
Use the paddle shifters to change between 1st and 7th speeds without releasing
your hands from the steering wheel. The transmission switches to the 7-speed
manual shift mode when you pull a paddle shifter while driving. This mode is useful
when engine braking is needed.
■When the transmi ssion is in (D:
The shift mode goes into the 7-speed ma nual shift mode temporarily, and the
number is displayed in the gear selection indicator.
The 7-speed manual shift mode is canceled automatically if you drive at constant
speed or accelerate, and the number in the gear selection indicator goes off.
You can cancel this mode by pulling the
(+ paddle shifter for a few seconds.
The 7-speed manual shift mode is especial ly useful when reducing the vehicle speed
temporarily before making a turn.
■When the transmi ssion is in (D with SPORT mode:
The shift mode goes into the 7-speed manual shift mode. The M indicator and the
speed number are displayed in the gear selection indicator. As the vehicle speed
slows down, the transmission automaticall y shifts down accordingly. When the
vehicle comes to a stop, it automatically shifts down into 1st.
If the vehicle speed increases and the engi ne speed reaches near the tachometer’s
red zone, the transmission automatically shifts up.
You can only pull away in 1st speed.
When canceling the 7-speed manual shift mode, pressing the SPORT button. When
the 7-speed manual shift mode is canceled, the M indicator and gear selection
indicator go off.
■7-Speed Manual Shift Mode1 7-Speed Manual Shift Mode
In the 7-speed manual shif t mode, the transmission
shifts up or down by opera ting either paddle shifter
under the following conditions:
Shift Up: The engine sp eed reaches the lowest
threshold of the higher speed position.
Shift Down: The engine sp eed reaches the highest
threshold of the lower speed position.
When the engine speed reaches near the
tachometer’s red zone, the transmission shifts up
automatically.
When the engine speed reaches the lowest threshold
of the selected speed positi on, the transmission shifts
down automatically.
Operating the paddle shifte rs on slippery surfaces
may cause the tires to lock up. In this case, the 7-
speed manual shift mode is canceled and goes back
to the normal
( D driving mode.
Page 459 of 659

457
uuHonda Sensing ®u
Driving
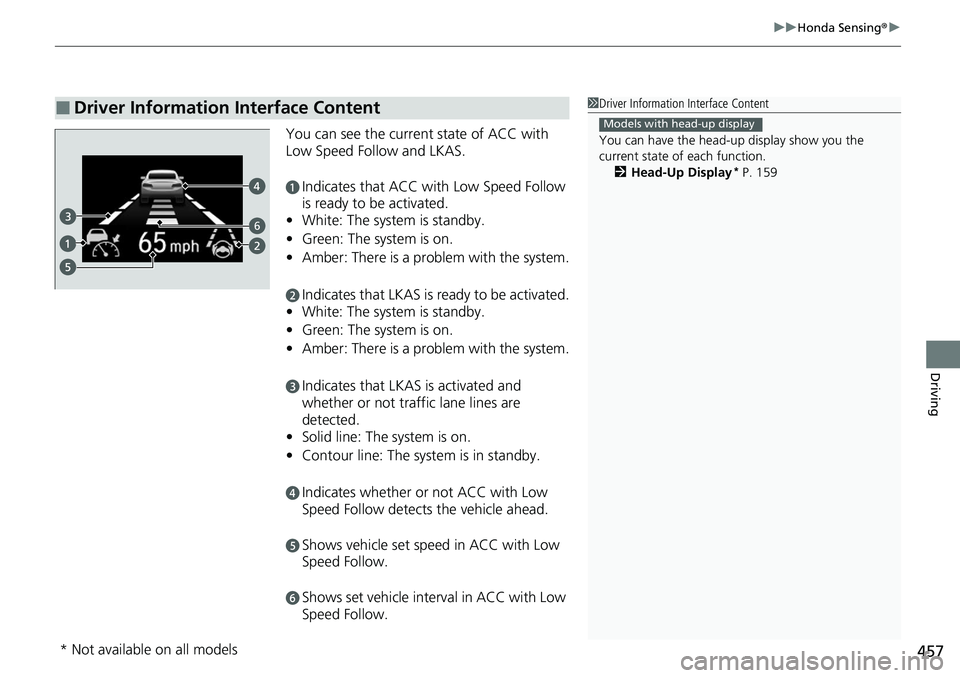
You can see the current state of ACC with
Low Speed Follow and LKAS.
aIndicates that ACC with Low Speed Follow
is ready to be activated.
• White: The system is standby.
• Green: The system is on.
• Amber: There is a problem with the system.
bIndicates that LKAS is ready to be activated.
• White: The system is standby.
• Green: The system is on.
• Amber: There is a problem with the system.
cIndicates that LKAS is activated and
whether or not traffic lane lines are
detected.
• Solid line: The system is on.
• Contour line: The system is in standby.
dIndicates whether or not ACC with Low
Speed Follow detects the vehicle ahead.
eShows vehicle set sp eed in ACC with Low
Speed Follow.
fShows set vehicle interval in ACC with Low
Speed Follow.
■Driver Information Interface Content1 Driver Information Interface Content
You can have the head-up display show you the
current state of each function.
2 Head-Up Display
* P. 159
Models with head-up display
6
* Not available on all models
Page 461 of 659

Continued459
uuHonda Sensing ®u Collision Mitigation Braking SystemTM (CMBSTM)
Driving
■When the system activates
You can change the distance ( Long/Normal /Short ) between vehicles at which the
system's earliest collision alert will come on through audio/information screen
setting options.
2 Customized Features P. 352
1When the system activates
The camera in the CMBS
TM is also designed to detect
pedestrians.
However, this pedestrian detection feature may not
activate or may not detect a pedestrian in front of
your vehicle under certain conditions.
Refer to the ones indicating the pedestrian detection
limitations from the list. 2 CMBS
TM Conditions and Limitations P. 462
The head-up warning uses a lens located at the front
end of the dashboard.
Do not cover the lens or spill any liquid on it.
Models with head-up display
Lens
The system provides visual and audible alerts of a possible collision, and stops if the
collision is avoided.
u Take appropriate action to prevent a collision (apply the brakes, change
lanes, etc.).
Beep Head-up
Warning
Lights
*
Visual Alerts
Audible Alert
* Not available on all models
Page 476 of 659

uuHonda Sensing ®u Adaptive Cruise Control (ACC) with Low Speed Follow
474
Driving
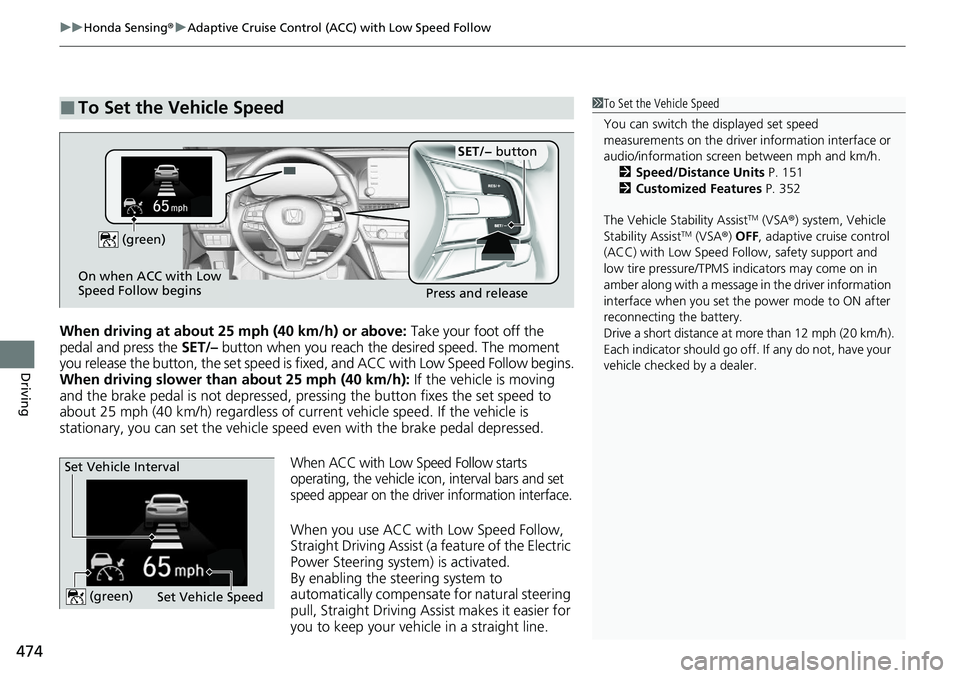
When driving at about 25 mph (40 km/h) or above: Take your foot off the
pedal and press the SET/– button when you reach the desired speed. The moment
you release the button, the set speed is fixed, and ACC with Low Speed Follow begins.
When driving slower than about 25 mph (40 km/h): If the vehicle is moving
and the brake pedal is not depressed, pressing the button fixes the set speed to
about 25 mph (40 km/h) regardless of current vehicle speed. If the vehicle is
stationary, you can set the vehicle speed even with the brake pedal depressed.
When ACC with Low Speed Follow starts
operating, the vehicle icon, interval bars and set
speed appear on the driver information interface.
When you use ACC with Low Speed Follow,
Straight Driving Assist (a feature of the Electric
Power Steering system) is activated.
By enabling the steering system to
automatically compensate for natural steering
pull, Straight Driving Assist makes it easier for
you to keep your vehicl e in a straight line.
■To Set the Vehicle Speed1To Set the Vehicle Speed
You can switch the displayed set speed
measurements on the driver information interface or
audio/information screen between mph and km/h. 2 Speed/Distance Units P. 151
2 Customized Features P. 352
The Vehicle Stability Assist
TM (VSA ®) system, Vehicle
Stability AssistTM (VSA ®) OFF, adaptive cruise control
(ACC) with Low Speed Follow, safety support and
low tire pressure/TPMS indicators may come on in
amber along with a message in the driver information
interface when you set the power mode to ON after
reconnecting the battery.
Drive a short distance at more than 12 mph (20 km/h).
Each indicator should go off. If any do not, have your
vehicle checked by a dealer.
On when ACC with Low
Speed Follow begins Press and release
SET/− button
(green)
Set Vehicle Speed
Set Vehicle Interval (green)