Page 17 of 25

Quick Reference Guide I 2827 I Quick Reference Guide
PHONE
Touch the PHONE 5 icon to access the Phone screen. Siri will
automatically asks ‘Who you would like to call’ when the PHONE 5 icon
is selected.
NOTE: Phone call sound quality is dependent on the wired connection.
Using the Lightning cable that came with the phone is recommended.
APPLE MUSIC
Touch the APPLE MUSIC 6 icon to access the Apple Music screen.
APPLE MAPS
Touch the APPLE MAPS 7 icon to access the Apple Map screen.
MESSAGES
Touch the MESSAGES 8 icon to access the Message screen. Siri will
automatically asks ‘To hear unread messages or create a new one’ when
the MESSAGE icon is selected.
3rd PARTY APPS
Supported CarPlay apps that are downloaded on your phone will appear
on the CarPlay screen. Touch the apps icons to access those supported
apps.
NOTE: A list of the supported CarPlay supported apps can be found at
http://www.apple.com/ios/carplay/
Ensure phone has latest version of the 3rd Party Apps.
Apple CarPlay uses Siri to perform many actions like sending
messages, placing calls, and looking up/setting POI/Destinations. A
Siri session can be initiated on any screen by:
1. Touch and holding the HOME icon 1 on the CarPlay screen or
2. Press the steering wheel VOICE RECOGNITION 13 button.
Note: Ensure Siri feature is set to ON in your phone (Go to Settings >
General > Siri).
3. Say any of the following commands;
•“Text ‘Call you later’” to send a text message.
•“Read text messages” to read available text message.
•“Call ” to make a phone call.
•“Find ” to locate a POI/Destination.
CarPlay Home Screen
SIRI
1 HOME ICON
2 WIRELESS CONNECTIVTY
3 CELLULAR SIGNAL
4 PHONE TIME5 PHONE
6 APPLE MUSIC™
7 APPLE MAPS
8 MESSAGES
9 3RD PARTY APPS
10 SCREEN PAGE INDICATOR
11 EXIT TO HOME SCREEN12 CURRENT CARPLAY AUDIO PLAYING
13 VOICE RECOGNITION
2
3
4
1
6578
911
12
13
10
INFOTAINMENT
GENESIS G80
Page 18 of 25

Quick Reference Guide I 3029 I Quick Reference Guide
Map position
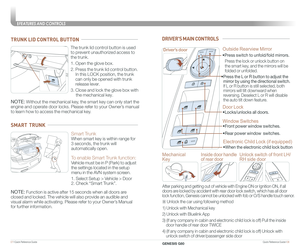
NAVIGATION
1 Move to the Home Screen2 Map view modeThe map view can be switch between Head Up and North Up.
3 Map Scale Display
4 Navigation Volume
5 Menu
6 Stop route/Resume route
7 Estimated arrival time and remaining distance
8 Current location and destination name display
9 Vehicle position mark
10 Route display
11 TBT (Turn by Turn): turns the TBT function on/off
12 Route: changes the route conditions when a
route is set
1
8
9
1011
2
3
4
5
67
12
NOTE: Map view can be changed by selecting Map view mode button.
USB PORTS
Plug in a USB cable or other media
device to connect an external audio
device and listen to it through the
audio system in your vehicle.
The rear USB charger is designed to
recharge batteries of small size
electrical devices using a USB cable.
The AC inverter supplies 115 volts
(150 watts) electric power to operate
electric accessories or equipment.
PAC 115V
Max 150WAC 115V
Max 150W
SS
PAC 115V
Max 150WAC 115V
Max 150W
SS
PAC 115V
Max 150WAC 115V
Max 150W
SS
WIRELESS CELLULAR PHONE CHARGING SYSTEM
NOTE:
The wireless cellular phone
charging system supports only the
Qi-enabled cellular phones ().
NOTE: Do not place any metallic items such as coins, keys on the
charger. Avoid putting credit cards, etc. on the charger as they
might get damaged by the magnetic field.
There is a wireless cellular phone
charging system inside the front
console. The system operates with all
doors closed, and the ignition switch is
in the ACC/ON position.
Front
Rear
P
AC 115V
Max 150WAC 115V
Max 150W
SS
PAC 115V
Max 150WAC 115V
Max 150W
SS
SS
INFOTAINMENT
GENESIS G80
Page 19 of 25

Quick Reference Guide I 3231 I Quick Reference Guide
HOMELINK WIRELESS GARAGE CONTROL SYSTEM
1
4
2
5
3
6
7
1. Press and release 1, 2 or 3 button.
• If the indicator 7 is turned ON in Orange, go to Step 3
(programming mode)
• If the indicator 7 is continuously turned ON or flashes in Green
rapidly several times, go to Step 2 (erasing mode)
2. Press and hold the button you wish to program for approximately
15- 25 seconds until the LED flashes in Orange for several times.
3. Hold the Garage Door Opener Original Transmitter near the
HomeLink Mirror.
4. Press the Original Transmitter button until the indicator 7 is turned
continuously ON or flashes in Green for approximately 10 seconds
and it indicates the programing is completed.
NOTE: If the indicator 7 flashes in Green continuously, but if the
garage door opener does not operate, please continue to follow
Rolling Code Programming steps below.
Two Way Communication
Some new garage door openers come equipped with a two-way
communication feature. If your garage door opener has this feature,
please also continue to follow the Rolling Code Programming steps
below. For more information and programming tips on two-way
communication please visit www. homelink.com/compatible/two-
waycommunication or call (800)-355-3515.
AUDIO CONTROL
RADIO
1. Users can set the volume level of each source (FM, AM, SXM, USB, BT
and so on) individually by adjusting volume knob.
2. Then AVN (Headunit) will save the last volume levels of each source in the
system sound settings.
3. If users change the source, the volume will revert to the previously set
volume for that source.
12345
6
7
1 Moves to home screen or the previous screen. 2 Moves to home screen. 3 Menu – Displays pop-up menu of each mode 4 Band - Selects the desired radio band by pressing [FM], [AM] or [SiriusXM].5 Voice Recognition - Moves to voice recognition screen. 6 Mode display - Shows the mode currently in play.7 Frequency Dial – Touch or drag to tune to the desired station.
Press to add current station to the preset.
INFOTAINMENT
GENESIS G80
Page 20 of 25
, press
the P button while depressing the
brake pedal.
To shift the gear to N (Neut")
Quick Reference Guide I 3433 I Quick Reference Guide
P
SHIFT BY WIRE GEAR SELECTOR
To shift the gear to P (Park), press
the P button while depressing the
brake pedal.
To shift the gear to N (Neutral), rotate
the shift dial clockwise from R
(Reverse) or counterclockwise from
D (Drive) while depressing the brake
pedal.
To shift the gear to R (Rear), rotate
the shift dial counterclockwise while
depressing the brake pedal.
A Rotary shifter (Rotary gear shift
dial, B Park button, C P Release
Cap
DRIVING
Rolling Code Programming
•You may need a ladder to access your garage door opener.
•You may need help from a second person.
•Be prepared some of the steps are time sensitive.
1. Firmly press and release the “Learn”, Smart”, or “ Program” button
of garage door opener on the ceiling while the indicator 7 flashes
in Green. Once the button is pressed, you have approximately 30
seconds to initiate the next step.
2. Return to the vehicle and firmly press the HomeLink button, hold for
two seconds and release the button up to three times. Do not press
the HomeLink button rapidly. At this point programming is complete
and your device should operate.
For more detailed information, please refer to your Owner’s manual or
visit www.homelink.com or call (800) 355-3515
Indicator 4 & 6:
Flashes in orange → “Closing” & “Opening”
Solid Green → “Closed” & “Opened”46
NOTE: If your garage door opener has Two-Way Communication
functionality, it is possible for HomeLink to stop functioning the garage
door shortly after initial programming, if the Two-Way Communication
Programming wasn’t properly completed. If you experience this,
completing the “Programming a New HomeLink Button” and “Two-
Way Communication Programming” will restore door operation.
DRIVER ATTENTION WARNING (DAW)
Driver Attention Warning is designed as a safety feature to warn or
inattentive driving.
A
B
C
• To set Driver Attention Warning, go to: User settings > Vehicle > Driver
Assistance > Driver Attention Warning.
Driver Attention Warning is operable, when driving speed is above 40 mph.
INFOTAINMENT
GENESIS G80
Page 21 of 25

ELECTRONIC PARKING BRAKE (EPB)
or
Stop the vehicle then pull
the EPB switch.
Applying
Move shift lever from P/N
to D/")
Quick Reference Guide I 3635 I Quick Reference Guide
LANE KEEPING ASSIST (LKA)
ELECTRONIC PARKING BRAKE (EPB)
or
Stop the vehicle then pull
the EPB switch.
Applying
Move shift lever from P/N
to D/R while depressing
the brake pedal.
Releasing
Press the EPB switch while
depressing the brake pedal.
NOTE: If necessary, emergency braking
is possible by pulling and holding the EPB
switch.
MODEMODE
MODEMODE
SMART CRUISE CONTROL (SCC)
MODEMODE
MODEMODE
Adjusting the vehicle speed
1. Push '+' switch 1 UP to increase cruising speed.
2. Push '-' switch 2 DOWN to decrease cruising speed.
NOTE: Quick push up/down will change speed by 1 mph. Holding
switch up/down will change speed by 5 mph.
To Cancel Smart Cruise Control
MODEM ODEM ODE+-M ODEM ODEM ODE
+-
M ODEM ODE
1
2
• To turn LKA on,
press the Lane Safety button.
• To turn LKA off,
press the button again.
Lane Keeping Assist detects lane
markers on the road, and helps
prevent the vehicle from departing
the lane while driving.
LKA operates only when the vehicle
speed is above 37 mph and when the
in the instrument cluster is green.
LKA will not operate properly if the
following conditions are present:
- the lane line is not clear
- on sharp bend in a road
- heavy fog
Refer to the Owner's Manual for more
detailed information.
NOTE: During operation, you
may feel the sensation of steering
wheel movement. Depending on
the road condition(gradient), the
deflection driving may occur. LKA
mode can be adjusted in the
User Settings page of the
infotainment system.
Smart Cruise Control helps maintain
distance from the vehicle ahead and drive at
a speed, set by the driver.
To turn on SCC:
1. Press the Driving Assist button
to turn on SCC. The speed will be set to
the current speed on the cluster.
2. If there is no vehicle in front of you, the
set speed will be maintained, but if there
is a vehicle in front of you, the speed
may decrease to maintain the distance
to the vehicle ahead. If the vehicle
ahead accelerates, your vehicle will
accelerate.
To set vehicle distance
Each time the button is pressed, the vehicle
to vehicle distance changes as follows:
Distance 2Distance 3Distance 4
Distance 1
To temporarily cancel SCC
Press the switch or depress the brake
pedal to temporarily cancel SCC.
To turn off the SCC
Press the Driving Assist button to turn
SCC off.
DRIVING
GENESIS G80
Page 22 of 25

The ISG system will automatically shut
off the engine when the vehicle is at a
standstill (i.e. red stop light, stop sig")
Quick Reference Guide I 3837 I Quick Reference Guide
IDLE STOP AND GO (ISG)
The ISG system will automatically shut
off the engine when the vehicle is at a
standstill (i.e. red stop light, stop sign,
and traffic jam) to increase vehicle’s
fuel economy and reduce exhaust gas
emissions. The auto stop indicator
will illuminate in green on the
instrument cluster when activated. To
restart the engine in auto stop mode,
release the brake pedal and press on
the accelerator. The auto stop
indicator goes OFF on the instrument
cluster once the engine is restarted.
Prerequisite for activation:
-The driver’s seatbelt is fastened.
-The driver’s door and the hood are
closed.
-The brake pressure is adequate.
-The battery is sufficiently charged.
-The outside temperature is between
14°F and 95°F (-10°C and 35°C).
-Engine is warmed up.
- The incline is gradual.
- Steering wheel is turned less than
180 degrees.
- Shift lever is in DRIVE or NEUTRAL.
NOTE: The engine will not shut off if the prerequisites are not satisfied. In
that case, the Auto Stop indicator will illuminate in yellow on the
instrument cluster.
To deactivate
Press the ISG OFF button, indicator illuminates.
To activate Press the ISG OFF button, indicator turns OFF.
BLIND-SPOT COLLISION-AVOIDANCE ASSIST (BCA)
Blind-Spot Collision-Avoidance Assist helps avoid collisions with a rear
side vehicle when changing lanes.
When operating the turn signal switch to change lanes, if there is a risk of
collision with a rear side vehicle, BCA provides a warning or controls the
vehicle to help avoid a collision depending on the collision risk levels\
.
1
2
3
HIGHWAY DRIVING ASSIST (HDA)
Highway Driving Assist helps
maintain a set distance and speed
from the vehicle ahead when driving
on a highway and helps center the
vehicle in the lane while driving, even
through a curve.
NOTE: If the engine is turned off then on again, the system maintains the last
setting.
Operation :
• Driving on the highway main road.
- Vehicle speed is under 120 mph (200 km/h).
• Press the Driving Assist button on the steering wheel.
- If entering the main road of highways while SCC and LFA is
operating, HDA will be automatically activated.
If HDA is operating, the indicator on the cluster will illuminate green.\
With the Engine Start/Stop button in the ON position, select or deselect \
‘Driver Assistance → Driving Convenience’ from the setting menu to
activate this setting.
DRIVING
GENESIS G80
Page 23 of 25

Low Tire Pressure Indicator /
TPMS Malfunction Indicator
LOW TIRE PRESSURE INDICATOR
Illuminates if")
Quick Reference Guide I 4039 I Quick Reference Guide
TIRE PRESSURE MONITORING SYSTEM (TPMS)
Low Tire Pressure Indicator /
TPMS Malfunction Indicator
LOW TIRE PRESSURE INDICATOR
Illuminates if one or more of your tires are significantly under-inflated.
TPMS MALFUNCTION INDICATOR
Blinks for approximately one minute, then remains illuminated when
there is a malfunction with the TPMS. Inspect all tires and adjust
tire pressure to specification. If the lamp remains illuminated, have
the system checked by an authorized retailer of Genesis Brand
Products as soon as possible.
Low Tire Pressure /
Tire Pressure Monitor /
TPMS Malfunction
Display (shown on the
cluster LCD display)
To access the TPMS menu within
the LCD display, press the Driving
Assist mode button on the steering
wheel to display tire pressure.
Tire pressures will display after
driving a short distance. If a
tire pressure drops lower than
predetermined specification, the
Low Tire Pressure Indicator will
illuminate and the LCD display
will indicate tire(s) requiring air.
FORWARD COLLISION-AVOIDANCE ASSIST (FCA)
NOTE: Forward Parking
Distance Warning will not
operate if the Parking Safety
button is Off.
Forward Collision-Avoidance Assist
designed to detect and monitor the
vehicle ahead and warn the driver if a
collision is imminent. On vehicles
equipped with both front view camera
and front radar sensor, a pedestrian or a
cyclist detection is also available.
NOTE: If driver does not maneuver to avoid impact when system detects a
slower/stopped vehicle or pedestrian ahead, system applies automatic bra\
king
To operate the system, select ‘Driver Assistance > Lane Safety’ from
the Settings menu.
Active Assist: FCA will activate emergency brake with a warning
message, an audible warning and steering wheel vibration depending
on the collision risk levels.
Warning Only: FCA will warn the driver with a warning message, an
audible warning and steering wheel vibration depending on the
collision risk levels.
OFF: FCA will off. The warning light will illuminate on the cluster.
FORWARD/REVERSE PARKING DISTANCE WARNING (PDW)
Forward/Reverse Parking Distance
Warning will warn the driver if an
obstacle is detected when the
vehicle is moving forward or
backward at low speeds.
PDW On/Off
Press the Parking Safety button to
turn On/Off:
On - LED On
Off - LED Off
If PDW is Off, PDW will turn On
automatically when in Reverse.
PDW will not warn when vehicle is
driven forward at speed above 6 mph.
DRIVING
GENESIS G80
Page 24 of 25

GENESIS SERVICE VALET PROGRAM TERMS AND CONDITIONS
Program Coverage Summary
Genesis Service Valet is included for the first 3 years
or 36,000 miles, whichever comes first, of ownership.
Complimentary
ServicesService ValetComplimentary
Loaner VehicleMaintenance
Original Owner or
LesseeYe sYe sYe s
Subsequent Owner or
Lessee
Warranty
Only
Warranty
OnlyNo
See below for program terms and conditions.
Service Valet is available while your vehicle is receiving complimentary maintenance, wear items, or warranty repairs by an authorized Genesis retailer. Simply contact your authorized Genesis retailer’s Service Experience Manager\
or contact the Customer Care Center at 844-340-9741 to make your appointment. The retailer will work with you to arrange your pickup and delivery time and location.
• Valet appointments must be made at least 2 business days in advance.
• Valet area of coverage is valid only within an estimated 1 hour drive time distance (based on traffic, weather, and road conditions) from the participating retailer location to the pickup/delivery location.
• Valet pickup and delivery must occur during normal business hours. After-hours pickup and delivery are at the discretion of your participating retailer.
• You must notify your Genesis Service Experience Manager 1 business day i\
n advance if location or time of valet services changes. If a change or cancellation is not made at least 1 business day in advance, you may be charged a fee, or Service Valet may be cancelled.
• You will be charged a fee if you elect to extend the use of the courtesy replacement vehicle or delay the delivery of your vehicle.
• Prior to or at the time of your vehicle pickup, you will need to provide your valet with the following information if a courtesy replacement vehicle is needed:
• Insurance company name, policy number, and expiration date
• Driver’s license number, state, expiration, and date of birth
• Credit card number and expiration date (standard requirement for rental car use)
• The above information for any additional drivers
Genesis brand vehicle owner must provide the valet with the Genesis brand vehicle that is currently registered in compliance with local and state laws. Road tolls incurred during the Service Valet may be charged to the vehicle owner.
SERVICE VALET
We come to you and provide you with alternative transportation. While yo\
ur vehicle is being serviced under this program, qualified drivers will be provided\
a courtesy replacement Genesis brand vehicle at no additional cost. You must be at \
least 25 years of age (in most states) with a valid driver’s license to drive a loaner vehicle. Please provide your Service Advocate with the following information:
• Insurance company name, policy number, and expiration date
• Driver’s license number, state, expiration and birth date
• Credit card number and expiration date (standard requirement for rental car use)
• The above information for any additional drivers
Vehicle Eligibility
For original retail owners of the Genesis vehicle, all factory-recommended scheduled maintenance are covered for the first 3 years or 36,000 miles,\
whichever comes first. The Service Valet Program is applicable to all 2017 - 2019 \
model year Genesis brand vehicle United States specification vehicles purchased in \
the United States from authorized Genesis retailers. The program is not in effect o\
utside of the United States.
• Vehicle coverage begins on the date of first retail sale. Fleet vehicles are excluded from this program.
• If the vehicle becomes damaged (such as by accident, fire, act of natur\
e, etc.) and is subsequently titled salvaged, flooded, or reconstructed, it is no\
longer eligible for the benefits of the Genesis G80 complimentary maintenance Program.
Guidelines for Scheduling Maintenance
The Service Valet Program covers factory-recommended scheduled maintenan\
ce for the first 3 years or 36,000 miles, whichever comes first. Covered ma\
intenance costs include all labor and parts necessary to complete the factory reco\
mmended service. Having your vehicle serviced at the specified time/mile interva\
ls is critical in maintaining long-term durability. Failure to have your vehicle serviced at the specified interval may invalidate the warranty under certain circumstanc\
es.
If for any reason a service is missed, the authorized Genesis retailer w\
ill perform the next or missed major service.
Some owners may wish to have their oil changed more frequently. The cust\
omer must pay for any additional services performed on the vehicle. Service procedures not specifically referenced in the Genesis Customer Care Quick Reference\
Guide must be preauthorized by a Genesis District Parts and Service Manager.
COMPLIMENTARY LOANER VEHICLE
COMPLIMENTARY MAINTENANCE COVERAGE