Page 1 of 25

Looking For more detailed information? This Quick Reference Guide does not replace your vehicle’sOwner’s Manual. If you require additional information or are unsure of a specific issue, we recommend that you always refer to the vehicle’s Owner’s Manual or contact your authorized retailer of Genesis Branded Products. The information contained in this Quick Reference Guide is correct at the time of printing; however, specifications and equipment can change without notice. No warranty or guarantee is being extended in this Quick Reference Guide, and Genesis Brand reserves the right to change product specifications and equipment at any time without incurring obligations. Some vehicles are shown with optional equipment.
MAINTENANCE
Low tire pressure indicator /
TPMS malfunction indicator
Scheduled Maintenance(Normal Usage)2.5T3.5T
Engine Oil And FilterReplace8,000 or 12 mos.Replace8,000 or 12 mos.
Fuel AdditivesAdd7,500 or 12 mos.Add6,000 or 12 mos.
Tire RotationPerform7,500 or 12 mos.Perform6,000 or 12 mos.
Vacuum Hose
Inspect7,500 or 12 mos.Inspect6,000 or 12 mos.
Air Conditioning Refrigerant
Brake Hoses & Lines
Drive Shafts & Boots
Exhaust Pipe & Muffler
Front Brake Disc/Pads, Calipers
Rear Brake Disc/Pads
Steering Gear Box, Linkage & Boots/ Lower Arm Ball Joint, Upper Arm Ball Joint
Suspension Mounting Bolts
Propeller Shaft
Air Cleaner FilerInspect7,500 or 6 mos.Inspect7,500 or 6 mos.
Replace30,000 or 24 mos.Replace30,000 or 24 mos.
Climate Control Air Filter (For Evaporator And Blower Unit)ReplaceEvery 12 mos.ReplaceEvery 12 mos.
Fuel Tank Air Filter
Inspect16,000 or 24 mos.Inspect16,000 or 24 mos.Fuel Filler Cap, Fuel tank
Brake Fluid
Parking Brake
Fuel Lines, Fuel Hoses And ConnectionsInspect16,000 or 24 mos.Inspect16,000 or 24 mos.
Front(AWD)/Rear Differential OilInspect30,000 or 48 mos.Inspect24,000 or 48 mos.
Drive BeltInspect
At first48,000 or 72 mos.InspectAt first48,000 or 72 mos.
After that, every8,000 or 12 mos.InspectAfter that, every8,000 or 12 mos.
Spark Plugs (Iridium Coated)Replace48,000Replace48,000
CoolantReplace
First 120,000 or 120 mos.Replace
First 120,000 or 120 mos.
Subsequent, every 30,000 or 24 mos.Subsequent, every 30,000 or 24 mos.
Automatic Transmission FluidNo checks or services required for Normal Usage driving.*Check the engine oil regularly between recommended oil change. Genesis Branded Vehicle recommend Full synthetic Oil.*The fuel filter is considered to be maintenance free but periodic inspection is recommended for this maintenance schedule depends on fuel quality. If there are some important safety matters like fuel flow restriction, surging, loss of power, hard starting problem etc, replace the fuel filter immediately regardless of maintenance schedule and consult an authorized HYUNDAI or KIA dealer for details.
*See Owner’s Manual for details.
☐ TIRE PRESSURE MONITORING SYSTEM (TPMS)- page 40
NOTE: Tire pressure may vary in colder temperatures causing the
low tire pressure indicator to illuminate. Inflate tires according to
the Tire Pressure Label located on the driver’s side door pillar.
☐ HOW TO DEFROST
1 Press the front defrost button.
2 Set to warmest temperature setting.
3 Set to highest fan speed.
☐ DEMONSTRATE AUTOMATIC CLIMATE CONTROL - page 17
☐ DEMONSTRATE HOW TO OPERATE WINDSHIELD WIPER AND
WASHER – page 12
NP150-J2021(Rev 11/16/20)Printing 11/19/20
GENESIS
G80
QUICK REFERENCE GUIDE
Sales Consultant Date Sales Manager Date
New Owner Date
Email
@
☐ INTRODUCTION AND LOCATION OF THE SERVICE
DEPARTMENT
☐ SET FIRST SERVICE VALET APPOINTMENT
☐ REVIEW FACTORY RECOMMENDED MAINTENANCE
SCHEDULE
☐ WAS THE CONDITION OF YOUR VEHICLE (AT DELIVERY)
TO YOUR SATISFACTION?
☐ GENESIS CONNECTED SERVICES
- Assist with creating a Genesis Owners account
- Assist with Genesis Connected Services enrollment
- Show Genesis Connected Services Users Manual
- Encourage customer to download the Genesis Intelligent
Assistant App
VOICE
RE COGNITION TIPS
Command ExampleBL UET OOTH®
Dial
Call “Dial
7 -1-4- 0-0-0- 8-8-8-8”
“Call John Smith ”
Command ExampleNA VIG ATION
Find Addr ess
City , S ta te> “1-
2-3-4-5 1s t Stree t,
F oun tain Valle y”
C ommand Example
Loca ted on R earview Mirr or L OC AL SEAR CH
Find
“Find L
ow e’s ® near me”
“S tarbuck s®”
Impr oving ho w you s tor e your con tacts can op timize your
Blue too th® Voic e R ecognition perf ormance:
• U se full names ins tead o f short or single-s yllable names
(“ John or Dad”)
• Avoid using special char acters/emojis or abbrevia tions
(“Dr .”) when sa ving contacts
Find “Find McDonald’s ®”
Page 2 of 25

GENESIS BRANDED VEHICLE OWNER PRIVACY POLICY
Your Genesis Branded Vehicle may be equipped with technologies and
services that use information collected, generated, recorded or stored by the
vehicle. We have created a Vehicle Owner Privacy Policy to explain how these
technologies and services collect, use, and share this information.
You may read our Vehicle Owner Privacy Policy at www.genesis.com/us/en/
my-privacy-rights.html#owner. If you would like to receive a hard copy of our
Vehicle Owner Privacy Policy, please contact Customer Care at:
Genesis Customer Care
Genesis Motor America/Phoenix
P.O. Box 83835
Phoenix, AZ 85071-3835
[email protected]
Genesis Customer Care Center representatives are available Monday
through Friday, between the hours of 5:00 AM and 5:00 PM PST and
Saturday between 6:30 AM and 3:00 PM PST (English).
For Customer Care assistance in Spanish or Korean, representatives are
available Monday through Friday between 6:30 AM and 3:00 PM PST.
Roadside Assistance: 1-844-340-9742
SiriusXM®Radio: 1-800-967-2346
Genesis Customer Care &Connected Services:
www.MyGenesis.com
1-844-340-9741
Page 3 of 25

Page 35
Shift by wiregear selector
Page 34
P
USB Ports Page 30
Use th")
Instrument cluster
Page13
Navigation
Page 29
Climate control systemPage 17
Wiper and washer
Page 12
Electronic Parking Brake (EPB)
Page 35
Shift by wiregear selector
Page 34
P
USB Ports Page 30
Use this Quick Reference Guide to learn
about the features that will enhance your
enjoyment of your Vehicle. More detailed
information about these features are available
in your Owner’s Manual.
WARNING!
To reduce the risk of serious injury to yourself and others,
read and understand the important SAFETY INFORMATION
in your Owner’s Manual.
FEATURES AND CONTROLS Climate control system 17Door lock 0 2Driver's main controls 0 8
Headlights and fog lights 1 1Head-up display 1 6Instrument cluster 13Interior lights 10LCD display control 1 5 LCD display view 1 5 Panoramic Sunroof 0 9 Seat-Driver position memory system 0 4Seat-Front seat adjustment 0 3Seat-Headrest adjustment 0 4Seat-Seat warmer & cooler 05Smart key 0 1Smart trunk 0 7Trunk lid control button 0 7Trunk operation 0 6
Warnings and indicators 1 6
Wipers and washer 1 2
INFOTAINMENTAndroid Auto™ \
23Apple CarPlay™ 25Audio control 31Bluetooth Phone Pairing 1 9Genesis Connected Services 20Homelink wireless garage control system 3 2 Navigation 2 9Radio 3 1USB ports 30Wireless cellular phone charging system 30
DRIVINGBlind-Spot Collision-Avoidance Assist (BCA) 38Driver Attention Warning (DAW) 34Electronic Parking Brake (EPB) 3 5Forward Collision Avoidance Assist (FCA) 39Forward/Reverse Parking Distance Warning (PDW) 39Highway Driving Assist(HDA) 3 8Idle Stop and Go [ISG) 3 7Lane Keeping Assist (LKA) 35Shift by Wire Gear Selector 34Smart Cruise Control [SCC] 3 6Tire Pressure Monitoring System (TPMS) 4 0
* Some vehicles may not be equipped with all the listed features.
Page 4 of 25

Quick Reference Guide I 0201 I Quick Reference Guide
Lock
Unlock
Trunk open
Panic
SMART KEYDOOR LOCK
PP
PP
Type AType B
Remote Start
PPPP
PP
Remote Smart Parking Assist
Lamp ON
Accessing mechanical key
Operating Door Locks from Outside the Vehicle
1. Place a soft cloth over the groove A, and pry open the smart key
cover.
2. Press the mechanical key and
remove it from the smart key FOB.
A
Mechanical Key
1
2
AB
Remote start using Smart Key (if equipped)
You can start the vehicle using the Remote Start button on the smart key.
To start the vehicle remotely:
1. Press the door lock button on the smart key within 32 feet (10m) from
the vehicle.
2. Press the Remote Start button for more than 2 seconds within 4
seconds after pressing the door lock button.
3. The hazard warning lights will blink and the engine will start.
4. To turn off the remote start function, press the Remote Start button once.
After pulling the door handle 1, turn the key 2 toward the front of the
vehicle to lock A or turn the key toward the rear of the vehicle to unlock B.
If you lock the driver’s door with a mechanical key while the engine is
running, turn the key 2 TWICE toward the front of the vehicle to lock A.
If you lock/unlock the driver's door with the mechanical key, only the
driver's door will lock/unlock automatically, not others.
Once the doors are unlocked, they can be opened by pulling the door
handle. When closing the door, push the door by hand. Make sure that
doors are closed securely.
* CAUTION
· If you locked the door with the touch sensor on the door handle, th\
e
doors cannot be unlocked with the sensor within 3 seconds.
· If you unlocked the door with the touch sensor on the door handle, \
the doors cannot be locked with the sensor within 2 seconds.
NOTE: User selectable option: Please see section 5 from your Owner’s
Manual for more details.
Driver’s door Lock / Unlock
· To Unlock : Place your hand
inside the door handle
· To Lock : Press the touch sensor
on the outside of the handle to lock.
FEATURES AND CONTROLS
GENESIS G80
Page 5 of 25
2
Seatback angle3
Seat cushion height1
Lumbar support
E")
Quick Reference Guide I 0403 I Quick Reference Guide
FRONT SEAT ADJUSTMENT
2
Forward and backward1
Seat cushion length (for driver’s seat)2
Seatback angle3
Seat cushion height1
Lumbar support
Ergo Motion Seat (if equipped)
4
Seat bolster adjustment (for driver’s seat)5
1
34
5
HEADREST ADJUSTMENT
To Raise Headrest:
Pull headrest up.
To Lower Headrest:
Press lock button while pressing
down on headrest.
To adjust headrest forward
(front seats only):
Pull forward to 1 of 3 positions.
To adjust headrest rearward
(front seats only):
Pull it fully forward to the farthest
position and release it.
DRIVER POSITION MEMORY SYSTEM
Seat cushion support (for driver’s seat)2
Ergo-Motion seat automatically
adjusts the driver seat during long
drives. Select seat settings on the
infotainment settings screen to
activate.
To Store Settings 1. Shift to P (Park) while the Engine
Start/Stop button is in the ON
position.
2. Adjust the driver’s seat position,
outer side view mirror position,
steering wheel position,
instrument panel illumination
intensity and head-up display
height/brightness to the desired
position.
NOTE: Transmission must be in P (Park).
NOTE: To reset the system,
please refer to the Owner’s
Manual.
To Recall Press the desired memory button (1 or 2). The system will beep once.
3. Press the SET button. The system will beep once and notify you ‘Press
button to save settings’ on the cluster LCD display.
4. Press one of the memory buttons (1 or 2) within 4 seconds. The system
will beep twice when the memory has been successfully stored.
5. ‘Driver 1 (or 2) settings saved’ will appear on the cluster L\
CD display. The
message appears only for the driver’s seat position memory setting.
FEATURES AND CONTROLS
GENESIS G80
Page 6 of 25

Quick Reference Guide I 0605 I Quick Reference Guide
SEAT WARMER
Touch and hold the icon to turn
OFF the seat warmers.
SEAT COOLER
Touch and hold the icon to turn OFF
the seat warmers.
Touch either of the seat cooler
icons to cool the driver’s seat or
front passenger’s seat, the setting
is changed as follows:
– Air Ventilation
– Warmer
Touch either of the seat warmer
icons to warm the driver’s seat or
front passenger’s seat, the setting
is changed as follows:
OFF
OFF
HIGH
HIGH
( )
( )
( )
( )
( )
( )
MIDDLE
MIDDLE
LOW
LOW
Press to open.
Smart key needs to
be within the range.
Power trunk open button
Press to open.
Press and hold to
close.
Power trunk main control button
Press to close.
Power trunk close button
Press to lock the trunk
and doors will lock as well.
Smart key needs to be
within range.
Power trunk lock button
PPPress and hold.
Power trunk open button on the
smart key
TRUNK OPERATION
NOTES: Trunk opening height adjustment is available in the Vehicle setup
options. Please refer to your Owner’s Manual for further information.
NOTE: If all doors are unlocked, you
can open the trunk without smart key.
NOTES:
When Customers slightly close the trunk lid manually, the trunk will close
automatically
When Customers slightly open the trunk lid manually, the trunk can open
automatically
HOLD
HOLD
FEATURES AND CONTROLS
GENESIS G80
Page 7 of 25

Quick Reference Guide I 0807 I Quick Reference Guide
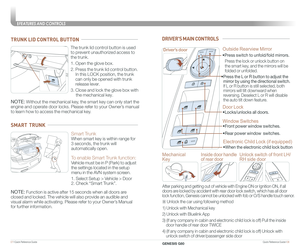
The trunk lid control button is used
to prevent unauthorized access to
the trunk.
1. Open the glove box.
2. Press the trunk lid control button.
In this LOCK position, the trunk
can only be opened with trunk
release lever.
3. Close and lock the glove box with
the mechanical key.
TRUNK LID CONTROL BUTTON
Smart Trunk
When smart key is within range for
3 seconds, the trunk will
automatically open.
To enable Smart Trunk function:
Vehicle must be in P (Park) to adjust
the settings located in the setup
menu in the AVN system screen.
1. Select Setup > Vehicle > Door
2. Check “Smart Trunk”.
NOTE: Function is active after 15 seconds when all doors are
closed and locked. The vehicle will also provide an audible and
visual alarm while activating. Please refer to your Owner’s Manual
for further information.
SMART TRUNK
NOTE: Without the mechanical key, the smart key can only start the
engine and operate door locks. Please refer to your Owner’s manual
to learn how to access the mechanical key.
• Front power window switches.
•
Rear power window switches.
• Press the L or R button to adjust the
mirror by using the directional switch.
If L or R button is still selected, both
mirrors will tilt downward when
reversing. Deselect L or R will disable
the auto tilt down feature.
Driver’s door
DRIVER'S MAIN CONTROLS
Outside Rearview Mirror
Door Lock
•Locks/unlocks all doors.
Window Switches
Electronic Child Lock (if equipped)
•When the electronic child lock button
•Press switch to unfold/fold mirrors.
Press the lock or unlock button on
the smart key, and the mirrors will be
folded or unfolded.
Mechanical
Key
Inside door handle
of rear door
Unlock switch of front LH/
RH side door
After parking and getting out of vehicle with Engine ON or Ignition ON, \
if all
doors are locked by accident with rear door lock switch, which has all door
lock function, Genesis cannot be unlocked with fob or O/S handle touch s\
enor.
※ Unlock the car using following method
1) Unlock with Mechanical key
2) Unlock with Bluelink App
3) (If any company in cabin and electronic child lock is off) Pull the inside
door handle of rear door TWICE
4) (If any company in cabin and electronic child lock is off) Unlock with
unlock switch of driver/passenger side door
FEATURES AND CONTROLS
GENESIS G80
Page 8 of 25
 1
Push the switch to turn front map lamp and rear room lamp")
Quick Reference Guide I 1009 I Quick Reference Guide
PANORAMIC SUNROOF
Sunshade
Sliding the sunroof
Tilting the sunroof
Master Switch ( ) 1
Push the switch to turn front map lamp and rear room lamp on or off
When the Master Switch 1 is pushed, the other Switches 2 , 3, 4, 5
don’t operate.
Door Mode Switch ( ) 2
When the Door Mode Switch 2 is pushed, map lamp 3 and rear room
lamp 4, 5 turn on if any door is opened and will turn off after all doors
are closed.
Map Lamp Touch Switch ( ,) 3
Touch the symbol to turn on and off for each side of map lamp.
Rear Map Lamp Touch Switch ( ,) 4
Touch the symbol to turn on and off for each side of rear map lamp.
Rear Mood Lamp Touch Switch ( ) 5
Touch the symbol to turn on and off rear mood lamp.
INTERIOR LIGHTS
12
33
When the sunshade is closed
If you push the sunroof control lever
upwards,the sunshade will slide all the
way open and then the sunroof glass
will tilt open.
When the sunshade is opened
If you push the sunroof control lever
upwards,The sunroof glass will tilt open.
Room Lamp (Rear)
445
Sunroof LeverSunroof operation
Push backward to 2nd detentShade + Sunroofopen
Push backward to 1st detentShade open
Push upTilt
Push forward to 2nd detentShade + Sunroof close
Push forward to 1st detentShade close
FEATURES AND CONTROLS
GENESIS G80