2021 FORD POLICE INTERCEPTOR tow
[x] Cancel search: towPage 7 of 412

Selecting a Drive Mode
..............................178
Drive Modes ...................................................
178
Load Carrying
Load Limit ......................................................
180
Towing
Towing a Trailer ............................................
185
Recommended Towing Weights ...........
186
Essential Towing Checks ..........................
188
Towing the Vehicle on Four Wheels ......
190
Driving Hints
Reduced Engine Performance .................
191
Economical Driving ......................................
191
Cold Weather Precautions .......................
192
Breaking-In .....................................................
192
Driving Through Water ...............................
192
Floor Mats ......................................................
193
Roadside Emergencies
Roadside Assistance ..................................
194
Hazard Flashers ...........................................
195
Fuel Shutoff ...................................................
195
Jump Starting the Vehicle ........................
196
Collision, Damage or Fire Event .............
198
Post-Crash Alert System ..........................
199
Transporting the Vehicle ..........................
199
Customer Assistance
Getting the Services You Need ...............
201
In California (U.S. Only) ...........................
202
The Better Business Bureau (BBB) Auto Line Program (U.S. Only) ....................
203
Utilizing the Mediation/Arbitration Program (Canada Only) ......................
204
Getting Assistance Outside the U.S. and Canada .......................................................
204
Ordering Additional Owner's Literature .......................................................................
206 Reporting Safety Defects (U.S. Only)
.......................................................................
206
Reporting Safety Defects (Canada Only) .......................................................................
206
Fuses
Fuse Specification Chart .........................
208
Changing a Fuse ..........................................
216
Maintenance
General Information ...................................
218
Opening and Closing the Hood ..............
218
Under Hood Overview - 3.0L .................
220
Under Hood Overview - 3.3L ...................
221
Engine Oil Dipstick - 3.0L .........................
222
Engine Oil Dipstick - 3.3L .........................
222
Engine Oil Check .........................................
222
Oil Change Indicator Reset ......................
223
Changing the Engine Air Filter - 3.0L ........................................................................\
224
Changing the Engine Air Filter - 3.3L ....
225
Engine Coolant Check ..............................
226
Automatic Transmission Fluid Check ........................................................................\
230
Brake Fluid Check .......................................
230
Power Steering Fluid Check .....................
231
Changing the 12V Battery .........................
231
Adjusting the Headlamps ........................
233
Washer Fluid Check ...................................
235
Fuel Filter .......................................................
235
Checking the Wiper Blades .....................
235
Changing the Front Wiper Blades ........
235
Changing the Rear Wiper Blades ..........
236
Changing a Bulb ..........................................
236
Vehicle Care
General Information ..................................
238
Cleaning Products ......................................
238
Cleaning the Exterior .................................
239
Waxing ............................................................
240
4
Explorer (CTW) Police, Canada/United States of America, Police, enUSA, Edition date: 202007, Second-Printing Table of Contents
Page 20 of 412
PROTECTING THE
ENVIRONMENT
You should play your part in protecting the
environment. Correct vehicle usage and
the authorized disposal of waste, cleaning
and lubrication materials are significant
steps toward this aim.
For additional information about our
sustainability progress and initiatives, visit
www
.sus t ainabilit y .f or d . c om .
17
Explorer (CTW) Police, Canada/United States of America, Police, enUSA, Edition date: 202007, Second-Printing Environment
Page 27 of 412
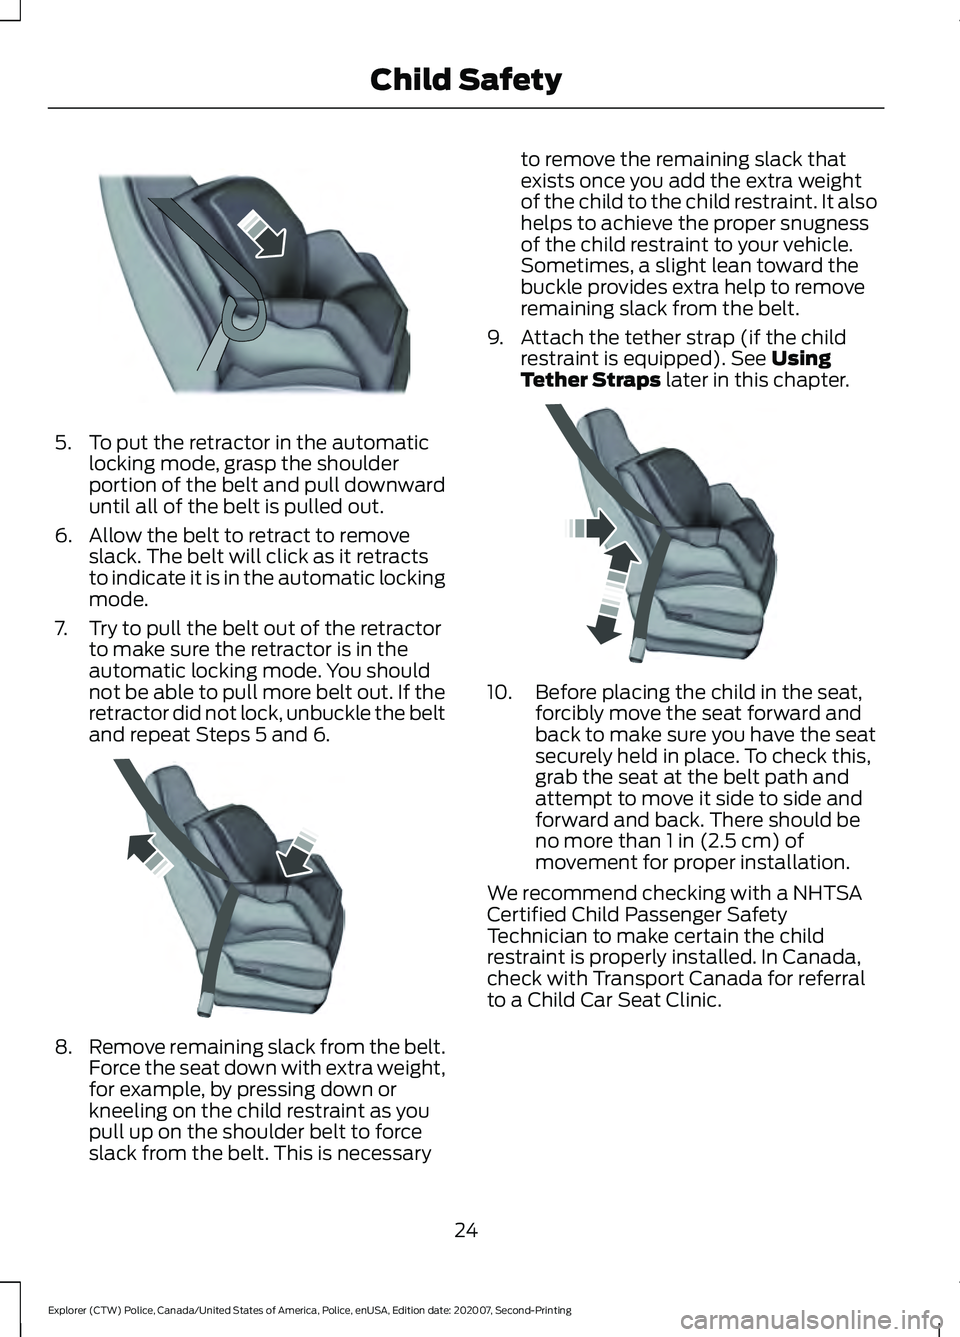
5. To put the retractor in the automatic
locking mode, grasp the shoulder
portion of the belt and pull downward
until all of the belt is pulled out.
6. Allow the belt to retract to remove slack. The belt will click as it retracts
to indicate it is in the automatic locking
mode.
7. Try to pull the belt out of the retractor to make sure the retractor is in the
automatic locking mode. You should
not be able to pull more belt out. If the
retractor did not lock, unbuckle the belt
and repeat Steps 5 and 6. 8.
Remove remaining slack from the belt.
Force the seat down with extra weight,
for example, by pressing down or
kneeling on the child restraint as you
pull up on the shoulder belt to force
slack from the belt. This is necessary to remove the remaining slack that
exists once you add the extra weight
of the child to the child restraint. It also
helps to achieve the proper snugness
of the child restraint to your vehicle.
Sometimes, a slight lean toward the
buckle provides extra help to remove
remaining slack from the belt.
9. Attach the tether strap (if the child restraint is equipped). See Using
Tether Straps later in this chapter. 10. Before placing the child in the seat,
forcibly move the seat forward and
back to make sure you have the seat
securely held in place. To check this,
grab the seat at the belt path and
attempt to move it side to side and
forward and back. There should be
no more than
1 in (2.5 cm) of
movement for proper installation.
We recommend checking with a NHTSA
Certified Child Passenger Safety
Technician to make certain the child
restraint is properly installed. In Canada,
check with Transport Canada for referral
to a Child Car Seat Clinic.
24
Explorer (CTW) Police, Canada/United States of America, Police, enUSA, Edition date: 202007, Second-Printing Child SafetyE142875 E142533 E142534
Page 33 of 412
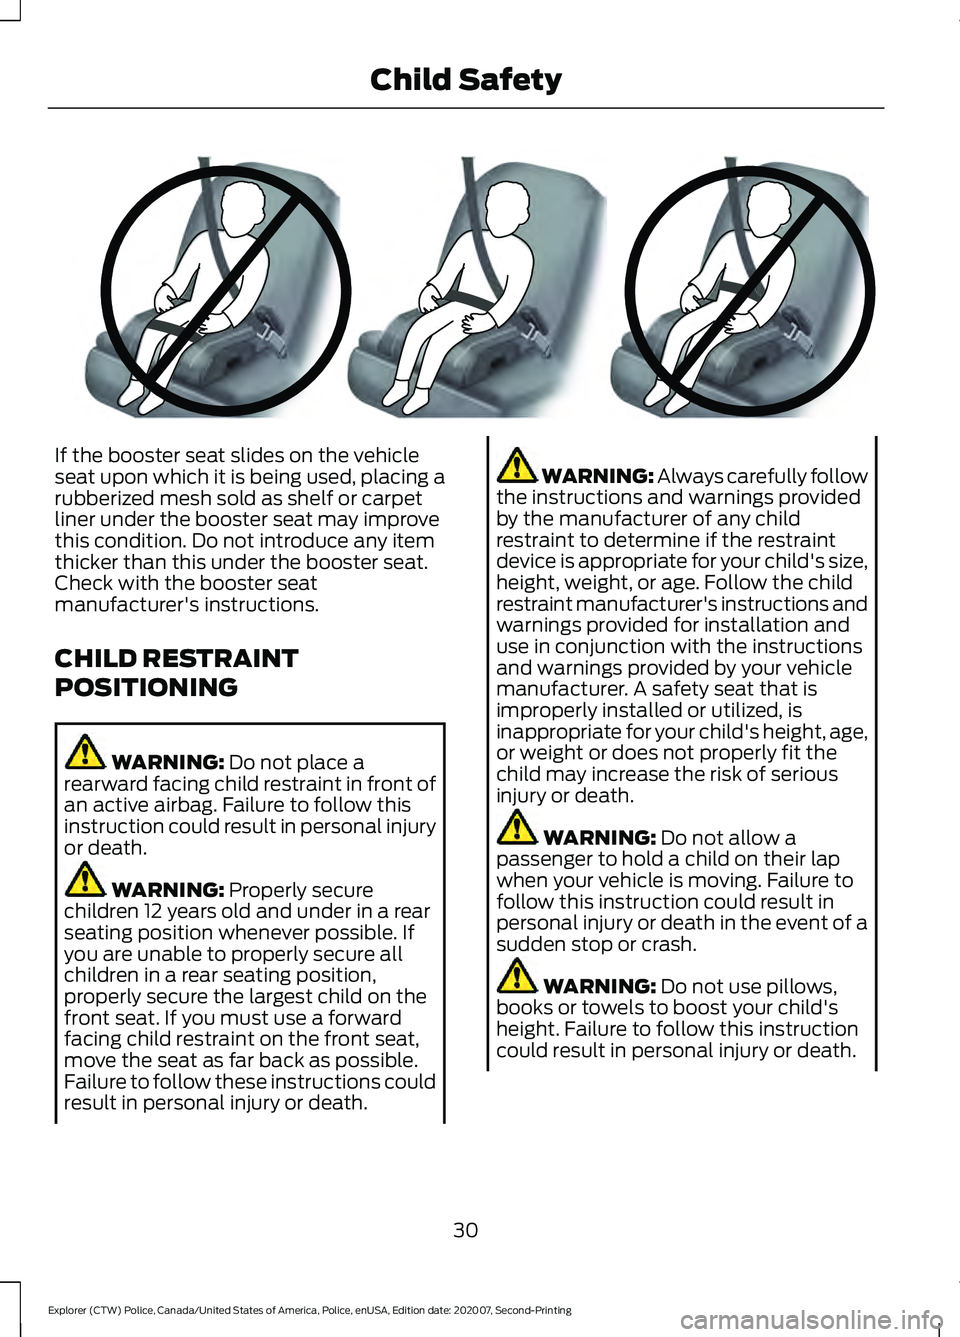
If the booster seat slides on the vehicle
seat upon which it is being used, placing a
rubberized mesh sold as shelf or carpet
liner under the booster seat may improve
this condition. Do not introduce any item
thicker than this under the booster seat.
Check with the booster seat
manufacturer's instructions.
CHILD RESTRAINT
POSITIONING
WARNING: Do not place a
rearward facing child restraint in front of
an active airbag. Failure to follow this
instruction could result in personal injury
or death. WARNING:
Properly secure
children 12 years old and under in a rear
seating position whenever possible. If
you are unable to properly secure all
children in a rear seating position,
properly secure the largest child on the
front seat. If you must use a forward
facing child restraint on the front seat,
move the seat as far back as possible.
Failure to follow these instructions could
result in personal injury or death. WARNING: Always carefully follow
the instructions and warnings provided
by the manufacturer of any child
restraint to determine if the restraint
device is appropriate for your child's size,
height, weight, or age. Follow the child
restraint manufacturer's instructions and
warnings provided for installation and
use in conjunction with the instructions
and warnings provided by your vehicle
manufacturer. A safety seat that is
improperly installed or utilized, is
inappropriate for your child's height, age,
or weight or does not properly fit the
child may increase the risk of serious
injury or death. WARNING:
Do not allow a
passenger to hold a child on their lap
when your vehicle is moving. Failure to
follow this instruction could result in
personal injury or death in the event of a
sudden stop or crash. WARNING:
Do not use pillows,
books or towels to boost your child's
height. Failure to follow this instruction
could result in personal injury or death.
30
Explorer (CTW) Police, Canada/United States of America, Police, enUSA, Edition date: 202007, Second-Printing Child SafetyE142597
Page 38 of 412
Pregnant women should always wear their
seatbelt. Position the lap belt portion of a
combination lap and shoulder belt low
across the hips below the belly and worn
as tight as comfort allows. Position the
shoulder belt to cross the middle of the
shoulder and the center of the chest.
Seatbelt Locking Modes
WARNING: If your vehicle is
involved in a crash, have the seatbelts
and associated components inspected
as soon as possible. Failure to follow this
instruction could result in personal injury
or death.
All safety restraints in the vehicle are
combination lap and shoulder belts. The
driver seatbelt has the first type of locking
mode, and the front outboard passenger
and rear seat seatbelts have both types of
locking modes described as follows:
Vehicle Sensitive Mode
This is the normal retractor mode, which
allows free shoulder belt length
adjustment to your movements and
locking in response to vehicle movement.
For example, if the driver brakes suddenly
or turns a corner sharply, or the vehicle
receives an impact of about
5 mph
(8 km/h) or more, the combination
seatbelts lock to help reduce forward
movement of the driver and passengers.
In addition, the design of the retractor is to
lock if you pull the webbing out too quickly.
If the seatbelt retractor locks, slowly lower
the height adjuster to allow the seatbelt
to retract. If the retractor does not unlock,
pull the seatbelt out slowly then feed a small length of webbing back toward the
stowed position. For rear seatbelts, recline
the rear seat backrest or push the seat
backrest cushion away from the seatbelt.
Feed a small length of webbing back
toward the stowed position.
Automatic Locking Mode
In this mode, the shoulder belt
automatically pre-locks. The belt retracts
to remove any slack in the shoulder belt.
The automatic locking mode is not
available on the driver seatbelt.
When to Use the Automatic Locking
Mode
Use this mode any time you install a child
safety seat, except a booster, in passenger
front or rear seating positions. Properly
restrain children 12 years old and under in
a rear seating position whenever possible.
See
Child Safety (page 20).
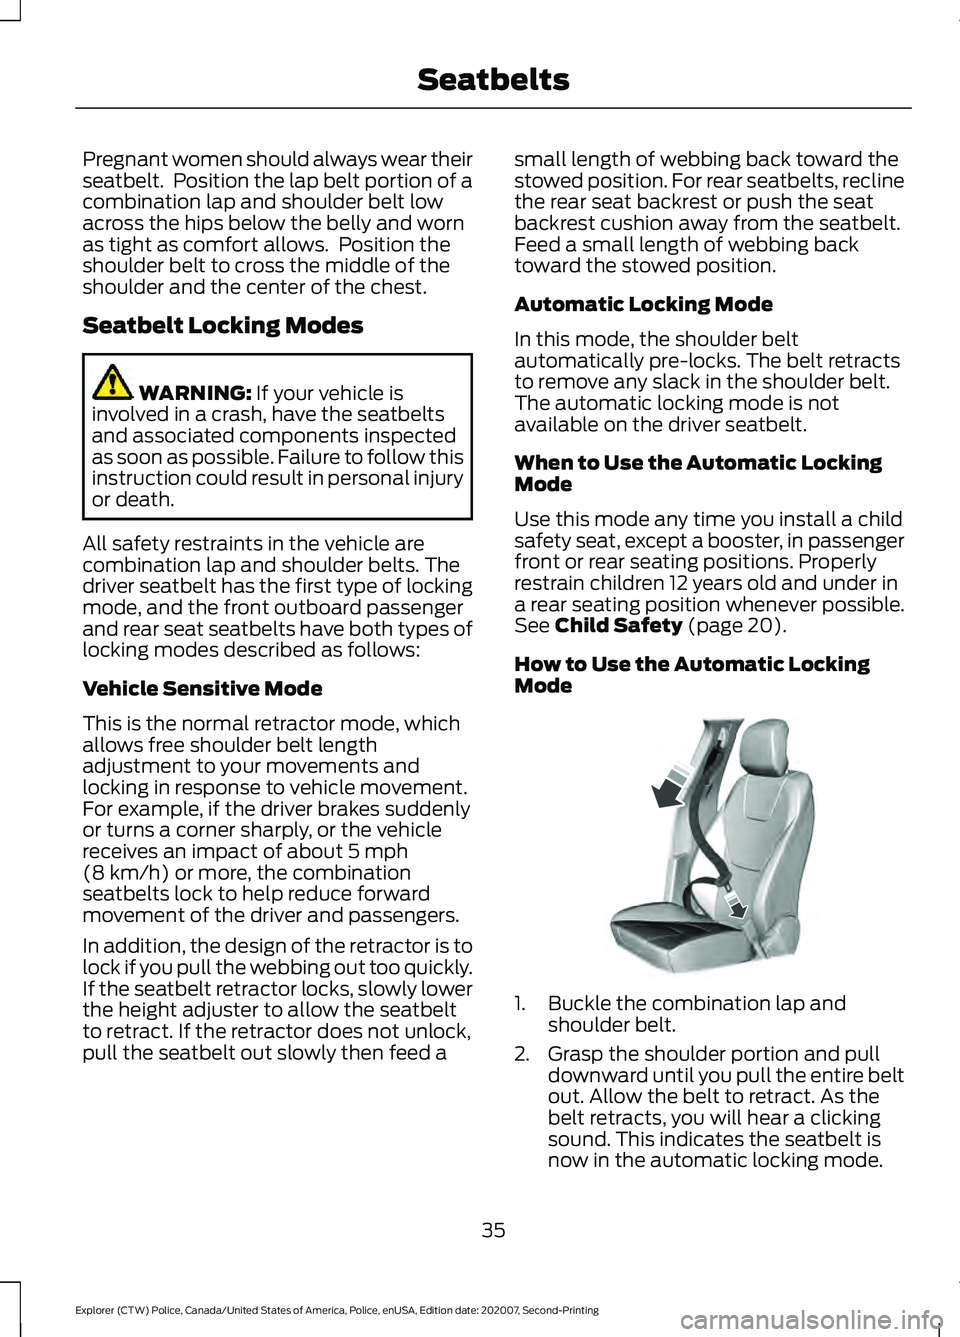
How to Use the Automatic Locking
Mode 1. Buckle the combination lap and
shoulder belt.
2. Grasp the shoulder portion and pull downward until you pull the entire belt
out. Allow the belt to retract. As the
belt retracts, you will hear a clicking
sound. This indicates the seatbelt is
now in the automatic locking mode.
35
Explorer (CTW) Police, Canada/United States of America, Police, enUSA, Edition date: 202007, Second-Printing SeatbeltsE142591
Page 50 of 412

The Safety Canopy will deploy during
significant side crashes or when a certain
likelihood of a rollover event is detected
by the rollover sensor. The Safety Canopy
is mounted to the roof side-rail sheet
metal, behind the headliner, above each
row of seats. In certain sideways crashes
or rollover events, the Safety Canopy will
be activated, regardless of which seats are
occupied. The Safety Canopy is designed
to inflate between the side window area
and occupants to further enhance
protection provided in side impact crashes
and rollover events.
The system consists of the following:
•
Safety canopy curtain airbags above
the trim panels over the front and rear
side windows identified by a label or
wording on the headliner or roof-pillar
trim.
• A flexible headliner which opens above
the side doors to allow air curtain
deployment · Crash sensors and monitoring
system with readiness indicator.
See Crash Sensors and Airbag
Indicator (page 47). Always properly restrain children 12 years
old and under in the rear seats. The Safety
Canopy will not interfere with children
restrained using a properly installed child
or booster seat because it is designed to
inflate downward from the headliner above
the doors along the side window opening.
The design and development of the Safety
Canopy included recommended testing
procedures that were developed by a
group of automotive safety experts known
as the Side Airbag Technical Working
Group. These recommended testing
procedures help reduce the risk of injuries
related to the deployment of side airbags
(including the Safety Canopy).
CRASH SENSORS AND
AIRBAG INDICATOR
WARNING:
Modifying or adding
equipment to the front end of your
vehicle (including hood, bumper system,
frame, front end body structure, tow
hooks and hood pins) may affect the
performance of the airbag system,
increasing the risk of injury. Do not
modify or add equipment to the front
end of your vehicle.
Your vehicle has a collection of crash and
occupant sensors which provide
information to the restraints control
module. The restraints control module
deploys (activates) the seatbelt
pretensioners, driver airbag, passenger
airbag, knee airbag(s), seat mounted side
airbags and the Safety Canopy. Based on
the type of crash, the restraints control
module will deploy the appropriate safety
devices.
47
Explorer (CTW) Police, Canada/United States of America, Police, enUSA, Edition date: 202007, Second-Printing Supplementary Restraints System E75004 E67017
Page 54 of 412
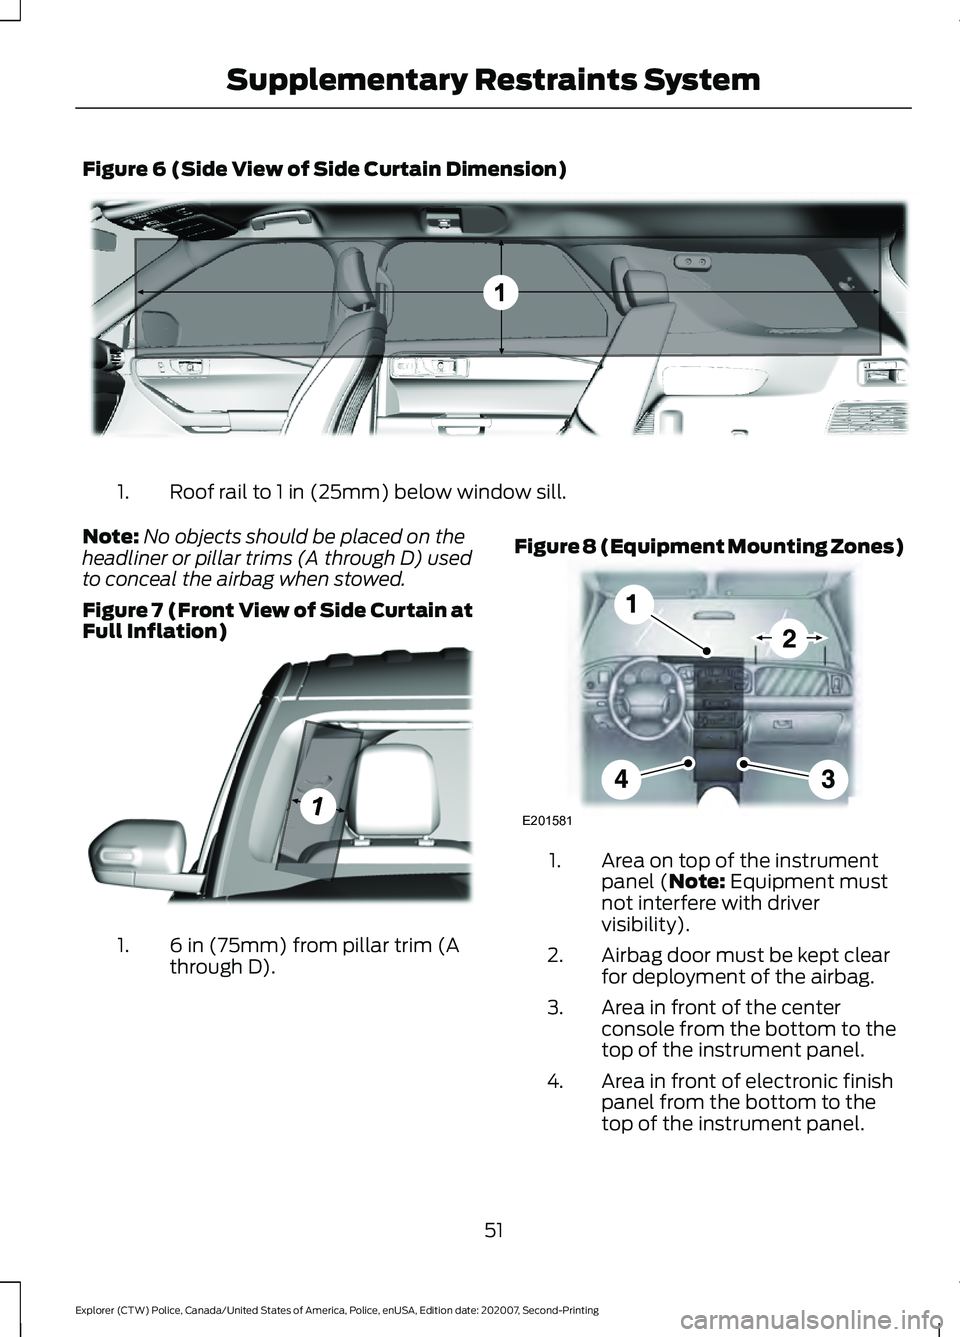
Figure 6 (Side View of Side Curtain Dimension)
Roof rail to 1 in (25mm) below window sill.
1.
Note: No objects should be placed on the
headliner or pillar trims (A through D) used
to conceal the airbag when stowed.
Figure 7 (Front View of Side Curtain at
Full Inflation) 6 in (75mm) from pillar trim (A
through D).
1. Figure 8 (Equipment Mounting Zones) Area on top of the instrument
panel (Note: Equipment must
not interfere with driver
visibility).
1.
Airbag door must be kept clear
for deployment of the airbag.
2.
Area in front of the center
console from the bottom to the
top of the instrument panel.
3.
Area in front of electronic finish
panel from the bottom to the
top of the instrument panel.
4.
51
Explorer (CTW) Police, Canada/United States of America, Police, enUSA, Edition date: 202007, Second-Printing Supplementary Restraints SystemE301094 E301077 E201581
Page 58 of 412

GENERAL INFORMATION ON
RADIO FREQUENCIES
This device complies with Part 15 of the
FCC Rules and with Licence exempt RSS
Standards of Industry Canada. Operation
is subject to the following two conditions:
•
This device may not cause harmful
interference, and
• This device must accept any
interference received, including
interference that may cause undesired
operation. WARNING: Changes or
modifications not expressively approved
by the party responsible for compliance
could void the user's authority to operate
the equipment. The term "IC:" before the
radio certification number only signifies
that Industry Canada technical
specifications were met.
The typical operating range for your
transmitter is approximately
33 ft (10 m).
Vehicles with the remote start feature will
have a greater range. One of the following
could cause a decrease in operating range:
• Weather conditions.
• Nearby radio towers.
• Structures around the vehicle.
• Other vehicles parked next to your
vehicle.
Other short distance radio transmissions,
for example amateur radios, medical
equipment, wireless headphones, remote
controls and alarm systems can also use
the radio frequency used by your remote
control. If the frequencies are jammed, you
will not be able to use your remote control.
You can lock and unlock the doors with the
key.
Note: Make sure to lock your vehicle before
leaving it unattended. Note:
If you are in range, the remote control
will operate if you press any button
unintentionally.
Note: The remote control contains sensitive
electrical components. Exposure to moisture
or impact may cause permanent damage.
REMOTE CONTROL
(IF EQUIPPED)
Note: If there is a problem with the remote
entry system, make sure to take all remote
controls with you to an authorized dealer in
order to aid in troubleshooting the problem.
Type 1 55
Explorer (CTW) Police, Canada/United States of America, Police, enUSA, Edition date: 202007, Second-Printing Keys and Remote ControlsE203600