2021 FORD POLICE INTERCEPTOR remove seats
[x] Cancel search: remove seatsPage 25 of 412

INSTALLING CHILD
RESTRAINTS
Child Seats
Use a child restraint (sometimes called an
infant carrier, convertible seat, or toddler
seat) for infants, toddlers or children
weighing 40 lb (18 kg) or less (generally
age four or younger).
Using Lap and Shoulder Belts WARNING:
Do not place a
rearward facing child restraint in front of
an active airbag. Failure to follow this
instruction could result in personal injury
or death. WARNING:
Properly secure
children 12 years old and under in a rear
seating position whenever possible. If
you are unable to properly secure all
children in a rear seating position,
properly secure the largest child on the
front seat. If you must use a forward
facing child restraint on the front seat,
move the seat as far back as possible.
Failure to follow these instructions could
result in personal injury or death. WARNING:
Depending on where
you secure a child restraint, and
depending on the child restraint design,
you may block access to certain seatbelt
buckle assemblies and LATCH lower
anchors, rendering those features
potentially unusable. To avoid risk of
injury, make sure occupants only use
seating positions where they are able to
be properly restrained.
When installing a child restraint with
combination lap and shoulder belts:
• Use the correct seatbelt buckle for that
seating position.
• Insert the belt tongue into the proper
buckle until you hear a snap and feel it
latch. Make sure the tongue is securely
fastened in the buckle.
• Keep the buckle release button
pointing up and away from the child
restraint, with the tongue between the
child restraint and the release button,
to prevent accidental unbuckling.
• Place the vehicle seat in the upright
position before you install the child
restraint.
• For second-row seating positions,
adjust the recliner slightly to improve
child restraint fit. If needed, remove the
head restraints.
• Put the seatbelt in the automatic
locking mode. See Step 5. This vehicle
does not require the use of a locking
clip.
Perform the following steps when
installing the child restraint with
combination lap and shoulder belts:
Note: Although the child restraint
illustrated is a forward facing child restraint,
the steps are the same for installing a rear
facing child restraint.
22
Explorer (CTW) Police, Canada/United States of America, Police, enUSA, Edition date: 202007, Second-Printing Child SafetyE142594
Page 32 of 412

Types of Booster Seats
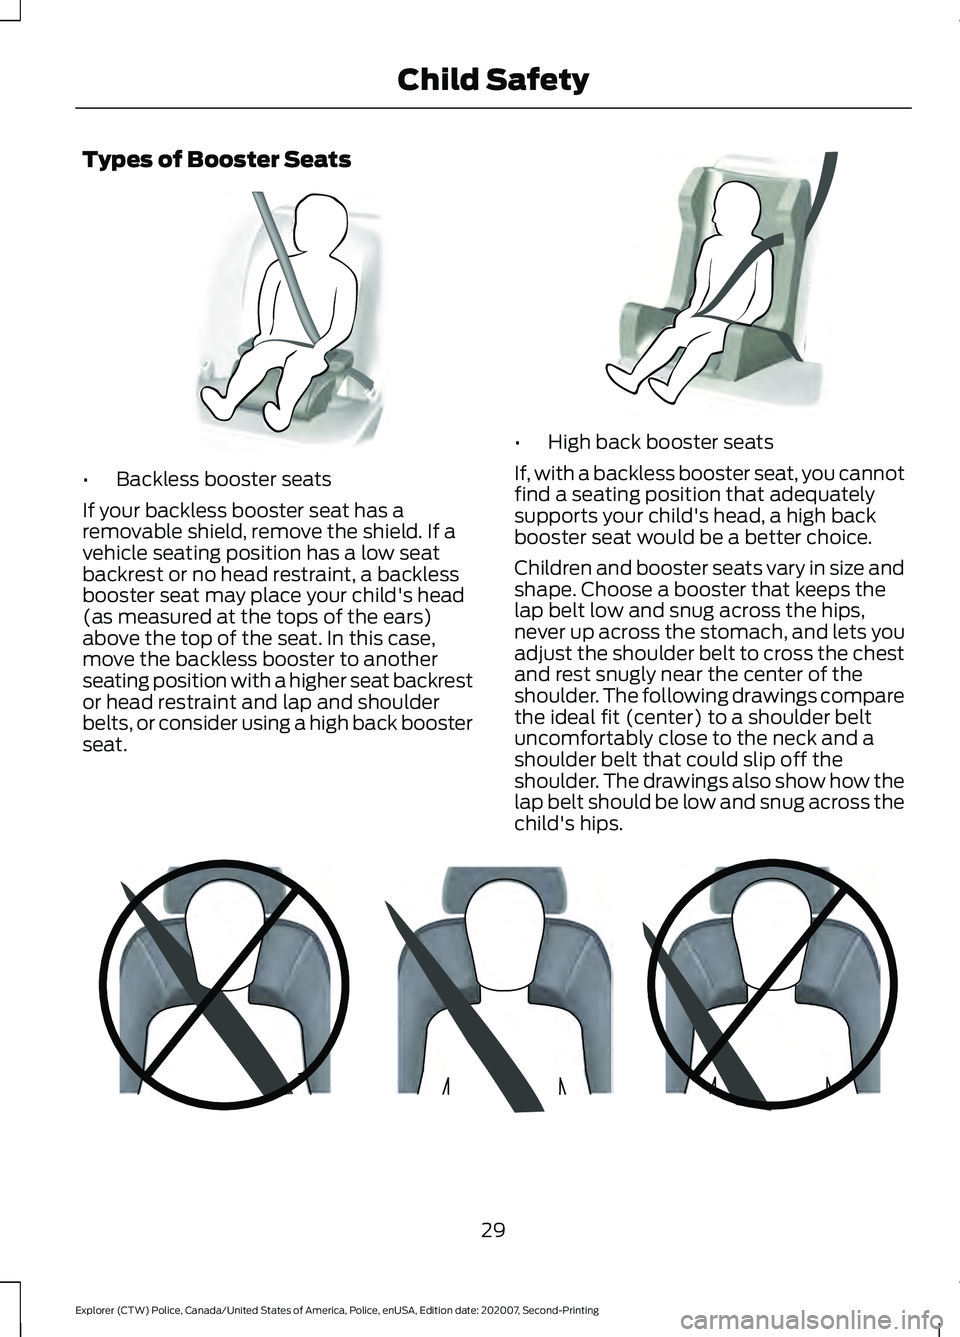
•
Backless booster seats
If your backless booster seat has a
removable shield, remove the shield. If a
vehicle seating position has a low seat
backrest or no head restraint, a backless
booster seat may place your child's head
(as measured at the tops of the ears)
above the top of the seat. In this case,
move the backless booster to another
seating position with a higher seat backrest
or head restraint and lap and shoulder
belts, or consider using a high back booster
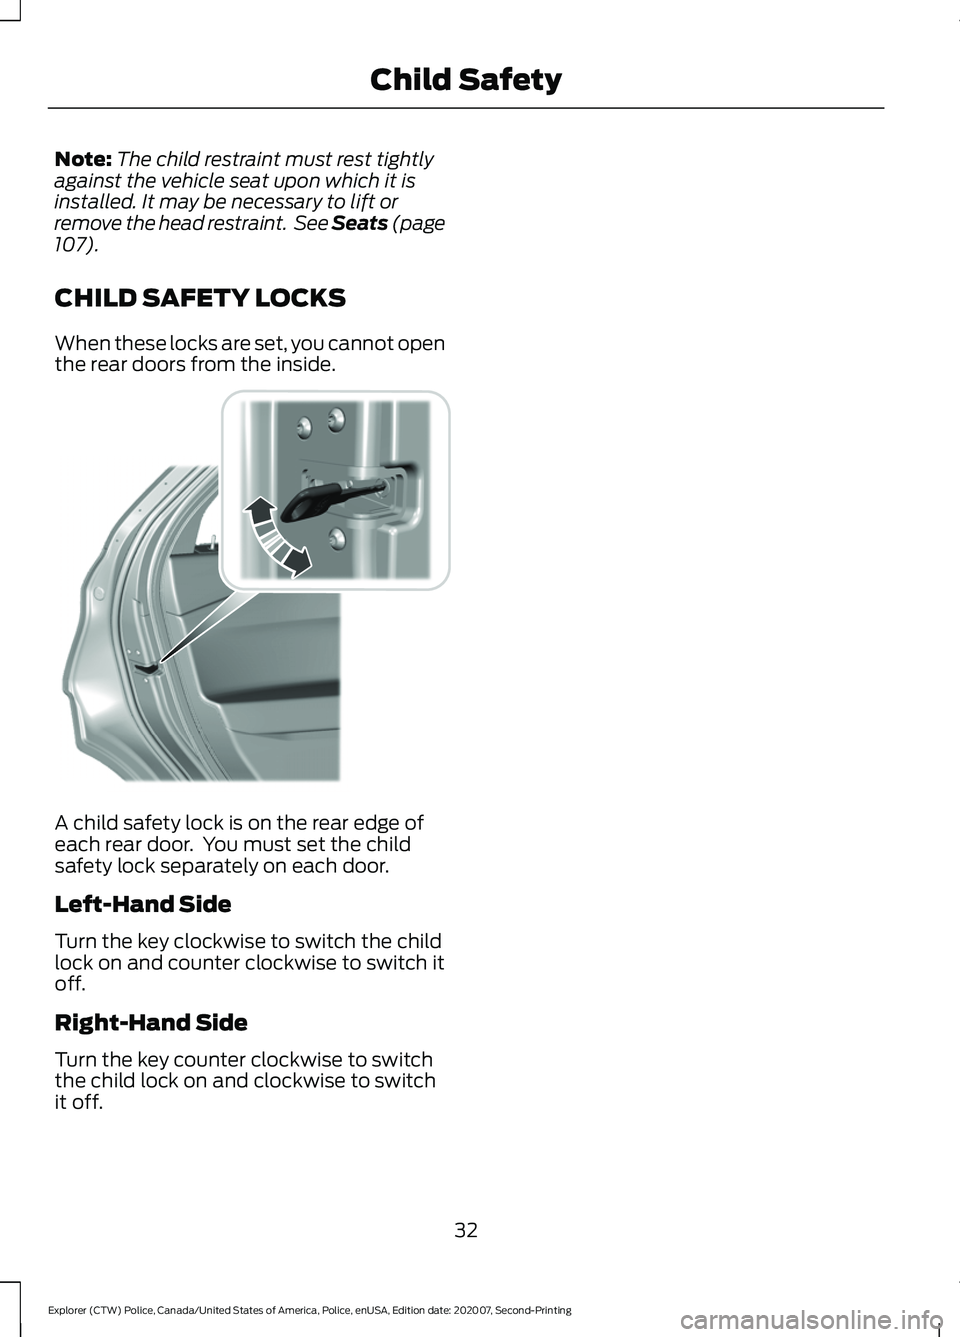
seat. •
High back booster seats
If, with a backless booster seat, you cannot
find a seating position that adequately
supports your child's head, a high back
booster seat would be a better choice.
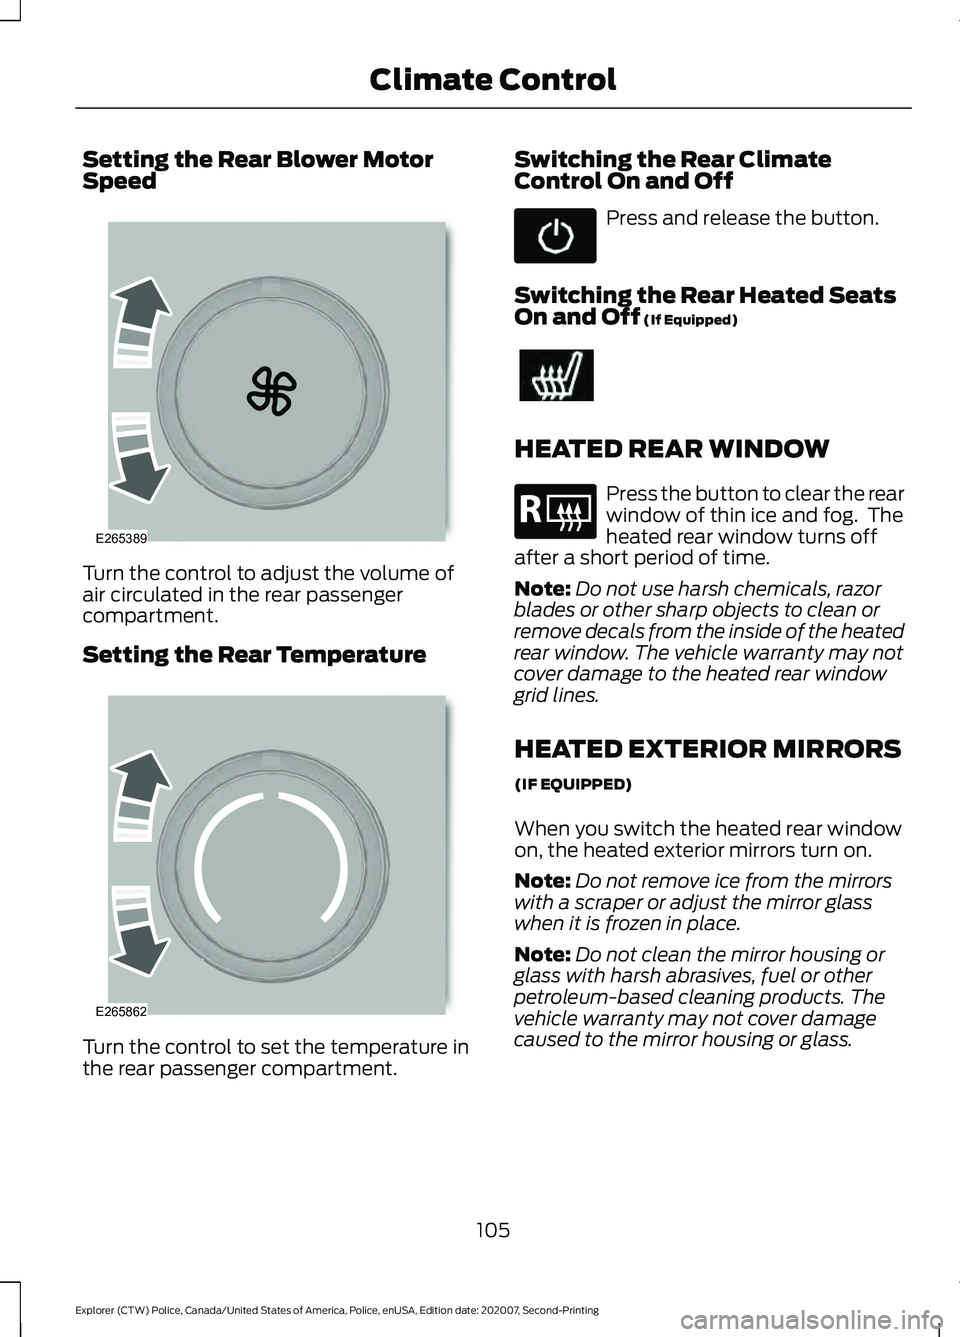
Children and booster seats vary in size and
shape. Choose a booster that keeps the
lap belt low and snug across the hips,
never up across the stomach, and lets you
adjust the shoulder belt to cross the chest
and rest snugly near the center of the
shoulder. The following drawings compare
the ideal fit (center) to a shoulder belt
uncomfortably close to the neck and a
shoulder belt that could slip off the
shoulder. The drawings also show how the
lap belt should be low and snug across the
child's hips. 29
Explorer (CTW) Police, Canada/United States of America, Police, enUSA, Edition date: 202007, Second-Printing Child SafetyE68924 E70710 E142596
Page 35 of 412

Note:
The child restraint must rest tightly
against the vehicle seat upon which it is
installed. It may be necessary to lift or
remove the head restraint. See Seats (page
107).
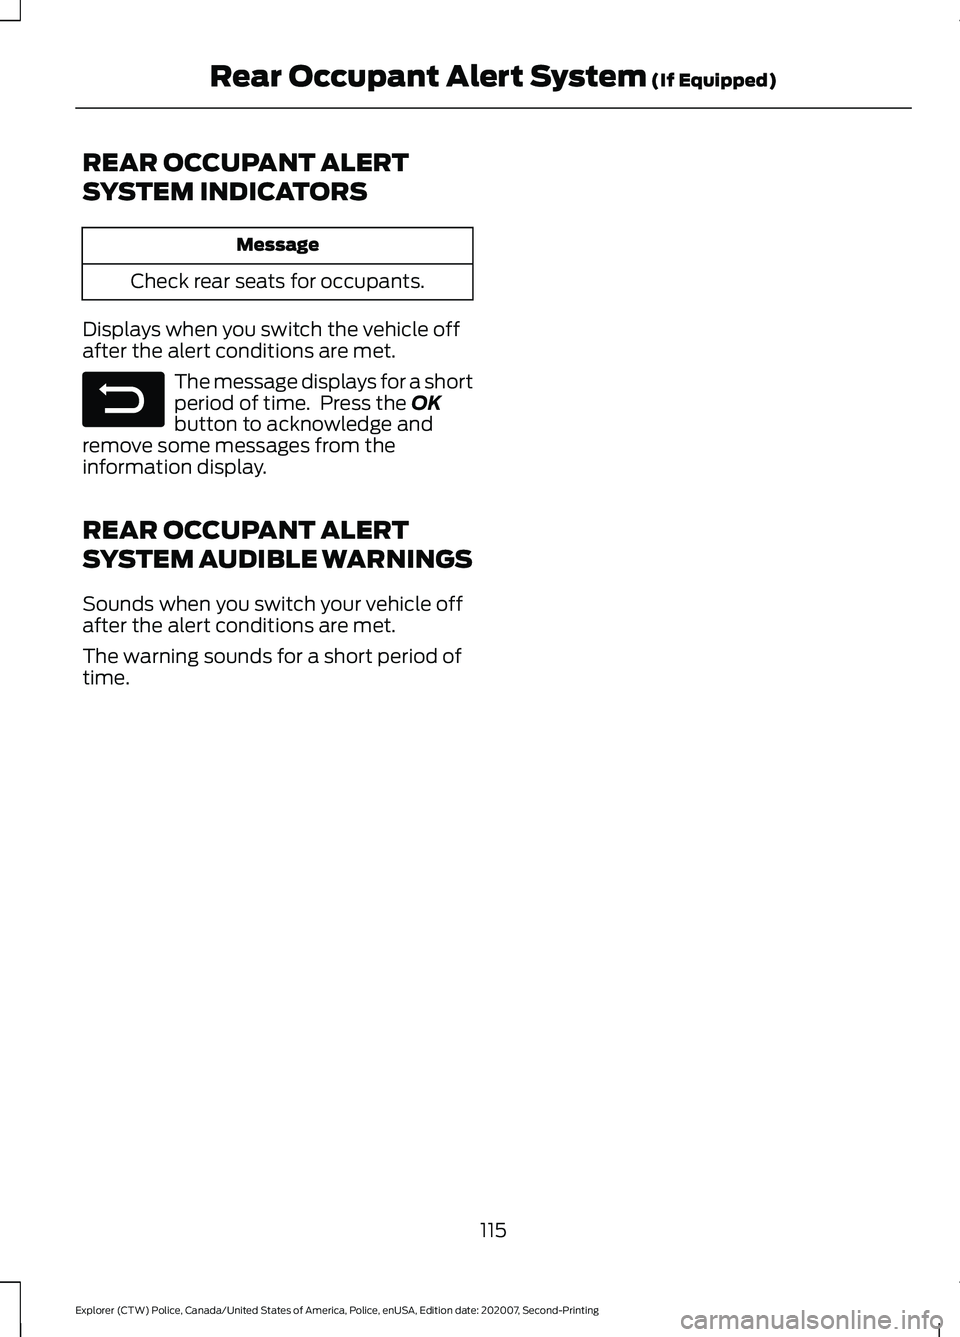
CHILD SAFETY LOCKS
When these locks are set, you cannot open
the rear doors from the inside. A child safety lock is on the rear edge of
each rear door. You must set the child
safety lock separately on each door.
Left-Hand Side
Turn the key clockwise to switch the child
lock on and counter clockwise to switch it
off.
Right-Hand Side
Turn the key counter clockwise to switch
the child lock on and clockwise to switch
it off.
32
Explorer (CTW) Police, Canada/United States of America, Police, enUSA, Edition date: 202007, Second-Printing Child SafetyE300933
Page 100 of 412

Pre-Collision Assist
Action
Message
You have a blocked sensor due to inclement weather, ice, mud or
water in front of the radar sensor. You can typically clean the sensor
to resolve.
Pre-Collision
Assist Not Avail- able SensorBlocked
A fault with the system has occurred. Have the system checked as
soon as possible.
Pre-Collision
Assist Not Avail- able
Seats Action
Message
Objects are by the passenger seat. After you move the objects awayfrom the seat, if the warning stays on or continues to come on, contact an authorized dealer as soon as possible.
Occupant Sensor
BLOCKED Remove Objects Near
Passenger Seat
Starting System Action
Message
Displays when starting the vehicle as a reminder to apply the brake.
To START Press
Brake
Displays when the starter has exceeded its cranking time inattempting to start the vehicle.
Cranking Time
Exceeded
Displays when the starter is attempting to start the vehicle.
Engine Start
Pending Please Wait
Displays when the pending start has been cancelled.
Pending Start
Cancelled
Your vehicle is ready to drive.
Ready to Drive
97
Explorer (CTW) Police, Canada/United States of America, Police, enUSA, Edition date: 202007, Second-Printing Information Displays
Page 106 of 412

Switching Maximum Air
Conditioning On and Off
Press and release the button for
maximum cooling.
The driver and passenger temperatures
are set to LO, recirculated air flows through
the instrument panel air vents, air
conditioning turns on and the blower motor
adjusts to the highest speed.
Switching Maximum Defrost On
and Off Press and release the button for
maximum defrosting.
The driver and passenger temperatures
are set to HI, air flows through the
windshield air vents, and the blower motor
adjusts to the highest speed.
Note: Depending on your region, air
conditioning turns on.
You can also use this setting to defog and
clear the windshield of a thin covering of
ice.
Note: To prevent window fogging, you
cannot select recirculated air when
maximum defrost is on.
Note: The heated rear window also turns
on when you select maximum defrost.
Switching Recirculated Air On and
Off Press and release the button to
switch between outside air and
recirculated air.
The air currently in the passenger
compartment recirculates. This may
reduce the time needed to cool the interior,
when used with A/C, and reduce unwanted
odors from entering your vehicle. Note:
Recirculated air may turn off, or
prevent you from switching on, in all air flow
modes except MAX A/C to reduce the risk
of fogging. Recirculation may also turn on
and off in various air distribution control
combinations during hot weather to improve
cooling efficiency.
HINTS ON CONTROLLING THE
INTERIOR CLIMATE
General Hints
Note: Prolonged use of recirculated air may
cause the windows to fog up.
Note: You may feel a small amount of air
from the footwell air vents regardless of the
air distribution setting.
Note: To reduce humidity build-up inside
your vehicle, do not drive with the system
switched off or with recirculated air always
switched on.
Note: Do not place objects under the front
seats as this may interfere with the airflow
to the rear seats.
Note: Remove any snow, ice or leaves from
the air intake area at the base of the
windshield.
Note: To improve the time to reach a
comfortable temperature in hot weather,
drive with the windows open until you feel
cold air through the air vents.
Automatic Climate Control
Note: Adjusting the settings when your
vehicle interior is extremely hot or cold is
not necessary. Automatic mode is best
recommended to maintain set temperature.
Note: The system adjusts to heat or cool
the interior to the temperature you select
as quickly as possible.
Note: For the system to function efficiently,
the instrument panel and side air vents
should be fully open.
103
Explorer (CTW) Police, Canada/United States of America, Police, enUSA, Edition date: 202007, Second-Printing Climate Control
Page 108 of 412

Setting the Rear Blower Motor
Speed
Turn the control to adjust the volume of
air circulated in the rear passenger
compartment.
Setting the Rear Temperature
Turn the control to set the temperature in
the rear passenger compartment. Switching the Rear Climate
Control On and Off Press and release the button.
Switching the Rear Heated Seats
On and Off (If Equipped) HEATED REAR WINDOW
Press the button to clear the rear
window of thin ice and fog. The
heated rear window turns off
after a short period of time.
Note: Do not use harsh chemicals, razor
blades or other sharp objects to clean or
remove decals from the inside of the heated
rear window. The vehicle warranty may not
cover damage to the heated rear window
grid lines.
HEATED EXTERIOR MIRRORS
(IF EQUIPPED)
When you switch the heated rear window
on, the heated exterior mirrors turn on.
Note: Do not remove ice from the mirrors
with a scraper or adjust the mirror glass
when it is frozen in place.
Note: Do not clean the mirror housing or
glass with harsh abrasives, fuel or other
petroleum-based cleaning products. The
vehicle warranty may not cover damage
caused to the mirror housing or glass.
105
Explorer (CTW) Police, Canada/United States of America, Police, enUSA, Edition date: 202007, Second-Printing Climate ControlE265389 E265862 E184884
Page 118 of 412

REAR OCCUPANT ALERT
SYSTEM INDICATORS
Message
Check rear seats for occupants.
Displays when you switch the vehicle off
after the alert conditions are met. The message displays for a short
period of time. Press the OK
button to acknowledge and
remove some messages from the
information display.
REAR OCCUPANT ALERT
SYSTEM AUDIBLE WARNINGS
Sounds when you switch your vehicle off
after the alert conditions are met.
The warning sounds for a short period of
time.
115
Explorer (CTW) Police, Canada/United States of America, Police, enUSA, Edition date: 202007, Second-Printing Rear Occupant Alert System
(If Equipped)E281480
Page 235 of 412

WARNING: Battery posts,
terminals and related accessories
contain lead and lead compounds,
chemicals known to the State of
California to cause cancer and
reproductive harm. Wash your hands
after handling
. WARNING:
This vehicle may have
more than one battery. Removing the
battery cables from only one battery
does not disconnect your vehicle
electrical system. Make sure you
disconnect the battery cables from all
batteries when disconnecting power.
Failure to do so may cause serious
personal injury or property damage. WARNING:
For vehicles with
Auto-Start-Stop the battery requirement
is different. You must replace the battery
with one of exactly the same
specification.
The battery is in the engine compartment.
See
Under Hood Overview (page 220).
Your vehicle has a maintenance-free
battery. It does not require additional
water during service.
If the vehicle battery has a cover and vent
hose, make sure you correctly install it after
cleaning or replacing the battery.
For longer, trouble-free operation, keep the
top of the battery clean and dry and the
battery cables tightly fastened to the
battery terminals. If any corrosion is
present on the battery or terminals, remove
the cables from the terminals and clean
with a wire brush. You can neutralize the
acid with a solution of baking soda and
water.
We recommend that you disconnect the
negative battery cable terminal from the
battery if you plan to store your vehicle for
an extended period. Note:
If you only disconnect the negative
battery cable terminal, make sure it is
isolated or placed away from the battery
terminal to avoid unintended connection or
arcing.
If you replace the battery make sure it
matches the electrical requirements of
your vehicle.
If you disconnect or replace the battery
and your vehicle has an automatic
transmission, it must relearn its adaptive
strategy. Because of this, the transmission
may shift firmly when first driven. This is
normal operation while the transmission
fully updates its operation to optimum
shift feel.
Battery Management System
(If
Equipped)
The battery management system monitors
battery conditions and takes actions to
extend battery life. If excessive battery
drain is detected, the system temporarily
disables some electrical systems to
protect the battery.
Systems included are:
• Heated rear window.
• Heated seats.
• Climate control.
• Heated steering wheel.
• Audio unit.
• Navigation system.
A message may appear in the information
displays to alert you that battery
protection actions are active. These
messages are only for notification that an
action is taking place, and not intended to
indicate an electrical problem or that the
battery requires replacement.
232
Explorer (CTW) Police, Canada/United States of America, Police, enUSA, Edition date: 202007, Second-Printing Maintenance