2021 FORD POLICE INTERCEPTOR mirror
[x] Cancel search: mirrorPage 5 of 412

Audio Control
.................................................65
Voice Control ..................................................
66
Cruise Control ................................................
66
Information Display Control .....................
66
Horn ...................................................................
66
Wipers and Washers
Windshield Wipers ........................................
67
Windshield Washers ....................................
67
Rear Window Wiper and Washers ..........
67
Lighting
General Information ....................................
69
Lighting Control .............................................
69
Autolamps .......................................................
70
Instrument Lighting Dimmer ......................
71
Daytime Running Lamps - Vehicles With: Configurable Daytime Running Lamps
........................................................................\
....
71
Daytime Running Lamps - Vehicles With: Daytime Running Lamps (DRL) ...........
71
Direction Indicators ........................................
71
Interior Lamps .................................................
72
Windows and Mirrors
Power Windows .............................................
74
Exterior Mirrors ................................................
75
Interior Mirror ...................................................
76
Sun Visors .........................................................
77
Instrument Cluster
Gauges ..............................................................
78
Warning Lamps and Indicators ................
79
Audible Warnings and Indicators ............
82
Information Displays
General Information ....................................
84
Information Messages .................................
87Climate Control
Automatic Climate Control
......................
101
Hints on Controlling the Interior Climate ........................................................................\
.
103
Rear Passenger Climate Controls .........
104
Heated Rear Window .................................
105
Heated Exterior Mirrors .............................
105
Interior Air Quality
What Is the Cabin Air Filter ......................
106
Replacing the Cabin Air Filter .................
106
Seats
Sitting in the Correct Position .................
107
Head Restraints ............................................
107
Manual Seats ................................................
109
Power Seats ...................................................
110
Rear Seats .......................................................
112
Rear Occupant Alert System
What is the Rear Occupant Alert System ........................................................................\
..
114
How Does the Rear Occupant Alert System Work ..............................................
114
Rear Occupant Alert System Precautions ........................................................................\
..
114
Rear Occupant Alert System Limitations ........................................................................\
..
114
Switching Rear Occupant Alert System On and Off ..................................................
114
Rear Occupant Alert System Indicators ........................................................................\
..
115
Rear Occupant Alert System Audible Warnings ......................................................
115
Auxiliary Power Points
Auxiliary Power Points ................................
116
2
Explorer (CTW) Police, Canada/United States of America, Police, enUSA, Edition date: 202007, Second-Printing Table of Contents
Page 77 of 412

POWER WINDOWS
WARNING: Do not leave children
unattended in your vehicle and do not
let them play with the power windows.
Failure to follow this instruction could
result in personal injury. WARNING:
When closing the
power windows, verify they are free of
obstruction and make sure that children
and pets are not in the proximity of the
window openings. Note:
You may hear a pulsing noise when
just one of the windows is open. Lower the
opposite window slightly to reduce this
noise.
Press the switch to open the window.
Lift the switch to close the window.
One-Touch Down
Note: One-touch down applies to the front
windows only.
Press the switch fully and release it. Press
again or lift it to stop the window.
One-Touch Up
Note: One-touch up applies to the front
windows only. Lift the switch fully and release it. Press or
lift it again to stop the window.
Resetting One-Touch Up
Start the engine.
1. Lift and hold the window switch until
you fully close the door window.
Continue to hold the switch for a few
seconds after you close the window.
2. Release the window switch.
3. Press and hold the window switch until
you fully open the door window.
4. Release the window switch.
5. Lift and hold the window switch until you fully close the window.
6. Test for correct window operation by carrying out the one-touch down and
one-touch up features.
Bounce-Back
The window will stop automatically while
closing. It reverses some distance if there
is an obstacle in the way.
Overriding the Bounce-Back Feature WARNING:
If you override
bounce-back, the window does not
reverse if it detects an obstacle. Take
care when closing the windows to avoid
personal injury or damage to your
vehicle.
The window stops if you release the switch
before the window fully closes. Pull up the
window switch and hold within a few
seconds of the window reaching the
bounce-back position. The window travels
up with no bounce-back protection.
74
Explorer (CTW) Police, Canada/United States of America, Police, enUSA, Edition date: 202007, Second-Printing Windows and MirrorsE295317
Page 78 of 412

Window Lock
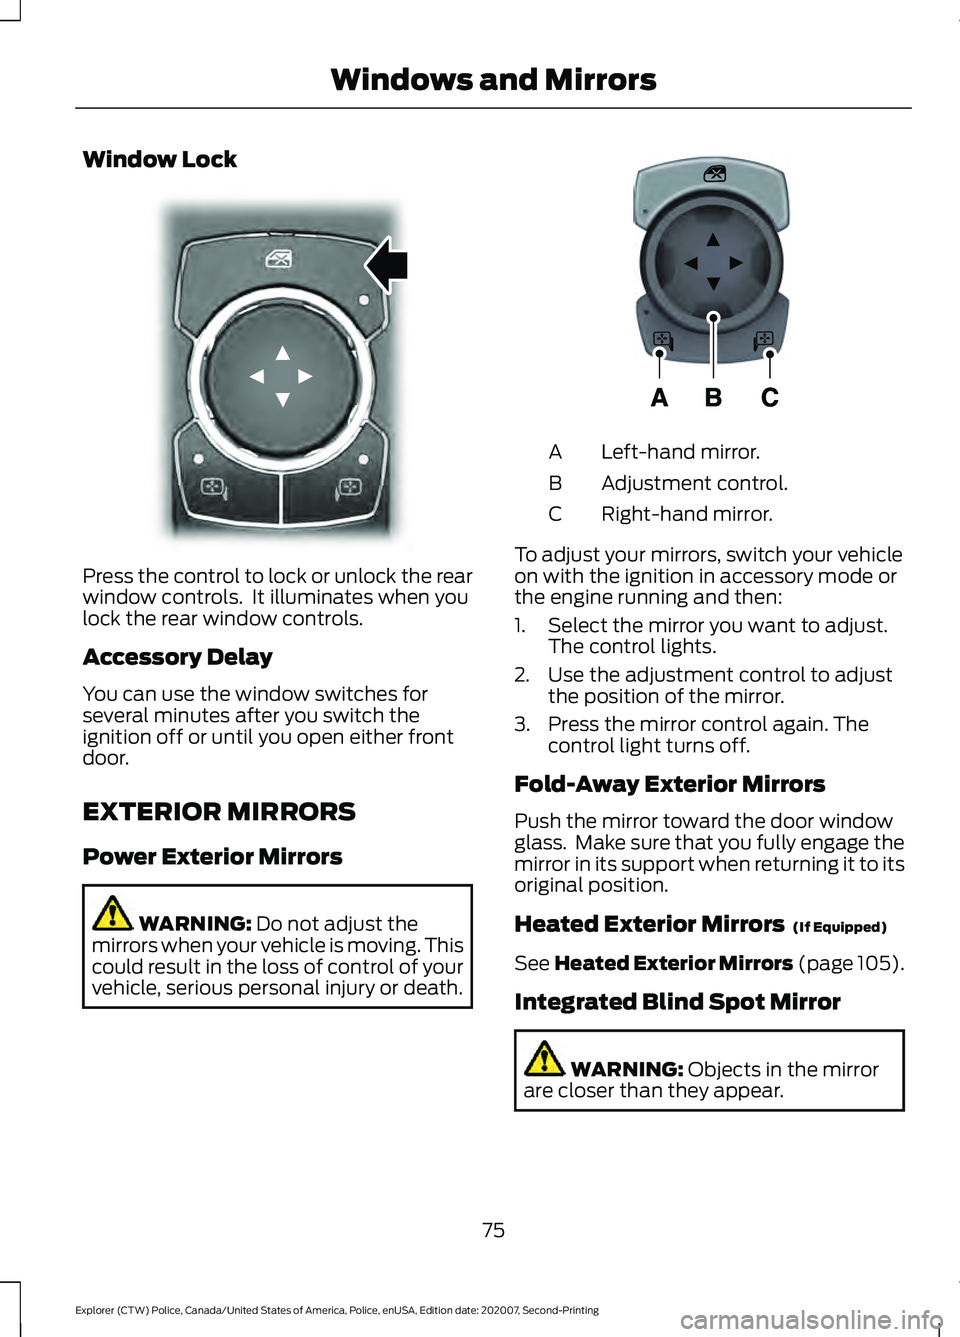
Press the control to lock or unlock the rear
window controls. It illuminates when you
lock the rear window controls.
Accessory Delay
You can use the window switches for
several minutes after you switch the
ignition off or until you open either front
door.
EXTERIOR MIRRORS
Power Exterior Mirrors
WARNING: Do not adjust the
mirrors when your vehicle is moving. This
could result in the loss of control of your
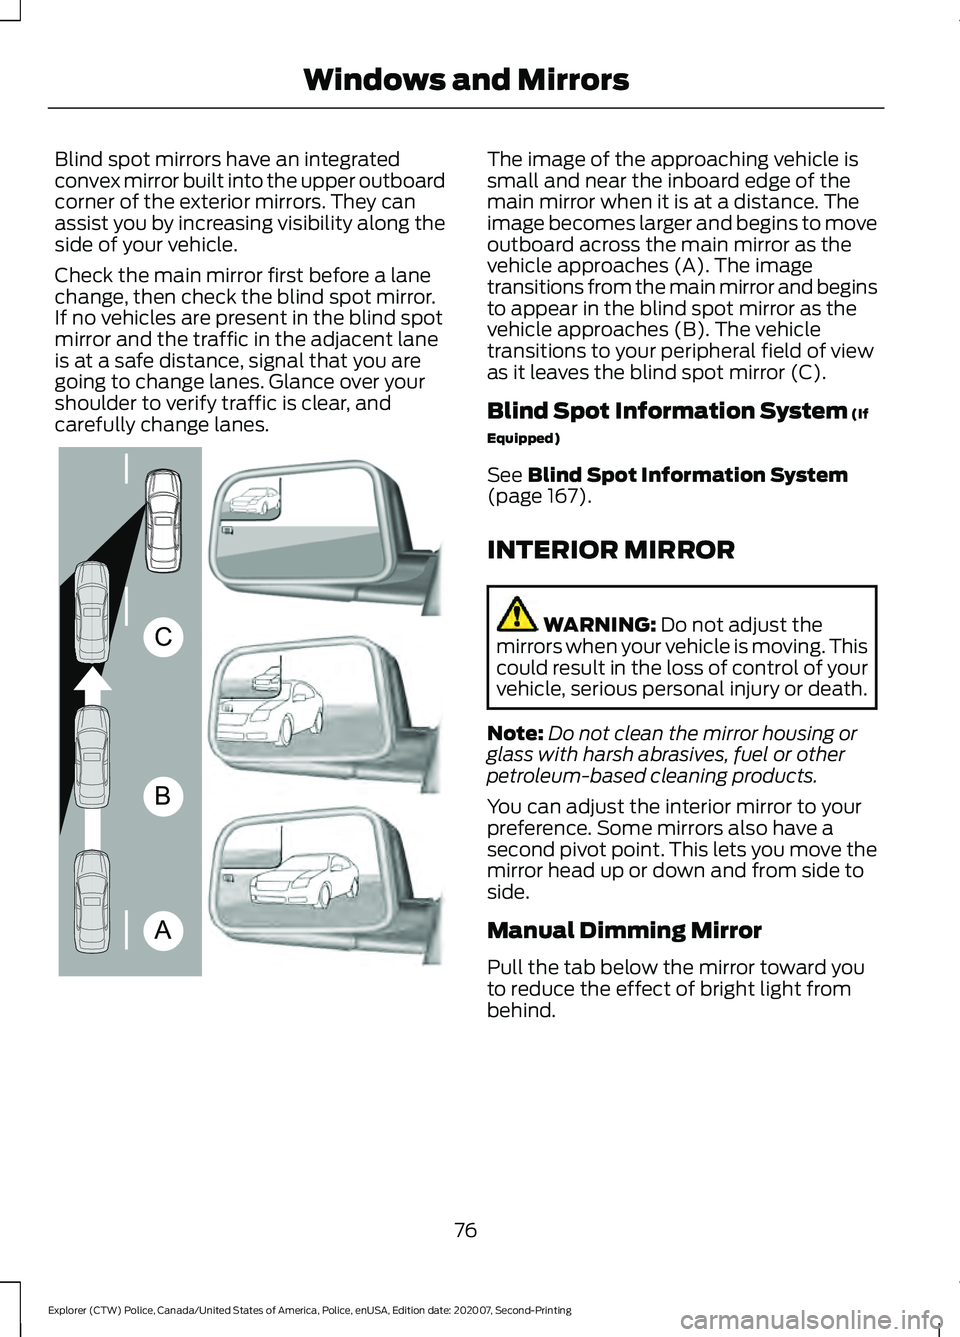
vehicle, serious personal injury or death. Left-hand mirror.
A
Adjustment control.
B
Right-hand mirror.
C
To adjust your mirrors, switch your vehicle
on with the ignition in accessory mode or
the engine running and then:
1. Select the mirror you want to adjust. The control lights.
2. Use the adjustment control to adjust the position of the mirror.
3. Press the mirror control again. The control light turns off.
Fold-Away Exterior Mirrors
Push the mirror toward the door window
glass. Make sure that you fully engage the
mirror in its support when returning it to its
original position.
Heated Exterior Mirrors (If Equipped)
See
Heated Exterior Mirrors (page 105).
Integrated Blind Spot Mirror WARNING:
Objects in the mirror
are closer than they appear.
75
Explorer (CTW) Police, Canada/United States of America, Police, enUSA, Edition date: 202007, Second-Printing Windows and MirrorsE304222 E297114
Page 79 of 412

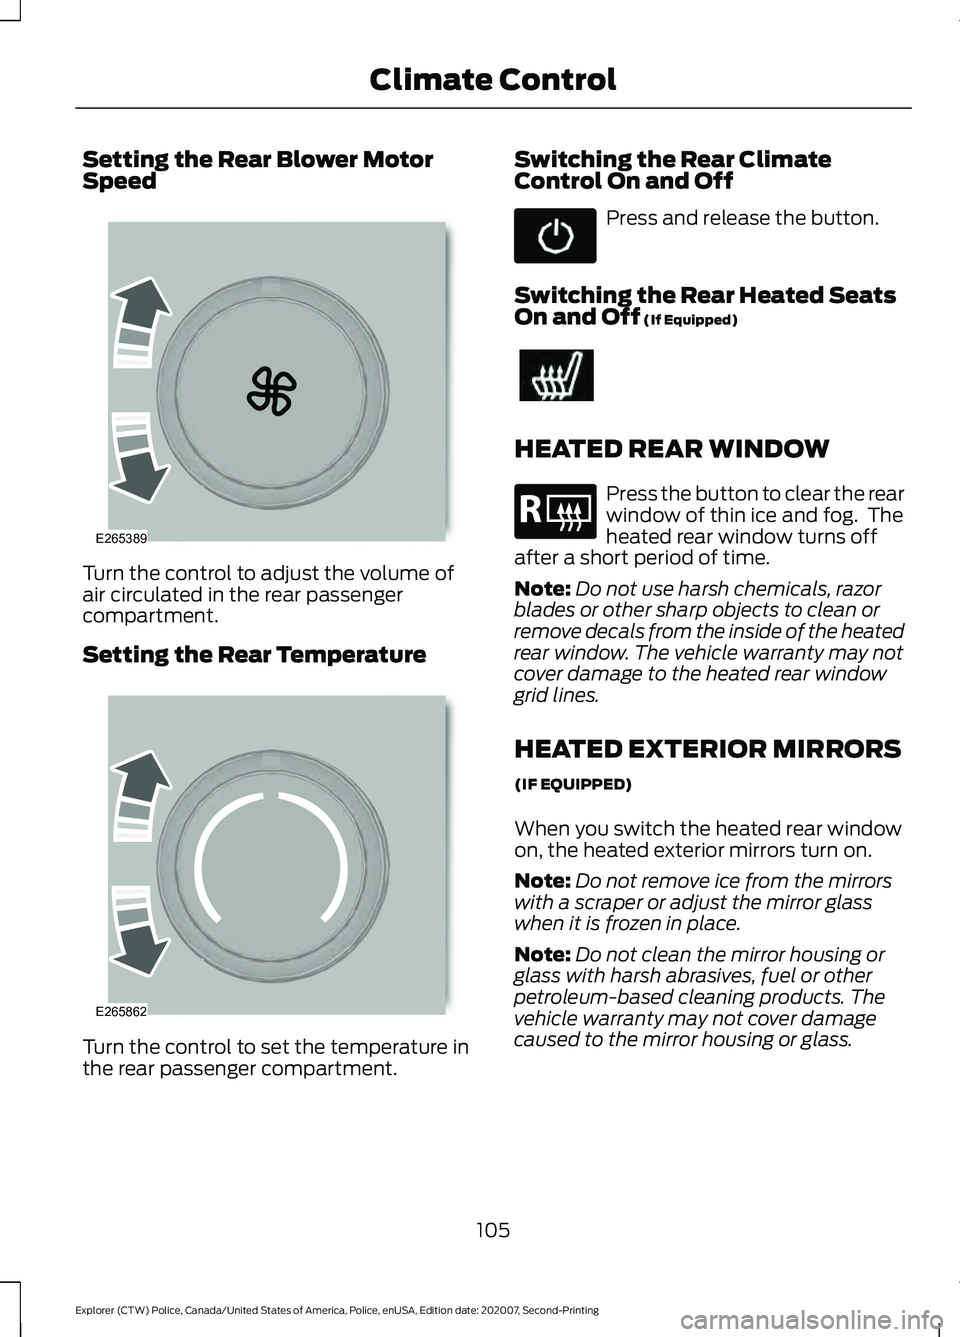
Blind spot mirrors have an integrated
convex mirror built into the upper outboard
corner of the exterior mirrors. They can
assist you by increasing visibility along the
side of your vehicle.
Check the main mirror first before a lane
change, then check the blind spot mirror.
If no vehicles are present in the blind spot
mirror and the traffic in the adjacent lane
is at a safe distance, signal that you are
going to change lanes. Glance over your
shoulder to verify traffic is clear, and
carefully change lanes. The image of the approaching vehicle is
small and near the inboard edge of the
main mirror when it is at a distance. The
image becomes larger and begins to move
outboard across the main mirror as the
vehicle approaches (A). The image
transitions from the main mirror and begins
to appear in the blind spot mirror as the
vehicle approaches (B). The vehicle
transitions to your peripheral field of view
as it leaves the blind spot mirror (C).
Blind Spot Information System (If
Equipped)
See
Blind Spot Information System
(page 167).
INTERIOR MIRROR WARNING:
Do not adjust the
mirrors when your vehicle is moving. This
could result in the loss of control of your
vehicle, serious personal injury or death.
Note: Do not clean the mirror housing or
glass with harsh abrasives, fuel or other
petroleum-based cleaning products.
You can adjust the interior mirror to your
preference. Some mirrors also have a
second pivot point. This lets you move the
mirror head up or down and from side to
side.
Manual Dimming Mirror
Pull the tab below the mirror toward you
to reduce the effect of bright light from
behind.
76
Explorer (CTW) Police, Canada/United States of America, Police, enUSA, Edition date: 202007, Second-Printing Windows and MirrorsA
B
CE138665
Page 80 of 412

Automatic Dimming Mirror (If Equipped)
Note:
Do not block the sensors on the front
and back of the mirror. A rear center
passenger or raised rear center head
restraint may also block light from reaching
the sensor.
The mirror dims to reduce the effect of
bright light from behind. It returns to
normal when the bright light from behind
is no longer present or if you shift into
reverse (R).
SUN VISORS
Slide-on-rod (If Equipped) Rotate the sun visor toward the side
window and extend it rearward for extra
shade.
77
Explorer (CTW) Police, Canada/United States of America, Police, enUSA, Edition date: 202007, Second-Printing Windows and MirrorsE138666
Page 108 of 412

Setting the Rear Blower Motor
Speed
Turn the control to adjust the volume of
air circulated in the rear passenger
compartment.
Setting the Rear Temperature
Turn the control to set the temperature in
the rear passenger compartment. Switching the Rear Climate
Control On and Off Press and release the button.
Switching the Rear Heated Seats
On and Off (If Equipped) HEATED REAR WINDOW
Press the button to clear the rear
window of thin ice and fog. The
heated rear window turns off
after a short period of time.
Note: Do not use harsh chemicals, razor
blades or other sharp objects to clean or
remove decals from the inside of the heated
rear window. The vehicle warranty may not
cover damage to the heated rear window
grid lines.
HEATED EXTERIOR MIRRORS
(IF EQUIPPED)
When you switch the heated rear window
on, the heated exterior mirrors turn on.
Note: Do not remove ice from the mirrors
with a scraper or adjust the mirror glass
when it is frozen in place.
Note: Do not clean the mirror housing or
glass with harsh abrasives, fuel or other
petroleum-based cleaning products. The
vehicle warranty may not cover damage
caused to the mirror housing or glass.
105
Explorer (CTW) Police, Canada/United States of America, Police, enUSA, Edition date: 202007, Second-Printing Climate ControlE265389 E265862 E184884
Page 164 of 412

Object Distance Indicator (If Equipped)
The system provides object distance
indication through the information display.
•
As the distance to the object
decreases, the indicator blocks
illuminate and move toward the vehicle
icon.
• If the system does not detect an object,
the distance indicator blocks are gray.
When you shift into reverse (R), the system
provides audible warnings and visual
indication when your vehicle is moving and
the detected object is moving toward your
vehicle. When you stop your vehicle, the
audible warnings stop after two seconds.
Visual indication remains on when the
transmission is in reverse (R). REAR VIEW CAMERA WARNING: The rear view camera
system is a reverse aid supplement
device that still requires the driver to use
it in conjunction with the interior and
exterior mirrors for maximum coverage. WARNING:
Objects that are close
to either corner of the bumper or under
the bumper, might not be seen on the
screen due to the limited coverage of the
camera system. WARNING:
Reverse your vehicle
slowly. Failure to follow this instruction
could result in the loss of control of your
vehicle, personal injury or death. WARNING:
Use caution when the
rear cargo door is ajar. If the rear cargo
door is ajar, the camera will be out of
position and the video image could be
incorrect. All guide lines disappear when
the rear cargo door is ajar. Failure to
follow this instruction could result in
personal injury. WARNING:
Use caution when
turning camera features on or off when
the transmission is not in park (P). Make
sure your vehicle is not moving.
The rear view camera provides a video
image of the area behind your vehicle.
During operation, lines appear in the
display representing the proximity to
objects behind your vehicle.
161
Explorer (CTW) Police, Canada/United States of America, Police, enUSA, Edition date: 202007, Second-Printing Parking AidsE190459
Page 166 of 412

Camera Guide Lines
Active guide lines.
A
Centerline.
B
Fixed guideline: Green zone.
C
Fixed guideline: Yellow zone.
D
Fixed guideline: Red zone.
E
Rear bumper.
F
Active guide lines are only shown with fixed
guide lines. To use active guide lines, turn
the steering wheel to point the guide lines
toward an intended path. If you change the
steering wheel position when reversing,
your vehicle could deviate from the original
intended path. The fixed and active guide lines fade in and
out depending on the steering wheel
position. The active guide lines do not
display when the steering wheel position
is straight.
Use caution when reversing. Objects in the
red zone are closest to your vehicle and
objects in the green zone are farther away.
Objects are getting closer to your vehicle
as they move from the green zone to the
yellow or red zones. Use the side view
mirrors and rear view mirror to get better
coverage on both sides and rear of the
vehicle.
Note:
Guide lines are not available on some
vehicles.
Note: Active guide lines are only available
when the transmission is in reverse (R).
Obstacle Distance Indicator (If
Equipped) The system provides an image of your
vehicle and the sensor zones. The zones
highlight green, yellow and red when the
parking aid sensors detect an object in the
coverage area.
163
Explorer (CTW) Police, Canada/United States of America, Police, enUSA, Edition date: 202007, Second-Printing Parking AidsABCD
F
E
E142436 E190459