2021 FORD POLICE INTERCEPTOR service
[x] Cancel search: servicePage 233 of 412

1. Stop your vehicle as soon as it is safe
to do so. Fully apply the parking brake,
shift into park (P) or neutral (N).
2. Leave the engine running until the coolant temperature gauge needle
returns to the normal position. If the
temperature does not drop after
several minutes, follow the remaining
steps.
3. Switch the engine off and wait for it to
cool. Check the coolant level.
4. If the coolant level is at or below the minimum mark, add prediluted coolant
immediately.
5. If the coolant level is normal, restart the engine and continue.
AUTOMATIC TRANSMISSION
FLUID CHECK
If required, have an authorized dealer check
and change the transmission fluid at the
correct service interval. See Scheduled
Maintenance (page 326).
The automatic transmission does not have
a transmission fluid dipstick.
Refer to your scheduled maintenance
information for scheduled intervals for fluid
checks and changes. Your transmission
does not consume fluid. However, if the
transmission slips, shifts slowly or if you
notice a sign of leaking fluid, contact an
authorized dealer.
Do not use supplemental transmission
fluid additives, treatments or cleaning
agents. The use of these materials may
affect transmission operation and result
in damage to internal transmission
components. BRAKE FLUID CHECK WARNING:
Do not use any fluid
other than the recommended brake fluid
as this will reduce brake efficiency. Use
of incorrect fluid could result in the loss
of vehicle control, serious personal injury
or death. WARNING:
Only use brake fluid
from a sealed container. Contamination
with dirt, water, petroleum products or
other materials may result in brake
system damage or failure. Failure to
adhere to this warning could result in the
loss of vehicle control, serious personal
injury or death. WARNING:
Do not allow the fluid
to touch your skin or eyes. If this
happens, rinse the affected areas
immediately with plenty of water and
contact your physician. WARNING:
The brake system
could be affected if the brake fluid level
is below the MIN mark or above the MAX
mark on the brake fluid reservoir.
230
Explorer (CTW) Police, Canada/United States of America, Police, enUSA, Edition date: 202007, Second-Printing Maintenance
Page 234 of 412

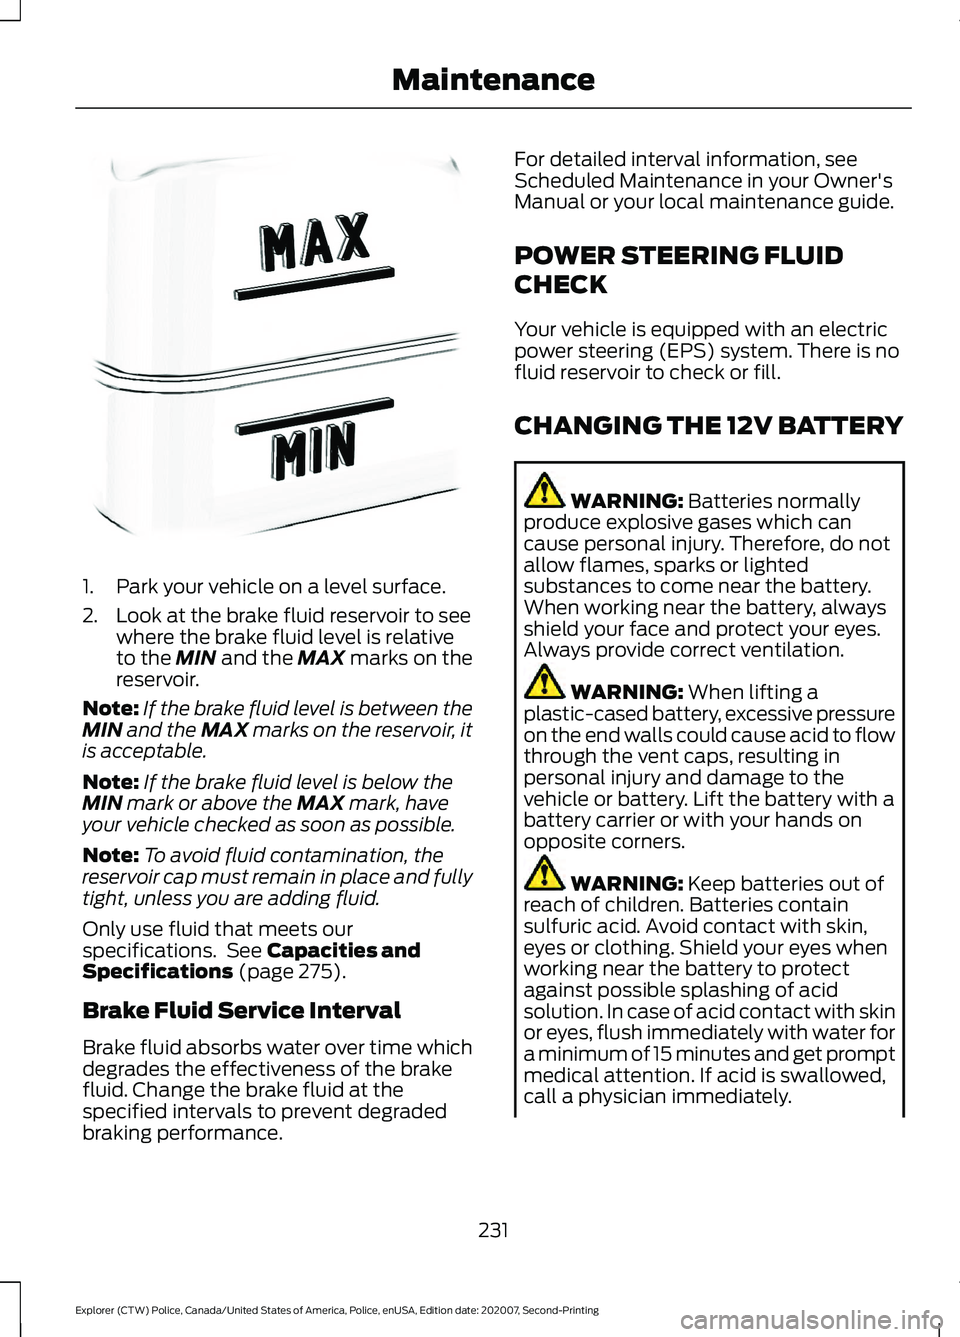
1. Park your vehicle on a level surface.
2. Look at the brake fluid reservoir to see
where the brake fluid level is relative
to the MIN and the MAX marks on the
reservoir.
Note: If the brake fluid level is between the
MIN
and the MAX marks on the reservoir, it
is acceptable.
Note: If the brake fluid level is below the
MIN
mark or above the MAX mark, have
your vehicle checked as soon as possible.
Note: To avoid fluid contamination, the
reservoir cap must remain in place and fully
tight, unless you are adding fluid.
Only use fluid that meets our
specifications. See
Capacities and
Specifications (page 275).
Brake Fluid Service Interval
Brake fluid absorbs water over time which
degrades the effectiveness of the brake
fluid. Change the brake fluid at the
specified intervals to prevent degraded
braking performance. For detailed interval information, see
Scheduled Maintenance in your Owner's
Manual or your local maintenance guide.
POWER STEERING FLUID
CHECK
Your vehicle is equipped with an electric
power steering (EPS) system. There is no
fluid reservoir to check or fill.
CHANGING THE 12V BATTERY
WARNING:
Batteries normally
produce explosive gases which can
cause personal injury. Therefore, do not
allow flames, sparks or lighted
substances to come near the battery.
When working near the battery, always
shield your face and protect your eyes.
Always provide correct ventilation. WARNING:
When lifting a
plastic-cased battery, excessive pressure
on the end walls could cause acid to flow
through the vent caps, resulting in
personal injury and damage to the
vehicle or battery. Lift the battery with a
battery carrier or with your hands on
opposite corners. WARNING:
Keep batteries out of
reach of children. Batteries contain
sulfuric acid. Avoid contact with skin,
eyes or clothing. Shield your eyes when
working near the battery to protect
against possible splashing of acid
solution. In case of acid contact with skin
or eyes, flush immediately with water for
a minimum of 15 minutes and get prompt
medical attention. If acid is swallowed,
call a physician immediately.
231
Explorer (CTW) Police, Canada/United States of America, Police, enUSA, Edition date: 202007, Second-Printing MaintenanceE170684
Page 235 of 412

WARNING: Battery posts,
terminals and related accessories
contain lead and lead compounds,
chemicals known to the State of
California to cause cancer and
reproductive harm. Wash your hands
after handling
. WARNING:
This vehicle may have
more than one battery. Removing the
battery cables from only one battery
does not disconnect your vehicle
electrical system. Make sure you
disconnect the battery cables from all
batteries when disconnecting power.
Failure to do so may cause serious
personal injury or property damage. WARNING:
For vehicles with
Auto-Start-Stop the battery requirement
is different. You must replace the battery
with one of exactly the same
specification.
The battery is in the engine compartment.
See
Under Hood Overview (page 220).
Your vehicle has a maintenance-free
battery. It does not require additional
water during service.
If the vehicle battery has a cover and vent
hose, make sure you correctly install it after
cleaning or replacing the battery.
For longer, trouble-free operation, keep the
top of the battery clean and dry and the
battery cables tightly fastened to the
battery terminals. If any corrosion is
present on the battery or terminals, remove
the cables from the terminals and clean
with a wire brush. You can neutralize the
acid with a solution of baking soda and
water.
We recommend that you disconnect the
negative battery cable terminal from the
battery if you plan to store your vehicle for
an extended period. Note:
If you only disconnect the negative
battery cable terminal, make sure it is
isolated or placed away from the battery
terminal to avoid unintended connection or
arcing.
If you replace the battery make sure it
matches the electrical requirements of
your vehicle.
If you disconnect or replace the battery
and your vehicle has an automatic
transmission, it must relearn its adaptive
strategy. Because of this, the transmission
may shift firmly when first driven. This is
normal operation while the transmission
fully updates its operation to optimum
shift feel.
Battery Management System
(If
Equipped)
The battery management system monitors
battery conditions and takes actions to
extend battery life. If excessive battery
drain is detected, the system temporarily
disables some electrical systems to
protect the battery.
Systems included are:
• Heated rear window.
• Heated seats.
• Climate control.
• Heated steering wheel.
• Audio unit.
• Navigation system.
A message may appear in the information
displays to alert you that battery
protection actions are active. These
messages are only for notification that an
action is taking place, and not intended to
indicate an electrical problem or that the
battery requires replacement.
232
Explorer (CTW) Police, Canada/United States of America, Police, enUSA, Edition date: 202007, Second-Printing Maintenance
Page 240 of 412

5. Gently pull the lamp assembly away
from the vehicle.
6. Turn the bulb holder counterclockwise
and remove it.
7. Remove the bulb by pulling it straight out. Rear direction indicator.
A
Reverse lamp.
B
LED Lamps
LED lamps are not serviceable items. See
an authorized dealer if they fail.
The following lamps are LED:
• Headlamp low beam.
• Headlamp high beam.
• Front direction indicator.
• Side direction indicator.
• Daytime running lamps.
• Front fog lamps (if equipped).
• Brake and rear lamp.
• Rear side marker lamp. •
Rear fog lamps (if equipped).
• Front side marker lamps.
• Front signature lamps.
• Central high mounted brake lamp.
License Plate Lamp 1. Use a suitable tool, for example a
screwdriver, to carefully remove the
lamp.
2. Turn the bulb holder counterclockwise
and remove it.
3. Remove the bulb by pulling it straight out.
237
Explorer (CTW) Police, Canada/United States of America, Police, enUSA, Edition date: 202007, Second-Printing MaintenanceE292171 A
B
A
12
203A
AE292276
Page 251 of 412

U.S. Department of
Transportation Tire quality
grades: The U.S. Department of
Transportation requires Ford
Motor Company to give you the
following information about tire
grades exactly as the government
has written it.
Treadwear
The treadwear grade is a
comparative rating based on the
wear rate of the tire when tested
under controlled conditions on a
specified government test course.
For example, a tire graded 150
would wear 1½ times as well on
the government course as a tire
graded 100. The relative
performance of tires depends
upon the actual conditions of their
use, however, and may depart
significantly from the norm due to
variations in driving habits, service
practices, and differences in road
characteristics and climate.
Traction AA A B C WARNING:
The traction
grade assigned to this tire is
based on straight-ahead braking
traction tests, and does not
include acceleration, cornering,
hydroplaning or peak traction
characteristics. The traction grades, from highest
to lowest are AA, A, B, and C. The
grades represent the tire
’s ability
to stop on wet pavement as
measured under controlled
conditions on specified
government test surfaces of
asphalt and concrete. A tire
marked C could have poor traction
performance.
Temperature A B C WARNING:
The
temperature grade for this tire is
established for a tire that is
properly inflated and not
overloaded. Excessive speed,
underinflation, or excessive
loading, either separately or in
combination, can cause heat
buildup and possible tire failure.
The temperature grades are A
(the highest), B and C,
representing the tire ’s resistance
to the generation of heat and its
ability to dissipate heat when
tested under controlled conditions
on a specified indoor laboratory
test wheel. Sustained high
temperature can cause the
material of the tire to degenerate
and reduce tire life, and excessive
temperature can lead to sudden
tire failure. The grade C
corresponds to a level of
performance which all passenger
car tires must meet under the
248
Explorer (CTW) Police, Canada/United States of America, Police, enUSA, Edition date: 202007, Second-Printing Wheels and Tires
Page 253 of 412

Information Contained on the
Tire Sidewall
Both United States and Canada
Federal regulations require tire
manufacturers to place
standardized information on the
sidewall of all tires. This
information identifies and
describes the fundamental
characteristics of the tire and also
provides a U.S. DOT Tire
Identification Number for safety
standard certification and in case
of a recall.
Information on P Type Tires
P215/65R15 95H is an example of
a tire size, load index and speed
rating. The definitions of these
items are listed below. (Note that
the tire size, load index and speed
rating for your vehicle could be
different from this example.) A.
P: Indicates a tire, designated
by the Tire and Rim Association,
that could be used for service on
cars, sport utility vehicles,
minivans and light trucks. Note:
If
your tire size does not begin with
a letter this could mean it is
designated by either the European
Tire and Rim Technical
Organization or the Japan Tire
Manufacturing Association.
B. 215:
Indicates the nominal
width of the tire in millimeters
from sidewall edge to sidewall
edge. In general, the larger the
number, the wider the tire.
C. 65:
Indicates the aspect ratio
which gives the tire's ratio of
height to width.
D. R:
Indicates a radial type tire.
E. 15:
Indicates the wheel or rim
diameter in inches. If you change
your wheel size, you will have to
purchase new tires to match the
new wheel diameter.
F. 95:
Indicates the tire's load
index. It is an index that relates to
how much weight a tire can carry.
You could find this information in
your owner ’s manual. If not,
contact a local tire dealer.
Note: You may not find this
information on all tires because it
is not required by federal law.
250
Explorer (CTW) Police, Canada/United States of America, Police, enUSA, Edition date: 202007, Second-Printing Wheels and TiresH
I
J
KL
M
A
B
CDEFGE142543
Page 256 of 412

The tire suppliers could have
additional markings, notes or
warnings such as standard load
or radial tubeless.
Additional Information
Contained on the Tire Sidewall
for LT Type Tires
Note:
Tire Quality Grades do not
apply to this type of tire. LT type tires have some additional
information beyond those of P
type tires; these differences are
described below.
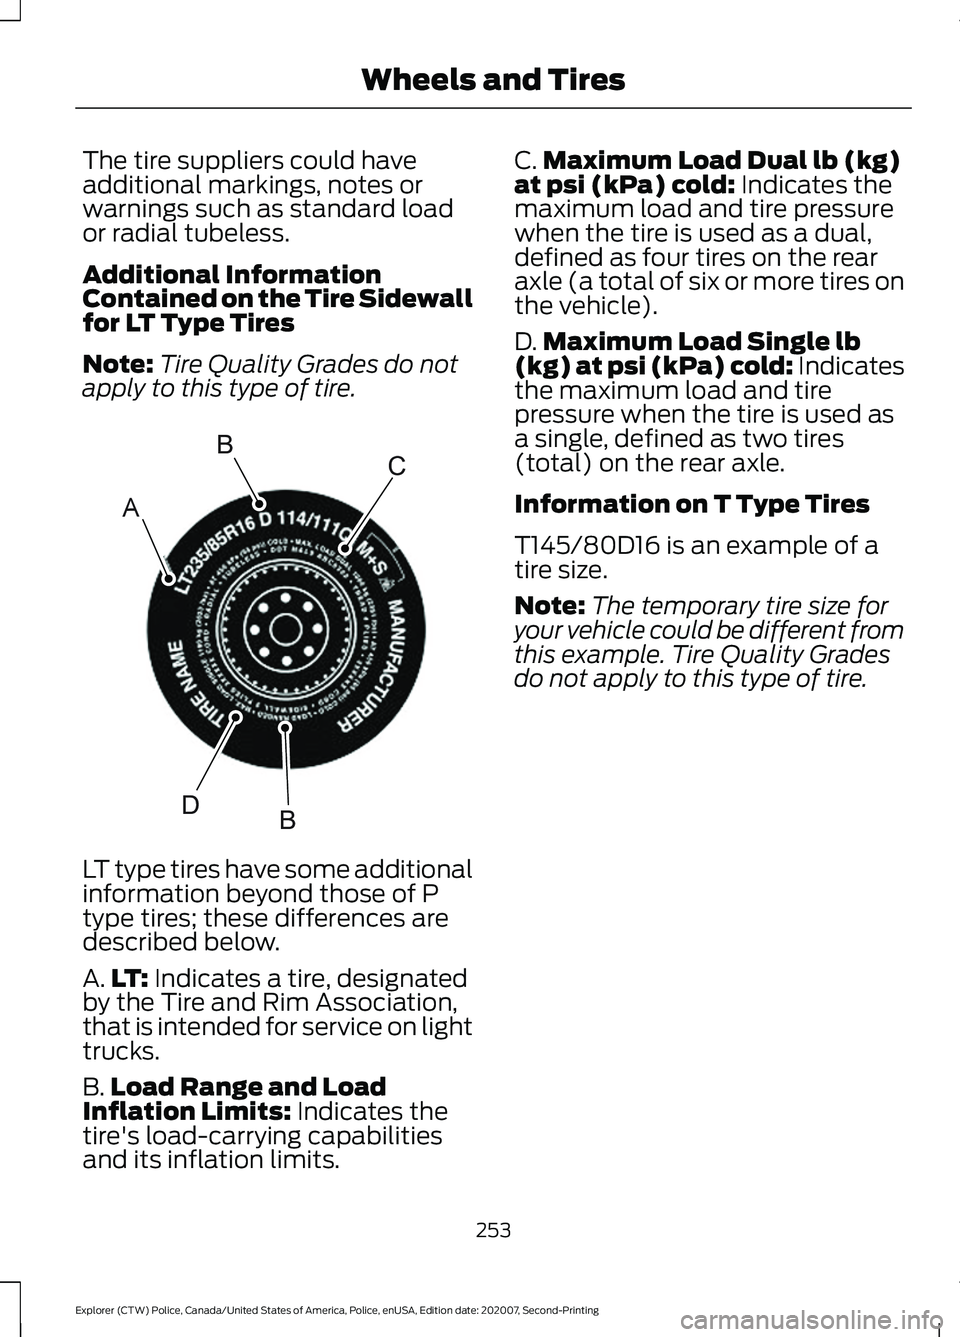
A.
LT: Indicates a tire, designated
by the Tire and Rim Association,
that is intended for service on light
trucks.
B. Load Range and Load
Inflation Limits:
Indicates the
tire's load-carrying capabilities
and its inflation limits. C.
Maximum Load Dual lb (kg)
at psi (kPa) cold:
Indicates the
maximum load and tire pressure
when the tire is used as a dual,
defined as four tires on the rear
axle (a total of six or more tires on
the vehicle).
D. Maximum Load Single lb
(kg) at psi (kPa) cold:
Indicates
the maximum load and tire
pressure when the tire is used as
a single, defined as two tires
(total) on the rear axle.
Information on T Type Tires
T145/80D16 is an example of a
tire size.
Note: The temporary tire size for
your vehicle could be different from
this example. Tire Quality Grades
do not apply to this type of tire.
253
Explorer (CTW) Police, Canada/United States of America, Police, enUSA, Edition date: 202007, Second-Printing Wheels and TiresA
BC
BDE142544
Page 257 of 412

T type tires have some additional
information beyond those of P
type tires; these differences are
described below:
A.
T: Indicates a type of tire,
designated by the Tire and Rim
Association, that is intended for
temporary service on cars, sport
utility vehicles, minivans and light
trucks.
B. 145:
Indicates the nominal
width of the tire in millimeters
from sidewall edge to sidewall
edge. In general, the larger the
number, the wider the tire. C.
80:
Indicates the aspect ratio
which gives the tire's ratio of
height to width. Numbers of 70 or
lower indicate a short sidewall.
D. D:
Indicates a diagonal type tire.
R:
Indicates a radial type tire.
E. 16:
Indicates the wheel or rim
diameter in inches. If you change
your wheel size, you will have to
purchase new tires to match the
new wheel diameter.
Recommended Tire Pressures
and Inflating Your Tires
Safe operation of your vehicle
requires that your tires are
properly inflated. Remember that
a tire can lose up to half of its air
pressure without appearing flat.
Every day before you drive, check
your tires. If one looks lower than
the others, use a tire gauge to
check the pressure of all tires and
adjust if required.
At least once a month and before
long trips, inspect each tire and
check the tire pressure with a tire
gauge (including spare, if
equipped). Inflate all tires to the
inflation pressure recommended
by Ford Motor Company. WARNING: Under-inflation
is the most common cause of
tire failures and may result in
severe tire cracking, tread
separation or blowout, with
unexpected loss of vehicle
254
Explorer (CTW) Police, Canada/United States of America, Police, enUSA, Edition date: 202007, Second-Printing Wheels and TiresA
BCDEE142545