2021 FORD POLICE INTERCEPTOR brake light
[x] Cancel search: brake lightPage 199 of 412

4. You can attempt to start the vehicle
by pressing the brake pedal and
START/STOP, or press START/STOP
without pressing the brake pedal.
5. If the vehicle does not start, repeat steps 1 through 4.
JUMP STARTING THE VEHICLE WARNING:
Batteries normally
produce explosive gases which can
cause personal injury. Therefore, do not
allow flames, sparks or lighted
substances to come near the battery.
When working near the battery, always
shield your face and protect your eyes.
Always provide correct ventilation. WARNING:
Keep batteries out of
reach of children. Batteries contain
sulfuric acid. Avoid contact with skin,
eyes or clothing. Shield your eyes when
working near the battery to protect
against possible splashing of acid
solution. In case of acid contact with skin
or eyes, flush immediately with water for
a minimum of 15 minutes and get prompt
medical attention. If acid is swallowed,
call a physician immediately. WARNING:
Use only adequately
sized cables with insulated clamps.
Preparing Your Vehicle
Do not attempt to push-start your
automatic transmission vehicle.
Note: Attempting to push-start a vehicle
with an automatic transmission may cause
transmission damage.
Note: Use only a 12-volt supply to start your
vehicle. Note:
Do not disconnect the battery of the
disabled vehicle as this could damage the
vehicle electrical system.
Park the booster vehicle close to the hood
of the disabled vehicle, making sure the
two vehicles do not touch.
Locating the Jump Starting
Connection Points 1. Open the hood. See
Opening and
Closing the Hood (page 218).
2. Remove the access cover.
3. Remove the red protective cover from the positive lead jump connection
point.
4. Locate the negative jump connection point on the rear mounting bolt for the
cross brace, as shown.
Connecting the Jumper Cables WARNING: If the engine is running
while the hood is open, stay clear of
moving engine components. Failure to
follow this warning could result in serious
personal injury or death. WARNING:
Do not connect the
negative jumper cable to any other part
of your vehicle. Use the ground point.
196
Explorer (CTW) Police, Canada/United States of America, Police, enUSA, Edition date: 202007, Second-Printing Roadside EmergenciesE288229
Page 214 of 412

Protected Component
Fuse Rating
Fuse or Relay
Number
Power liftgate module.
30A
41
Trailer brake control module.
30A
42
Body control module.
60A
43
Brake on and off switch.
10A
44
Battery charger control module (hybrid
electric vehicle).
15A
46
Heated backlite.
40A
50
Visor control module.
20A
54
Run/start access feed.
Trailer tow park lamps.
20A
55
Trailer tow battery charge.
30A
57
Trailer tow backup lamps.
10A
58
Not used (spare).
15A
61
Headlamp washer pump.
15A
62
Four-wheel drive module.
40A
64
Front window wiper motor.
30A
69
Rear window wiper motor.
15A
71
Not used (spare).
20A
72
Driver door module.
30A
73
Not used.
—
78
Not used.
—
79
Not used (spare).
20A
80
Not used (spare).
20A
82
Rear blower motor.
20A
88
Trailer tow lighting module.
20A
91
Integrated spark control (hybrid electric
vehicle).
15A
95
211
Explorer (CTW) Police, Canada/United States of America, Police, enUSA, Edition date: 202007, Second-Printing Fuses
Page 234 of 412

1. Park your vehicle on a level surface.
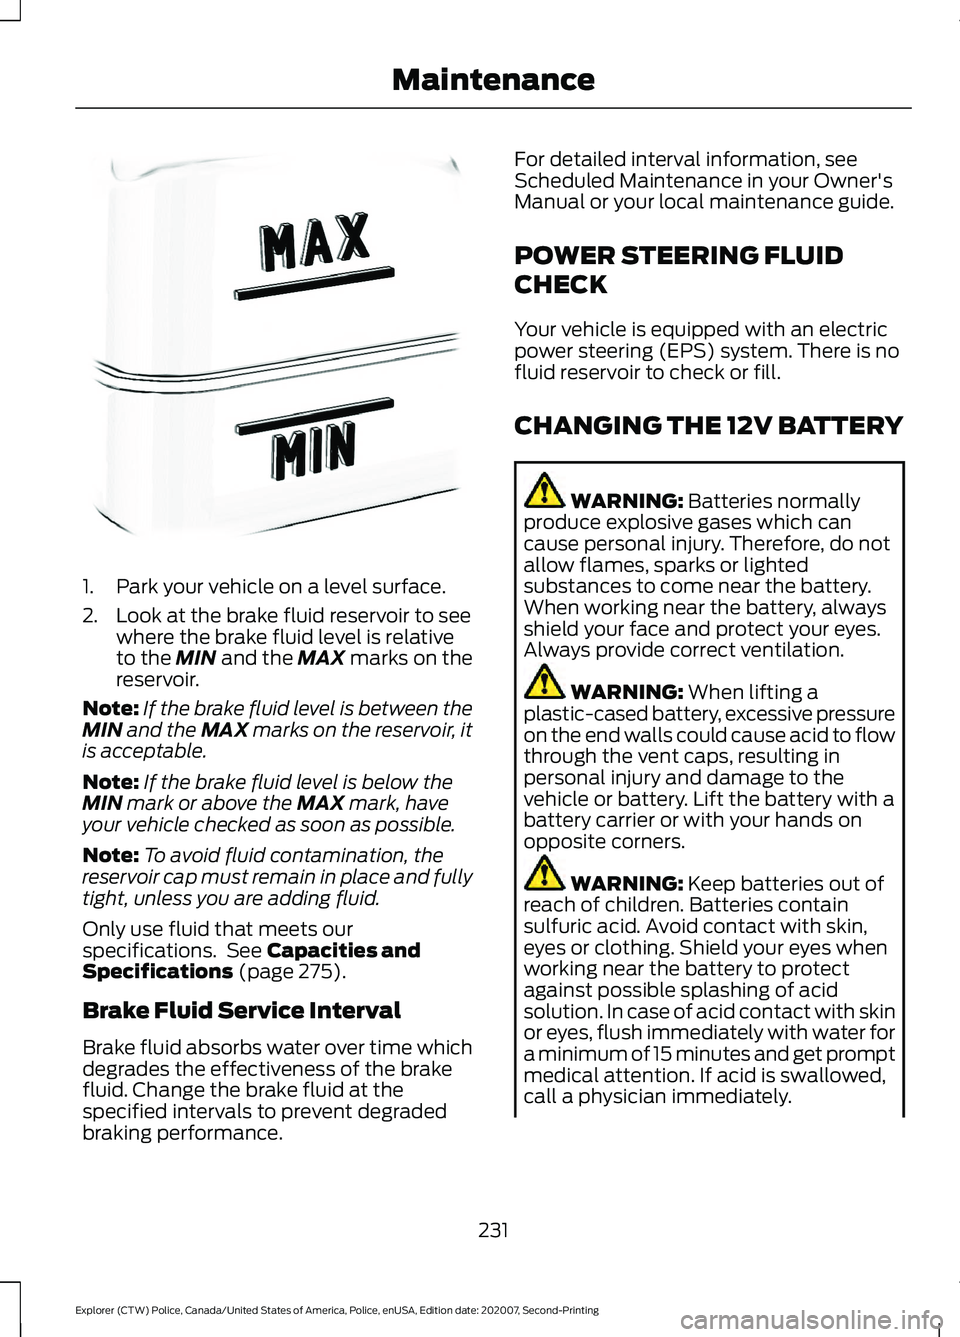
2. Look at the brake fluid reservoir to see
where the brake fluid level is relative
to the MIN and the MAX marks on the
reservoir.
Note: If the brake fluid level is between the
MIN
and the MAX marks on the reservoir, it
is acceptable.
Note: If the brake fluid level is below the
MIN
mark or above the MAX mark, have
your vehicle checked as soon as possible.
Note: To avoid fluid contamination, the
reservoir cap must remain in place and fully
tight, unless you are adding fluid.
Only use fluid that meets our
specifications. See
Capacities and
Specifications (page 275).
Brake Fluid Service Interval
Brake fluid absorbs water over time which
degrades the effectiveness of the brake
fluid. Change the brake fluid at the
specified intervals to prevent degraded
braking performance. For detailed interval information, see
Scheduled Maintenance in your Owner's
Manual or your local maintenance guide.
POWER STEERING FLUID
CHECK
Your vehicle is equipped with an electric
power steering (EPS) system. There is no
fluid reservoir to check or fill.
CHANGING THE 12V BATTERY
WARNING:
Batteries normally
produce explosive gases which can
cause personal injury. Therefore, do not
allow flames, sparks or lighted
substances to come near the battery.
When working near the battery, always
shield your face and protect your eyes.
Always provide correct ventilation. WARNING:
When lifting a
plastic-cased battery, excessive pressure
on the end walls could cause acid to flow
through the vent caps, resulting in
personal injury and damage to the
vehicle or battery. Lift the battery with a
battery carrier or with your hands on
opposite corners. WARNING:
Keep batteries out of
reach of children. Batteries contain
sulfuric acid. Avoid contact with skin,
eyes or clothing. Shield your eyes when
working near the battery to protect
against possible splashing of acid
solution. In case of acid contact with skin
or eyes, flush immediately with water for
a minimum of 15 minutes and get prompt
medical attention. If acid is swallowed,
call a physician immediately.
231
Explorer (CTW) Police, Canada/United States of America, Police, enUSA, Edition date: 202007, Second-Printing MaintenanceE170684
Page 236 of 412

After battery replacement, or in some
cases after charging the battery with an
external charger, the battery management
system requires eight hours of vehicle sleep
time to relearn the battery state of charge.
During this time your vehicle must remain
fully locked with the ignition switched off.
Note:
Prior to relearning the battery state
of charge, the battery management system
may temporarily disable some electrical
systems.
Electrical Accessory Installation
To make sure the battery management
system works correctly, do not connect an
electrical device ground connection
directly to the battery negative post. This
can cause inaccurate measurements of
the battery condition and potential
incorrect system operation.
Note: If you add electrical accessories or
components to the vehicle, it may adversely
affect battery performance and durability.
This may also affect the performance of
other electrical systems in the vehicle.
Remove and Reinstall the Battery
To disconnect or remove the battery, do
the following:
1. Apply the parking brake and switch the
ignition off.
2. Switch all electrical equipment off, for
example lights and radio.
3. Wait a minimum of two minutes before
disconnecting the battery.
Note: The engine management system has
a power hold function and remains powered
for a period of time after you switch the
ignition off. This is to allow diagnostic and
adaptive tables to be stored. Disconnecting
the battery without waiting can cause
damage not covered by the vehicle
Warranty. 4. Disconnect the negative battery cable
terminal.
5. Disconnect the positive battery cable terminal.
6. Remove the battery securing clamp.
7. Remove the battery.
8. To install, reverse the removal procedure.
Note: Before reconnecting the battery,
make sure the ignition remains switched off.
Note: Make sure the battery cable terminals
are fully tightened.
If you disconnect or replace the vehicle
battery, you must reset the following
features:
• Window bounce-back. See Power
Windows (page 74).
• Clock Settings.
• Pre-set radio stations.
Battery Disposal Make sure that you dispose of
old batteries in an
environmentally friendly way.
Seek advice from your local authority
about recycling old batteries.
ADJUSTING THE HEADLAMPS
Vertical Aim Adjustment
If your vehicle has been involved in a crash,
have the aim of the headlamp beam
checked by an authorized dealer.
233
Explorer (CTW) Police, Canada/United States of America, Police, enUSA, Edition date: 202007, Second-Printing MaintenanceE107998
Page 246 of 412

2. Remove dirt and brake dust with a
sponge.
3. Remove tar and grease with a bug and
tar remover. We recommend that you
use Ford approved bug and tar remover
if available.
4. Thoroughly rinse the wheels with water
after cleaning.
If you intend on parking your vehicle for an
extended period after cleaning the wheels
with a wheel cleaner, drive your vehicle for
a few minutes before doing so. This
reduces the risk of corrosion of the brake
discs, brake pads and linings.
Do not clean the wheels when they are hot.
Note: Some car washes could damage
wheel rims and covers.
Note: Using non-recommended cleaners,
harsh cleaning products, chrome wheel
cleaners or abrasive materials could
damage wheel rims and covers.
VEHICLE STORAGE
If you plan on storing your vehicle for 30
days or more, read the following
maintenance recommendations to make
sure your vehicle stays in good operating
condition.
We engineer and test all motor vehicles
and their components for reliable, regular
driving. Under various conditions,
long-term storage may lead to degraded
engine performance or failure unless you
use specific precautions to preserve engine
components. General
•
Store all vehicles in a dry, ventilated
place.
• Protect from sunlight, if possible.
• If vehicles are stored outside, they
require regular maintenance to protect
against rust and damage.
Body
• Wash your vehicle thoroughly to
remove dirt, grease, oil, tar or mud from
exterior surfaces, rear-wheel housing
and the underside of front fenders.
• Periodically wash your vehicle if it is
stored in exposed locations.
• Touch-up exposed or primed metal to
prevent rust.
• Cover chrome and stainless steel parts
with a thick coat of auto wax to prevent
discoloration. Re-wax as necessary
when you wash your vehicle.
• Lubricate all hood, door and luggage
compartment hinges and latches with
a light grade oil.
• Cover interior trim to prevent fading.
• Keep all rubber parts free from oil and
solvents.
Engine
• Change the engine oil and filter prior to
storage because used engine oil
contains contaminates which may
cause engine damage.
• Start the engine every 15 days for a
minimum of 15 minutes. Run at fast
idle with the climate controls set to
defrost until the engine reaches normal
operating temperature.
243
Explorer (CTW) Police, Canada/United States of America, Police, enUSA, Edition date: 202007, Second-Printing Vehicle Care
Page 271 of 412

5. Train the tire pressure monitoring
system sensors in the tires using the
following system reset sequence
starting with the left front tire in the
following clockwise order: Left front -
driver side front tire, Right front -
passenger side front tire, Right rear -
passenger side rear tire, Left rear -
driver side rear tire.
6. Remove the valve cap from the valve stem on the left front tire. Decrease the
air pressure until the horn sounds.
Note: The single horn tone confirms that
the sensor identification code has been
learned by the module for this position. If a
double horn is heard, the reset procedure
was unsuccessful, and you must repeat it.
7. Remove the valve cap from the valve stem on the right front tire. Decrease
the air pressure until the horn sounds.
8. Remove the valve cap from the valve stem on the right rear tire. Decrease the
air pressure until the horn sounds.
9. Remove the valve cap from the valve stem on the left rear tire. Decrease the
air pressure until the horn sounds.
Training is complete after the horn
sounds for the last tire trained, driver
side rear tire, the system indicator
stops flashing, and a message shows
in the information display.
10. Turn the ignition off. If two short horn
beeps are heard, the reset procedure
was unsuccessful and you must
repeat it. If after repeating the
procedure and two short beeps are
heard when the ignition is turned to
off, seek assistance from your
authorized dealer. 11.
Set all four tires to the recommended
air pressure as indicated on the
Safety Compliance Certification
Label, affixed to either the door hinge
pillar, door-latch post, or the door
edge that meets the door-latch post,
next to the driver seating position or
Tire Label located on the B-Pillar or
the edge of the driver door.
CHANGING A ROAD WHEEL (IF
EQUIPPED) WARNING:
If the tire pressure
monitor sensor becomes damaged it
may not function.
Note: You should only use tire sealants in
roadside emergencies as they may cause
damage to the tire pressure monitoring
system sensor.
Note: The tire pressure monitoring system
indicator light illuminates when the spare
tire is in use. To restore the full function of
the monitoring system, all road wheels
equipped with tire pressure monitoring
sensors must be mounted on the vehicle.
If you get a flat tire when driving, do not
apply the brake heavily. Instead, gradually
decrease your speed. Hold the steering
wheel firmly and slowly move to a safe
place on the side of the road.
Have a flat serviced by an authorized
dealer in order to prevent damage to the
tire pressure monitoring system sensors.
See
Tire Pressure Monitoring System
(page 263). Replace the spare tire with a
road tire as soon as possible. During
repairing or replacing of the flat tire, have
the authorized dealer inspect the tire
pressure monitoring system sensor for
damage.
268
Explorer (CTW) Police, Canada/United States of America, Police, enUSA, Edition date: 202007, Second-Printing Wheels and Tires
Page 331 of 412

Check Every Month
Engine oil level.
Function of all interior and exterior lights.
Tires (including spare) for wear and proper pressure. Windshield washer fluid level.
Holes and slots in the tail pipe to make sure they are functional and clear of debris. Check Every Six Months
Battery connections. Clean if necessary.
Body and door drain holes for obstructions. Clean if necessary. Cooling system fluid level and coolant strength.
Door weatherstrips for wear. Lubricate if necessary.
Hinges, latches and outside locks for proper operation. Lubricate if necessary. Parking brake for proper operation.
Seatbelts and seat latches for wear and function.
Safety warning lamps (brake, ABS, airbag and seatbelt) for operation.
Washer spray and wiper operation. Clean or replace blades as necessary.
Multi-Point Inspection
In order to keep your vehicle running right,
it is important to have the systems on your
vehicle checked regularly. This can help
identify potential issues and prevent major
problems. We recommend having the
following multi-point inspection performed
at every scheduled maintenance interval
to help make sure your vehicle keeps
running great.
328
Explorer (CTW) Police, Canada/United States of America, Police, enUSA, Edition date: 202007, Second-Printing Scheduled Maintenance
Page 337 of 412

Driver Training/EVOC
Replace engine oil and filter as indicated by the information
display and perform services listed in the Extreme Usage
Scheduled Maintenance chart.
As required
Inspect brake pads, rotors, calipers hoses, and service as
required.
Inspect engine oil level.
Inspect vehicle every day
prior to starting training
Set tire pressure. Refer to driver door placard for cold tire
pressure information.
Inspect tire quality for wear.
Set wheel lug nut torque. The cold wheel lug nut torque
is 150 lb.ft (204 Nm). If wheels are torqued while they are
hot (after 15 minutes of EVOC driving), torque may be
checked to hot wheel lug nut torque of
70 lb.ft (95 Nm).
Proper functioning of safety devices (seat belts, no air bag
lights, etc.)
Front differential/axle fluid.
25 hours of training use
Rear differential/axle fluid.
100 hours of training use
Change transmission and transfer case fluids.
Annually
Note: Follow base owner guide direction
for 1,000-mile vehicle break-in prior to using
vehicle for training purposes.
Note: Incorporate vehicle cool-down after
hard driving.
Note: Perform Training / EVOC service
according to the Extreme Usage Scheduled
Maintenance chart.
Note: Use Police Interceptor part numbers
for replacement parts. Engine Idle Hour Meter
Your vehicle may have an idle meter to
indicate how much time the vehicle has
been sitting in park (P) or neutral (N). The
meter is incorporated with the vehicle
odometer. Depressing the odometer-reset
button once displays the trip odometer
(miles [kilometers] following by a "T" for
trip odometer); depressing the
odometer-reset button a second time
displays the idle meter (hours following by
an "H" for hours). The idle meter only
accumulates time while the vehicle is in
park (P) or neutral (N). Displayed time is
cumulative for the vehicle and cannot be
reset to zero. Police vehicles often
334
Explorer (CTW) Police, Canada/United States of America, Police, enUSA, Edition date: 202007, Second-Printing Scheduled Maintenance