2021 FORD POLICE INTERCEPTOR manual transmission
[x] Cancel search: manual transmissionPage 74 of 412

INSTRUMENT LIGHTING
DIMMER
The instrument lighting dimmer buttons
are on the lighting control.
Repeatedly press one of the
buttons to adjust the brightness.
DAYTIME RUNNING LAMPS -
VEHICLES WITH:
CONFIGURABLE DAYTIME
RUNNING LAMPS WARNING: The daytime running
lamps system does not activate the rear
lamps and may not provide adequate
lighting during low visibility driving
conditions. Make sure you switch the
headlamps on, as appropriate, during all
low visibility conditions. Failure to do so
may result in a crash.
Switch the daytime running lamps on or
off using the touchscreen:
1. Select
Settings.
2. Select
Vehicle.
3. Select
Lighting.
The daytime running lamps turn on when:
1. The lamps are on in the information display.
2. You switch the ignition on.
3. The transmission is not in park (P) for vehicles with automatic transmissions
or you release the parking brake for
vehicles with manual transmissions. 4.
The lighting control is in the autolamps
position.
5. The headlamps are off.
The other lighting control switch positions
do not turn on the daytime running lamps.
If the daytime running lamps are off in the
information display, the lamps stay off in
all switch positions.
DAYTIME RUNNING LAMPS -
VEHICLES WITH: DAYTIME
RUNNING LAMPS (DRL) WARNING:
The daytime running
lamps system does not activate the rear
lamps and may not provide adequate
lighting during low visibility driving
conditions. Make sure you switch the
headlamps on, as appropriate, during all
low visibility conditions. Failure to do so
may result in a crash.
The system turns the lamps on in daylight
conditions.
To switch the system on, switch the
lighting control to any position except
headlamps.
DIRECTION INDICATORS 71
Explorer (CTW) Police, Canada/United States of America, Police, enUSA, Edition date: 202007, Second-Printing LightingE291299 E296433 E311431
Page 102 of 412

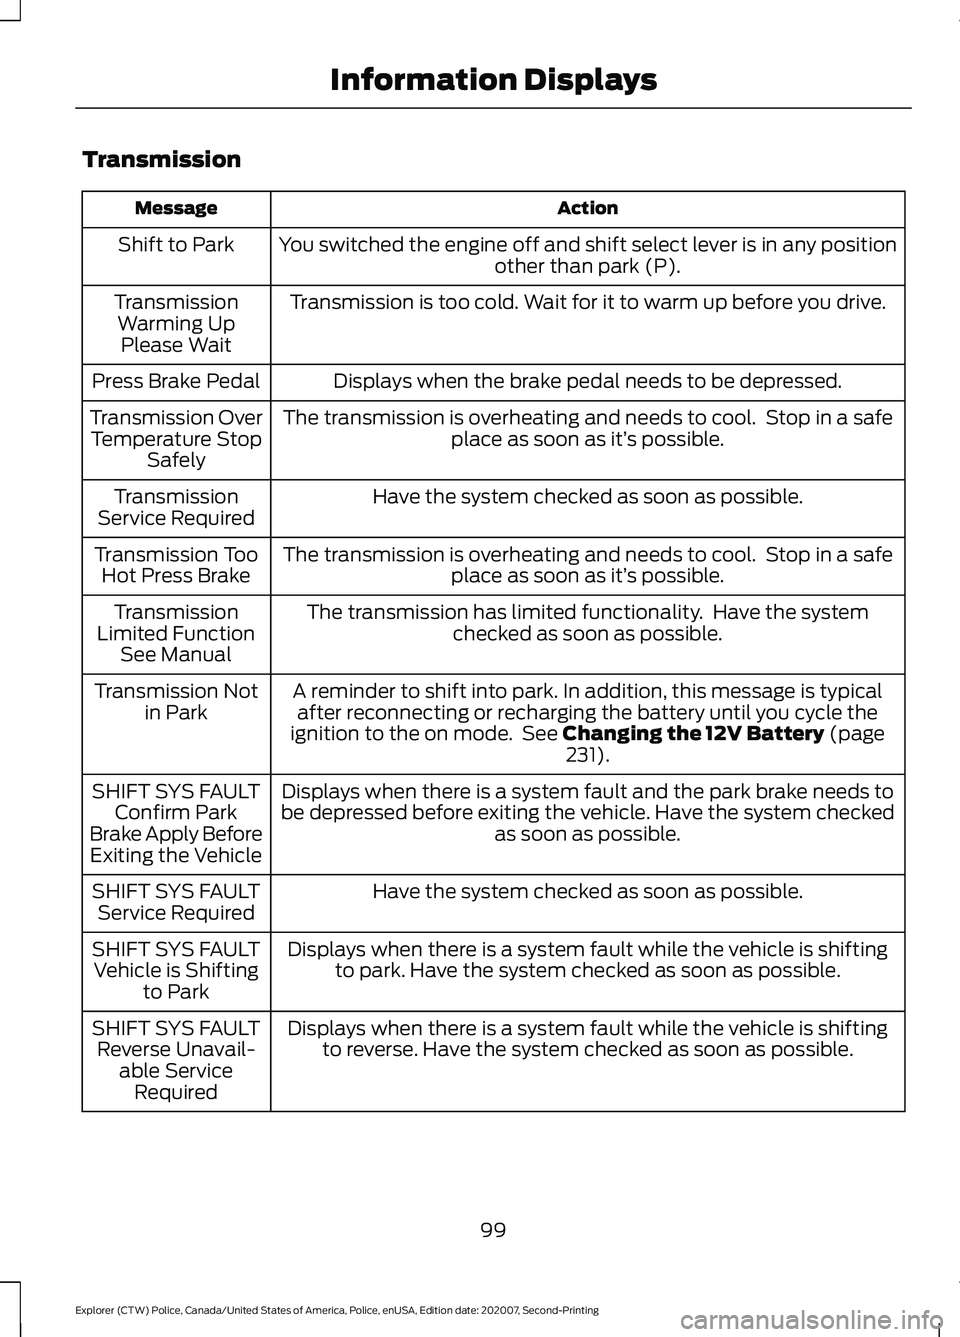
Transmission
Action
Message
You switched the engine off and shift select lever is in any position other than park (P).
Shift to Park
Transmission is too cold. Wait for it to warm up before you drive.
Transmission
Warming UpPlease Wait
Displays when the brake pedal needs to be depressed.
Press Brake Pedal
The transmission is overheating and needs to cool. Stop in a safeplace as soon as it’ s possible.
Transmission Over
Temperature Stop Safely
Have the system checked as soon as possible.
Transmission
Service Required
The transmission is overheating and needs to cool. Stop in a safeplace as soon as it’ s possible.
Transmission Too
Hot Press Brake
The transmission has limited functionality. Have the systemchecked as soon as possible.
Transmission
Limited Function See Manual
A reminder to shift into park. In addition, this message is typicalafter reconnecting or recharging the battery until you cycle the
ignition to the on mode. See Changing the 12V Battery (page
231).
Transmission Not
in Park
Displays when there is a system fault and the park brake needs to
be depressed before exiting the vehicle. Have the system checked as soon as possible.
SHIFT SYS FAULT
Confirm Park
Brake Apply Before Exiting the Vehicle
Have the system checked as soon as possible.
SHIFT SYS FAULT
Service Required
Displays when there is a system fault while the vehicle is shiftingto park. Have the system checked as soon as possible.
SHIFT SYS FAULT
Vehicle is Shifting to Park
Displays when there is a system fault while the vehicle is shiftingto reverse. Have the system checked as soon as possible.
SHIFT SYS FAULT
Reverse Unavail- able ServiceRequired
99
Explorer (CTW) Police, Canada/United States of America, Police, enUSA, Edition date: 202007, Second-Printing Information Displays
Page 138 of 412

Description and Action
Message
A warning message appears
in the information display
when the fuel system fails
to depressurize or the fuel
filler door fails to open. You
may have to use the fuel
filler door manual override
lever.
Refuel
Error See
Manual
If the information message appears, do the
following:
1. Check the fuel filler door for anything that may be obstructing its movement,
for example ice or snow.
2. Remove any obstruction from the fuel filler door.
3. Press the button on the driver door to open the fuel filler door.
4. If the fuel filler door fails to open and the information message remains in
the information display, use the fuel
filler door manual override lever.
Fuel Filler Door Manual Override
Lever WARNING: The fuel system may
be under pressure. If you hear a hissing
sound near the fuel filler inlet, do not
refuel until the sound stops. Otherwise,
fuel may spray out, which could cause
serious personal injury.
Note: The transmission must be in park (P)
or neutral (N).
When using the manual override lever do
the following:
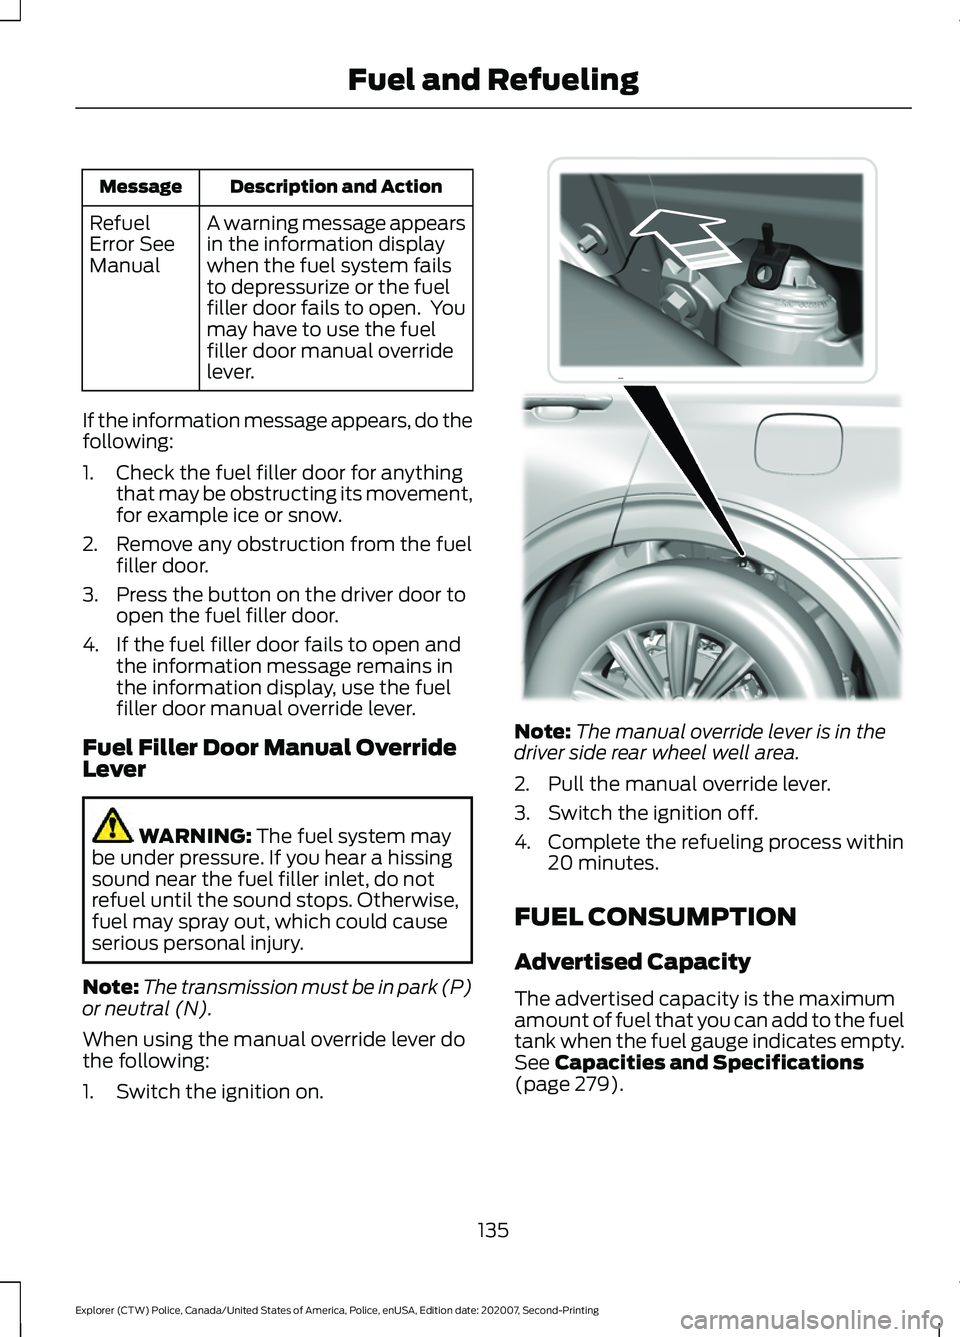
1. Switch the ignition on. Note:
The manual override lever is in the
driver side rear wheel well area.
2. Pull the manual override lever.
3. Switch the ignition off.
4. Complete the refueling process within 20 minutes.
FUEL CONSUMPTION
Advertised Capacity
The advertised capacity is the maximum
amount of fuel that you can add to the fuel
tank when the fuel gauge indicates empty.
See
Capacities and Specifications
(page 279).
135
Explorer (CTW) Police, Canada/United States of America, Police, enUSA, Edition date: 202007, Second-Printing Fuel and RefuelingE297793
Page 156 of 412

If it continues to flash or does not
illuminate, the system has malfunctioned.
Have your vehicle checked as soon as
possible.
Note:
You can apply the electric parking
brake when the ignition is off.
Note: The electric parking brake could
automatically apply when you shift into park
(P). See Transmission (page 142).
Applying the Electric Parking Brake in
an Emergency
Note: Do not apply the electric parking
brake when your vehicle is moving, except
in an emergency. If you repeatedly use the
electric parking brake to slow or stop your
vehicle, you could cause damage to the
brake system.
You can use the electric parking brake to
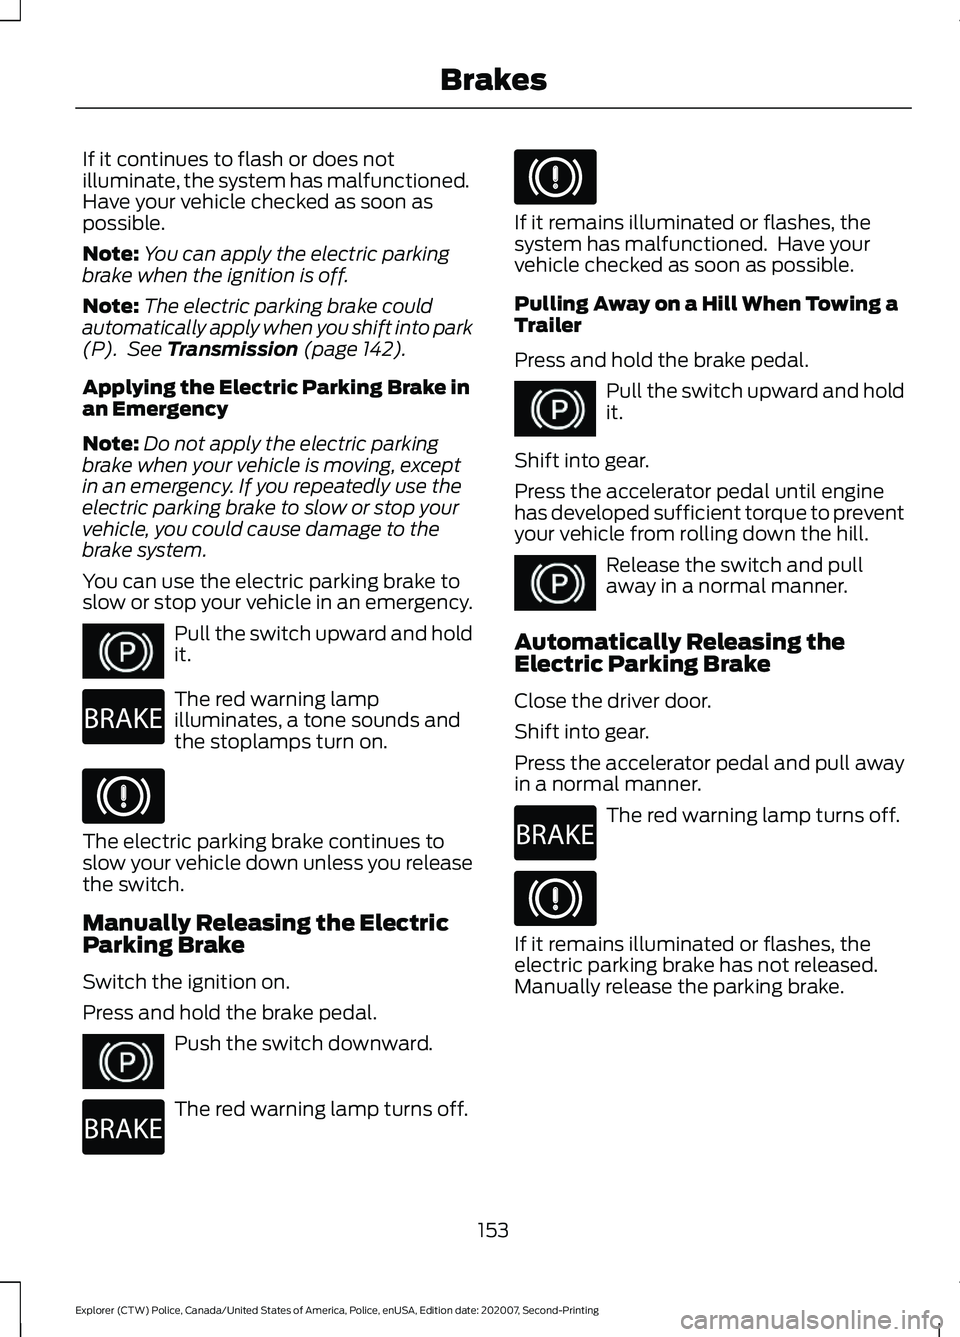
slow or stop your vehicle in an emergency. Pull the switch upward and hold
it.
The red warning lamp
illuminates, a tone sounds and
the stoplamps turn on.
The electric parking brake continues to
slow your vehicle down unless you release
the switch.
Manually Releasing the Electric
Parking Brake
Switch the ignition on.
Press and hold the brake pedal.
Push the switch downward.
The red warning lamp turns off. If it remains illuminated or flashes, the
system has malfunctioned. Have your
vehicle checked as soon as possible.
Pulling Away on a Hill When Towing a
Trailer
Press and hold the brake pedal.
Pull the switch upward and hold
it.
Shift into gear.
Press the accelerator pedal until engine
has developed sufficient torque to prevent
your vehicle from rolling down the hill. Release the switch and pull
away in a normal manner.
Automatically Releasing the
Electric Parking Brake
Close the driver door.
Shift into gear.
Press the accelerator pedal and pull away
in a normal manner. The red warning lamp turns off.
If it remains illuminated or flashes, the
electric parking brake has not released.
Manually release the parking brake.
153
Explorer (CTW) Police, Canada/United States of America, Police, enUSA, Edition date: 202007, Second-Printing BrakesE267156 E270480 E267156 E270480 E267156 E267156 E270480
Page 157 of 412

Releasing the Electric Parking
Brake if the Vehicle Battery is
Running Out of Charge
Connect a booster battery to the vehicle
battery to release the electric parking brake
if the vehicle battery is running out of
charge. See Jump Starting the Vehicle
(page 196).
HILL START ASSIST WARNING:
The system does not
replace the parking brake. When you
leave your vehicle, always apply the
parking brake. WARNING:
You must remain in
your vehicle when the system turns on.
At all times, you are responsible for
controlling your vehicle, supervising the
system and intervening, if required.
Failure to take care may result in the loss
of control of your vehicle, serious
personal injury or death. WARNING:
The system will turn
off if a malfunction is apparent or if you
rev the engine excessively. Failure to take
care may result in the loss of control of
your vehicle, serious personal injury or
death.
The system makes it easier to pull away
when your vehicle is on a slope without the
need to use the parking brake.
When the system is active, your vehicle
remains stationary on the slope for two to
three seconds after you release the brake
pedal. This allows time to move your foot
from the brake to the accelerator pedal.
The system releases the brakes
automatically once the engine has developed sufficient torque to prevent your
vehicle from rolling down the slope. This
is an advantage when pulling away on a
slope, for example from a car park ramp,
traffic lights or when reversing uphill into
a parking space.
The system activates on any slope that
causes your vehicle to roll.
Note:
There is no warning light to indicate
the system is either on or off.
Using Hill Start Assist
1. Press the brake pedal to bring your vehicle to a complete standstill. Keep
the brake pedal pressed and shift into
first gear when facing uphill or reverse
(R) when facing downhill.
2. If the sensors detect that your vehicle is on a slope, the system activates
automatically.
3. When you remove your foot from the brake pedal, your vehicle remains on
the slope without rolling away for
about two to three seconds. This hold
time automatically extends if you are
in the process of driving off.
4. Drive off in the normal manner. The system releases the brakes
automatically.
Note: When you remove your foot from the
brake pedal and press the pedal again when
the system is active, you will experience
significantly reduced brake pedal travel. This
is normal.
Switching the System On and Off
Vehicles with Manual Transmission
You can switch this feature on or off in the
information display. The system
remembers the last setting when you start
your vehicle.
154
Explorer (CTW) Police, Canada/United States of America, Police, enUSA, Edition date: 202007, Second-Printing Brakes
Page 167 of 412

Rear Camera On Demand (If Equipped)
Press the camera button on the
overhead console to bring up the
rear camera view in the display
screen. The guide lines appear as white
and you are able to use the manual zoom
feature by pressing the zoom button.
Manual Zoom WARNING:
When manual zoom is
on, the full area behind your vehicle may
not show. Be aware of your surroundings
when using the manual zoom feature.
Note: Manual zoom is only available when
the transmission is in reverse (R).
Note: When you enable manual zoom, only
the centerline is shown.
Selectable settings for this feature are
zoom in, +, and zoom out, -. Press the
symbol in the camera screen to change the
view. The default setting is zoom off.
Manual zoom allows you to get a closer
view of an object behind your vehicle. The
zoomed image keeps the bumper in the
image to provide a reference. The zoom is
only active when the transmission is in
reverse (R).
Rear Camera Delay
Selectable settings for this feature are on
and off.
The default setting for the rear camera
delay is off.
When shifting the transmission out of
reverse (R) and into any gear other than
park (P), the camera image remains in the
display until:
• Your vehicle speed reaches
approximately
5 mph (8 km/h).
• You shift your vehicle into park (P).
164
Explorer (CTW) Police, Canada/United States of America, Police, enUSA, Edition date: 202007, Second-Printing Parking AidsE327108
Page 188 of 412

TOWING A TRAILER
WARNING: Towing trailers
beyond the maximum
recommended gross trailer
weight exceeds the limit of your
vehicle and could result in engine
damage, transmission damage,
structural damage, loss of
vehicle control, vehicle rollover
and personal injury. WARNING:
Do not exceed
the GVWR or the GAWR
specified on the certification
label.
Note: See
Recommended
Towing Weights (page 186).
Your vehicle may have electrical
items, such as fuses or relays,
related to towing. See
Fuses
(page 208).
Your vehicle's load capacity
designation is by weight, not by
volume, so you cannot necessarily
use all available space when
loading a vehicle or trailer.
Towing a trailer places an extra
load on your vehicle's engine,
transmission, axle, brakes, tires
and suspension. Inspect these
components periodically during,
and after, any towing operation. Load Placement
To help minimize how trailer
movement affects your vehicle
when driving:
•
Load the heaviest items closest
to the trailer floor.
• Load the heaviest items
centered between the left and
right side trailer tires.
• Load the heaviest items above
the trailer axles or just slightly
forward toward the trailer
tongue. Do not allow the final
trailer tongue weight to go
above or below 10-15% of the
loaded trailer weight.
• Select a ball mount with the
correct rise or drop and load
capacity. When both the
loaded vehicle and trailer are
connected, the trailer frame
should be level, or slightly
angled down toward your
vehicle, when viewed from the
side.
When driving with a trailer or
payload, a slight takeoff vibration
or shudder may be present due to
the increased payload weight.
Additional information regarding
proper trailer loading and setting
your vehicle up for towing is
located in another chapter of this
manual. See
Load Limit (page
180).
You can also find information in
the
RV & Trailer Towing Guide
available at your authorized
dealer, or online.
185
Explorer (CTW) Police, Canada/United States of America, Police, enUSA, Edition date: 202007, Second-Printing Towing
Page 274 of 412

Note:
No maintenance or additional
lubrication of your jack is required over the
service life of your vehicle.
1. Park on a level surface, set the parking
brake and switch on the hazard
flashers.
2. Apply the parking brake, place the transmission in park (P) or reverse (R)
for manual transmission. Turn the
engine off. 3. Block the wheel diagonally opposite
the flat tire. For example, if the left
front tire is flat, block the right rear
wheel. 4. Turn the wing nut securing the spare
tire counterclockwise, remove the wing
nut.
5. Remove the spare tire, jack and wrench
from the spare tire storage
compartment under the trunk load
floor. 6. Turn the hex nut on the jack
counterclockwise to remove the lug
wrench from jack. This lowers the jack
and loosens the mechanical lock.
271
Explorer (CTW) Police, Canada/United States of America, Police, enUSA, Edition date: 202007, Second-Printing Wheels and TiresE142551 E288598 E175694