2021 FORD POLICE INTERCEPTOR lock
[x] Cancel search: lockPage 28 of 412
Using Lower Anchors and Tethers
for CHildren (LATCH)
WARNING: Do not attach two child
safety restraints to the same anchor. In
a crash, one anchor may not be strong
enough to hold two child safety restraint
attachments and may break, causing
serious injury or death. WARNING: Depending on where
you secure a child restraint, and
depending on the child restraint design,
you may block access to certain seatbelt
buckle assemblies and LATCH lower
anchors, rendering those features
potentially unusable. To avoid risk of
injury, make sure occupants only use
seating positions where they are able to
be properly restrained.
The LATCH system has three vehicle
anchor points: two lower anchors where
the seat backrest and seat cushion meet
(called the seat bight) and one top tether
anchor behind that seating position.
LATCH compatible child restraints have
two rigid or webbing mounted
attachments that connect to the two lower
anchors at the LATCH equipped seating
positions in your vehicle. This type of
attachment method eliminates the need
to use seatbelts to attach the child
restraint. However, you can still use the
seatbelt to attach the child restraint. For
forward-facing child restraints, you must
also attach the top tether strap to the
proper top tether anchor if one came with
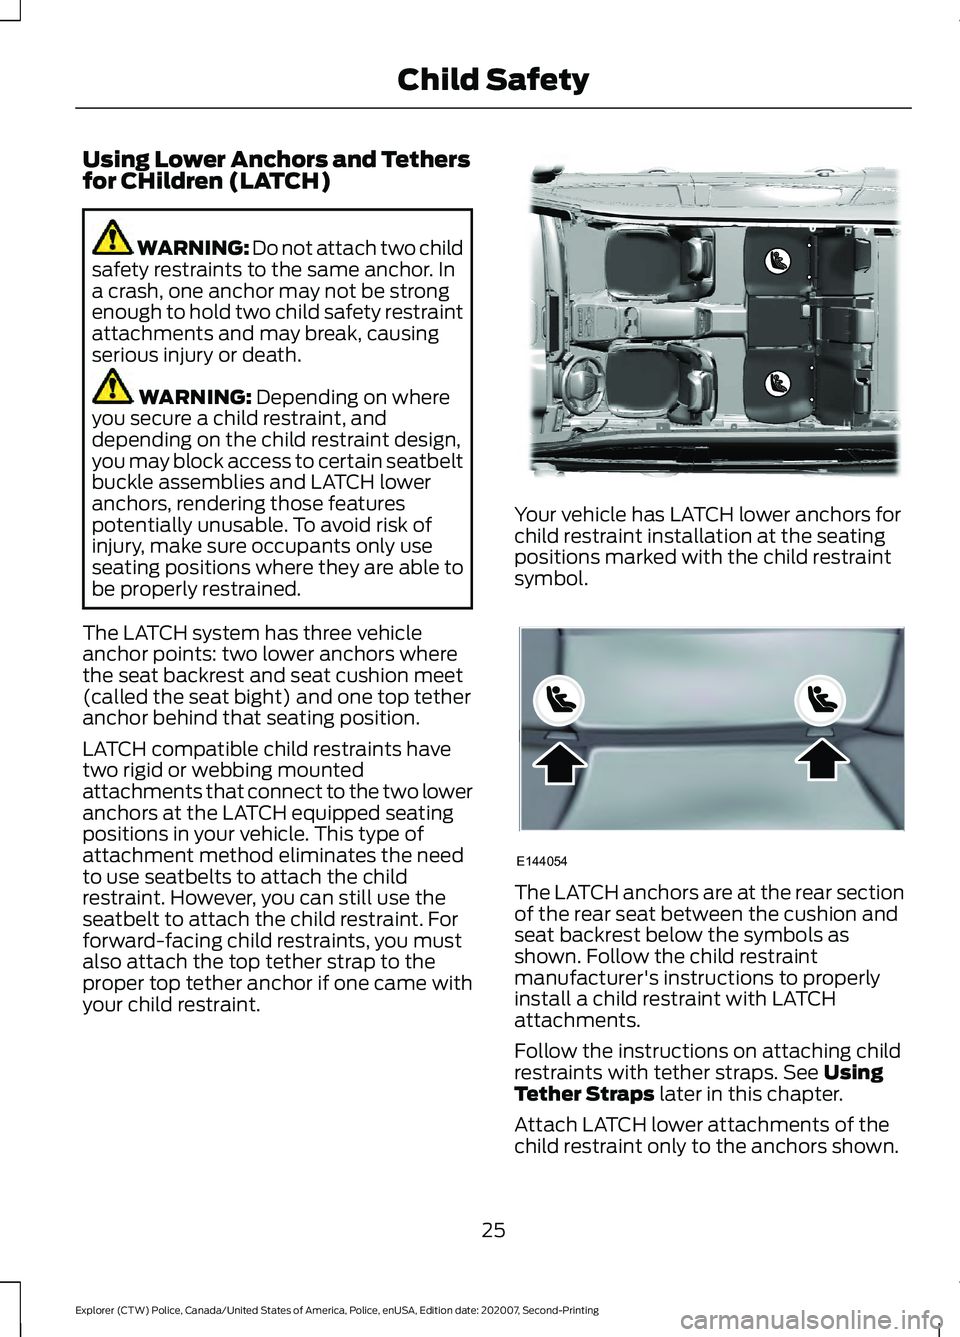
your child restraint. Your vehicle has LATCH lower anchors for
child restraint installation at the seating
positions marked with the child restraint
symbol.
The LATCH anchors are at the rear section
of the rear seat between the cushion and
seat backrest below the symbols as
shown. Follow the child restraint
manufacturer's instructions to properly
install a child restraint with LATCH
attachments.
Follow the instructions on attaching child
restraints with tether straps. See
Using
Tether Straps later in this chapter.
Attach LATCH lower attachments of the
child restraint only to the anchors shown.
25
Explorer (CTW) Police, Canada/United States of America, Police, enUSA, Edition date: 202007, Second-Printing Child SafetyE322471 E144054
Page 35 of 412
Note:
The child restraint must rest tightly
against the vehicle seat upon which it is
installed. It may be necessary to lift or
remove the head restraint. See Seats (page
107).
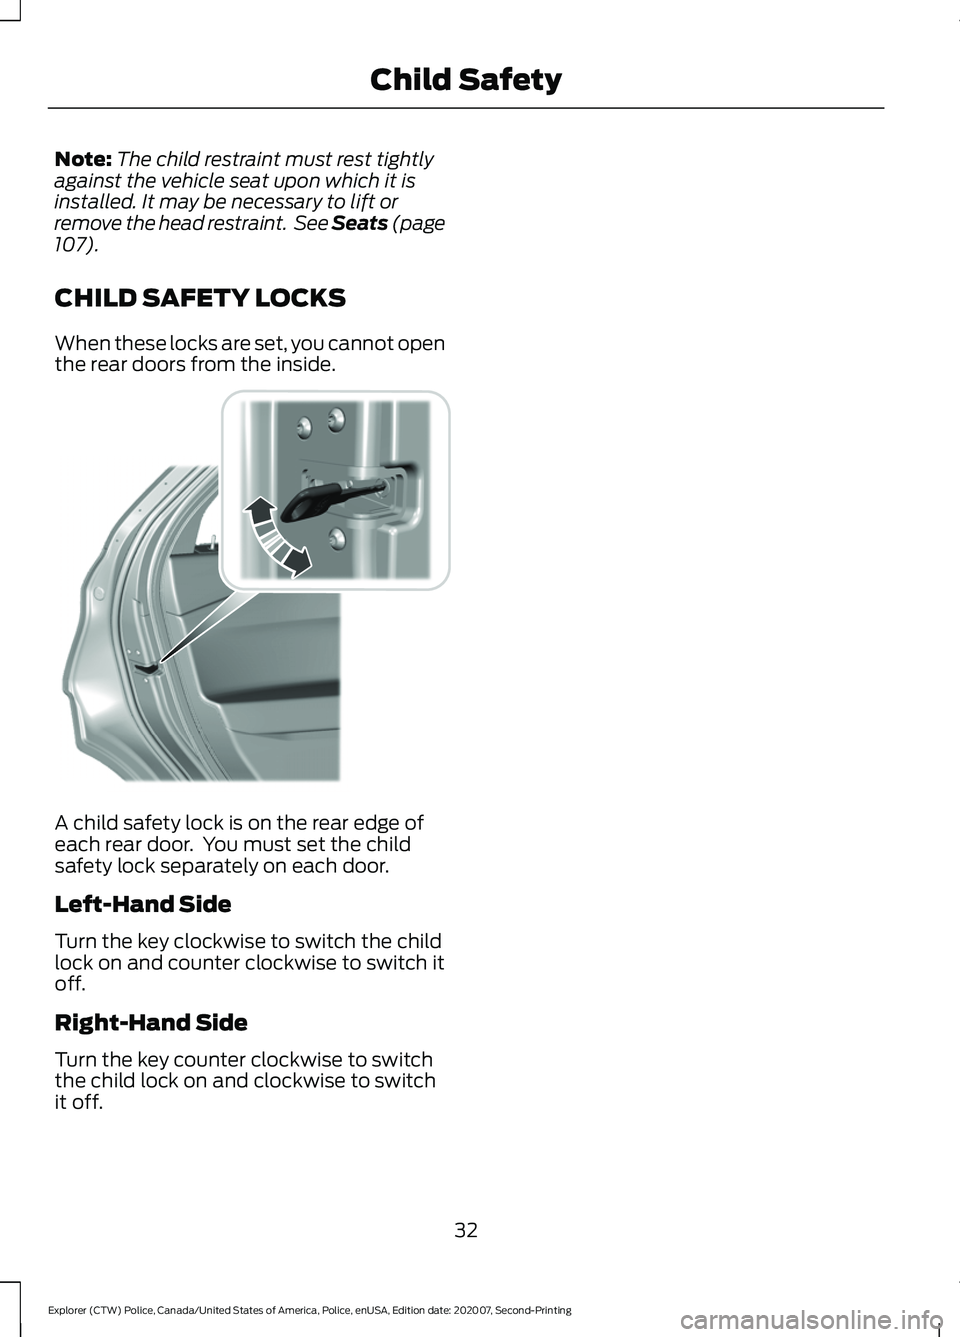
CHILD SAFETY LOCKS
When these locks are set, you cannot open
the rear doors from the inside. A child safety lock is on the rear edge of
each rear door. You must set the child
safety lock separately on each door.
Left-Hand Side
Turn the key clockwise to switch the child
lock on and counter clockwise to switch it
off.
Right-Hand Side
Turn the key counter clockwise to switch
the child lock on and clockwise to switch
it off.
32
Explorer (CTW) Police, Canada/United States of America, Police, enUSA, Edition date: 202007, Second-Printing Child SafetyE300933
Page 36 of 412

PRINCIPLE OF OPERATION
WARNING: Always drive and ride
with your seatback upright and the lap
belt snug and low across the hips. WARNING:
Children must always
be properly restrained. WARNING:
Do not allow a
passenger to hold a child on their lap
when your vehicle is moving. Failure to
follow this instruction could result in
personal injury or death in the event of a
sudden stop or crash. WARNING:
All occupants of your
vehicle, including the driver, should
always properly wear their seatbelts,
even when an airbag supplemental
restraint system is provided. Failure to
properly wear your seatbelt could
seriously increase the risk of injury or
death. WARNING:
It is extremely
dangerous to ride in a cargo area, inside
or outside of a vehicle. In a crash, people
riding in these areas are more likely to be
seriously injured or killed. Do not allow
people to ride in any area of your vehicle
that is not equipped with seats and
seatbelts. Make sure everyone in your
vehicle is in a seat and properly using a
seatbelt. Failure to follow this warning
could result in serious personal injury or
death. WARNING:
In a rollover crash, an
unbelted person is significantly more
likely to die than a person wearing a
seatbelt. WARNING:
Each seating position
in your vehicle has a specific seatbelt
assembly made up of one buckle and
one tongue designed to be used as a pair.
Use the shoulder belt on the outside
shoulder only. Never wear the shoulder
belt under the arm. Never use a single
seatbelt for more than one person. WARNING:
Even with advanced
restraints systems, properly restrain
children 12 and under in a rear seating
position. Failure to follow this could
seriously increase the risk of injury or
death. WARNING:
Seatbelts and seats
may be hot in a vehicle that is in the
sunshine. The hot seatbelts or seats may
burn a small child. Check seat covers and
buckles before you place a child
anywhere near them.
All seating positions in your vehicle have
lap and shoulder seatbelts. All occupants
of the vehicle should always properly wear
their seatbelts, even when an airbag
supplemental restraint system is provided.
The seatbelt system consists of:
• Lap and shoulder seatbelts.
• Shoulder seatbelt with automatic
locking mode, (except driver seatbelt).
• Height adjuster at the front outermost
seating positions.
• Seatbelt pretensioners at the front
outermost and second row outermost
seating positions.
• Belt tension sensor at the front
outermost passenger seating position. •
Seatbelt warning light and chime.
33
Explorer (CTW) Police, Canada/United States of America, Police, enUSA, Edition date: 202007, Second-Printing SeatbeltsE71880
Page 38 of 412
Pregnant women should always wear their
seatbelt. Position the lap belt portion of a
combination lap and shoulder belt low
across the hips below the belly and worn
as tight as comfort allows. Position the
shoulder belt to cross the middle of the
shoulder and the center of the chest.
Seatbelt Locking Modes
WARNING: If your vehicle is
involved in a crash, have the seatbelts
and associated components inspected
as soon as possible. Failure to follow this
instruction could result in personal injury
or death.
All safety restraints in the vehicle are
combination lap and shoulder belts. The
driver seatbelt has the first type of locking
mode, and the front outboard passenger
and rear seat seatbelts have both types of
locking modes described as follows:
Vehicle Sensitive Mode
This is the normal retractor mode, which
allows free shoulder belt length
adjustment to your movements and
locking in response to vehicle movement.
For example, if the driver brakes suddenly
or turns a corner sharply, or the vehicle
receives an impact of about
5 mph
(8 km/h) or more, the combination
seatbelts lock to help reduce forward
movement of the driver and passengers.
In addition, the design of the retractor is to
lock if you pull the webbing out too quickly.
If the seatbelt retractor locks, slowly lower
the height adjuster to allow the seatbelt
to retract. If the retractor does not unlock,
pull the seatbelt out slowly then feed a small length of webbing back toward the
stowed position. For rear seatbelts, recline
the rear seat backrest or push the seat
backrest cushion away from the seatbelt.
Feed a small length of webbing back
toward the stowed position.
Automatic Locking Mode
In this mode, the shoulder belt
automatically pre-locks. The belt retracts
to remove any slack in the shoulder belt.
The automatic locking mode is not
available on the driver seatbelt.
When to Use the Automatic Locking
Mode
Use this mode any time you install a child
safety seat, except a booster, in passenger
front or rear seating positions. Properly
restrain children 12 years old and under in
a rear seating position whenever possible.
See
Child Safety (page 20).
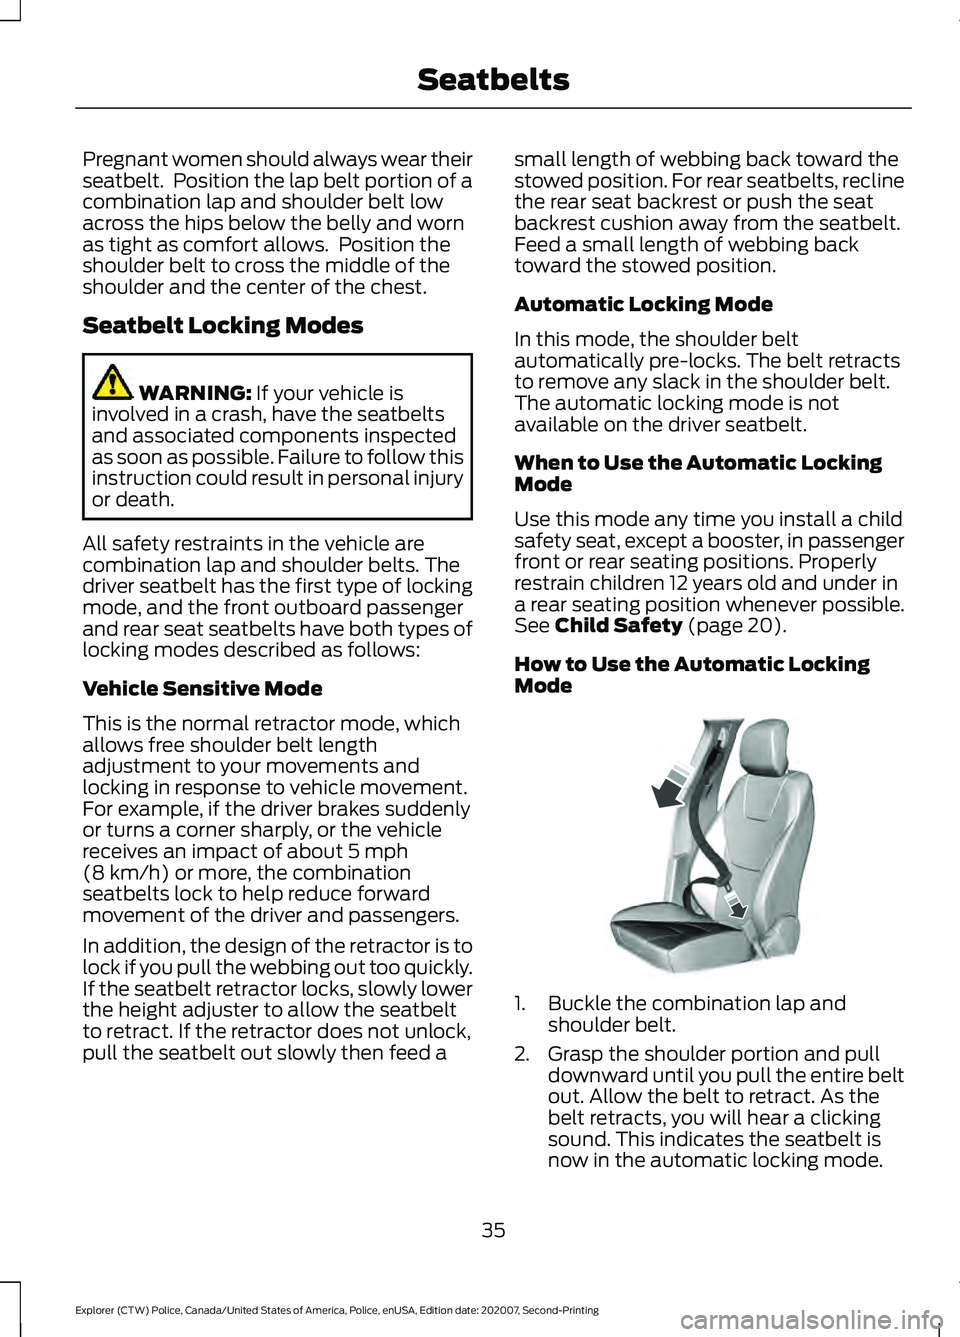
How to Use the Automatic Locking
Mode 1. Buckle the combination lap and
shoulder belt.
2. Grasp the shoulder portion and pull downward until you pull the entire belt
out. Allow the belt to retract. As the
belt retracts, you will hear a clicking
sound. This indicates the seatbelt is
now in the automatic locking mode.
35
Explorer (CTW) Police, Canada/United States of America, Police, enUSA, Edition date: 202007, Second-Printing SeatbeltsE142591
Page 39 of 412
How to Disengage the Automatic
Locking Mode
Unbuckle the combination lap and
shoulder belt and allow it to retract
completely to disengage the automatic
locking mode and turn on the vehicle
sensitive (emergency) locking mode.
SEATBELT HEIGHT
ADJUSTMENT
WARNING: Position the seatbelt
height adjuster so that the seatbelt rests
across the middle of your shoulder.
Failure to adjust the seatbelt correctly
could reduce its effectiveness and
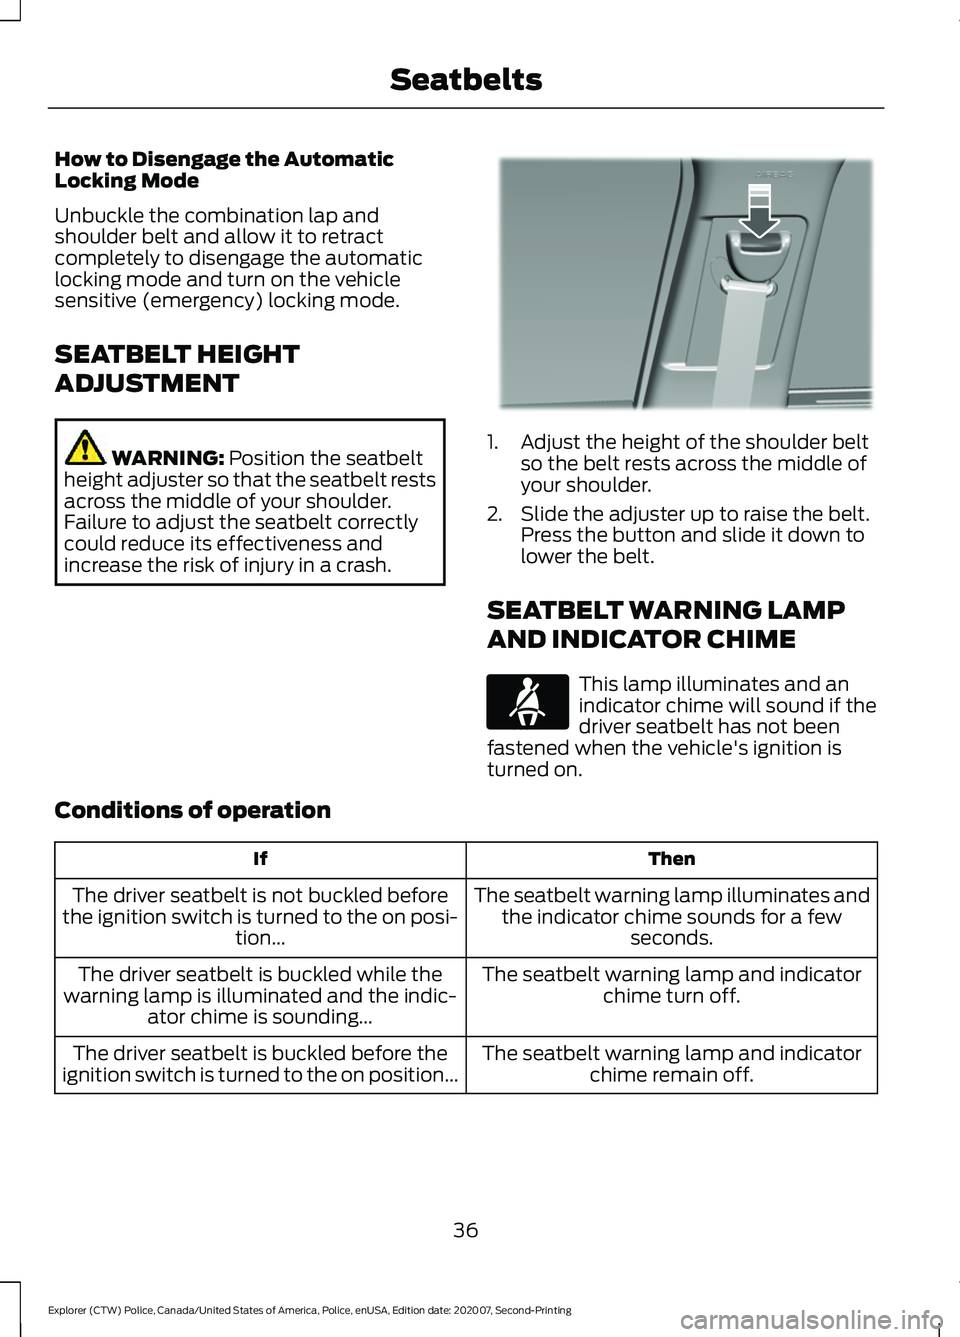
increase the risk of injury in a crash. 1. Adjust the height of the shoulder belt
so the belt rests across the middle of
your shoulder.
2. Slide the adjuster up to raise the belt. Press the button and slide it down to
lower the belt.
SEATBELT WARNING LAMP
AND INDICATOR CHIME This lamp illuminates and an
indicator chime will sound if the
driver seatbelt has not been
fastened when the vehicle's ignition is
turned on.
Conditions of operation Then
If
The seatbelt warning lamp illuminates andthe indicator chime sounds for a few seconds.
The driver seatbelt is not buckled before
the ignition switch is turned to the on posi- tion...
The seatbelt warning lamp and indicatorchime turn off.
The driver seatbelt is buckled while the
warning lamp is illuminated and the indic- ator chime is sounding...
The seatbelt warning lamp and indicatorchime remain off.
The driver seatbelt is buckled before the
ignition switch is turned to the on position...
36
Explorer (CTW) Police, Canada/United States of America, Police, enUSA, Edition date: 202007, Second-Printing SeatbeltsE201573 E71880
Page 52 of 412
WARNING: Keep the areas in front
of the airbags free from obstruction. Do
not affix anything to or over the airbag
covers. Objects could become projectiles
during airbag deployment. Failure to
follow this instruction could result in
personal injury or death.
Dual driver and passenger airbags, side
airbags and knee airbags affect the way
police equipment can be mounted in police
vehicles.
Any surfaces that could come into contact
with an airbag, once it has deployed, must
not damage the airbag or alter its
deployment path.
Once the airbag has fully deployed, any
peripheral equipment surfaces that could
come into contact with the airbag (such
as when the airbag deflates with the
loading of an occupant) must not damage
the airbag or alter its deployment path.
Sharp edges, corners or protrusions could
damage the nylon airbag material and
reduce the effectiveness of the airbag.
Some approximate dimensions for airbags,
at full inflation, are provided. These
dimensions are somewhat flexible and
represent free form deployments without
the loading of occupants. The shaded
areas in Figures 8 through 10 represent
available police equipment mounting
zones. These zones are shown for police
vehicles with standard bucket seats. The
zone dimensions provided in Figures 8
through 10 are approximate and will vary
with the loading of occupants in the seats.
All airbag and equipment mounting zone
dimensions are approximate due to
different airbag deployment
characteristics.
Do not mount equipment between the side
of the front seat and the door trim that will
block deployment of the side airbag. Do not mount equipment between the
seats and the body side as shown in Figure
7 that would prevent the side curtain airbag
from achieving occupant coverage.
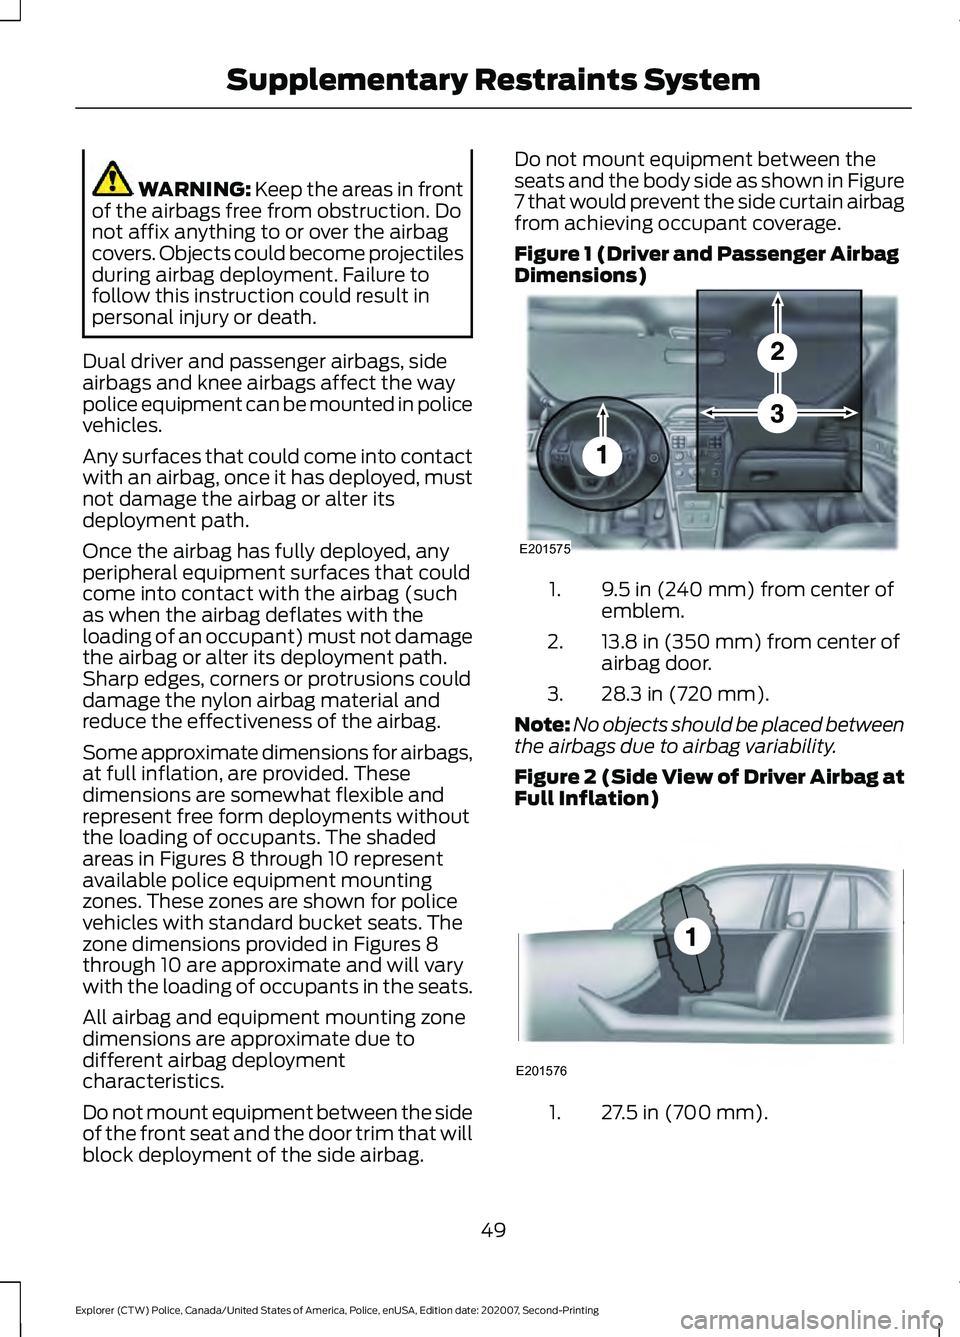
Figure 1 (Driver and Passenger Airbag
Dimensions)
9.5 in (240 mm) from center of
emblem.
1.
13.8 in (350 mm) from center of
airbag door.
2.
28.3 in (720 mm).
3.
Note: No objects should be placed between
the airbags due to airbag variability.
Figure 2 (Side View of Driver Airbag at
Full Inflation) 27.5 in (700 mm).
1.
49
Explorer (CTW) Police, Canada/United States of America, Police, enUSA, Edition date: 202007, Second-Printing Supplementary Restraints SystemE201575 E201576
Page 58 of 412

GENERAL INFORMATION ON
RADIO FREQUENCIES
This device complies with Part 15 of the
FCC Rules and with Licence exempt RSS
Standards of Industry Canada. Operation
is subject to the following two conditions:
•
This device may not cause harmful
interference, and
• This device must accept any
interference received, including
interference that may cause undesired
operation. WARNING: Changes or
modifications not expressively approved
by the party responsible for compliance
could void the user's authority to operate
the equipment. The term "IC:" before the
radio certification number only signifies
that Industry Canada technical
specifications were met.
The typical operating range for your
transmitter is approximately
33 ft (10 m).
Vehicles with the remote start feature will
have a greater range. One of the following
could cause a decrease in operating range:
• Weather conditions.
• Nearby radio towers.
• Structures around the vehicle.
• Other vehicles parked next to your
vehicle.
Other short distance radio transmissions,
for example amateur radios, medical
equipment, wireless headphones, remote
controls and alarm systems can also use
the radio frequency used by your remote
control. If the frequencies are jammed, you
will not be able to use your remote control.
You can lock and unlock the doors with the
key.
Note: Make sure to lock your vehicle before
leaving it unattended. Note:
If you are in range, the remote control
will operate if you press any button
unintentionally.
Note: The remote control contains sensitive
electrical components. Exposure to moisture
or impact may cause permanent damage.
REMOTE CONTROL
(IF EQUIPPED)
Note: If there is a problem with the remote
entry system, make sure to take all remote
controls with you to an authorized dealer in
order to aid in troubleshooting the problem.
Type 1 55
Explorer (CTW) Police, Canada/United States of America, Police, enUSA, Edition date: 202007, Second-Printing Keys and Remote ControlsE203600
Page 60 of 412

Sounding the Panic Alarm (If Equipped)
On Type 1, press the button to
sound the panic alarm. Press the
button again or switch the
ignition on to turn it off.
Note: The panic alarm operates regardless
of the ignition position.
Opening the Liftgate With the
Liftgate Button (If Equipped) On Type 2, press the button to
unlock the liftgate. The liftgate
unlocks for 45 seconds, during
which time you can open the liftgate using
the exterior liftgate release button. See
Manual Liftgate
(page 61).
Note: Only the liftgate unlocks. All other
passenger doors remain in the previous
locking state.
Note: If you do not open the liftgate within
45 seconds of unlocking it, the liftgate locks
again. Press the button on the remote
control or use the key blade inserted into
the liftgate lock cylinder to unlock the
liftgate again.
Note: The liftgate does not unlock when
you unlock all the doors using the remote
control or power door lock control, unless
you use the global unlock feature which,
overrides the 45-second timer.
REPLACING A LOST KEY OR
REMOTE CONTROL
Replacement keys or remote controls can
be purchased from an authorized dealer.
Authorized dealers can program remote
controls for your vehicle.
57
Explorer (CTW) Police, Canada/United States of America, Police, enUSA, Edition date: 202007, Second-Printing Keys and Remote ControlsE138624