2021 FORD POLICE INTERCEPTOR brake
[x] Cancel search: brakePage 271 of 412

5. Train the tire pressure monitoring
system sensors in the tires using the
following system reset sequence
starting with the left front tire in the
following clockwise order: Left front -
driver side front tire, Right front -
passenger side front tire, Right rear -
passenger side rear tire, Left rear -
driver side rear tire.
6. Remove the valve cap from the valve stem on the left front tire. Decrease the
air pressure until the horn sounds.
Note: The single horn tone confirms that
the sensor identification code has been
learned by the module for this position. If a
double horn is heard, the reset procedure
was unsuccessful, and you must repeat it.
7. Remove the valve cap from the valve stem on the right front tire. Decrease
the air pressure until the horn sounds.
8. Remove the valve cap from the valve stem on the right rear tire. Decrease the
air pressure until the horn sounds.
9. Remove the valve cap from the valve stem on the left rear tire. Decrease the
air pressure until the horn sounds.
Training is complete after the horn
sounds for the last tire trained, driver
side rear tire, the system indicator
stops flashing, and a message shows
in the information display.
10. Turn the ignition off. If two short horn
beeps are heard, the reset procedure
was unsuccessful and you must
repeat it. If after repeating the
procedure and two short beeps are
heard when the ignition is turned to
off, seek assistance from your
authorized dealer. 11.
Set all four tires to the recommended
air pressure as indicated on the
Safety Compliance Certification
Label, affixed to either the door hinge
pillar, door-latch post, or the door
edge that meets the door-latch post,
next to the driver seating position or
Tire Label located on the B-Pillar or
the edge of the driver door.
CHANGING A ROAD WHEEL (IF
EQUIPPED) WARNING:
If the tire pressure
monitor sensor becomes damaged it
may not function.
Note: You should only use tire sealants in
roadside emergencies as they may cause
damage to the tire pressure monitoring
system sensor.
Note: The tire pressure monitoring system
indicator light illuminates when the spare
tire is in use. To restore the full function of
the monitoring system, all road wheels
equipped with tire pressure monitoring
sensors must be mounted on the vehicle.
If you get a flat tire when driving, do not
apply the brake heavily. Instead, gradually
decrease your speed. Hold the steering
wheel firmly and slowly move to a safe
place on the side of the road.
Have a flat serviced by an authorized
dealer in order to prevent damage to the
tire pressure monitoring system sensors.
See
Tire Pressure Monitoring System
(page 263). Replace the spare tire with a
road tire as soon as possible. During
repairing or replacing of the flat tire, have
the authorized dealer inspect the tire
pressure monitoring system sensor for
damage.
268
Explorer (CTW) Police, Canada/United States of America, Police, enUSA, Edition date: 202007, Second-Printing Wheels and Tires
Page 273 of 412

Drive cautiously when using a full-size
dissimilar spare wheel and tire assembly
and seek service as soon as possible.
Tire Change Procedure
WARNING: To reduce the risk of
possible serious injury or death, do not
remove the full size spare tire from the
factory secured location. This location
is necessary to achieve police-rated
75 mph (120 km/h)
rear impact
crash-test performance. Removal
increases the risk of fuel leak in
high-speed rear impacts. WARNING:
The jack supplied with
this vehicle is only intended for changing
wheels. Do not use the vehicle jack other
than when you are changing a wheel in
an emergency. WARNING: Check that the vehicle
jack is not damaged or deformed and
the thread is lubricated and clean. WARNING:
To help prevent your
vehicle from moving when changing a
wheel, shift the transmission into park
(P), set the parking brake and use an
appropriate block or wheel chock to
secure the wheel diagonally opposite to
the wheel being changed. For example,
when changing the front left wheel,
place an appropriate block or wheel
chock on the right rear wheel. WARNING:
Always use the jack
provided as original equipment with your
vehicle. If using a jack other than the one
provided, make sure the jack capacity is
adequate for the vehicle weight,
including any vehicle cargo or
modifications. If you are unsure if the jack
capacity is adequate, contact the
authorized dealer. WARNING:
Do not work on your
vehicle when the jack is the only support
as your vehicle could slip off the jack.
Failure to follow this instruction could
result in personal injury or death. WARNING:
Use only the specified
jacking points. If you use other positions,
you may damage the body, steering,
suspension, engine, braking system or
the fuel lines. WARNING:
Never place anything
between the vehicle jack and your
vehicle. WARNING:
Never place anything
between the vehicle jack and the ground. WARNING:
Park your vehicle so
that you do not obstruct the flow of
traffic or place yourself in any danger and
set up a warning triangle. WARNING:
Do not attempt to
change a tire on the side of the vehicle
close to moving traffic. Pull far enough
off the road to avoid the danger of being
hit when operating the jack or changing
the wheel.
Note: Passengers should not remain in your
vehicle when the vehicle is being jacked.
Note: Jack at the specified locations to
avoid damage to the vehicle. 270
Explorer (CTW) Police, Canada/United States of America, Police, enUSA, Edition date: 202007, Second-Printing Wheels and TiresE166722
Page 274 of 412

Note:
No maintenance or additional
lubrication of your jack is required over the
service life of your vehicle.
1. Park on a level surface, set the parking
brake and switch on the hazard
flashers.
2. Apply the parking brake, place the transmission in park (P) or reverse (R)
for manual transmission. Turn the
engine off. 3. Block the wheel diagonally opposite
the flat tire. For example, if the left
front tire is flat, block the right rear
wheel. 4. Turn the wing nut securing the spare
tire counterclockwise, remove the wing
nut.
5. Remove the spare tire, jack and wrench
from the spare tire storage
compartment under the trunk load
floor. 6. Turn the hex nut on the jack
counterclockwise to remove the lug
wrench from jack. This lowers the jack
and loosens the mechanical lock.
271
Explorer (CTW) Police, Canada/United States of America, Police, enUSA, Edition date: 202007, Second-Printing Wheels and TiresE142551 E288598 E175694
Page 277 of 412

TECHNICAL SPECIFICATIONS
Wheel Lug Nut Torque Specifications
WARNING: When you install a wheel, always remove any corrosion, dirt or foreign
materials present on the mounting surfaces of the wheel or the surface of the wheel
hub, brake drum or brake disc that contacts the wheel. Make sure to secure any fasteners
that attach the rotor to the hub so they do not interfere with the mounting surfaces of
the wheel. Installing wheels without correct metal-to-metal contact at the wheel
mounting surfaces can cause the wheel nuts to loosen and the wheel to come off while
your vehicle is in motion, resulting in loss of vehicle control, personal injury or death. lb.ft (Nm)
1
Bolt Size
150 lb.ft (204 Nm)
M14 x 1.5
1 Torque specifications are for nut and bolt threads free of dirt and rust. Use only our
recommended replacement fasteners.
Retighten the lug nuts to the specified torque within 100 miles (160 kilometers) after any
wheel disturbance, such as tire rotation, changing a flat tire or wheel removal. Wheel pilot bore.
A
Inspect the wheel pilot bore and
mounting surface prior to installation.
Remove any visible corrosion or loose
particles.
274
Explorer (CTW) Police, Canada/United States of America, Police, enUSA, Edition date: 202007, Second-Printing Wheels and TiresE145950
Page 282 of 412

VEHICLE IDENTIFICATION
NUMBER
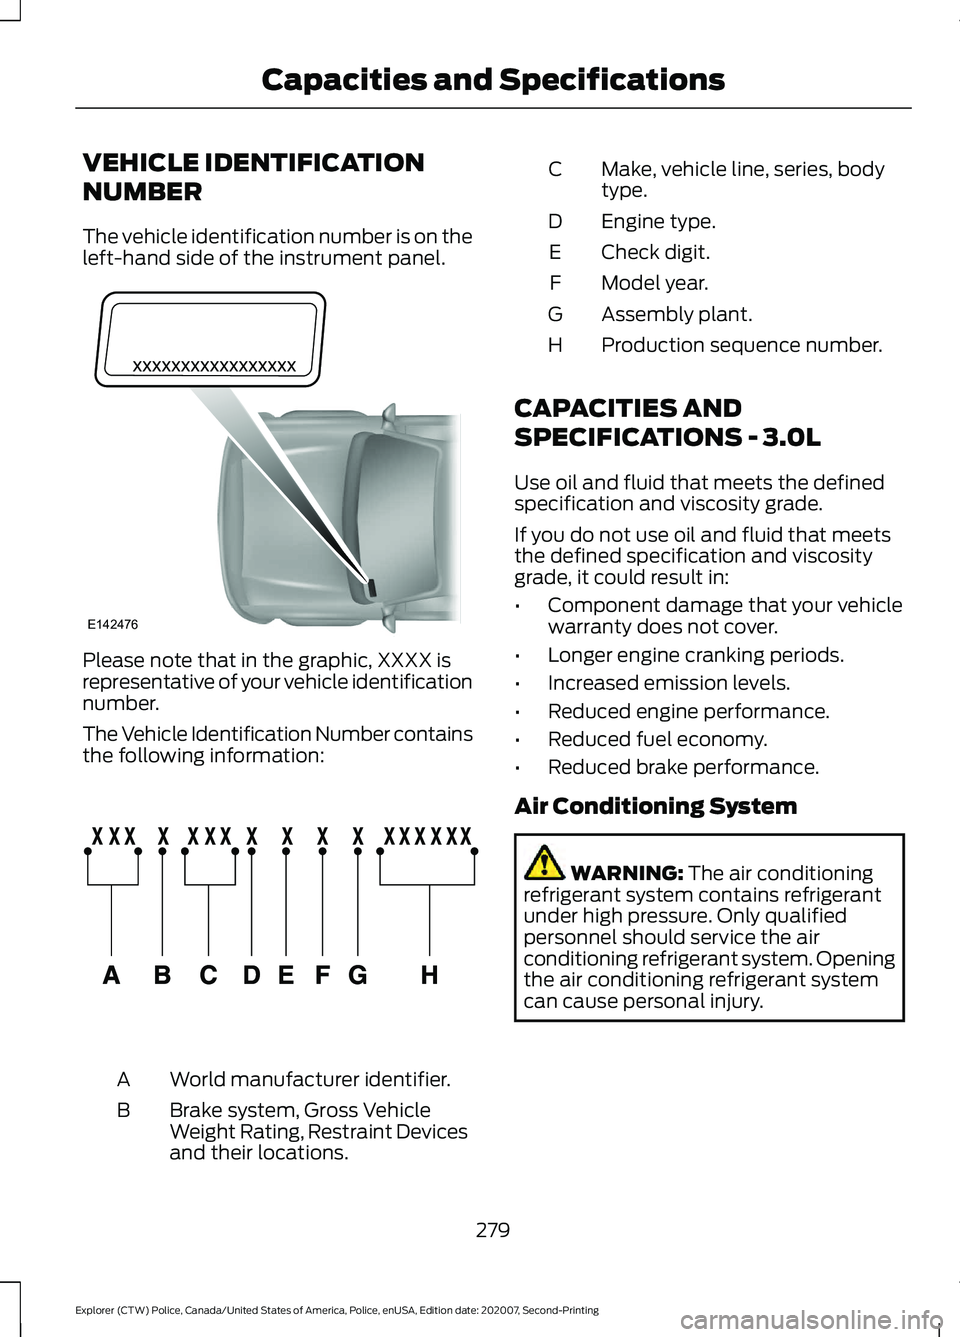
The vehicle identification number is on the
left-hand side of the instrument panel.
Please note that in the graphic, XXXX is
representative of your vehicle identification
number.
The Vehicle Identification Number contains
the following information:
World manufacturer identifier.
A
Brake system, Gross Vehicle
Weight Rating, Restraint Devices
and their locations.
B Make, vehicle line, series, body
type.
C
Engine type.
D
Check digit.
E
Model year.
F
Assembly plant.
G
Production sequence number.
H
CAPACITIES AND
SPECIFICATIONS - 3.0L
Use oil and fluid that meets the defined
specification and viscosity grade.
If you do not use oil and fluid that meets
the defined specification and viscosity
grade, it could result in:
• Component damage that your vehicle
warranty does not cover.
• Longer engine cranking periods.
• Increased emission levels.
• Reduced engine performance.
• Reduced fuel economy.
• Reduced brake performance.
Air Conditioning System WARNING: The air conditioning
refrigerant system contains refrigerant
under high pressure. Only qualified
personnel should service the air
conditioning refrigerant system. Opening
the air conditioning refrigerant system
can cause personal injury.
279
Explorer (CTW) Police, Canada/United States of America, Police, enUSA, Edition date: 202007, Second-Printing Capacities and SpecificationsE142476 E142477
Page 287 of 412

Hydraulic Brake System
Materials
Specification
Name
WSS-M6C65-A2
Motorcraft® DOT 4 LV High Performance Motor
Vehicle Brake Fluid(U.S.)
Motorcraft® DOT 4 LV High Performance Motor
Vehicle Brake Fluid / Liquide de frein automobile
haute performance DOT 4 LV Motorcraft®(Canada)
PM-20(U.S. & Canada)
Note: We recommend using DOT 4 Low
Viscosity (LV) High Performance Brake Fluid
or equivalent meeting WSS-M6C65-A2. Use
of any fluid other than the recommended
fluid could cause reduced brake
performance and not meet our performance
standards. Keep brake fluid clean and dry.
Contamination with dirt, water, petroleum
products or other materials could result in
brake system damage and possible failure. Locks
Materials Specification
Name
-
Motorcraft® Penetrating and Lock Lubricant(U.S.)
Motorcraft® Penetrating Fluid / Liquide dégrippant
Motorcraft®(Canada)
XL-1(U.S.)
CXC-51-A(Canada)
Transfer Case
Capacities Quantity
Variant
1.1 qt (1 L)
All.
284
Explorer (CTW) Police, Canada/United States of America, Police, enUSA, Edition date: 202007, Second-Printing Capacities and Specifications
Page 289 of 412

Materials
Specification
Name
WSS-M2C942-A
Motorcraft® SAE 75W-85 Premium Synthetic
Hypoid Gear Lubricant(U.S.)
Motorcraft® SAE 75W-85 Premium Synthetic
Hypoid Gear Lubricant / Huile synthétique de haute
qualité pour engrenages hypoïdes SAE 75W-85
Motorcraft®(Canada)
XY-75W85-QL(U.S. & Canada)
Washer Reservoir
Capacities Quantity
Variant
Fill as required.
All.
Materials Specification
Name
WSS-M14P19-A
Motorcraft® Premium Windshield Wash Concen-
trate with Bitterant(U.S.)
Motorcraft® Premium Quality Windshield Washer
Fluid / Liquide lave-glace de haute qualité Motor-
craft®(Canada)
ZC-32-B2(U.S.)
CXC-37-A/B/D/F(Canada)
CAPACITIES AND
SPECIFICATIONS - 3.3L
Use oil and fluid that meets the defined
specification and viscosity grade.
If you do not use oil and fluid that meets
the defined specification and viscosity
grade, it could result in:
• Component damage that your vehicle
warranty does not cover.
• Longer engine cranking periods. •
Increased emission levels.
• Reduced engine performance.
• Reduced fuel economy.
• Reduced brake performance.
286
Explorer (CTW) Police, Canada/United States of America, Police, enUSA, Edition date: 202007, Second-Printing Capacities and Specifications
Page 294 of 412

Materials
Specification
Name
ESA-M1C75-B
Motorcraft® Premium Long-Life Grease(U.S.)
Motorcraft® Premium Long-Life Grease / Graisse
longue durée de qualité première Motor-
craft®(Canada)
XG-1-E1(U.S. & Canada)
ESB-M1C93-B
Motorcraft® Multi-Purpose Grease Spray(U.S.)
Motorcraft® Multi-Purpose Grease Spray / Graisse
tout usage en aérosol Motorcraft®(Canada)
XL-5-A(U.S. & Canada)
Hydraulic Brake System
Materials Specification
Name
WSS-M6C65-A2
Motorcraft® DOT 4 LV High Performance Motor
Vehicle Brake Fluid(U.S.)
Motorcraft® DOT 4 LV High Performance Motor
Vehicle Brake Fluid / Liquide de frein automobile
haute performance DOT 4 LV Motorcraft®(Canada)
PM-20(U.S. & Canada)
Note: We recommend using DOT 4 Low
Viscosity (LV) High Performance Brake Fluid
or equivalent meeting WSS-M6C65-A2. Use
of any fluid other than the recommended
fluid could cause reduced brake
performance and not meet our performance
standards. Keep brake fluid clean and dry.
Contamination with dirt, water, petroleum
products or other materials could result in
brake system damage and possible failure. Locks
291
Explorer (CTW) Police, Canada/United States of America, Police, enUSA, Edition date: 202007, Second-Printing Capacities and Specifications