Page 153 of 321

Protected Components
Fuse
Rating
Fuse or
Relay
Number
Not used (spare).
20 A 1
5
Not used (spare).
10 A 2
6
Not used (spare).
10 A 2
7
Not used (spare).
10 A 2
8
Brake on-off switch.
10 A 2
9
Push button start switch.
5 A 2
10
Right-hand and left-hand exterior door locks and handles.
5 A 2
11
RF transceiver module.
7.5 A 2
12
Steering column control module logic.
7.5 A 2
13
Smart datalink connector logic.
Instrument cluster.
Extended power mode module.
10 A 2
14
Smart datalink connector power.
10 A 2
15
Decklid release relay.
15 A 1
16
Combined sensor module.
5 A 2
17
Telematics control unit - modem.
5 A 2
18
Not used (spare).
7.5 A 2
19
Front damper controllers.
7.5 A 2
20
Shift indicator module head up display.
5 A 2
21
Interior temperature sensor.
Extended power mode module.
5 A 2
22
Right-hand window switch illumination.
10 A 1
23
Right-hand door lock switch illumination.
150
Ford GT (CGX) Canada/United States of America, enUSA, Edition date: 202010, First-Printing Fuses
Page 154 of 321

Protected Components
Fuse
Rating
Fuse or
Relay
Number
Left-hand door lock switch illumination.
Power mirror/window switch (motor).
Right-hand smart window motor (logic).
Left-hand smart window motor (logic).
Central lock relay.
20 A 1
24
Central unlock relay.
Left-hand smart window motor.
30 A 1
25
Right-hand smart window motor.
30 A 1
26
Not used (spare).
30 A 1
27
Electronic steering column lock (relay supply).
20 A 1
28
Not used (spare).
30 A 1
29
Not used (spare).
30 A 1
30
Not used (spare).
15 A 1
31
SYNC.
10 A 1
32
Audio on/off switch.
Gear shift module.
Heating ventilation and air conditioning electronic control unit
power.
Audio control module.
20 A 1
33
Run-start relay (R12).
30 A 1
34
Steering angle sensor module.
5 A 1
35
Auxiliary power point.
15 A 1
36
Heating ventilation and air conditioning electronic control unit
ignition.
20 A 1
37
Front power distribution box ignition (F1, F3, F20, F22).
151
Ford GT (CGX) Canada/United States of America, enUSA, Edition date: 202010, First-Printing Fuses
Page 155 of 321
Protected Components
Fuse
Rating
Fuse or
Relay
Number
Rear power distribution box 1 ignition (F4, F8, F12, F16).
Not used.
—
38
1 Micro 2 fuse.
2 Micro 3 fuse.
Note: Spare fuses can vary per amperage
depending on the trim level of the vehicle.
CHANGING A FUSE
Fuses WARNING: Always replace a fuse
with one that has the specified
amperage rating. Using a fuse with a
higher amperage rating can cause severe
wire damage and could start a fire. If electrical components in the vehicle are
not working, a fuse may have blown. Blown
fuses are identified by a broken wire within
the fuse. Check the appropriate fuses
before replacing any electrical
components.
152
Ford GT (CGX) Canada/United States of America, enUSA, Edition date: 202010, First-Printing FusesE217331
Page 156 of 321
Fuse Types
Fuse Type
Callout
Micro 2
A
Micro 3
B
Maxi
C
Mini
D
M Case
E
J Case
F
J Case Low Profile
G
153
Ford GT (CGX) Canada/United States of America, enUSA, Edition date: 202010, First-Printing FusesE207206
Page 157 of 321

GENERAL INFORMATION
Have your Ford GT serviced regularly to
help maintain its roadworthiness and
resale value. There is a network of Ford GT
service dealers that are certified to help
you with their professional servicing
expertise. We believe that their specially
trained technicians are best qualified to
service your vehicle properly and expertly.
They are supported by a range of highly
specialized tools developed specifically
for servicing the Ford GT.
If your vehicle requires professional service,
an authorized dealer can provide the
necessary parts and service. Check your
warranty information to find out which
parts and services are covered.
Use only recommended fuels, lubricants,
fluids and service parts conforming to
specifications. Motorcraft® parts are
designed and built to provide the best
performance in your vehicle.
Precautions
•
Do not work on a hot engine.
• Make sure that nothing gets caught in
moving parts.
• Do not work on a vehicle with the
engine running in an enclosed space,
unless you are sure you have enough
ventilation.
• Keep all open flames and other burning
material (such as cigarettes) away
from the battery and all fuel related
parts.
Working with the Engine Off
1. Set the parking brake and shift to park
(P).
2. Switch off the engine.
3. Block the wheels. Working with the Engine On WARNING: To reduce the risk of
vehicle damage and personal burn
injuries, do not start your engine with the
air cleaner removed and do not remove
it while the engine is running.
1. Set the parking brake and shift to park
(P).
2. Block the wheels.
OPENING AND CLOSING THE
HOOD
Opening the Front Hood 154
Ford GT (CGX) Canada/United States of America, enUSA, Edition date: 202010, First-Printing MaintenanceE229939
Page 158 of 321

1.
Inside the vehicle, pull the hood release
handle located on the left side panel
left of the pedals.
2. Slightly lift the hood. 3. Release the hood latch by pulling up
on the secondary release lever. 4.
Open the hood and support it with the
prop rod.
Closing the Front Hood
1. Remove the hood prop rod from the under hood slot and securely place it
back in its holder.
2. Lower the hood and lightly press down
until closed.
Note: If you do not close the front hood
correctly, an indicator lamp displays in the
instrument cluster. See Warning Lamps
and Indicators (page 69).
Opening the Rear Hatch
You can open the rear hatch by three
different methods:
• A button on your remote control. See
Remote Control
(page 46).
• In the case of a dead battery or other
electrical concerns, use the key blade
in your remote control. See
Remote
Control (page 46).
• A button on the lighting control switch.
After you release the rear hatch latch, lift
the rear hatch into the open position.
A hydraulic cylinder holds the rear hatch
open.
Closing the Rear Hatch
1. Pull down the rear hatch.
2. Lightly press the hatch into position so
the latch fully engages.
155
Ford GT (CGX) Canada/United States of America, enUSA, Edition date: 202010, First-Printing MaintenanceE233210 E233828
Page 159 of 321

UNDER HOOD OVERVIEW
Negative jump start post. See Jump Starting the Vehicle (page 134).
A.
Brake fluid reservoir.
See Brake Fluid Check (page 162).
B.
Cabin air filter access door. See
Cabin Air Filter (page 85).
C.
Washer fluid reservoir. See
Windshield Washers (page 61).
D.
Front hood sensor. See
Warning Lamps and Indicators (page 69).
E.
Hydraulic fluid reservoir for power steering, active aero and active suspension.
See
Power Steering Fluid Check (page 163).
F.
Positive jump start post. See
Jump Starting the Vehicle (page 134).
G.
Front power distribution box. See
Fuse Specification Chart (page 143).
H.
Engine coolant reservoir.
See Engine Coolant Check (page 158).
I.
Rear power distribution box 2. See
Fuse Specification Chart (page 143).
J.
Rear power distribution box 1. See
Fuse Specification Chart (page 143).
K.
Oil cap, reservoir and dipstick. See
Engine Oil Dipstick (page 157).
L.
156
Ford GT (CGX) Canada/United States of America, enUSA, Edition date: 202010, First-Printing MaintenanceE270336
Page 160 of 321

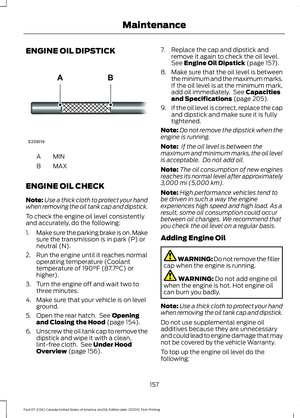
ENGINE OIL DIPSTICK
MINA
MAX
B
ENGINE OIL CHECK
Note: Use a thick cloth to protect your hand
when removing the oil tank cap and dipstick.
To check the engine oil level consistently
and accurately, do the following:
1. Make sure the parking brake is on. Make
sure the transmission is in park (P) or
neutral (N).
2. Run the engine until it reaches normal operating temperature (Coolant
temperature of 190°F (87.7°C) or
higher).
3. Turn the engine off and wait two to three minutes.
4. Make sure that your vehicle is on level ground.
5. Open the rear hatch. See
Opening
and Closing the Hood (page 154).
6. Unscrew the oil tank cap to remove the
dipstick and wipe it with a clean,
lint-free cloth. See
Under Hood
Overview (page 156). 7. Replace the cap and dipstick and
remove it again to check the oil level.
See
Engine Oil Dipstick (page 157).
8. Make sure that the oil level is between
the minimum and the maximum marks.
If the oil level is at the minimum mark,
add oil immediately. See
Capacities
and Specifications (page 205).
9. If the oil level is correct, replace the cap
and dipstick and make sure it is fully
tightened.
Note: Do not remove the dipstick when the
engine is running.
Note: If the oil level is between the
maximum and minimum marks, the oil level
is acceptable. Do not add oil.
Note: The oil consumption of new engines
reaches its normal level after approximately
3,000 mi (5,000 km)
.
Note: High performance vehicles tend to
be driven in such a way the engine
experiences high speed and high load. As a
result, some oil consumption could occur
between oil changes. We recommend that
you check the oil level on a regular basis.
Adding Engine Oil WARNING: Do not remove the filler
cap when the engine is running. WARNING:
Do not add engine oil
when the engine is hot. Hot engine oil
can burn you badly.
Note: Use a thick cloth to protect your hand
when removing the oil tank cap and dipstick.
Do not use supplemental engine oil
additives because they are unnecessary
and could lead to engine damage that may
not be covered by the vehicle Warranty.
To top up the engine oil level do the
following:
157
Ford GT (CGX) Canada/United States of America, enUSA, Edition date: 202010, First-Printing MaintenanceE230019