2021 FORD F-350 lock
[x] Cancel search: lockPage 132 of 666
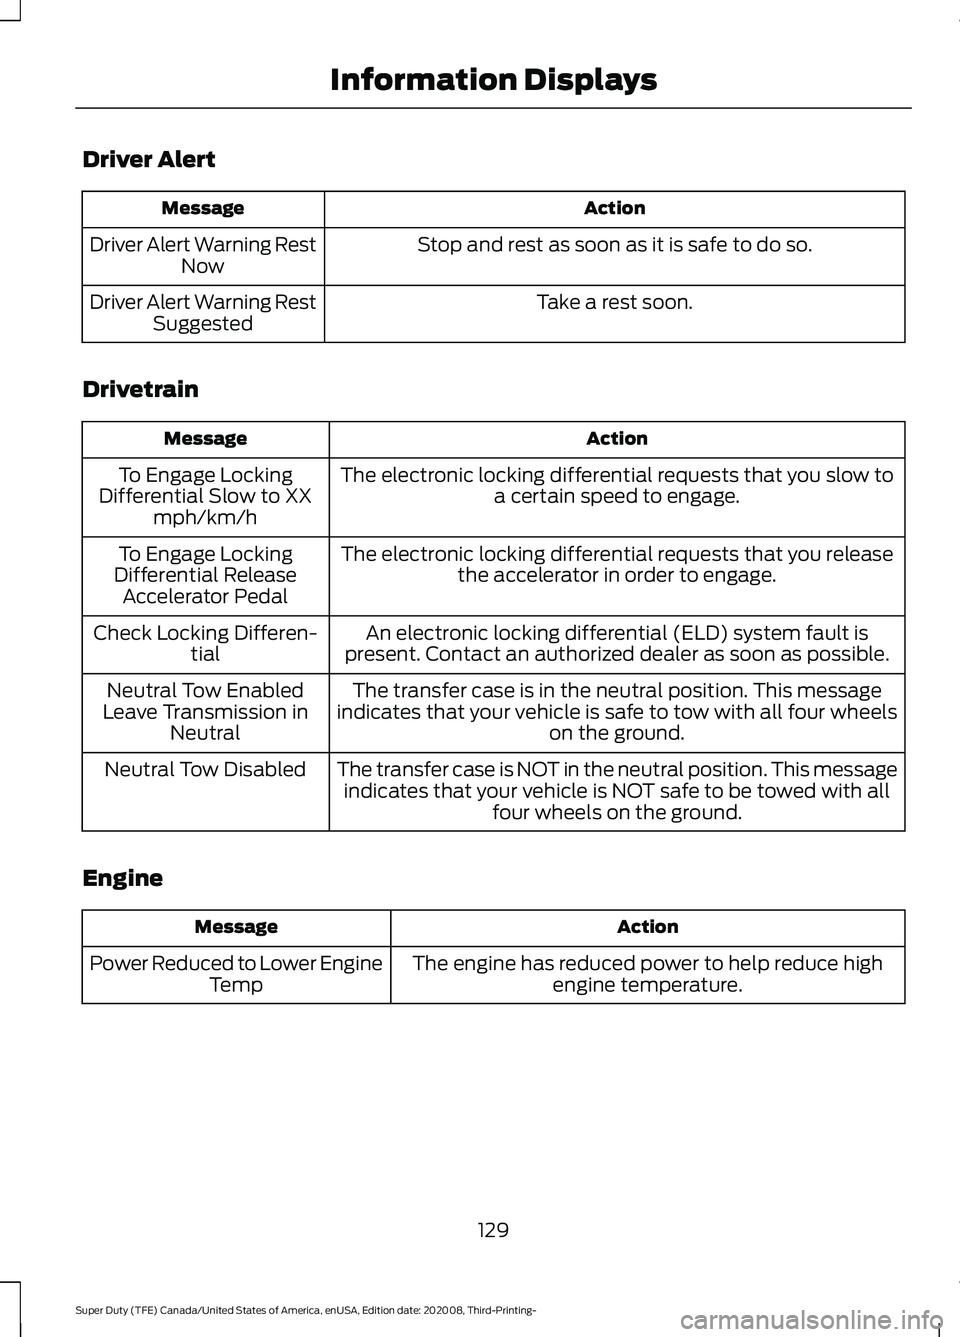
Driver Alert
Action
Message
Stop and rest as soon as it is safe to do so.
Driver Alert Warning Rest
Now
Take a rest soon.
Driver Alert Warning Rest
Suggested
Drivetrain Action
Message
The electronic locking differential requests that you slow toa certain speed to engage.
To Engage Locking
Differential Slow to XX mph/km/h
The electronic locking differential requests that you releasethe accelerator in order to engage.
To Engage Locking
Differential Release Accelerator Pedal
An electronic locking differential (ELD) system fault is
present. Contact an authorized dealer as soon as possible.
Check Locking Differen-
tial
The transfer case is in the neutral position. This message
indicates that your vehicle is safe to tow with all four wheels on the ground.
Neutral Tow Enabled
Leave Transmission in Neutral
The transfer case is NOT in the neutral position. This messageindicates that your vehicle is NOT safe to be towed with all four wheels on the ground.
Neutral Tow Disabled
Engine Action
Message
The engine has reduced power to help reduce highengine temperature.
Power Reduced to Lower Engine
Temp
129
Super Duty (TFE) Canada/United States of America, enUSA, Edition date: 202008, Third-Printing- Information Displays
Page 137 of 666

Action
Message
The electric park brake system has been put into a special
mode that is used to allow service of the rear brakes. Contact an authorized dealer.
Park Brake Maintenance
Mode
The electric park brake system has detected a condition thatrequires service. Some functionality could still be available. Contact an authorized dealer.
Park Brake Limited
Function Service Required
The electric park brake system has detected a condition thatrequires service. Contact an authorized dealer.
Park Brake Malfunction
Service Now
Power Steering Action
Message
The power steering system detects a condition that requiresservice. See an authorized dealer.
Steering Fault Service
Now
The power steering system is not working. Stop your vehiclein a safe place. Contact an authorized dealer.
Steering Loss Stop
Safely
The power steering system detects a condition within the
power steering system or passive entry or passive start system requires service. Contact an authorized dealer.
Steering Assist Fault
Service Required
The steering lock system detects a condition that requiresservice. See an authorized dealer.
Steering Lock Malfunc-
tion Service Now
Pre-Collision Assist Action
Message
You have a blocked sensor due to bad weather, ice, mud or
water in front of the radar sensor. You can typically clean the
sensor to resolve.
Pre-Collision Assist Not
Available Sensor Blocked
A fault with the system has occurred. Contact an authorized
dealer as soon as possible.
Pre-Collision Assist Not
Available
134
Super Duty (TFE) Canada/United States of America, enUSA, Edition date: 202008, Third-Printing- Information Displays
Page 141 of 666
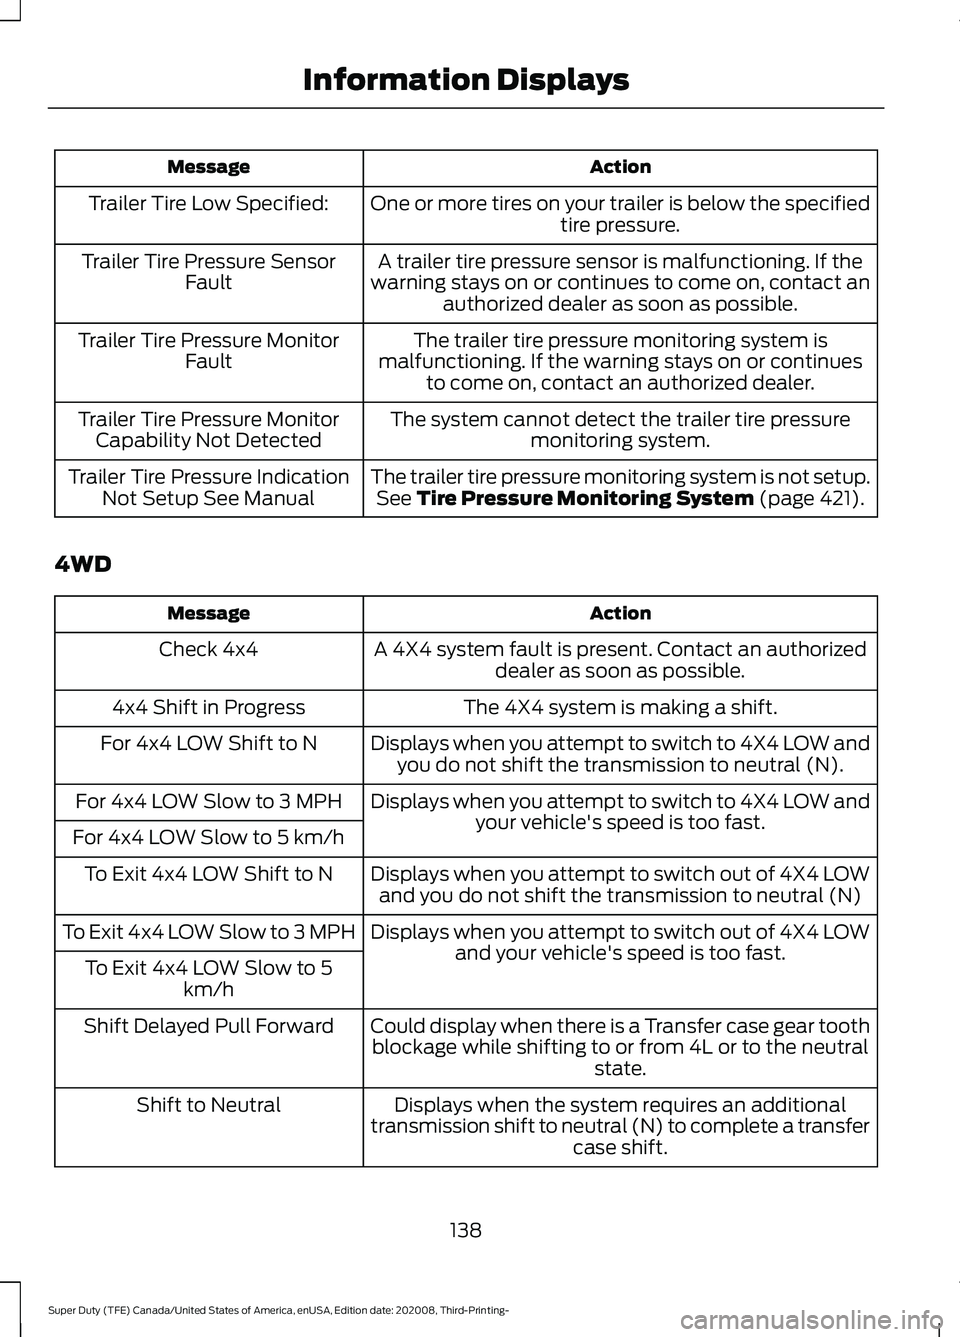
Action
Message
One or more tires on your trailer is below the specifiedtire pressure.
Trailer Tire Low Specified:
A trailer tire pressure sensor is malfunctioning. If the
warning stays on or continues to come on, contact an authorized dealer as soon as possible.
Trailer Tire Pressure Sensor
Fault
The trailer tire pressure monitoring system is
malfunctioning. If the warning stays on or continues to come on, contact an authorized dealer.
Trailer Tire Pressure Monitor
Fault
The system cannot detect the trailer tire pressuremonitoring system.
Trailer Tire Pressure Monitor
Capability Not Detected
The trailer tire pressure monitoring system is not setup.See Tire Pressure Monitoring System (page 421).
Trailer Tire Pressure Indication
Not Setup See Manual
4WD Action
Message
A 4X4 system fault is present. Contact an authorizeddealer as soon as possible.
Check 4x4
The 4X4 system is making a shift.
4x4 Shift in Progress
Displays when you attempt to switch to 4X4 LOW andyou do not shift the transmission to neutral (N).
For 4x4 LOW Shift to N
Displays when you attempt to switch to 4X4 LOW andyour vehicle's speed is too fast.
For 4x4 LOW Slow to 3 MPH
For 4x4 LOW Slow to 5 km/h Displays when you attempt to switch out of 4X4 LOWand you do not shift the transmission to neutral (N)
To Exit 4x4 LOW Shift to N
Displays when you attempt to switch out of 4X4 LOWand your vehicle's speed is too fast.
To Exit 4x4 LOW Slow to 3 MPH
To Exit 4x4 LOW Slow to 5 km/h
Could display when there is a Transfer case gear toothblockage while shifting to or from 4L or to the neutral state.
Shift Delayed Pull Forward
Displays when the system requires an additional
transmission shift to neutral (N) to complete a transfer case shift.
Shift to Neutral
138
Super Duty (TFE) Canada/United States of America, enUSA, Edition date: 202008, Third-Printing- Information Displays
Page 150 of 666
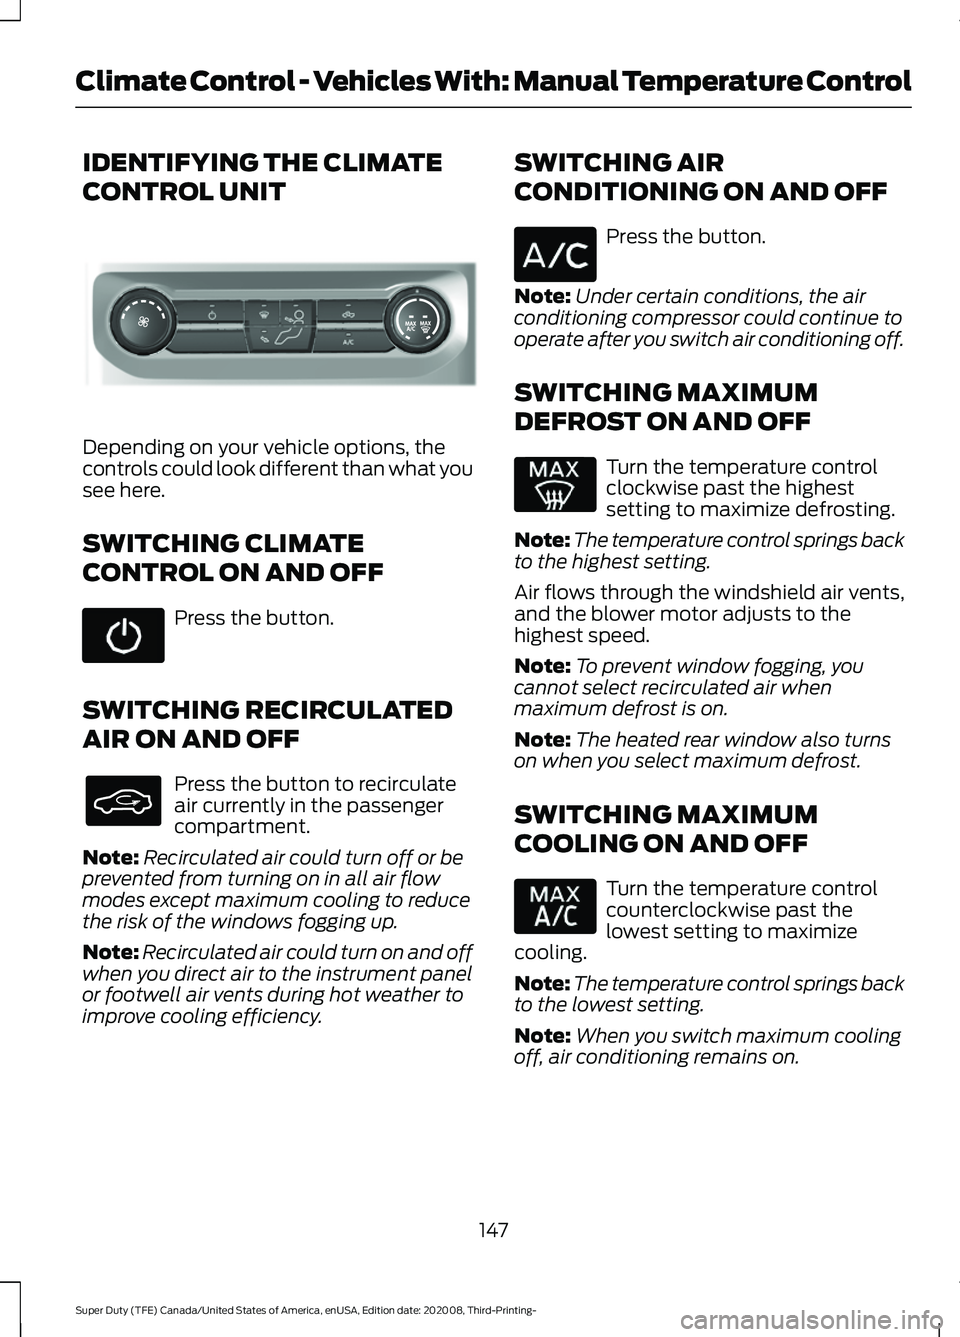
IDENTIFYING THE CLIMATE
CONTROL UNIT
Depending on your vehicle options, the
controls could look different than what you
see here.
SWITCHING CLIMATE
CONTROL ON AND OFF
Press the button.
SWITCHING RECIRCULATED
AIR ON AND OFF Press the button to recirculate
air currently in the passenger
compartment.
Note: Recirculated air could turn off or be
prevented from turning on in all air flow
modes except maximum cooling to reduce
the risk of the windows fogging up.
Note: Recirculated air could turn on and off
when you direct air to the instrument panel
or footwell air vents during hot weather to
improve cooling efficiency. SWITCHING AIR
CONDITIONING ON AND OFF Press the button.
Note: Under certain conditions, the air
conditioning compressor could continue to
operate after you switch air conditioning off.
SWITCHING MAXIMUM
DEFROST ON AND OFF Turn the temperature control
clockwise past the highest
setting to maximize defrosting.
Note: The temperature control springs back
to the highest setting.
Air flows through the windshield air vents,
and the blower motor adjusts to the
highest speed.
Note: To prevent window fogging, you
cannot select recirculated air when
maximum defrost is on.
Note: The heated rear window also turns
on when you select maximum defrost.
SWITCHING MAXIMUM
COOLING ON AND OFF Turn the temperature control
counterclockwise past the
lowest setting to maximize
cooling.
Note: The temperature control springs back
to the lowest setting.
Note: When you switch maximum cooling
off, air conditioning remains on.
147
Super Duty (TFE) Canada/United States of America, enUSA, Edition date: 202008, Third-Printing- Climate Control - Vehicles With: Manual Temperature ControlE308141
Page 151 of 666
SWITCHING THE HEATED
REAR WINDOW ON AND OFF (IF
EQUIPPED)
Press the button to clear the rear
window of thin ice and fog. The
heated rear window turns off
after a short period of time.
Note: Do not use harsh chemicals, razor
blades or other sharp objects to clean or
remove decals from the inside of the heated
rear window as this could cause damage to
the heated rear window grid lines not
covered by the vehicle Warranty.
SWITCHING THE HEATED
MIRRORS ON AND OFF (IF
EQUIPPED) Press the button.
SETTING THE BLOWER MOTOR
SPEED Note:
Lights on the control illuminate to
indicate the blower motor speed.
Note: When you switch the blower motor
off, air conditioning turns off and the
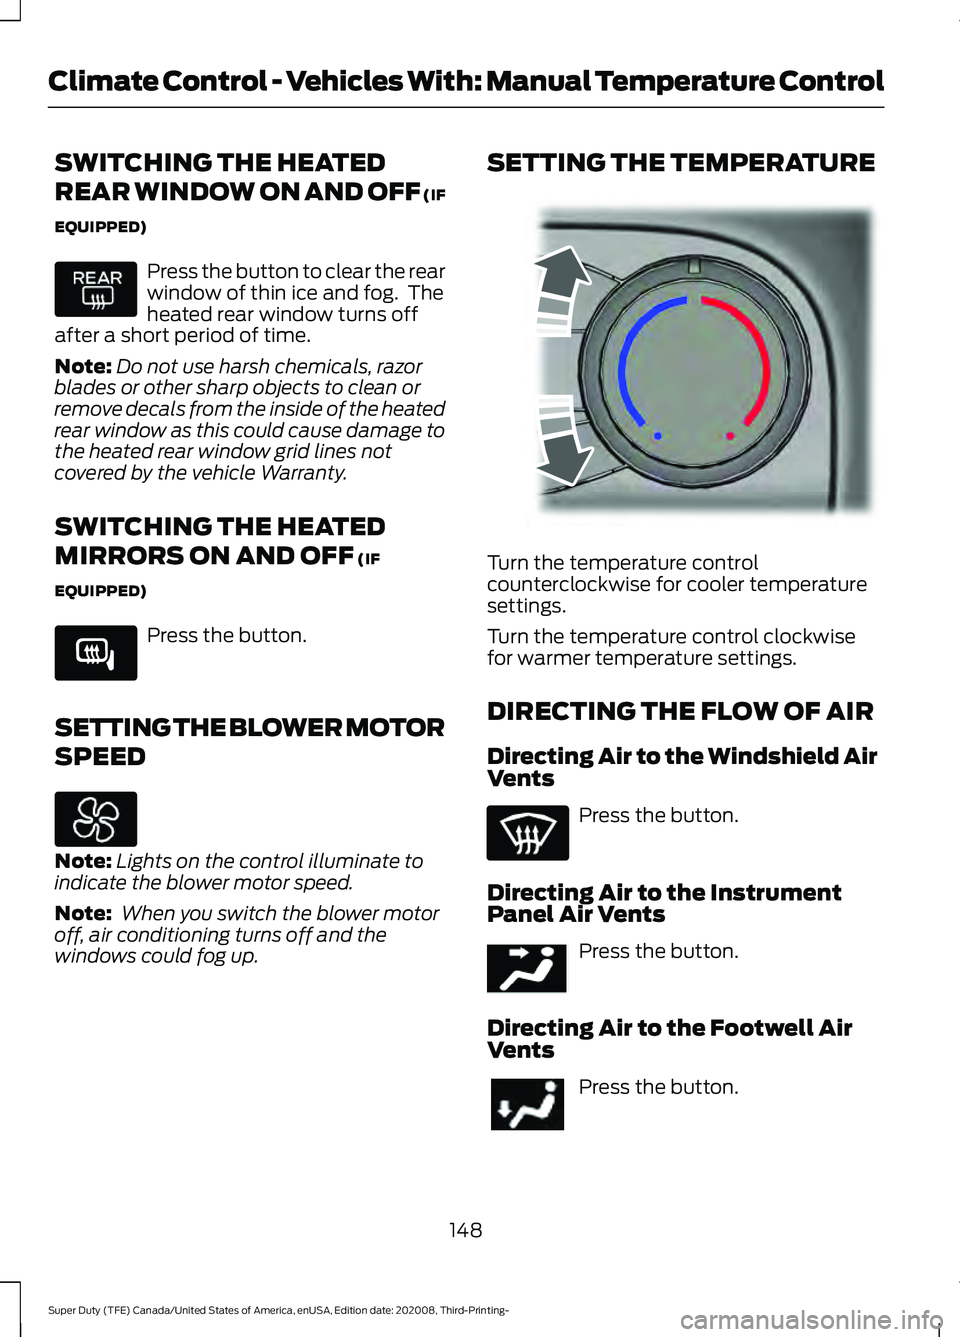
windows could fog up. SETTING THE TEMPERATURE
Turn the temperature control
counterclockwise for cooler temperature
settings.
Turn the temperature control clockwise
for warmer temperature settings.
DIRECTING THE FLOW OF AIR
Directing Air to the Windshield Air
Vents
Press the button.
Directing Air to the Instrument
Panel Air Vents Press the button.
Directing Air to the Footwell Air
Vents Press the button.
148
Super Duty (TFE) Canada/United States of America, enUSA, Edition date: 202008, Third-Printing- Climate Control - Vehicles With: Manual Temperature Control E266189 E244106 E244097
Page 155 of 666
WARNING: The head restraint is a
safety device. Whenever possible it
should be installed and properly
adjusted when the seat is occupied.
Failure to adjust the head restraint
properly could reduce its effectiveness
during certain impacts.
Note: Adjust the seat backrest to an upright
driving position before adjusting the head
restraint. Adjust the head restraint so that
the top of it is level with the top of your head
and as far forward as possible. Make sure
that you remain comfortable. If you are
extremely tall, adjust the head restraint to
its highest position.
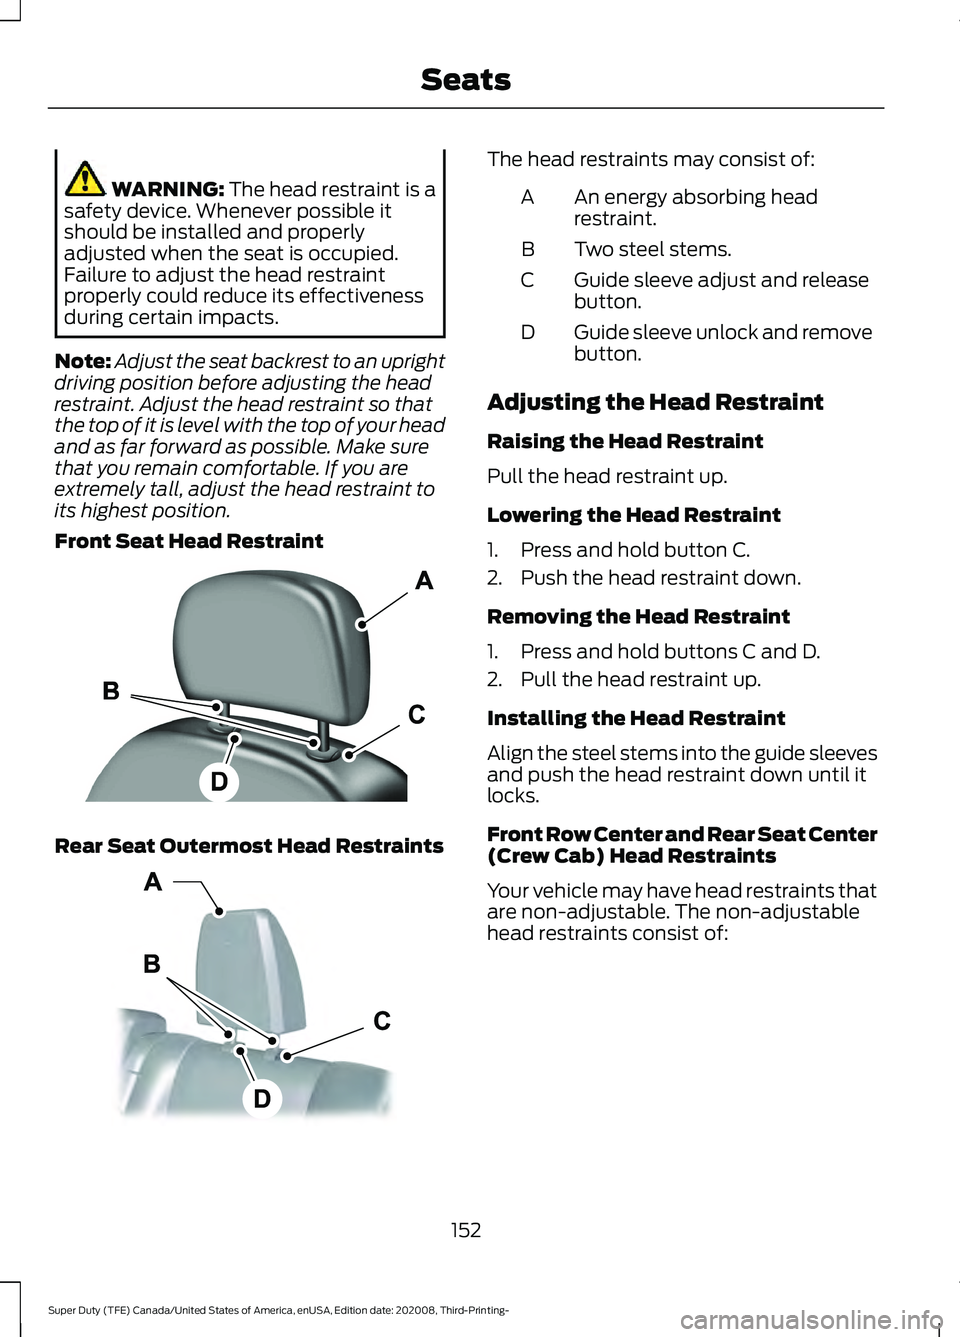
Front Seat Head Restraint Rear Seat Outermost Head Restraints The head restraints may consist of:
An energy absorbing head
restraint.
A
Two steel stems.
B
Guide sleeve adjust and release
button.
C
Guide sleeve unlock and remove
button.
D
Adjusting the Head Restraint
Raising the Head Restraint
Pull the head restraint up.
Lowering the Head Restraint
1. Press and hold button C.
2. Push the head restraint down.
Removing the Head Restraint
1. Press and hold buttons C and D.
2. Pull the head restraint up.
Installing the Head Restraint
Align the steel stems into the guide sleeves
and push the head restraint down until it
locks.
Front Row Center and Rear Seat Center
(Crew Cab) Head Restraints
Your vehicle may have head restraints that
are non-adjustable. The non-adjustable
head restraints consist of:
152
Super Duty (TFE) Canada/United States of America, enUSA, Edition date: 202008, Third-Printing- SeatsE138642 E153105
Page 156 of 666
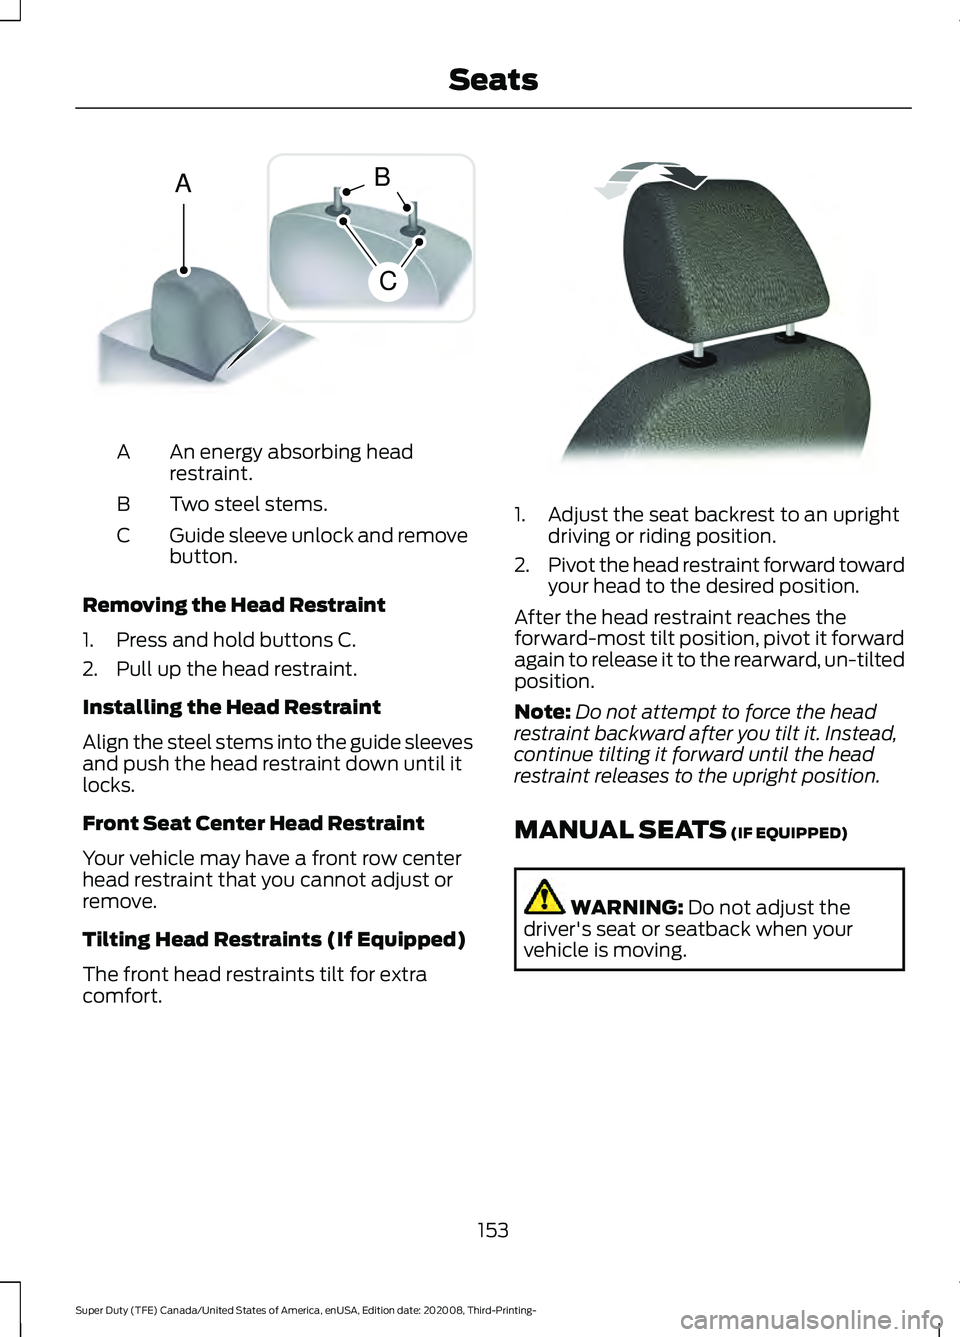
An energy absorbing head
restraint.
A
Two steel stems.
B
Guide sleeve unlock and remove
button.
C
Removing the Head Restraint
1. Press and hold buttons C.
2. Pull up the head restraint.
Installing the Head Restraint
Align the steel stems into the guide sleeves
and push the head restraint down until it
locks.
Front Seat Center Head Restraint
Your vehicle may have a front row center
head restraint that you cannot adjust or
remove.
Tilting Head Restraints (If Equipped)
The front head restraints tilt for extra
comfort. 1. Adjust the seat backrest to an upright
driving or riding position.
2. Pivot the head restraint forward toward
your head to the desired position.
After the head restraint reaches the
forward-most tilt position, pivot it forward
again to release it to the rearward, un-tilted
position.
Note: Do not attempt to force the head
restraint backward after you tilt it. Instead,
continue tilting it forward until the head
restraint releases to the upright position.
MANUAL SEATS (IF EQUIPPED) WARNING:
Do not adjust the
driver's seat or seatback when your
vehicle is moving.
153
Super Duty (TFE) Canada/United States of America, enUSA, Edition date: 202008, Third-Printing- SeatsA
C
B E162872 E144727
Page 160 of 666
MEMORY FUNCTION (IF EQUIPPED)
WARNING:
Before activating the
memory seat, make sure that the area
immediately surrounding the seat is clear
of obstructions and that all occupants
are clear of moving parts. WARNING:
Do not use the memory
function when your vehicle is moving.
This feature recalls the position of the
following:
• Driver seat.
• Power mirrors.
• Optional power steering column.
• Optional power adjustable pedals.
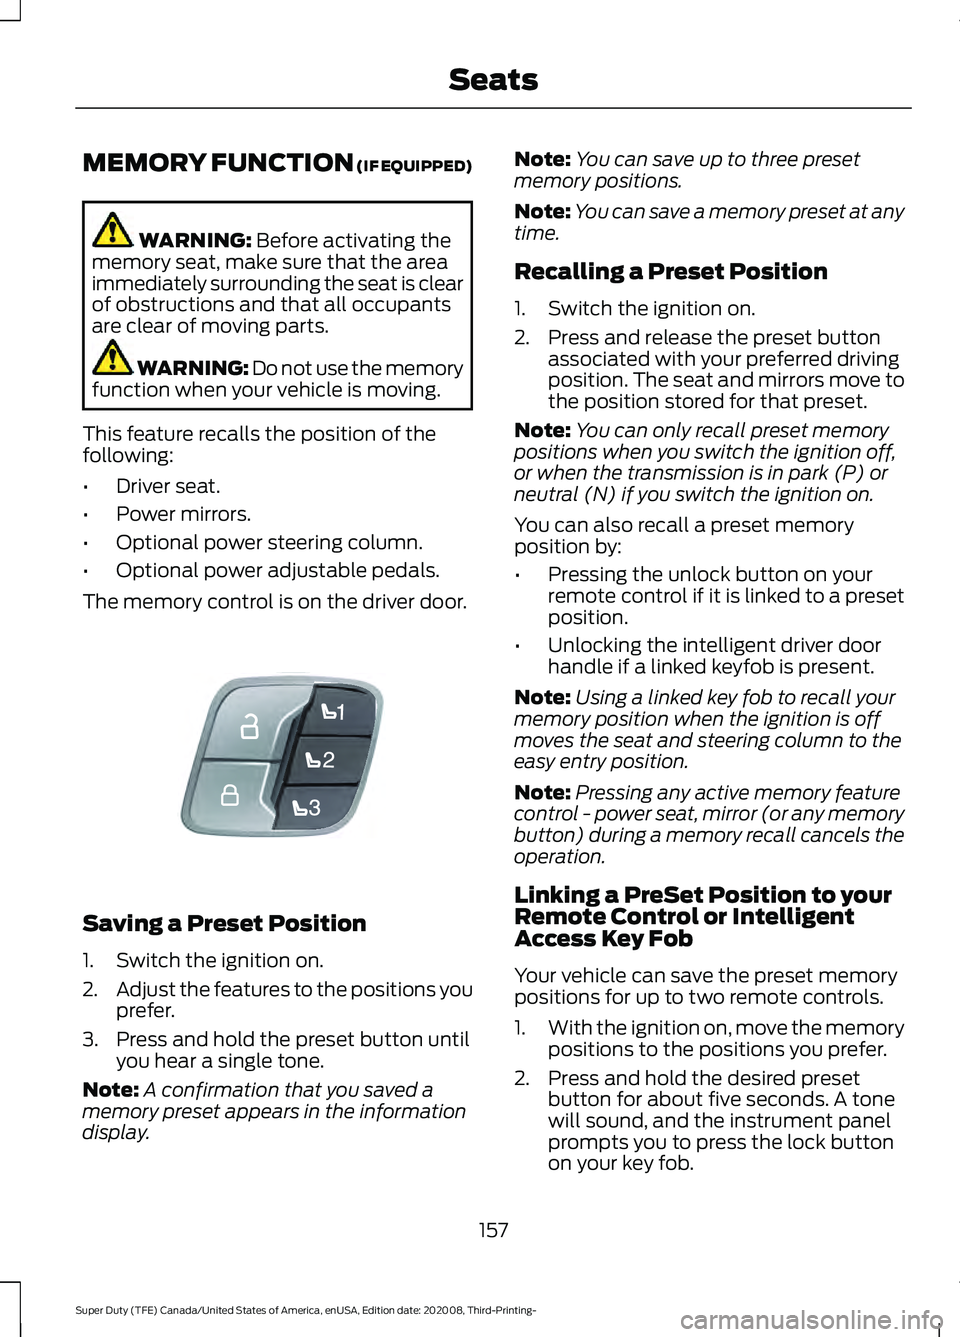
The memory control is on the driver door. Saving a Preset Position
1. Switch the ignition on.
2.
Adjust the features to the positions you
prefer.
3. Press and hold the preset button until you hear a single tone.
Note: A confirmation that you saved a
memory preset appears in the information
display. Note:
You can save up to three preset
memory positions.
Note: You can save a memory preset at any
time.
Recalling a Preset Position
1. Switch the ignition on.
2. Press and release the preset button associated with your preferred driving
position. The seat and mirrors move to
the position stored for that preset.
Note: You can only recall preset memory
positions when you switch the ignition off,
or when the transmission is in park (P) or
neutral (N) if you switch the ignition on.
You can also recall a preset memory
position by:
• Pressing the unlock button on your
remote control if it is linked to a preset
position.
• Unlocking the intelligent driver door
handle if a linked keyfob is present.
Note: Using a linked key fob to recall your
memory position when the ignition is off
moves the seat and steering column to the
easy entry position.
Note: Pressing any active memory feature
control - power seat, mirror (or any memory
button) during a memory recall cancels the
operation.
Linking a PreSet Position to your
Remote Control or Intelligent
Access Key Fob
Your vehicle can save the preset memory
positions for up to two remote controls.
1. With the ignition on, move the memory
positions to the positions you prefer.
2. Press and hold the desired preset button for about five seconds. A tone
will sound, and the instrument panel
prompts you to press the lock button
on your key fob.
157
Super Duty (TFE) Canada/United States of America, enUSA, Edition date: 202008, Third-Printing- SeatsE307868