2021 FORD F-350 lock
[x] Cancel search: lockPage 74 of 666
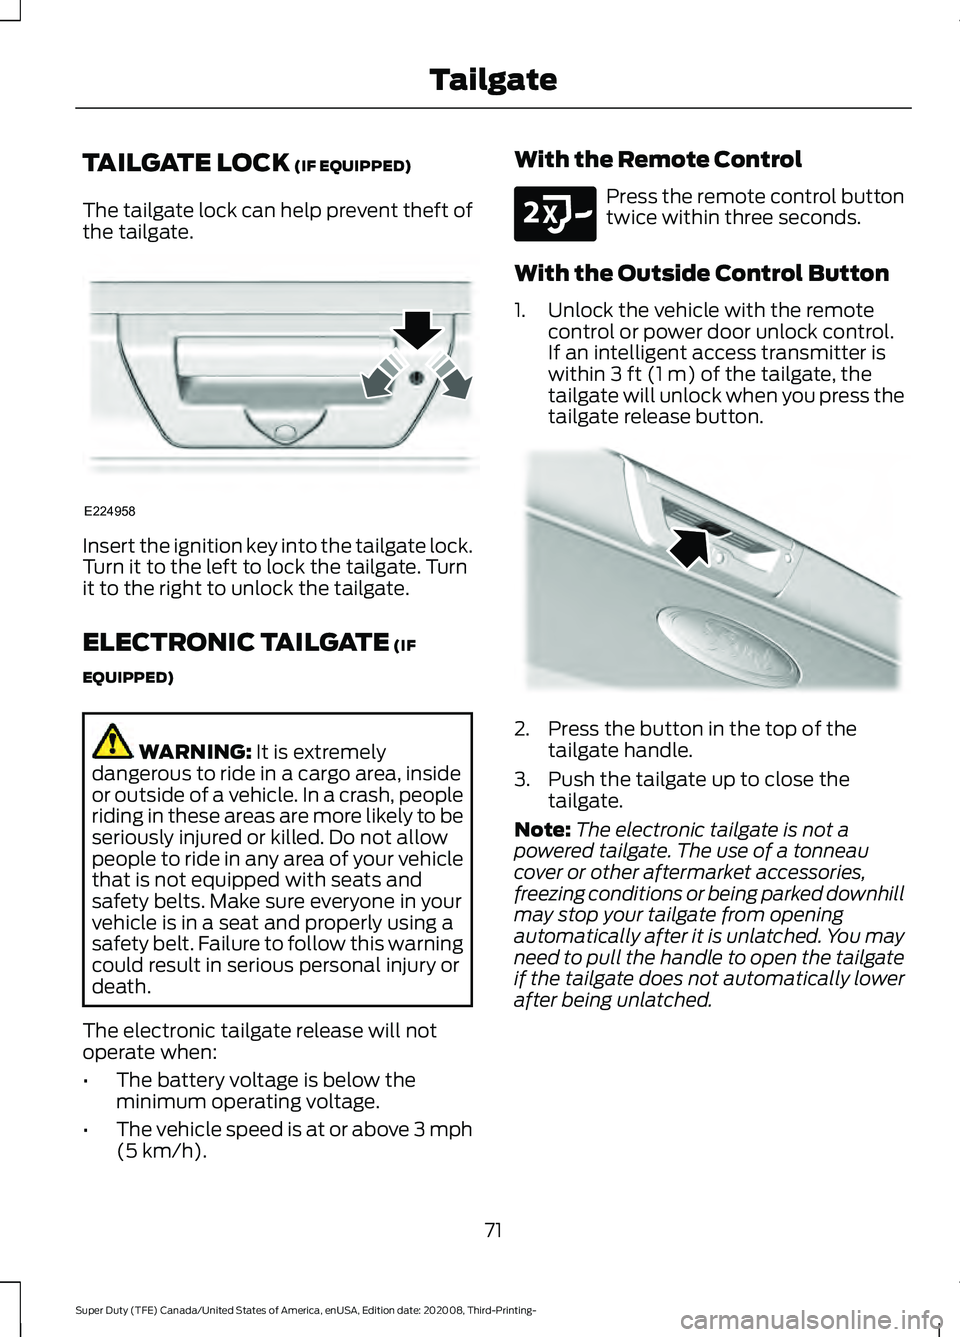
TAILGATE LOCK (IF EQUIPPED)
The tailgate lock can help prevent theft of
the tailgate. Insert the ignition key into the tailgate lock.
Turn it to the left to lock the tailgate. Turn
it to the right to unlock the tailgate.
ELECTRONIC TAILGATE
(IF
EQUIPPED) WARNING:
It is extremely
dangerous to ride in a cargo area, inside
or outside of a vehicle. In a crash, people
riding in these areas are more likely to be
seriously injured or killed. Do not allow
people to ride in any area of your vehicle
that is not equipped with seats and
safety belts. Make sure everyone in your
vehicle is in a seat and properly using a
safety belt. Failure to follow this warning
could result in serious personal injury or
death.
The electronic tailgate release will not
operate when:
• The battery voltage is below the
minimum operating voltage.
• The vehicle speed is at or above 3 mph
(5 km/h)
. With the Remote Control Press the remote control button
twice within three seconds.
With the Outside Control Button
1. Unlock the vehicle with the remote control or power door unlock control.
If an intelligent access transmitter is
within
3 ft (1 m) of the tailgate, the
tailgate will unlock when you press the
tailgate release button. 2. Press the button in the top of the
tailgate handle.
3. Push the tailgate up to close the tailgate.
Note: The electronic tailgate is not a
powered tailgate. The use of a tonneau
cover or other aftermarket accessories,
freezing conditions or being parked downhill
may stop your tailgate from opening
automatically after it is unlatched. You may
need to pull the handle to open the tailgate
if the tailgate does not automatically lower
after being unlatched.
71
Super Duty (TFE) Canada/United States of America, enUSA, Edition date: 202008, Third-Printing- TailgateE224958 E191530 E187693
Page 76 of 666
•
Make sure the step is clean before use.
• Keep the step load, you plus the load,
below 350 lb (159 kg).
Opening the Step
Note: Make sure to close and fully latch the
step before moving your vehicle. Do not
drive with the step or grab handle open.
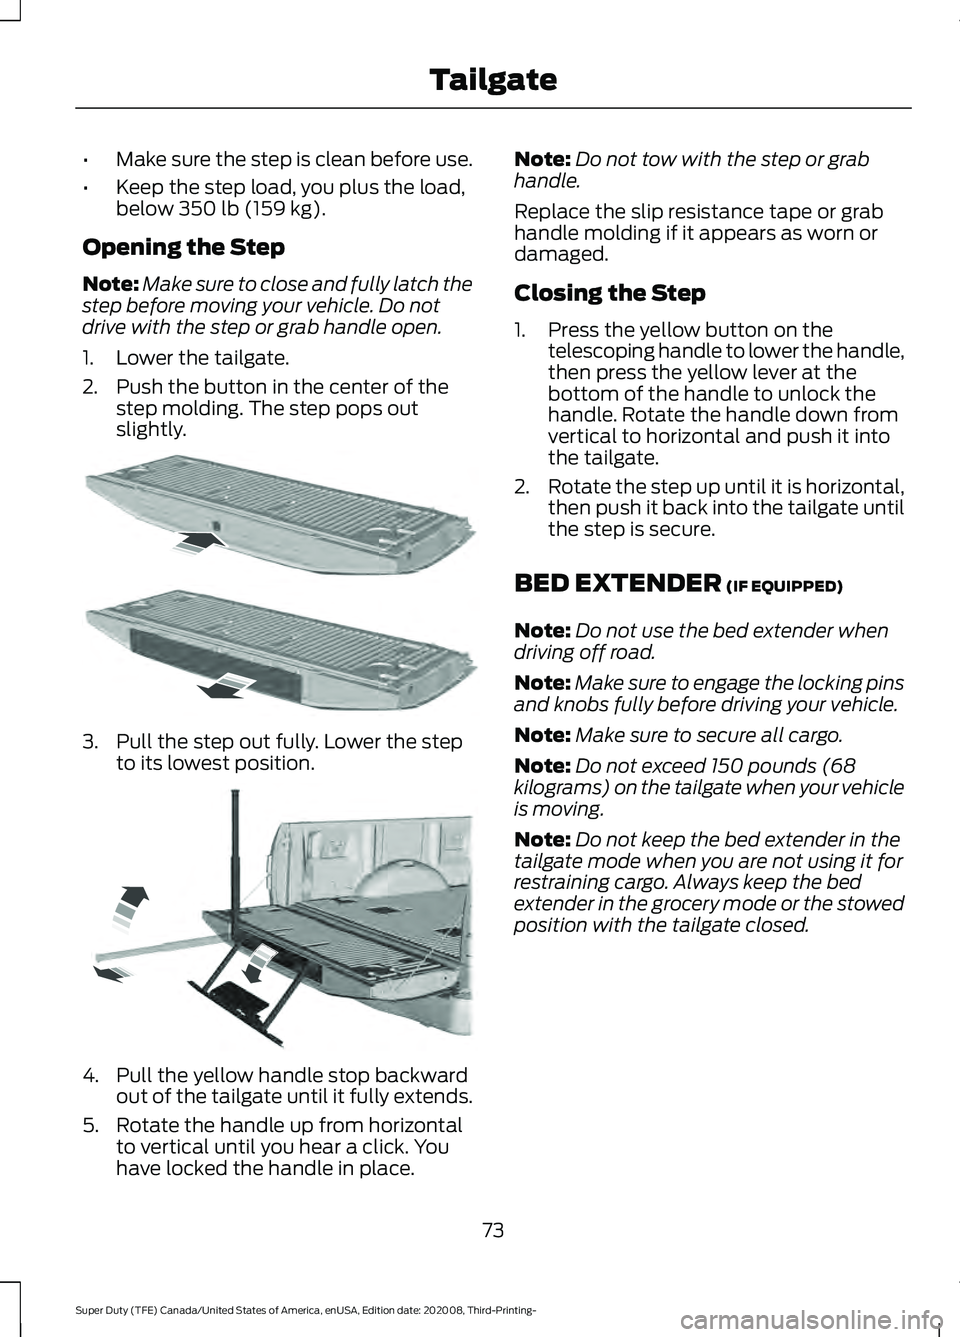
1. Lower the tailgate.
2. Push the button in the center of the step molding. The step pops out
slightly. 3. Pull the step out fully. Lower the step
to its lowest position. 4. Pull the yellow handle stop backward
out of the tailgate until it fully extends.
5. Rotate the handle up from horizontal to vertical until you hear a click. You
have locked the handle in place. Note:
Do not tow with the step or grab
handle.
Replace the slip resistance tape or grab
handle molding if it appears as worn or
damaged.
Closing the Step
1. Press the yellow button on the telescoping handle to lower the handle,
then press the yellow lever at the
bottom of the handle to unlock the
handle. Rotate the handle down from
vertical to horizontal and push it into
the tailgate.
2. Rotate the step up until it is horizontal,
then push it back into the tailgate until
the step is secure.
BED EXTENDER
(IF EQUIPPED)
Note: Do not use the bed extender when
driving off road.
Note: Make sure to engage the locking pins
and knobs fully before driving your vehicle.
Note: Make sure to secure all cargo.
Note: Do not exceed 150 pounds (68
kilograms) on the tailgate when your vehicle
is moving.
Note: Do not keep the bed extender in the
tailgate mode when you are not using it for
restraining cargo. Always keep the bed
extender in the grocery mode or the stowed
position with the tailgate closed.
73
Super Duty (TFE) Canada/United States of America, enUSA, Edition date: 202008, Third-Printing- TailgateE187718 E189557
Page 77 of 666
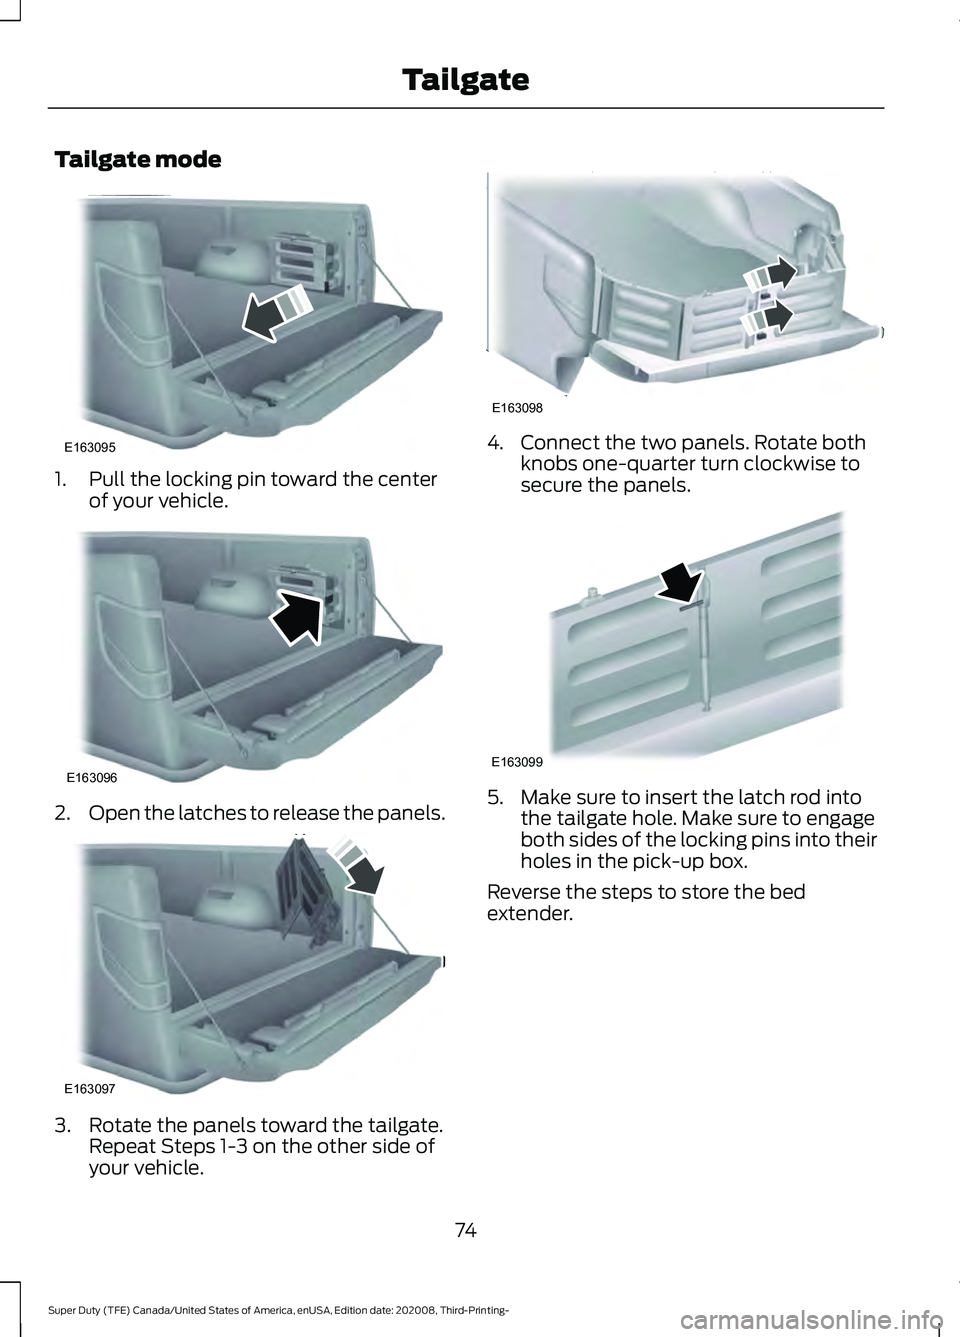
Tailgate mode
1. Pull the locking pin toward the center
of your vehicle. 2.
Open the latches to release the panels. 3. Rotate the panels toward the tailgate.
Repeat Steps 1-3 on the other side of
your vehicle. 4. Connect the two panels. Rotate both
knobs one-quarter turn clockwise to
secure the panels. 5. Make sure to insert the latch rod into
the tailgate hole. Make sure to engage
both sides of the locking pins into their
holes in the pick-up box.
Reverse the steps to store the bed
extender.
74
Super Duty (TFE) Canada/United States of America, enUSA, Edition date: 202008, Third-Printing- TailgateE163095 E163096 E163097 E163098 E163099
Page 79 of 666
PASSIVE ANTI-THEFT
SYSTEM
The system prevents someone from
starting the engine with an incorrectly
coded key.
Note:
The system is not compatible with
aftermarket remote start systems. Use of
these may result in engine starting problems
and a loss of security.
Note: Metallic objects, electronic devices
or a second coded key on the same key
chain could cause vehicle starting problems
if they are too close to the key when starting
the engine. Prevent these objects from
touching the coded key when starting the
engine. Switch the ignition off, move all
objects on the key chain away from the
coded key and restart the engine if a
problem occurs.
Note: Do not leave a duplicate coded key
in your vehicle. Always take your keys and
lock all doors when leaving your vehicle.
SecuriLock®
The system helps prevent the engine from
starting unless you use a coded key
programmed to your vehicle. Using the
wrong key may prevent your vehicle from
starting.
A message could appear in the information
display.
If you are unable to start your vehicle with
a coded key, it is not operating correctly.
A message could appear in the information
display.
Automatic Arming
The system arms when you switch the
ignition off. Automatic Disarming
The system disarms when you switch the
ignition on with a coded key.
ANTI-THEFT ALARM (IF EQUIPPED)
The active anti-theft system is designed
to warn you in the event of unauthorized
vehicle entry and is also designed to help
prevent unwanted towing of your vehicle.
You can choose what is monitored by
arming the system in different ways. See
Information Displays
(page 110).
The direction indicators flash and the horn
sounds if the system triggers while the
alarm is armed.
Take all remote controls to an authorized
dealer if there is any potential alarm
problem with your vehicle.
Using the System
You can select two levels of alarm security.
You can change the level of security when
the ignition is switched off through the
information display with the two options
below:
Perimeter Only (If Equipped)
Perimeter only monitors the following:
• Doors.
• Hood.
• Tailgate.
All Sensors (If Equipped)
All sensors monitors the following:
• Doors.
• Hood.
• Tailgate.
• Movement inside your vehicle.
• Change in vehicle inclination, for
example, unwanted towing.
76
Super Duty (TFE) Canada/United States of America, enUSA, Edition date: 202008, Third-Printing- Security
Page 80 of 666
Note:
Do not choose all sensors monitor
mode when the vehicle is in transport or if
movement within the vehicle is likely to
occur.
Note: For correct operation of the interior
motion detection system, make sure you
close all the windows prior to arming the
system. This helps prevent accidental alarm
activation due to external influences.
Additionally, the interior motion sensing
system does not arm if any door is ajar.
Arming the Alarm
The alarm is ready to arm when there is
not a key in the ignition. Lock your vehicle
using the remote control or keyless entry
keypad. You can also lock your vehicle
using the lock sensor on the exterior door
handle if your vehicle is equipped with
intelligent access. See Locking and
Unlocking (page 66).
The direction indicators flash once after
you lock your vehicle. This indicates the
alarm is in the pre-armed mode. It fully
arms after 20 seconds.
Disarming the Alarm
Disarm the alarm by any of the following
actions:
• Press the power door unlock button
within the 20-second pre-armed mode.
• Unlock the doors with the remote
control or keyless entry keypad. If
equipped with intelligent access, you
can use the unlock sensor on the
exterior door handle. See
Locking and
Unlocking (page 66).
• Switch the ignition on or start your
vehicle.
• Use a key in the driver door lock
cylinder to unlock your vehicle, then
switch the ignition on within 12
seconds.
77
Super Duty (TFE) Canada/United States of America, enUSA, Edition date: 202008, Third-Printing- Security
Page 81 of 666

USING POWER RUNNING
BOARDS
WARNING: In extreme climates,
excessive ice buildup may occur, causing
the running boards not to deploy. Make
sure that the running boards have
deployed, and have finished moving
before attempting to step on them. The
running boards will resume normal
function once the blockage is cleared. WARNING:
Switch off the running
boards before jacking or placing any
object under your vehicle. Never place
your hand between the extended running
board and your vehicle. A moving running
board may cause injury.
Note: Do not use the running boards, front
and rear hinge assemblies, running board
motors, or the running board underbody
mounts to lift your vehicle when jacking.
Always use proper jacking points.
Note: The running boards may operate
more slowly in cool temperatures.
Note: The running board mechanism may
trap debris such as mud, dirt, snow, ice and
salt. This may cause unwanted noise. If this
happens, manually set the running boards
to the deployed position. Then, wash the
system, in particular the front and rear hinge
arms, with a high-pressure car wash wand. Automatic Power Deploy The running boards extend down and out
when you open the door. This can help you
enter and exit your vehicle.
Automatic Power Stow
When you close the doors, the running
boards return to the stowed position after
a two-second delay.
Manual Power Deploy
You can manually operate the running
boards in the information display.
1. Using the instrument cluster display
controls on the steering wheel, select
Settings
.
2. Select
Advanced Settings.
3. Select
Vehicle.
4. Select
Power Running Boards.
5. Select a setting.
Set the running boards in the deployed
position to access the roof.
The running boards return to the stowed
position and enter automatic mode when
the vehicle speed exceeds 3 mph (5 km/h).
78
Super Duty (TFE) Canada/United States of America, enUSA, Edition date: 202008, Third-Printing- Power Running Boards
(If Equipped)E166682
Page 84 of 666
Note:
If you press any adjustment or
memory button when in easy exit mode, the
system cancels the operation.
Note: Depending on your vehicle, the
column may move up and in.
ADJUSTING THE STEERING
WHEEL - VEHICLES WITH:
MANUAL ADJUSTABLE
STEERING COLUMN WARNING: Do not adjust the
steering wheel when your vehicle is
moving.
Note: Make sure that you are sitting in the
correct position. See
Sitting in the Correct
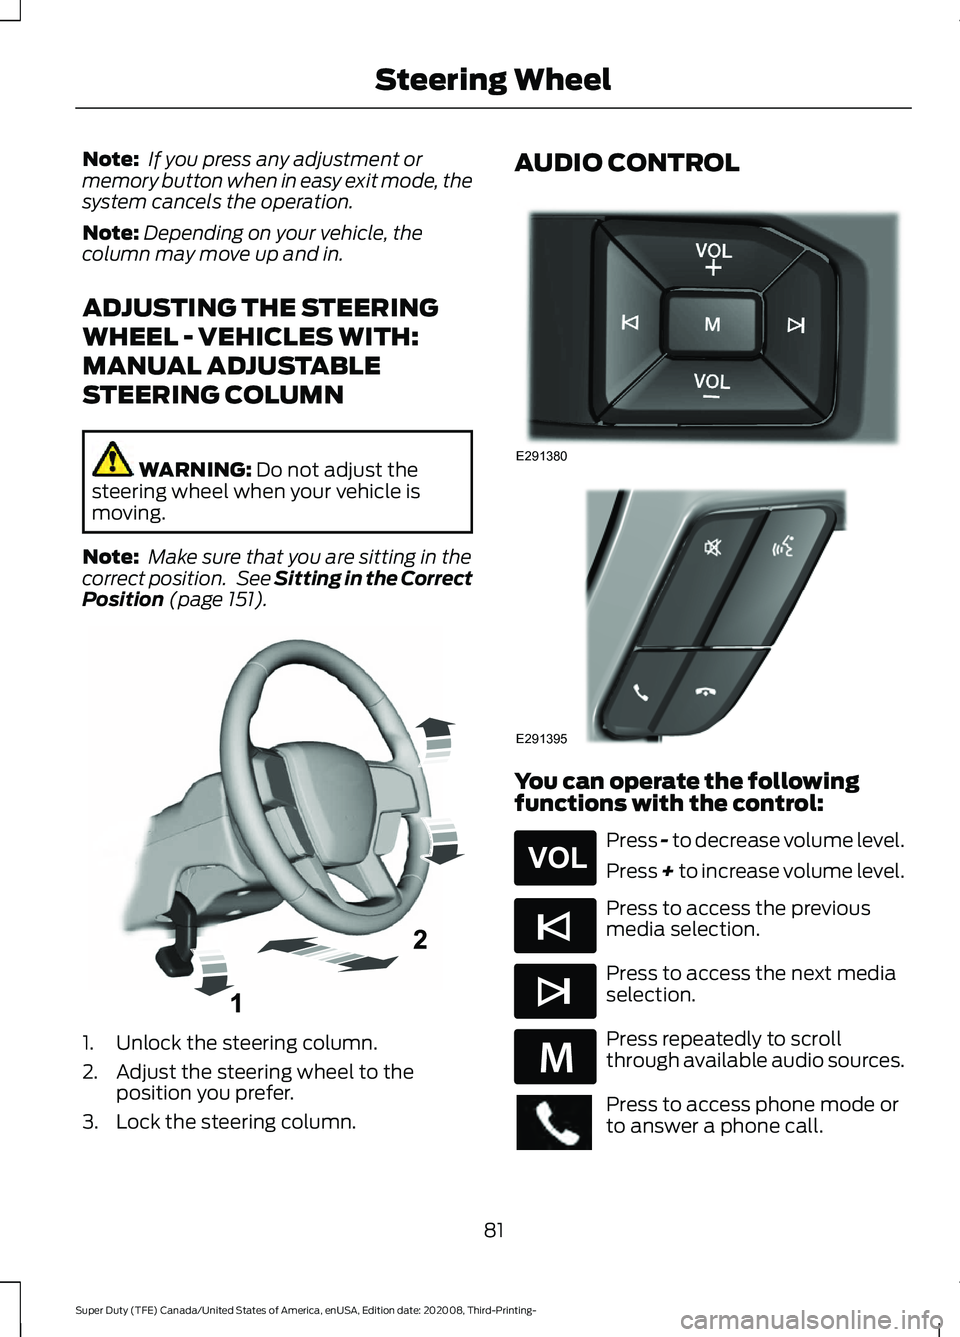
Position (page 151). 1. Unlock the steering column.
2. Adjust the steering wheel to the
position you prefer.
3. Lock the steering column. AUDIO CONTROL
You can operate the following
functions with the control:
Press - to decrease volume level.
Press + to increase volume level.
Press to access the previous
media selection.
Press to access the next media
selection.
Press repeatedly to scroll
through available audio sources.
Press to access phone mode or
to answer a phone call.
81
Super Duty (TFE) Canada/United States of America, enUSA, Edition date: 202008, Third-Printing- Steering WheelE261502 E291380 E291395 E265304 E265045 E265044 E289636
Page 96 of 666
WHAT IS AUTOMATIC HIGH
BEAM CONTROL
The system turns on high beams if it is dark
enough and no other traffic is present. If it
detects an approaching vehicle
’s
headlamps or tail lamps, or street lighting
ahead, the system turns the high beams
off. Low beams remain on.
A camera sensor, centrally mounted
behind the windshield of your vehicle,
continuously monitors conditions to turn
the high beams on and off.
SWITCHING AUTOMATIC HIGH
BEAM CONTROL ON AND OFF
Switch the system on or off using the
information display. See General
Information (page 110).
Activating the Automatic High
Beam Control Switch the lighting control to the
autolamps position to activate.
See
Autolamps (page 88).
Note: Automatic high beams are not
available when autolamps are not turned
on.
When active, the high beams turn on if:
• The ambient light level is low enough.
• There is no traffic in front of your
vehicle.
• The vehicle speed is greater than
approximately
32 mph (52 km/h).
When active, the high beams turn off if:
• The ambient light level is high enough
that high beams are not required.
• The system detects an approaching
vehicle's headlamps or tail lamps.
• The system detects severe rain, snow
or fog. •
The camera is blocked.
• The vehicle speed falls below
approximately
27 mph (44 km/h).
Note: The deactivation speed is lower on
curves.
Note: High beam reactivation may be
delayed in certain curvy road situations.
Note: The system may not operate properly
if the sensor is blocked. Keep the windshield
free from obstruction or damage.
Note: The system may not operate properly
in cold or inclement conditions. You can
switch on the high beams by overriding the
system.
Note: If the system detects a blockage, for
example bird droppings, bug splatter, snow
or ice, the system goes into low beam mode
until you clear the blockage. A message may
appear in the information display if the
camera is blocked.
Note: Using much larger tires or equipping
vehicle accessories such as snowplows can
modify your vehicle's ride height and
degrade automatic high beam control
performance.
AUTOMATIC HIGH BEAM
CONTROL INDICATORS The indicator illuminates to
confirm when the system is
ready to assist.
OVERRIDING AUTOMATIC
HIGH BEAM CONTROL WARNING:
The system does not
relieve you of your responsibility to drive
with due care and attention. You may
need to override the system if it does not
turn the high beams on or off.
93
Super Duty (TFE) Canada/United States of America, enUSA, Edition date: 202008, Third-Printing- Automatic High Beam Control
(If Equipped)