2021 FORD F-150 instrument panel
[x] Cancel search: instrument panelPage 231 of 796

WHAT IS THE POWER OUTLET
The power outlet can power devices using
a 12 V outlet adapter.
POWER OUTLET
PRECAUTIONS WARNING:
Do not plug optional
electrical accessories into the cigar
lighter socket. Incorrect use of the cigar
lighter can cause damage not covered
by the vehicle warranty, and can result
in fire or serious injury.
When you switch the vehicle on, you can
use the socket to power
12 V appliances
with a maximum current rating of 20 A. Do
not use the power point over the vehicle
capacity of
12 V DC 240 W or a fuse could
blow. Do not plug in any device that
supplies power to the vehicle through the
power points. This could result in damage
to vehicle systems. Do not hang any
accessory from the accessory plug. Always
keep the power point caps closed when
not in use. Do not insert objects other than
an accessory plug into the power point.
To prevent the battery from running out of
charge:
• Do not use the power point longer than
necessary when the vehicle is off.
• Do not leave devices plugged in
overnight or when you park your vehicle
for extended periods. LOCATING THE POWER
OUTLETS
Power outlets are in the following
locations:
•
On the instrument panel.
• Inside the center console.
• On the rear of the center console.
227
F-150 (TFD) Canada/United States of America, enUSA, Edition date: 202104, Second-Printing Power Outlet - Vehicles With: 12V Power Outlet
Page 235 of 796

WHAT IS THE WIRELESS
ACCESSORY CHARGER
The wireless accessory charger allows you
to charge one compatible Qi wireless
charging device on the charging area.
WIRELESS ACCESSORY
CHARGER PRECAUTIONS
WARNING: Wireless charging
devices can affect the operation of
implanted medical devices, including
cardiac pacemakers. If you have any
implanted medical devices, we
recommend that you consult with your
physician.
Keep the charging area clean and remove
foreign objects prior to charging a device.
Do not place items with a magnetic strip
or radio-frequency identification chip, for
example passports, parking tickets,
transportation passes or credit cards, near
the charging area when charging a device.
Damage could occur to the magnetic strip
or radio-frequency identification chip.
Do not place metal objects, for example
remote controls, coins and candy
wrappers, on or near the charging area
when charging a device. Metal objects may
heat up and degrade the charging
performance, in addition to causing
interruptions in charging.
Charging could be interrupted, degraded,
or could stop if any of the following occur:
• The system detects a foreign object.
• The device is misaligned on the
charging area.
• The device moves on the active
charging area when the vehicle is in
motion. •
The vehicle ambient temperature is too
high.
• You attempt to charge a non-Qi
compatible device on the wireless
charger.
Note: During charging, the device and the
charger could heat up, this is normal. If the
battery gets hotter than usual, the device
may stop charging.
LOCATING THE WIRELESS
ACCESSORY CHARGER The charging area is on the
center console or in the media
bin below the instrument panel.
CHARGING A WIRELESS
DEVICE
Place the device on the center of the
charging surface with the charging side
down. The charging stops after your device
reaches a full charge.
You can use the charger when the vehicle
is in accessory mode, when the vehicle is
running, or when SYNC is on. Displays on the status bar when
wireless charging is in progress.
Note: The charging performance may be
affected if your device is in a case. It may be
necessary to remove the case to wirelessly
charge your device.
Note: Software and firmware updates may
affect device compatibility, including the
use of unofficial software or firmware. You
should verify charging functionality with your
specific devices in-vehicle.
231
F-150 (TFD) Canada/United States of America, enUSA, Edition date: 202104, Second-Printing Wireless Accessory Charger
(If Equipped)E297549
Page 236 of 796

CUP HOLDERS
CUP HOLDER PRECAUTIONS
WARNING: Use caution when
stowing items or hot drinks in the cup
holders. Items could become loose or
spill during hard braking, acceleration or
crashes. Failure to follow this instruction
could result in personal injury.
GLOVE COMPARTMENT
OPENING THE GLOVE
COMPARTMENT
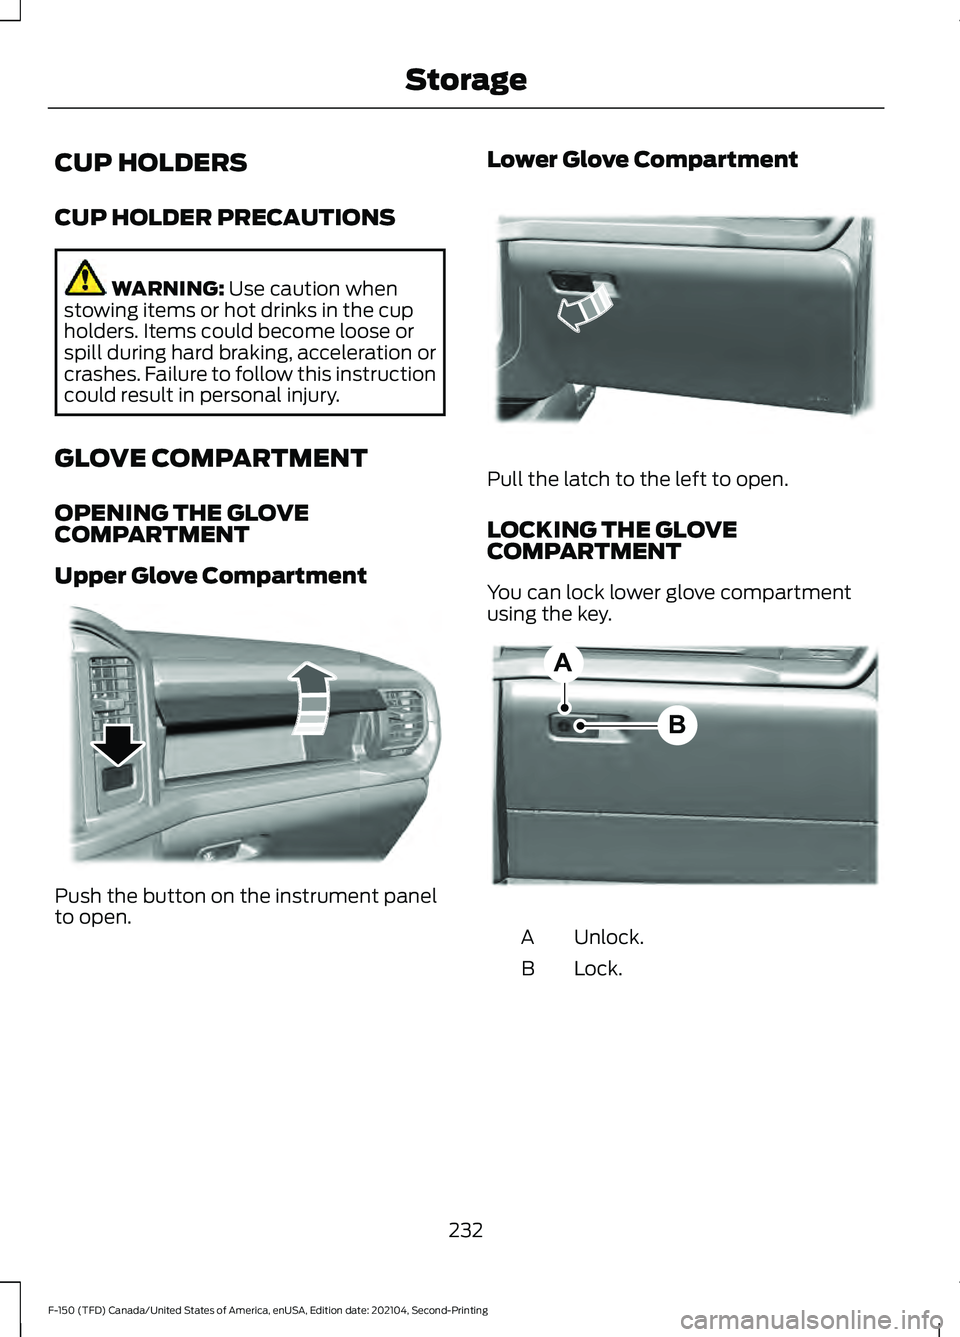
Upper Glove Compartment Push the button on the instrument panel
to open. Lower Glove Compartment Pull the latch to the left to open.
LOCKING THE GLOVE
COMPARTMENT
You can lock lower glove compartment
using the key.
Unlock.
A
Lock.
B
232
F-150 (TFD) Canada/United States of America, enUSA, Edition date: 202104, Second-Printing StorageE310219 E310218 B
AE351063
Page 247 of 796

Switching the System On
1. With your vehicle running and the
transmission in park (P), press the
button on the instrument panel. See
Instrument Cluster Indicators (page
176). An indicator lamp illuminates to
confirm the system is on.
2. Switch the ignition off and remove the
key.
When the system is on:
• The power window switches turn off
and the windows remain in their current
state.
• The luggage compartment or liftgate
unlock switch turns off.
Note: When the system is on, you can use
the key blade or the remote control to lock
and unlock your vehicle.
Switching the System Off
• Turn the key to the run position.
• Press the button on the instrument
panel.
Note: If you switch the system off before
switching the ignition to the run position,
your vehicle shuts down. AUTOMATIC ENGINE STOP -
VEHICLES WITH: KEYLESS
ENTRY AND PUSH BUTTON
START
WHAT IS AUTOMATIC ENGINE
STOP
Automatic engine stop is a feature that
switches the engine off if it has been idling
for an extended period to help you save
fuel.
HOW DOES AUTOMATIC ENGINE
STOP WORK
Automatic engine stop turns the engine
off. The ignition also turns off in order to
save battery power. Before the engine
shuts down, a message appears in the
information display showing a timer
counting down. If you do not intervene
within 30 seconds, the engine shuts down.
Another message appears in the
information display to inform you that the
engine has shut down in order to save fuel.
Start your vehicle as you normally do.
SWITCHING AUTOMATIC ENGINE
STOP ON AND OFF
1. Press
Settings on the touchscreen.
2. Press
Vehicle Settings.
3. Switch
30min Max Idle on or off.
Note: You cannot permanently switch off
the automatic shutdown. If you switch it off,
it turns on each time you switch the ignition
on.
243
F-150 (TFD) Canada/United States of America, enUSA, Edition date: 202104, Second-Printing Starting and Stopping the EngineE227967
Page 268 of 796

WARNING: Stop refueling when
the fuel pump nozzle automatically
shuts off for the first time. Failure to
follow this will fill the expansion space
in the fuel tank and could lead to fuel
overflowing. WARNING:
Do not overfill the fuel
tank. The pressure in an overfilled tank
may cause leakage and lead to fuel spray
and fire. WARNING:
Wait at least five
seconds before removing the fuel pump
nozzle to allow any residual fuel to drain
into the fuel tank.
1. When you stop your vehicle, shift into park (P) and switch the ignition off. 2.
Press the button on the left side of the
instrument panel next to the headlamp
switch to open the fuel filler door. The
fuel filler door can take up to 15
seconds to open before you can insert
a fuel filler nozzle.
3. Select the correct fuel pump nozzle for
your vehicle. 4. Insert the fuel pump nozzle up to the
first notch. Keep the fuel pump nozzle
resting on the fuel tank filler pipe. 5. Hold the fuel pump nozzle in position
A when refueling. Holding the fuel
pump nozzle in position B can affect
the flow of fuel and shut off the fuel
pump nozzle before the fuel tank is full.
264
F-150 (TFD) Canada/United States of America, enUSA, Edition date: 202104, Second-Printing Fuel and RefuelingE293006 E139202 E327438
Page 269 of 796

6. Operate the fuel pump nozzle within
the area shown. 7. When the pump shuts off, wait 5
seconds, then raise the fuel pump
nozzle and slowly remove it.
8. Fully close the fuel filler door.
Note: To close the fuel filler door, press the
center rear edge of the fuel filler door and
then release.
Complete the refueling process within 20
minutes. If 20 minutes elapses, press the
button on the left side of the instrument
panel again. Fuel pump nozzle automatic
shut off could occur if you do not press the
button on the left side instrument panel.
Note: Do not attempt to start the engine
if you have filled the fuel tank with incorrect
fuel. Incorrect fuel use could cause damage
not covered by the vehicle Warranty. Have
your vehicle immediately checked. MANUALLY OPENING THE FUEL
FILLER DOOR - EXCLUDING:
HYBRID ELECTRIC VEHICLE (HEV)
Your vehicle does not have a fuel tank filler
cap.
Left-hand side. To open the fuel
filler door, press the center rear
edge of the fuel filler door and
then release.
A
Right-hand side. To open the
fuel filler door, press the center
rear edge of the fuel filler door
and then release.
B
Left-hand side. Pull the rear of
the fuel filler door to open it.
C
Right-hand side. Pull the rear of
the fuel filler door to open it.
D
MANUALLY OPENING THE FUEL
FILLER DOOR - HYBRID ELECTRIC
VEHICLE (HEV)
Note: The transmission must be in park (P)
or neutral (N).
To manually open the fuel door do the
following:
265
F-150 (TFD) Canada/United States of America, enUSA, Edition date: 202104, Second-Printing Fuel and RefuelingE358906 E119081 E206911
Page 293 of 796

3.
Carefully open the hinged access cover
using a plastic type wedge or pry tool
at the upper edge of the panel. If done
correctly, the panel will swing
downward.
Note: Do not activate the override lever
until you are in the driver's seat. If damage
occurs when access cover is opened,
contact your authorized Ford Dealer for a
replacement.
4. Switch ignition on, but do not start your
vehicle.
5. Once in the driver seat, fully apply the brake pedal and hold. Do not release.
Pull the tether straight out toward the
driver seat until engaged. If done
correctly, a message will appear in the
instrument cluster.
Note: Do not use excessive force when
using the manual park release handle, as it
could result in damage to the handle.
Note: Your vehicle is now out of the park
(P) position and is free to roll. 6.
With your foot still fully applied on the
brake pedal, disengage the parking
brake. See Electric Parking Brake
(page 311).
7. Your vehicle remains in neutral (N) for emergency towing purposes.
8. Turn off the ignition.
9. Once safe to do so, and there is no risk
that your vehicle will roll, disconnect
the negative (black) battery cable from
the battery.
Returning Your Vehicle to Normal
Mode 1. Once it is safe to do so, reconnect the
negative (black) battery cable to the
battery.
2. Apply the parking brake. See Electric
Parking Brake
(page 311).
Note: If vehicle battery is dead, for example,
no electrical power available, an external
power may be required to apply the parking
brake.
Note: Do not pull the tether until you are in
the driver seat.
3. Once in the driver seat, fully apply the brake pedal and hold, do not release.
Using the tether, pull the handle
towards the driver seat until you hit a
hard stop.
4. Pull the lever toward the floor until it hits a hard stop, before returning to the
stowed position.
Note: Maintain tension on the strap until
the lever reaches the stowed position.
289
F-150 (TFD) Canada/United States of America, enUSA, Edition date: 202104, Second-Printing Automatic TransmissionE336473 E315156 E315157
Page 297 of 796

•
Additional noise from the transfer case
or other drive components.
• Difficulty shifting out of a mechanically
locked four-wheel drive mode.
Use of a dissimilar spare wheel and tire
assembly can lead to impairment of the
following:
• Comfort and noise.
• Winter weather driving capability.
• Wet driving capability.
• Four-wheel drive capability.
Mechanical Shift Blocking
On four-wheel drive vehicles with a
mechanically locked four-wheel drive high
mode, the transfer case distributes torque
to the front wheels by mechanically
interlocking the front and rear driveshafts
together. Various external factors can
affect shifting performance of this type of
system including, but not limited to:
• Vehicle acceleration.
• Dissimilar tire sizes.
• Steering input.
If the system detects a mechanical shift
blockage at speed after you select
two-wheel drive high, the message "4x4
Unable to Disengage See Manual", could
display momentarily. If this message
displays, one or more of the following
actions can relieve the mechanical shift
block:
• Momentary acceleration.
• Momentary braking.
• Bringing the vehicle to a stop.
• Shifting the transmission to neutral and
back to drive.
• Shifting the transmission to reverse
and back to drive.
• Driving the vehicle around a tight turn
at a slow speed. SELECTING A FOUR-WHEEL
DRIVE MODE - RAPTOR
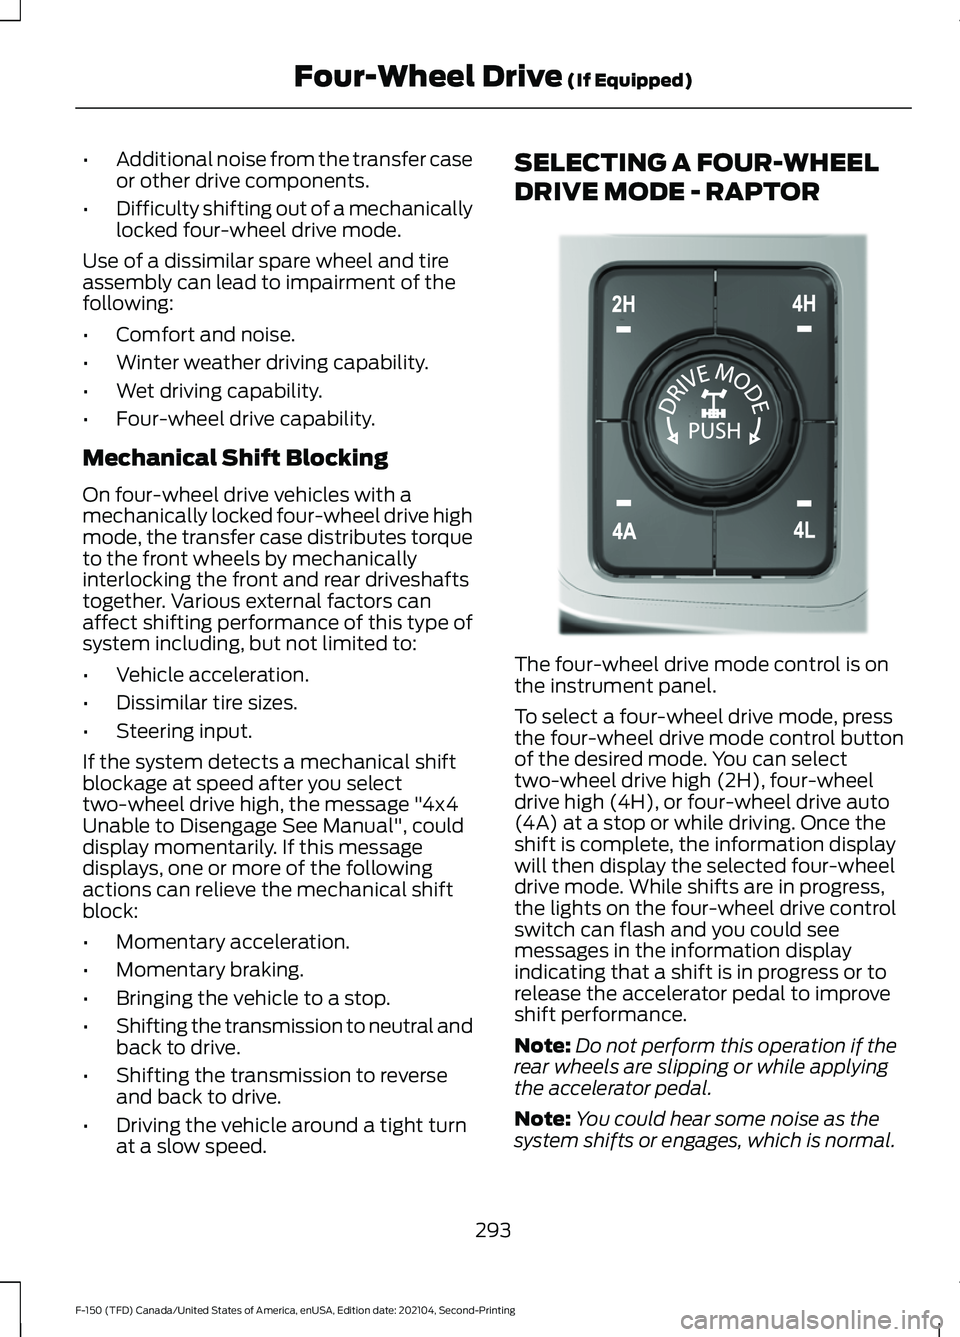
The four-wheel drive mode control is on
the instrument panel.
To select a four-wheel drive mode, press
the four-wheel drive mode control button
of the desired mode. You can select
two-wheel drive high (2H), four-wheel
drive high (4H), or four-wheel drive auto
(4A) at a stop or while driving. Once the
shift is complete, the information display
will then display the selected four-wheel
drive mode. While shifts are in progress,
the lights on the four-wheel drive control
switch can flash and you could see
messages in the information display
indicating that a shift is in progress or to
release the accelerator pedal to improve
shift performance.
Note:
Do not perform this operation if the
rear wheels are slipping or while applying
the accelerator pedal.
Note: You could hear some noise as the
system shifts or engages, which is normal.
293
F-150 (TFD) Canada/United States of America, enUSA, Edition date: 202104, Second-Printing Four-Wheel Drive (If Equipped)E308146