2021 FORD F-150 ignition
[x] Cancel search: ignitionPage 439 of 796

6. If the trailer wheels lock up, indicated
by squealing tires, reduce the gain
setting. If the trailer wheels turn freely,
increase the gain setting. Repeat Steps
5 and 6 until the gain setting is at a
point just below trailer wheel lock-up.
If towing a heavier trailer, trailer wheel
lock-up may not be attainable even
with the maximum gain setting of 10.
Note: Only perform this procedure at
speeds of approximately 20– 25 mph
(30–40 km/h).
Note: The trailer brake controller reduces
output at vehicle speeds below
11 mph
(18 km/h) so that trailer and vehicle braking
is not jerky or harsh. This feature is only
available when applying the brakes using
your vehicle's brake pedal, not the
controller.
Note: Your vehicle's brake system and the
trailer brake system work independently of
each other. Changing the gain setting on the
controller does not affect the operation of
your vehicle's brakes whether you attach a
trailer or not.
Note: With the proper electrical connection,
pressing your vehicle brake pedal or using
the manual control lever illuminates both
trailer and vehicle brake lamps.
Note: When you switch the engine off, the
controller output is disabled and the display
and module shut down. The controller
module and display turn on when you switch
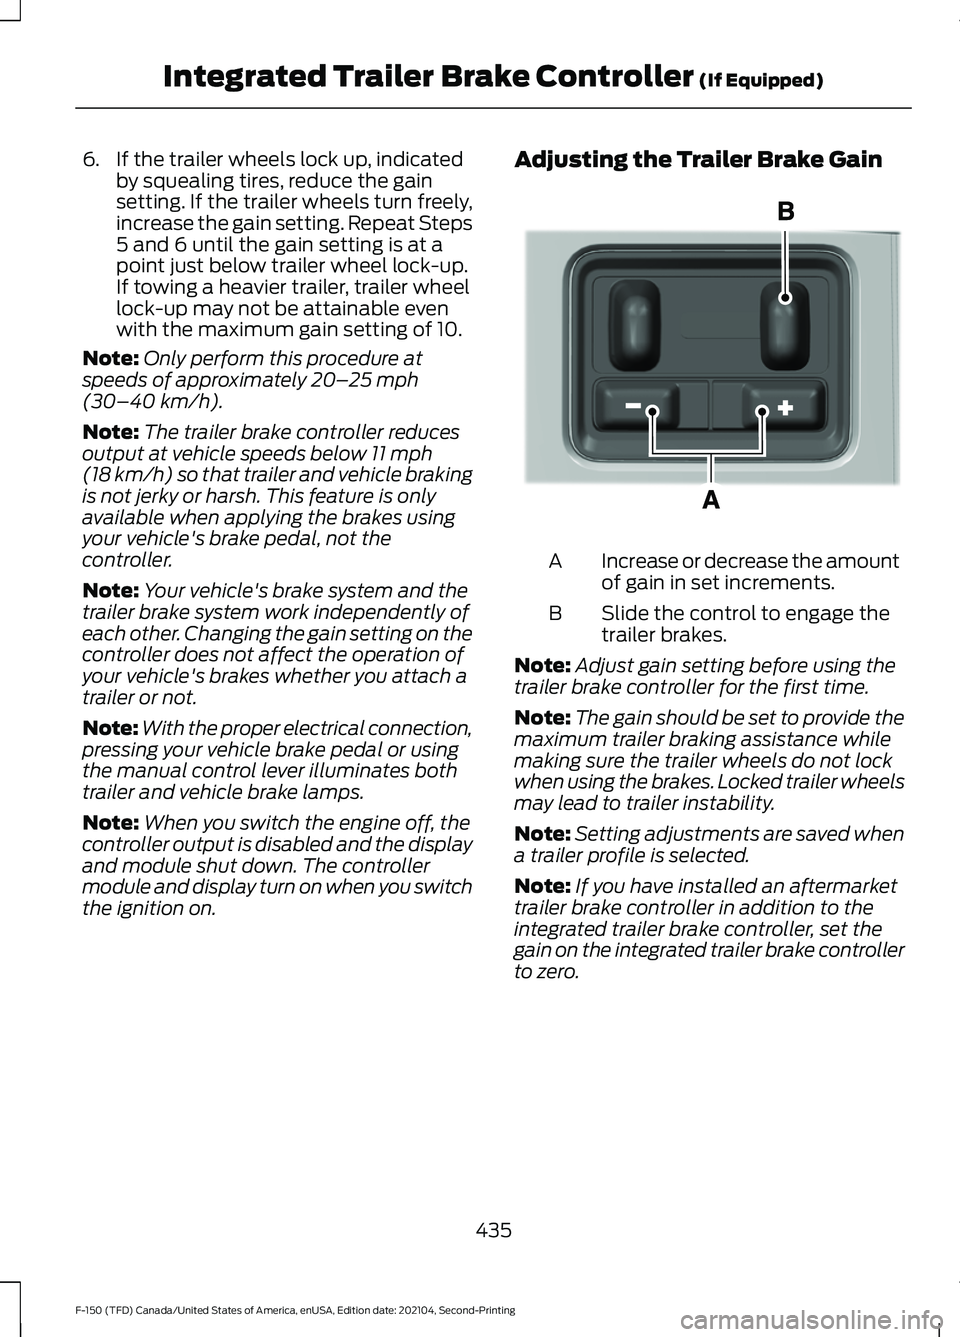
the ignition on. Adjusting the Trailer Brake Gain
Increase or decrease the amount
of gain in set increments.
A
Slide the control to engage the
trailer brakes.
B
Note: Adjust gain setting before using the
trailer brake controller for the first time.
Note: The gain should be set to provide the
maximum trailer braking assistance while
making sure the trailer wheels do not lock
when using the brakes. Locked trailer wheels
may lead to trailer instability.
Note: Setting adjustments are saved when
a trailer profile is selected.
Note: If you have installed an aftermarket
trailer brake controller in addition to the
integrated trailer brake controller, set the
gain on the integrated trailer brake controller
to zero.
435
F-150 (TFD) Canada/United States of America, enUSA, Edition date: 202104, Second-Printing Integrated Trailer Brake Controller
(If Equipped)E333154
Page 440 of 796

ADJUSTING THE INTEGRATED
TRAILER BRAKE CONTROLLER
MODE
Select the correct integrated trailer brake
controller mode option using the
touchscreen.
Note:
Trailer brake gain settings are saved
to the active trailer profile.
Selecting the Trailer Brake Type
1. Press Default for trailers with
electromagnetic drum brake systems
or press
Electric over Hydraulic for
trailers with electrically actuated
hydraulic brake systems. 2. Press
Save.
Selecting the Trailer Brake Effort
1. Select a setting for your trailer.
Note: The default value is
Low and is the
recommended setting for most trailers.
Select a different setting if your trailer's
brakes require more initial voltage, or you
prefer more aggressive trailer braking.
2. Press
Save.
INTEGRATED TRAILER BRAKE CONTROLLER –
TROUBLESHOOTING
INTEGRATED TRAILER BRAKE CONTROLLER – INFORMATION
MESSAGES Details
Message
The system detects the trailer wiring
connection is disconnected, during a given ignition cycle.
Trailer Disconnected
The system detects an electrical fault inthe trailer brake circuit. If this message
appears without a trailer attached, see your authorized dealer. If a trailer is attached, inspect and repair the trailer wiring.
Trailer Wiring Fault
Displays the current gain setting for thetrailer brake.
Trailer Brake Gain: {trailer gain value:#0.0}
Displays the current gain setting for the
trailer brake when you do not have a trailer connected.
Trailer Brake Gain: {trailer gain value:#0.0}
No Trailer
436
F-150 (TFD) Canada/United States of America, enUSA, Edition date: 202104, Second-Printing Integrated Trailer Brake Controller
(If Equipped)
Page 489 of 796

Post-Incident
1. Do not store a severely damaged
vehicle with a lithium-ion battery inside
a structure or within 50 ft (15 m) of any
structure or vehicle.
2. Make sure that passenger and luggage
compartments remain ventilated.
3. As with any vehicle, call emergency assistance immediately if you see
sparks, smoke or flames coming from
the vehicle.
SWITCHING THE HAZARD
FLASHERS ON AND OFF The hazard flasher button is on
the instrument panel. Press the
button to switch the hazard
flashers on if your vehicle is creating a
safety hazard for other road users.
When you switch the hazard flashers on,
all front and rear direction indicators flash.
Note: The hazard flashers operate when
the ignition is in any position, or if the key is
not in the ignition. The battery loses charge
and could have insufficient power to restart
your vehicle.
Press the button again to switch them off.
JUMP STARTING THE VEHICLE
JUMP STARTING PRECAUTIONS WARNING: Batteries normally
produce explosive gases which can
cause personal injury. Therefore, do not
allow flames, sparks or lighted
substances to come near the battery.
When working near the battery, always
shield your face and protect your eyes.
Always provide correct ventilation. WARNING:
Keep batteries out of
reach of children. Batteries contain
sulfuric acid. Avoid contact with skin,
eyes or clothing. Shield your eyes when
working near the battery to protect
against possible splashing of acid
solution. In case of acid contact with skin
or eyes, flush immediately with water for
a minimum of 15 minutes and get prompt
medical attention. If acid is swallowed,
call a physician immediately. WARNING:
Use only adequately
sized cables with insulated clamps. WARNING:
Make sure that the
cables are clear of any moving parts and
fuel delivery system parts. WARNING: Connect batteries with
only the same nominal voltage. WARNING: If the engine is running
while the hood is open, stay clear of
moving engine components. Failure to
follow this warning could result in serious
personal injury or death.
Do not attempt to push-start an automatic
transmission vehicle. This could cause
transmission damage.
Do not disconnect the battery of the
disabled vehicle. This could damage your
vehicle's electrical system.
PREPARING THE VEHICLE
Use only a 12 volt supply to start your
vehicle.
Park the booster vehicle close to the hood
of the disabled vehicle, making sure the
two vehicles do not touch.
485
F-150 (TFD) Canada/United States of America, enUSA, Edition date: 202104, Second-Printing Crash and Breakdown Information
Page 491 of 796

Removing the Jumper Cables
Remove the jumper cables in the reverse
order that they were connected.
Note:
Do not switch the headlamps on
when disconnecting the cables. The peak
voltage could blow the bulbs.
POST-CRASH ALERT SYSTEM
WHAT IS THE POST-CRASH
ALERT SYSTEM
The system helps draw attention to your
vehicle in the event of a serious impact.
HOW DOES THE POST-CRASH
ALERT SYSTEM WORK
The system is designed to turn the hazard
flashers on and to intermittently sound the
horn in the event of a serious impact that
deploys an airbag or the seatbelt
pretensioners.
POST-CRASH ALERT SYSTEM
LIMITATIONS
Depending on applicable laws in the
country your vehicle was built for, the horn
does not sound in the event of a serious
impact.
SWITCHING THE POST-CRASH
ALERT SYSTEM OFF
Press the hazard flasher switch or the
unlock button on the remote control to
switch the system off.
Note: The alert turns off when the vehicle
battery runs out of charge. AUTOMATIC CRASH SHUTOFF
WHAT IS AUTOMATIC CRASH
SHUTOFF
The automatic crash shutoff is designed
to stop the fuel going to the engine in the
event of a moderate or severe crash.
Note:
Not every impact causes a shutoff.
AUTOMATIC CRASH SHUTOFF
PRECAUTIONS WARNING: If your vehicle has been
involved in a crash, have the fuel system
checked. Failure to follow this instruction
could result in fire, personal injury or
death.
RE-ENABLING YOUR VEHICLE
1. Switch the ignition off.
2. Attempt to start your vehicle.
3. Switch the ignition off.
4. Attempt to start your vehicle.
Note: If your vehicle does not start after the
third attempt, have your vehicle checked as
soon as possible.
487
F-150 (TFD) Canada/United States of America, enUSA, Edition date: 202104, Second-Printing Crash and Breakdown Information
Page 492 of 796

RECOVERY TOWING
ACCESSING THE FRONT TOWING
POINT
WARNING: Using recovery hooks
is dangerous and should only be done by
a person familiar with proper vehicle
recovery safety practices. Improper use
of recovery hooks may cause hook failure
or separation from the vehicle and could
result in serious injury or death. WARNING:
Slowly remove the
slack from the recovery strap prior to
pulling. Failure to do so can introduce
significantly higher loads which can
cause the recovery hooks to break off, or
the recovery strap to fail which can cause
serious injury or death. WARNING:
Never link two straps
together with a clevis pin. These heavy
metal objects could become projectiles
if the strap breaks and can cause serious
injury or death. WARNING:
Switch the ignition off
before removing the recovery hook.
Failure to do so could result in personal
injury. WARNING: The recovery hook can
become hot. Let the recovery hook cool
down before removing it. Failure to do
so could result in personal injury.
Your vehicle has frame-mounted front
recovery hooks.
Note: Do not apply a load to the recovery
hooks that is greater than the gross vehicle
weight rating of your vehicle. Before using recovery hooks:
•
Make sure all attaching points are
secure and capable of withstanding
the applied load.
• Do not use chains, cables or tow straps
with metal hook ends.
• Only use recovery straps that have a
minimum breaking strength two to
three times the gross vehicle weight of
the stuck vehicle.
• Make sure the recovery strap is in good
condition and free of visible cuts, tears
or damage.
• Use a damper device such as a tarp,
heavy blanket or piece of carpet, and
place it over the recovery strap to help
absorb the energy in the event the
strap breaks.
• Make sure the stuck vehicle is not
loaded heavier than its gross vehicle
weight rating specified on the
certification label.
• Align the tow vehicle and stuck vehicle
in a straight line, within 10 degrees.
• Keep bystanders to the sides of the
vehicle, at a distance of at least twice
the length of the recovery strap. This
helps avoid injury from the hazard of a
recovery hook or strap breaking, or a
vehicle lurching into their path.
488
F-150 (TFD) Canada/United States of America, enUSA, Edition date: 202104, Second-Printing Crash and Breakdown Information
Page 494 of 796

TOWING YOUR VEHICLE
PRECAUTIONS
Use the following guidelines when towing
your vehicle. Failure to follow this
instruction could result in vehicle damage
not covered by the vehicle warranty.
Note:
Make sure you properly secure your
vehicle to the tow vehicle.
Note: If you are unsure of the vehicle ’s
configuration, contact an authorized dealer.
RECREATIONALLY TOWING
YOUR VEHICLE - 4X4 WARNING: Do not disconnect the
battery when recreationally towing your
vehicle. This prevents the transfer case
from shifting properly and could cause
the vehicle to roll, even if the
transmission is in park (P). WARNING:
Placing the transfer
case in its neutral position could cause
your vehicle to freely roll. Make sure you
press and hold the brake pedal and the
vehicle is in a secure, safe position when
you place the transfer case in its neutral
position.
Follow these guidelines if you have a need
for recreational towing. An example of
recreational towing would be towing your
vehicle behind a motorhome. These
guidelines are to make sure that you do
not damage the transmission. You can only tow your vehicle with all
wheels on the ground by placing the
transfer case in its neutral position and
engaging the recreational tow feature.
Perform the following steps after
positioning your vehicle behind the tow
vehicle and properly securing them
together.
Note:
Put your climate control system in
recirculated air mode to prevent exhaust
fumes from entering your vehicle.
Note: Failure to put the transfer case in its
neutral position can damage vehicle
components.
Note: You can check the towing status at
any time by opening the driver door or
turning the ignition to the accessory or on
position. Neutral Tow Enabled Leave
Transmission in Neutral
appears in the
instrument cluster display to confirm you
can recreationally tow your vehicle.
Note: If your vehicle has an anti-theft
alarm, make sure you switch perimeter
sensing on when towing. See
Setting the
Alarm Security Level (page 135).
Switching
Neutral Tow On
1. Start your vehicle.
2. Press the 2H button on the four-wheel
drive mode control.
3. Place your vehicle in temporary neutral
mode. See
Entering Temporary
Neutral Mode (page 286).
4. Switch your vehicle off by pressing the
push button ignition switch once or
turning the key as far toward the off
position as possible. A message
appears in the instrument cluster
display.
5. Switch your vehicle to accessory mode
by pressing the push button ignition
switch once without pressing the brake
pedal or by turning the key to the on
position.
490
F-150 (TFD) Canada/United States of America, enUSA, Edition date: 202104, Second-Printing Towing Your Vehicle
Page 495 of 796

6. Press and hold the brake pedal.
7. Using the instrument cluster controls
on the steering wheel, select Settings.
8. Select Neutral Tow.
9. Press and hold the
OK button until a
confirmation message appears in the
information display.
Note: If completed successfully, the
information display shows
Neutral Tow
Enabled Leave Transmission in Neutral.
This indicates that your vehicle is safe to
tow with all wheels on the ground.
Note: If you do not see a confirmation
message in the instrument cluster display,
you must perform the procedure again from
the beginning.
Note: You may hear noise as the transfer
case shifts into its neutral position. This is
normal.
10. Release the brake pedal.
11. Leave the transmission in neutral (N)
and switch your vehicle off by
pressing the push button ignition
switch once without pressing the
brake pedal or turning the key as far
toward the off position.
Note: Vehicles with keys do not turn to the
off position when the transmission is in
neutral (N). You must leave the key in the
ignition when towing. Use the keyless entry
keypad or an extra set of keys to lock and
unlock your vehicle.
Switching
Neutral Tow Off
1. With your vehicle properly secured to the tow vehicle, press and hold the
brake pedal and start the engine.
2. Switch your vehicle off by pressing the
push button ignition switch once or
turning the key as far towards the off
position and release the brake pedal. 3. Place your vehicle in accessory mode
by pressing the push button ignition
switch once without pressing the brake
pedal or by turning the ignition key to
the on position.
4. Press and hold the brake pedal.
5. Shift into park (P).
6. Release the brake pedal.
Note: If completed successfully, the
instrument cluster displays 2H and Neutral
Tow Disabled
.
Note: You must perform the switching
neutral tow on and switching neutral tow
off procedures again from the beginning if
the indicator light and message do not
display.
Note: You may hear a noise as the transfer
case shifts out of its neutral position. This
is normal.
7. Apply the parking brake, then disconnect your vehicle from the tow
vehicle.
8. Release the parking brake, start the engine, and shift into drive (D) to make
sure the transfer case is out of the
neutral tow position.
9. If the transfer case does not successfully shift out of its neutral
position, set the parking brake. Have
your vehicle checked as soon as
possible.
Resolving the
Shift Delayed Drive
Forward Message
1. Press and hold the brake pedal.
2. Start your vehicle.
3. Shift into neutral (N).
4. With the vehicle running, shift into drive
(D) and let the vehicle roll forward up
to
3 ft (1 m).
491
F-150 (TFD) Canada/United States of America, enUSA, Edition date: 202104, Second-Printing Towing Your Vehicle
Page 504 of 796

Protected Component
Fuse Rating
Fuse
Loca- tion
Not used.
—
1
Delayed accessory feed.
10 A
2
Wireless charger.
7.5 A
3
Not used.
20 A
4
Not used.
—
5
Driver power window switch.
10 A
6
Gear shift module.
10 A
7
Cell phone passport module.
5 A
8
Combined sensor module.
5 A
9
Not used.
—
10
Not used.
—
11
Enhanced central gateway.
7.5 A
12
Climate control.
Instrument cluster.
7.5 A
13
Steering column control module.
Not used (spare).
15 A
14
Integrated control panel.
15 A
15
SYNC.
Not used.
—
16
Headlamp control module.
7.5 A
17
Not used.
7.5 A
18
Headlamp switch.
5 A
19
Passive start.
5 A
20
Ignition switch.
Key inhibit solenoid.
Trailer brake switch.
5 A
21
Not used.
5 A
22
500
F-150 (TFD) Canada/United States of America, enUSA, Edition date: 202104, Second-Printing Fuses