2021 FORD EXPLORER instrument cluster
[x] Cancel search: instrument clusterPage 6 of 577

Instrument Cluster
Gauges - Vehicles With: 6.5 Inch
Instrument Cluster Display Screen
........................................................................\
.103
Gauges - Vehicles With: 12.3 Inch Instrument Cluster Display Screen
........................................................................\
104
Gauges - Vehicles With: 4.2 Inch Instrument Cluster Display Screen
........................................................................\
106
Warning Lamps and Indicators ..............
107
Audible Warnings and Indicators .............
111
Information Displays
General Information - Vehicles With: 6.5 Inch Instrument Cluster Display Screen
........................................................................\
..
112
General Information - Vehicles With: 12.3 Inch Instrument Cluster Display Screen
........................................................................\
..
114
General Information - Vehicles With: 4.2 Inch Instrument Cluster Display Screen
........................................................................\
..
117
Personalized Settings .................................
119
Information Messages ................................
121
Climate Control
Automatic Climate Control .....................
139
Hints on Controlling the Interior Climate ........................................................................\
..
141
Rear Passenger Climate Controls .........
142
Heated Windshield .....................................
143
Heated Rear Window .................................
144
Heated Exterior Mirrors .............................
144
Remote Start ................................................
144
Interior Air Quality
What Is the Cabin Air Filter ......................
145
Replacing the Cabin Air Filter ..................
145
Seats
Sitting in the Correct Position .................
146Head Restraints
...........................................
146
Manual Seats ................................................
148
Power Seats ..................................................
149
Memory Function .........................................
152
Rear Seats ......................................................
153
Heated Seats ................................................
158
Ventilated Seats ..........................................
159
Rear Occupant Alert System
What is the Rear Occupant Alert System ........................................................................\
160
How Does the Rear Occupant Alert System Work ............................................
160
Rear Occupant Alert System Precautions ........................................................................\
160
Rear Occupant Alert System Limitations ........................................................................\
160
Switching Rear Occupant Alert System On and Off .................................................
160
Rear Occupant Alert System Indicators ........................................................................\
..
161
Rear Occupant Alert System Audible Warnings ......................................................
161
Garage Door Opener
Universal Garage Door Opener ..............
162
Auxiliary Power Points
Auxiliary Power Points ...............................
167
Wireless Accessory Charger ....................
168
Storage Compartments
Cup Holders .....................................................
171
Overhead Console ........................................
171
Starting and Stopping the Engine
General Information ....................................
172
Ignition Switch ...............................................
172
Keyless Starting ............................................
172
3
Explorer (CTW), enUSA, Edition date: 202007, Second-Printing Table of Contents
Page 10 of 577

Cleaning the Interior
..................................346
Cleaning the Instrument Panel and Instrument Cluster Lens .......................
347
Cleaning Leather Seats .............................
347
Repairing Minor Paint Damage .............
348
Cleaning the Wheels .................................
348
Vehicle Storage ...........................................
348
Body Styling Kits ........................................
350
Wheels and Tires
General Information ...................................
351
Tire Care .........................................................
353
Using Summer Tires ..................................
366
Using Snow Chains ....................................
366
Tire Pressure Monitoring System .........
368
Changing a Road Wheel ...........................
374
Technical Specifications .........................
380
Capacities and Specifications
Engine Specifications - 2.3L EcoBoost™ ........................................................................\
382
Engine Specifications - 3.0L ..................
383
Engine Specifications - 3.0L, ST ...........
383
Engine Specifications - 3.3L, Gasoline ........................................................................\
385
Engine Specifications - 3.3L, Hybrid Electric Vehicle (HEV) ..........................
386
Transmission Specifications - ST ........
386
Motorcraft Parts - 2.3L EcoBoost™ .....
388
Motorcraft Parts - 3.0L ............................
389
Motorcraft Parts - 3.3L .............................
390
Vehicle Identification Number ................
391
Capacities and Specifications - 2.3L EcoBoost™ ................................................
391
Capacities and Specifications - 3.0L .......................................................................
398
Capacities and Specifications - 3.3L, Gasoline .....................................................
405
Capacities and Specifications - 3.3L, Hybrid Electric Vehicle (HEV) .............
412Bulb Specification Chart
..........................
419
Connected Vehicle
What Is a Connected Vehicle ..................
421
Connected Vehicle Requirements .........
421
Connected Vehicle Limitations ..............
421
Connecting the Vehicle to a Mobile Network .......................................................
421
Connecting the Vehicle to a Wi-Fi Network - Vehicles With: SYNC 3 ......
421
Connected Vehicle – Troubleshooting - Vehicles With: Modem ..........................
422
Connected Vehicle – Troubleshooting - Vehicles With: SYNC 3 ..........................
423
Vehicle Wi-Fi Hotspot
Creating a Vehicle Wi-Fi Hotspot .........
425
Changing the Vehicle Wi-Fi Hotspot Name or Password ................................
425
Audio System
General Information ..................................
426
Audio Unit .....................................................
426
Digital Radio ..................................................
427
Satellite Radio .............................................
429
USB Port ........................................................
432
SYNC™ 3
General Information ..................................
433
Using Voice Recognition ..........................
435
Entertainment ..............................................
441
Climate ............................................................
451
Phone ..............................................................
453
Navigation .....................................................
455
Electric Vehicle Information ...................
460
Apps .................................................................
461
Settings ..........................................................
464
SYNC™ 3 Troubleshooting ....................
466
7
Explorer (CTW), enUSA, Edition date: 202007, Second-Printing Table of Contents
Page 56 of 577

The restraints control module also
monitors the readiness of the above safety
devices plus the crash and occupant
sensors. The readiness of the safety
system is indicated by a warning indicator
light in the instrument cluster or by a
backup tone if the warning light is not
working. Routine maintenance of the
airbag is not required.
A difficulty with the system is indicated by
one or more of the following:
•
The readiness light will not illuminate
immediately after you switch the
ignition on.
• The readiness light either flashes or
stays lit.
• A series of five beeps is heard. The tone
pattern repeats periodically until the
problem, the light or both are repaired.
If any of these things happen, even
intermittently, have the supplemental
restraint system serviced at an authorized
dealer immediately. Unless serviced, the
system may not function properly in the
event of a crash.
The restraint system is designed to
activate when the vehicle sustains
conditions sufficient to cause the restraint
control module to deploy a safety device. The fact that not all the safety devices
activate for all occupants in a crash does
not mean something is wrong with the
system. Rather, it means the restraints
control module determined the accident
conditions (crash severity, type of crash,
belt usage) were not appropriate to
activate these safety devices.
•
The front airbags are designed to
activate only in frontal and near-frontal
crashes (not rollovers, side impacts or
rear impacts) unless the crash causes
sufficient frontal deceleration.
• The seatbelt pretensioners are
designed to activate in frontal,
near-frontal and side crashes, and in
rollovers.
• The knee airbag(s) may deploy based
on crash severity and occupant
conditions.
• The side airbags are designed to inflate
in certain side impact crashes or
rollover events. Side airbags may
activate in other types of crashes if your
vehicle experiences sufficient sideways
motion or deformation, or a certain
likelihood of rollover.
• The Safety Canopy is designed to
inflate in certain side impact crashes
or rollover events. The Safety Canopy
may activate in other types of crashes
if your vehicle experiences sufficient
sideways motion or deformation, or a
certain likelihood of rollover.
AIRBAG DISPOSAL
Contact your authorized dealer as soon as
possible. Airbags must be disposed of by
qualified personnel.
53
Explorer (CTW), enUSA, Edition date: 202007, Second-Printing Supplementary Restraints SystemE67017
Page 79 of 577

*This method only works for vehicles with
the hands-free liftgate feature.
Setting the Liftgate Open Height
1. Open the liftgate.
2.
Stop the liftgate movement by pressing
the control button on the liftgate when
it reaches the desired height.
Note: Once the liftgate has stopped
moving, you can also manually move it to
the desired height.
3. Press and hold the liftgate control button on the liftgate until you hear a
tone, indicating programming is
complete.
Note: You can only use the liftgate control
button to program the height.
Note: You cannot program the height if the
liftgate position is too low.
The new open liftgate height is recalled
when the power liftgate is opened. To
change the programmed height, repeat the
above procedure. Once you open the
power liftgate, you can manually move it
to a different height.
Note: The system recalls the new
programmed height until you reprogram it,
even if you disconnect the battery.
When operating the power liftgate after
you have programmed a lower height than
fully open, you can fully open the liftgate
by manually pushing it upward to the
maximum open position. Obstacle Detection
Note:
Entering your vehicle while the
liftgate is closing can cause your vehicle to
bounce and activate obstacle detection. To
prevent this, let the power liftgate close
completely before you enter your vehicle.
Before driving off, check the instrument
cluster for a liftgate or door ajar message or
warning indicator. Failure to do this could
result in unintentionally leaving the liftgate
open while driving.
When Closing
The system stops when it detects an
obstacle. A tone sounds and the system
reverses to open. Once you remove the
obstacle, you can power close the liftgate.
When Opening
The system stops when it detects an
obstacle and a tone sounds. Once you
remove the obstacle, you can continue to
operate the liftgate.
Switching the Power Liftgate On
or Off
You can switch the power liftgate on or off
through the vehicle settings on your
touchscreen.
When switched off, the liftgate only
unlatches and will not power open or close.
Hands-Free Feature (If Equipped)
Make sure you have the passive key within
3 ft (1 m)
of the liftgate.
1. Stand behind your vehicle, and face the
liftgate.
2. Move your foot, in a single-kick motion,
without pausing, under and away from
the rear bumper detection area.
76
Explorer (CTW), enUSA, Edition date: 202007, Second-Printing Liftgate
Page 106 of 577

GAUGES - VEHICLES WITH: 6.5 INCH INSTRUMENT CLUSTER
DISPLAY SCREEN
Tachometer.
A
Information bar.
B
Speedometer.
C
Fuel gauge.
D
Information display.
E
Engine coolant temperature gauge.
F
Information Bar
Displays information related to the
navigation, outside air temperature,
odometer and distance to empty.
Information Display
Displays information related to the
navigation, outside air temperature,
odometer and distance to empty. Information Display
Information that appears depends on your
vehicle settings. See General
Information (page 117).
Fuel Gauge
The fuel gauge indicates about how much
fuel is in the fuel tank.
The arrow adjacent to the fuel pump
symbol indicates on which side of your
vehicle the fuel filler door is located.
103
Explorer (CTW), enUSA, Edition date: 202007, Second-Printing Instrument ClusterE282067
Page 107 of 577

Note:
The fuel gauge may vary slightly
when your vehicle is moving or on a slope.
Low Fuel Reminder
A low fuel level reminder displays and
sounds when the distance to empty
reaches 75 mi (120 km) to empty for
MyKey, and at 50 mi (80 km), 25 mi
(40 km), 10 mi (20 km) and 0 mi (0 km)
for all vehicle keys.
Note: The low fuel reminder can appear at
different fuel gauge positions depending on
fuel economy conditions. This variation is
normal.
Distance to Empty
Indicates the approximate distance your
vehicle can travel on the fuel remaining in
the tank. Changes in driving pattern can
cause the value to not only decrease but
also increase or stay constant for periods
of time. Engine Coolant Temperature
Gauge WARNING:
Do not remove the
coolant reservoir cap when the engine is
on or the cooling system is hot. Wait 10
minutes for the cooling system to cool
down. Cover the coolant reservoir cap
with a thick cloth to prevent the
possibility of scalding and slowly remove
the cap. Failure to follow this instruction
could result in personal injury.
Indicates engine coolant temperature. At
normal operating temperature, the level
indicator will be in the normal range. If the
engine coolant temperature exceeds the
normal range, stop your vehicle as soon as
safely possible, switch off the engine and
let the engine cool.
GAUGES - VEHICLES WITH:
12.3 INCH INSTRUMENT
CLUSTER DISPLAY SCREEN
Note: Clusters shown in single gauge view.
Note: Displays may appear slightly different
depending on region.
104
Explorer (CTW), enUSA, Edition date: 202007, Second-Printing Instrument Cluster
Page 108 of 577

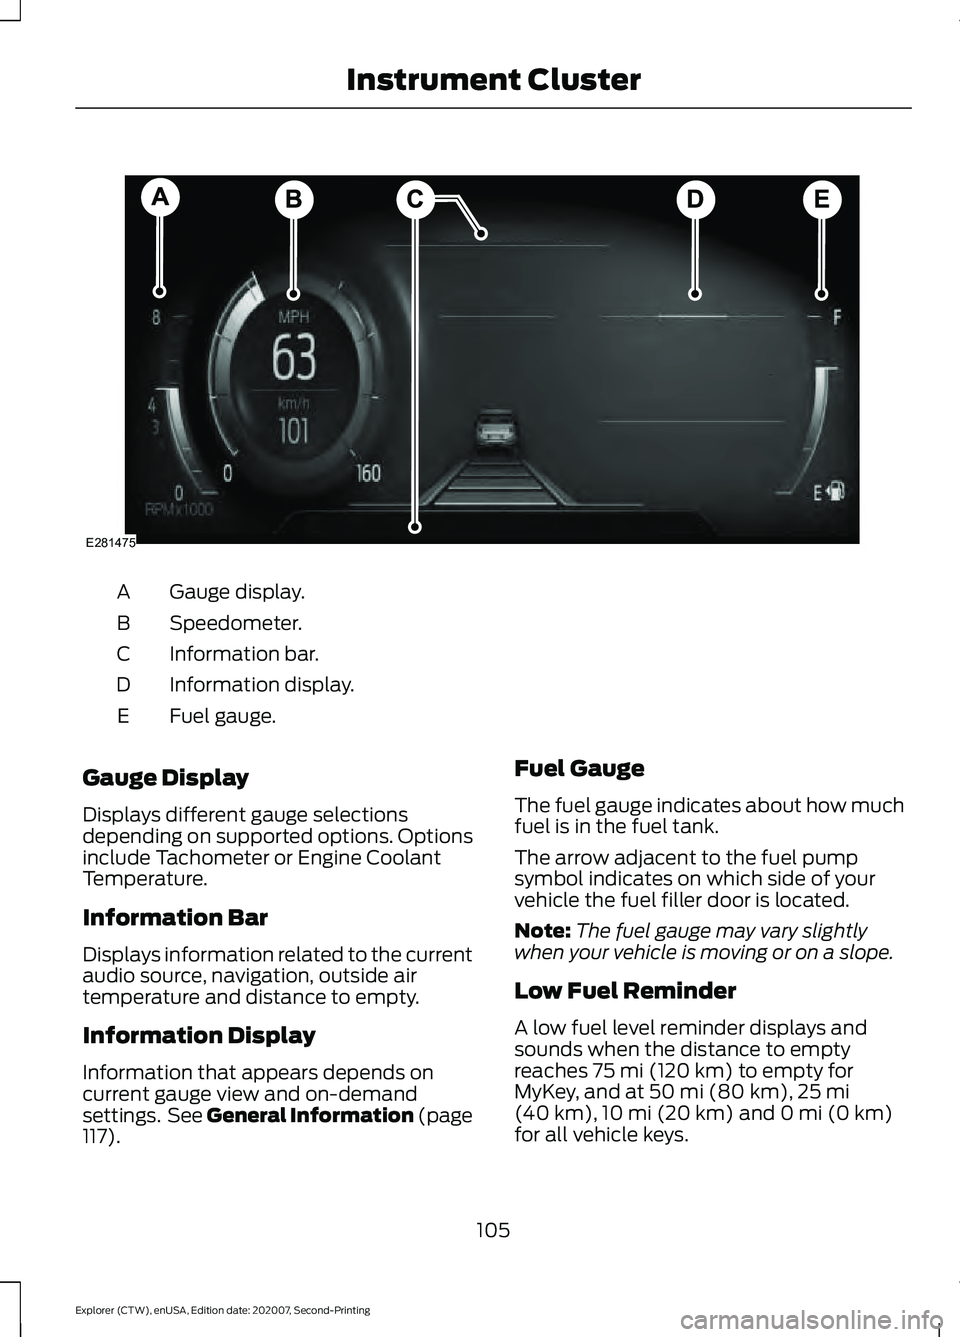
Gauge display.
A
Speedometer.
B
Information bar.
C
Information display.
D
Fuel gauge.
E
Gauge Display
Displays different gauge selections
depending on supported options. Options
include Tachometer or Engine Coolant
Temperature.
Information Bar
Displays information related to the current
audio source, navigation, outside air
temperature and distance to empty.
Information Display
Information that appears depends on
current gauge view and on-demand
settings. See General Information (page
117). Fuel Gauge
The fuel gauge indicates about how much
fuel is in the fuel tank.
The arrow adjacent to the fuel pump
symbol indicates on which side of your
vehicle the fuel filler door is located.
Note:
The fuel gauge may vary slightly
when your vehicle is moving or on a slope.
Low Fuel Reminder
A low fuel level reminder displays and
sounds when the distance to empty
reaches
75 mi (120 km) to empty for
MyKey, and at 50 mi (80 km), 25 mi
(40 km), 10 mi (20 km) and 0 mi (0 km)
for all vehicle keys.
105
Explorer (CTW), enUSA, Edition date: 202007, Second-Printing Instrument ClusterE281475
Page 109 of 577

Note:
The low fuel reminder can appear at
different fuel gauge positions depending on
fuel economy conditions. This variation is
normal.
Distance to Empty
Indicates the approximate distance your
vehicle can travel on the fuel remaining in
the tank. Changes in driving pattern can
cause the value to not only decrease but
also increase or stay constant for periods
of time. Engine Coolant Temperature
Gauge WARNING: Do not remove the
coolant reservoir cap when the engine is
on or the cooling system is hot. Wait 10
minutes for the cooling system to cool
down. Cover the coolant reservoir cap
with a thick cloth to prevent the
possibility of scalding and slowly remove
the cap. Failure to follow this instruction
could result in personal injury.
Indicates engine coolant temperature. At
normal operating temperature, the level
indicator will be in the normal range. If the
engine coolant temperature exceeds the
normal range, stop your vehicle as soon as
safely possible, switch off the engine and
let the engine cool.
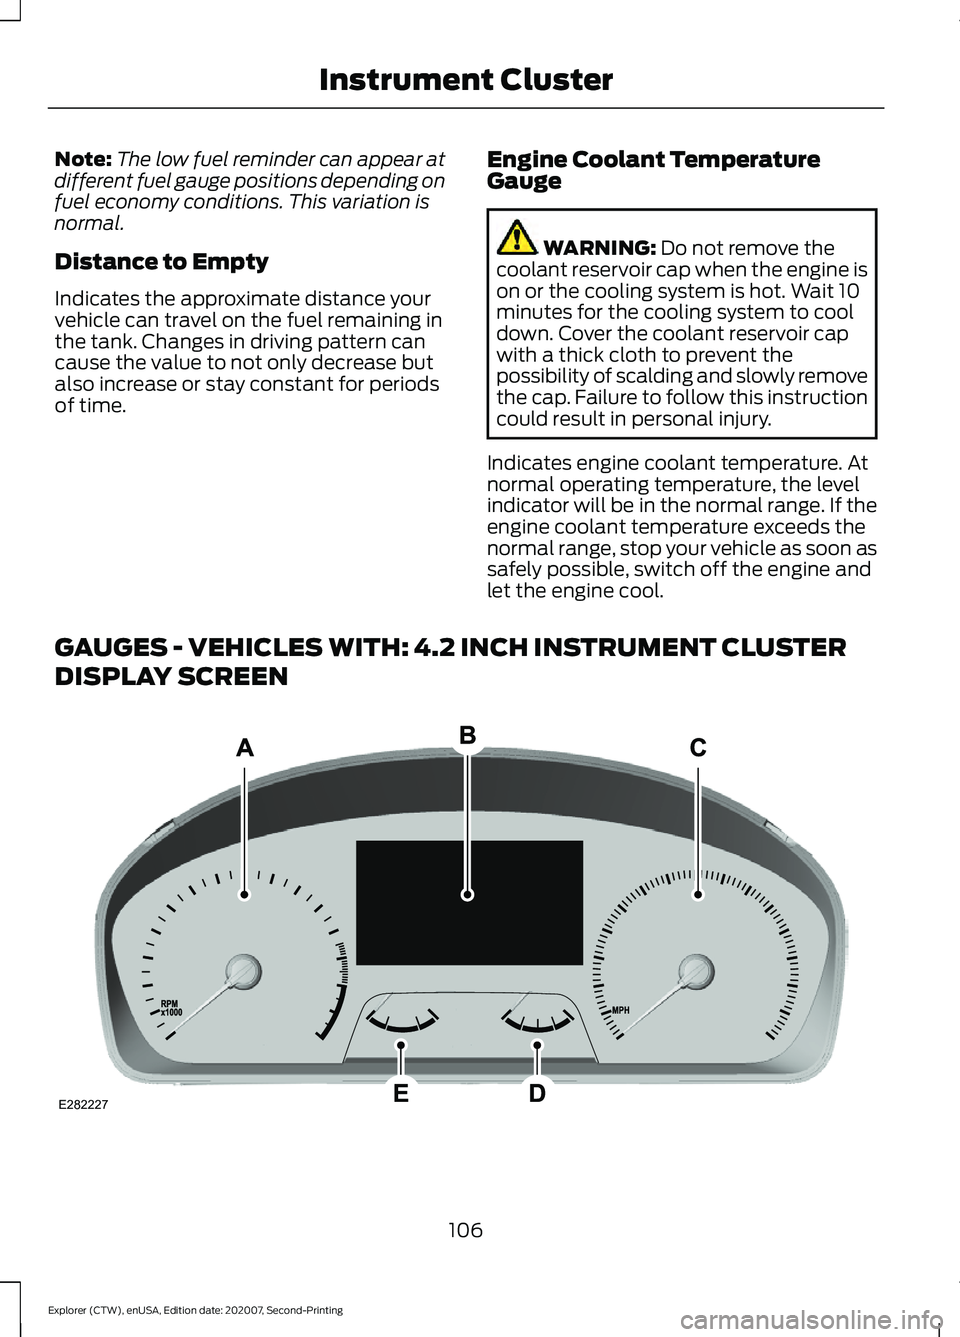
GAUGES - VEHICLES WITH: 4.2 INCH INSTRUMENT CLUSTER
DISPLAY SCREEN 106
Explorer (CTW), enUSA, Edition date: 202007, Second-Printing Instrument ClusterE282227