2021 FORD EXPLORER roof
[x] Cancel search: roofPage 5 of 577

Clearing All MyKeys
......................................66
Checking MyKey System Status .............
66
Using MyKey With Remote Start Systems ........................................................
67
MyKey – Troubleshooting ..........................
67
Doors and Locks
Locking and Unlocking ...............................
69
Keyless Entry ...................................................
72
Liftgate
Power Liftgate ................................................
74
Security
Passive Anti-Theft System ........................
78
Anti-Theft Alarm ...........................................
78
Steering Wheel
Adjusting the Steering Wheel - Vehicles With: Manual Adjustable Steering
Column .........................................................
80
Adjusting the Steering Wheel - Vehicles With: Power Adjustable Steering
Column .........................................................
80
Audio Control ..................................................
82
Voice Control ..................................................
82
Cruise Control - Vehicles With: Adaptive Cruise Control With Stop and Go .......
82
Cruise Control - Vehicles With: Cruise Control ..........................................................
83
Information Display Control ......................
83
Heated Steering Wheel ..............................
83
Horn ....................................................................
83
Wipers and Washers
Windshield Wipers .......................................
84
Autowipers ......................................................
84
Windshield Washers ....................................
85
Rear Window Wiper and Washers .........
86Lighting
General Information
.....................................
87
Lighting Control .............................................
87
Autolamps .......................................................
88
Instrument Lighting Dimmer ....................
88
Headlamp Exit Delay ...................................
88
Daytime Running Lamps - Vehicles With: Configurable Daytime Running Lamps
........................................................................\
..
89
Daytime Running Lamps - Vehicles With: Daytime Running Lamps (DRL) .........
89
Front Fog Lamps ...........................................
89
Adaptive Headlamps ..................................
90
Direction Indicators ......................................
90
Interior Lamps .................................................
91
Ambient Lighting - Vehicles With: 8 Inch Information and Entertainment Display
Screen ...........................................................
92
Ambient Lighting - Vehicles With: 10.1 Inch Information and Entertainment
Display Screen ...........................................
92
Automatic High Beam Control
What Is Automatic High Beam Control ........................................................................\
..
94
Switching Automatic High Beam Control On and Off ...................................................
94
Automatic High Beam Control Indicators ........................................................................\
..
94
Overriding Automatic High Beam Control ........................................................................\
..
95
Windows and Mirrors
Power Windows ............................................
96
Global Opening ..............................................
97
Exterior Mirrors - Excluding: ST ................
97
Exterior Mirrors - ST .....................................
98
Interior Mirror ................................................
100
Sun Visors ......................................................
100
Moonroof .........................................................
101
2
Explorer (CTW), enUSA, Edition date: 202007, Second-Printing Table of Contents
Page 8 of 577
360 Degree Camera
...................................241
Cruise Control
What Is Cruise Control ..............................
244
Switching Cruise Control On and Off ........................................................................\
244
Setting the Cruise Control Speed ........
244
Canceling the Set Speed .........................
245
Resuming the Set Speed .........................
245
Cruise Control Indicators .........................
245
Adaptive Cruise Control
How Does Adaptive Cruise Control With Stop and Go Work .................................
246
What Is Adaptive Cruise Control With Lane Centering ........................................
246
What Is Intelligent Adaptive Cruise Control ........................................................
246
Adaptive Cruise Control Precautions - Vehicles With: Adaptive Cruise Control
With Lane Centering .............................
246
Adaptive Cruise Control Precautions - Vehicles With: Adaptive Cruise Control
With Stop and Go ..................................
246
Adaptive Cruise Control Limitations - Vehicles With: Adaptive Cruise Control
With Lane Centering ..............................
247
Adaptive Cruise Control Limitations - Vehicles With: Adaptive Cruise Control
With Stop and Go ..................................
248
Switching Adaptive Cruise Control On and Off .......................................................
250
Setting the Adaptive Cruise Control Speed .........................................................
250
Setting the Adaptive Cruise Control Gap ........................................................................\
.
251
Canceling the Set Speed .........................
252
Resuming the Set Speed .........................
252
Overriding the Set Speed .........................
252
Adaptive Cruise Control Indicators - Vehicles With: Adaptive Cruise Control
With Lane Centering ..............................
253Adaptive Cruise Control Indicators -
Vehicles With: Adaptive Cruise Control
With Stop and Go ...................................
253
Adaptive Cruise Control Indicators - Vehicles With: Intelligent Adaptive
Cruise Control ..........................................
253
Switching From Adaptive Cruise Control to Cruise Control .....................................
253
Switching Lane Centering On and Off ........................................................................\
254
Switching Intelligent Mode On and Off ........................................................................\
255
Adjusting the Set Speed Tolerance ......
255
Adaptive Cruise Control – Troubleshooting ......................................
256
Driving Aids
Driver Alert ....................................................
259
Lane Keeping System ...............................
260
Blind Spot Information System ............
264
Cross Traffic Alert .......................................
268
Speed Sign Recognition ............................
271
Steering ...........................................................
273
Pre-Collision Assist ....................................
273
Drive Mode Control
What Is Drive Mode Control ....................
278
Selecting a Drive Mode .............................
278
Drive Modes ..................................................
278
Load Carrying
Rear Under Floor Storage .......................
280
Cargo Nets ....................................................
280
Luggage Covers ............................................
281
Roof Racks and Load Carriers ................
281
Load Limit ......................................................
282
Towing
Towing a Trailer ...........................................
288
Trailer Sway Control ..................................
289
Recommended Towing Weights ..........
289
5
Explorer (CTW), enUSA, Edition date: 202007, Second-Printing Table of Contents
Page 55 of 577
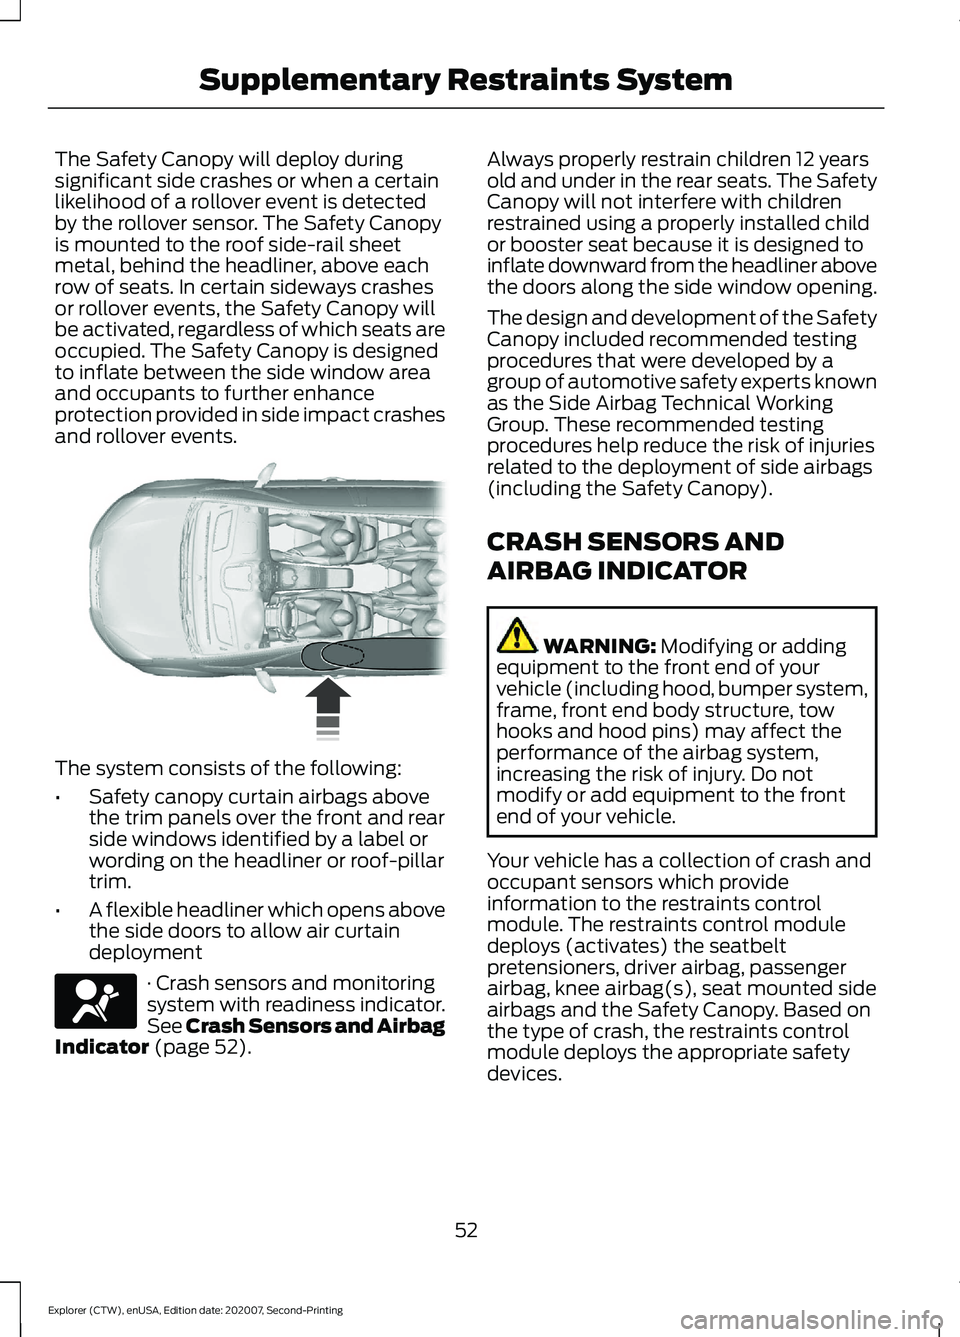
The Safety Canopy will deploy during
significant side crashes or when a certain
likelihood of a rollover event is detected
by the rollover sensor. The Safety Canopy
is mounted to the roof side-rail sheet
metal, behind the headliner, above each
row of seats. In certain sideways crashes
or rollover events, the Safety Canopy will
be activated, regardless of which seats are
occupied. The Safety Canopy is designed
to inflate between the side window area
and occupants to further enhance
protection provided in side impact crashes
and rollover events.
The system consists of the following:
•
Safety canopy curtain airbags above
the trim panels over the front and rear
side windows identified by a label or
wording on the headliner or roof-pillar
trim.
• A flexible headliner which opens above
the side doors to allow air curtain
deployment · Crash sensors and monitoring
system with readiness indicator.
See Crash Sensors and Airbag
Indicator (page 52). Always properly restrain children 12 years
old and under in the rear seats. The Safety
Canopy will not interfere with children
restrained using a properly installed child
or booster seat because it is designed to
inflate downward from the headliner above
the doors along the side window opening.
The design and development of the Safety
Canopy included recommended testing
procedures that were developed by a
group of automotive safety experts known
as the Side Airbag Technical Working
Group. These recommended testing
procedures help reduce the risk of injuries
related to the deployment of side airbags
(including the Safety Canopy).
CRASH SENSORS AND
AIRBAG INDICATOR
WARNING:
Modifying or adding
equipment to the front end of your
vehicle (including hood, bumper system,
frame, front end body structure, tow
hooks and hood pins) may affect the
performance of the airbag system,
increasing the risk of injury. Do not
modify or add equipment to the front
end of your vehicle.
Your vehicle has a collection of crash and
occupant sensors which provide
information to the restraints control
module. The restraints control module
deploys (activates) the seatbelt
pretensioners, driver airbag, passenger
airbag, knee airbag(s), seat mounted side
airbags and the Safety Canopy. Based on
the type of crash, the restraints control
module deploys the appropriate safety
devices.
52
Explorer (CTW), enUSA, Edition date: 202007, Second-Printing Supplementary Restraints System E75004 E67017
Page 104 of 577
Illuminated Vanity Mirror
Lift the cover to switch the lamp on.
MOONROOF (IF EQUIPPED)
WARNING:
Do not leave children
unattended in your vehicle and do not
let them play with the moonroof. Failure
to follow this instruction could result in
personal injury. WARNING:
When closing the
moonroof, verify that it is free of
obstruction and make sure that children
and pets are not in the proximity of the
roof opening.
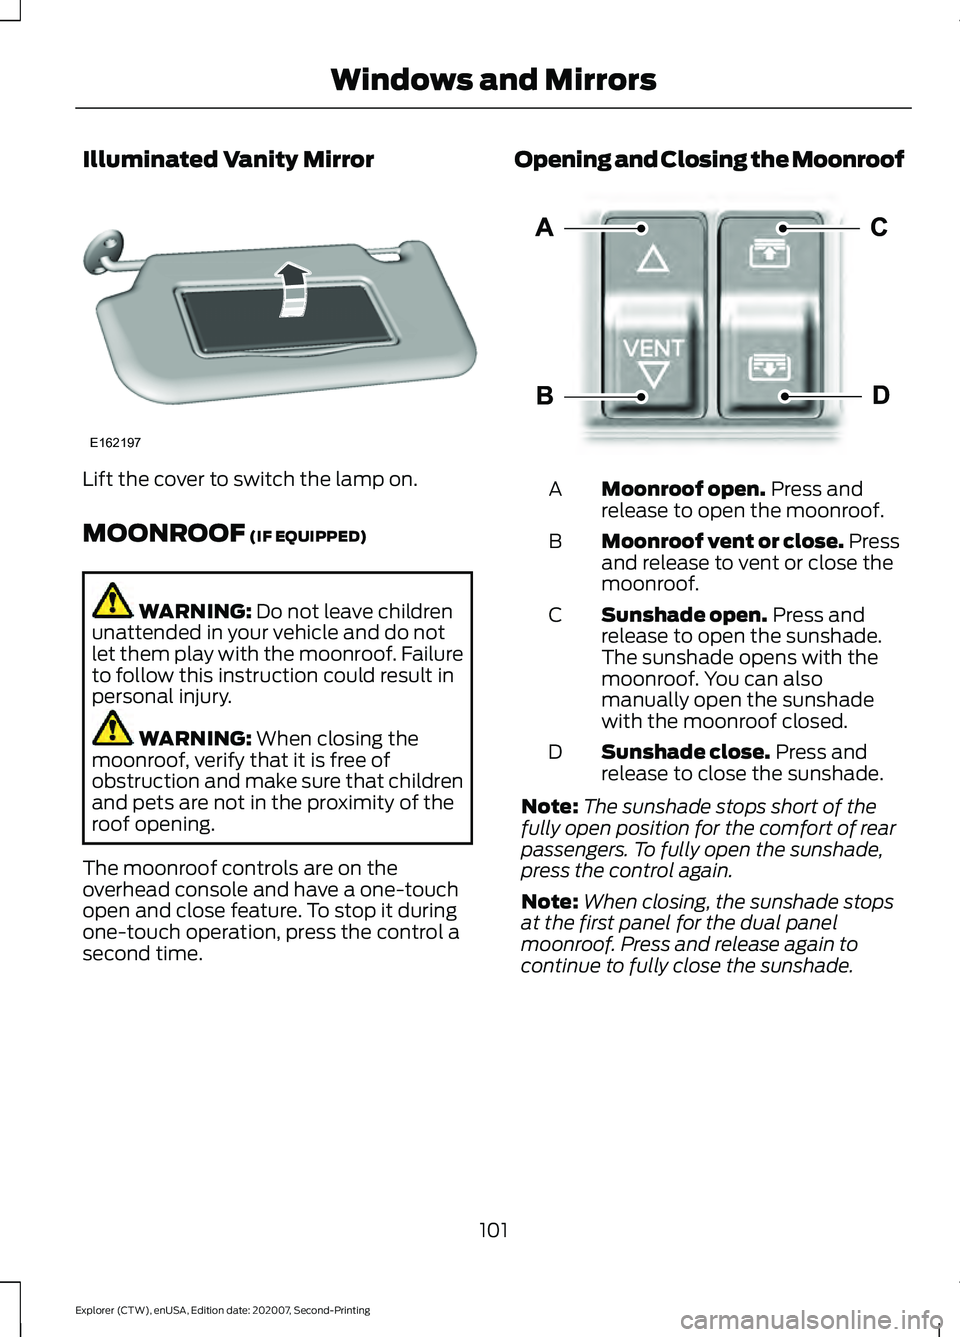
The moonroof controls are on the
overhead console and have a one-touch
open and close feature. To stop it during
one-touch operation, press the control a
second time. Opening and Closing the Moonroof
Moonroof open.
Press and
release to open the moonroof.
A
Moonroof vent or close. Press
and release to vent or close the
moonroof.
B
Sunshade open.
Press and
release to open the sunshade.
The sunshade opens with the
moonroof. You can also
manually open the sunshade
with the moonroof closed.
C
Sunshade close.
Press and
release to close the sunshade.
D
Note: The sunshade stops short of the
fully open position for the comfort of rear
passengers. To fully open the sunshade,
press the control again.
Note: When closing, the sunshade stops
at the first panel for the dual panel
moonroof. Press and release again to
continue to fully close the sunshade.
101
Explorer (CTW), enUSA, Edition date: 202007, Second-Printing Windows and MirrorsE162197 E295253
Page 105 of 577
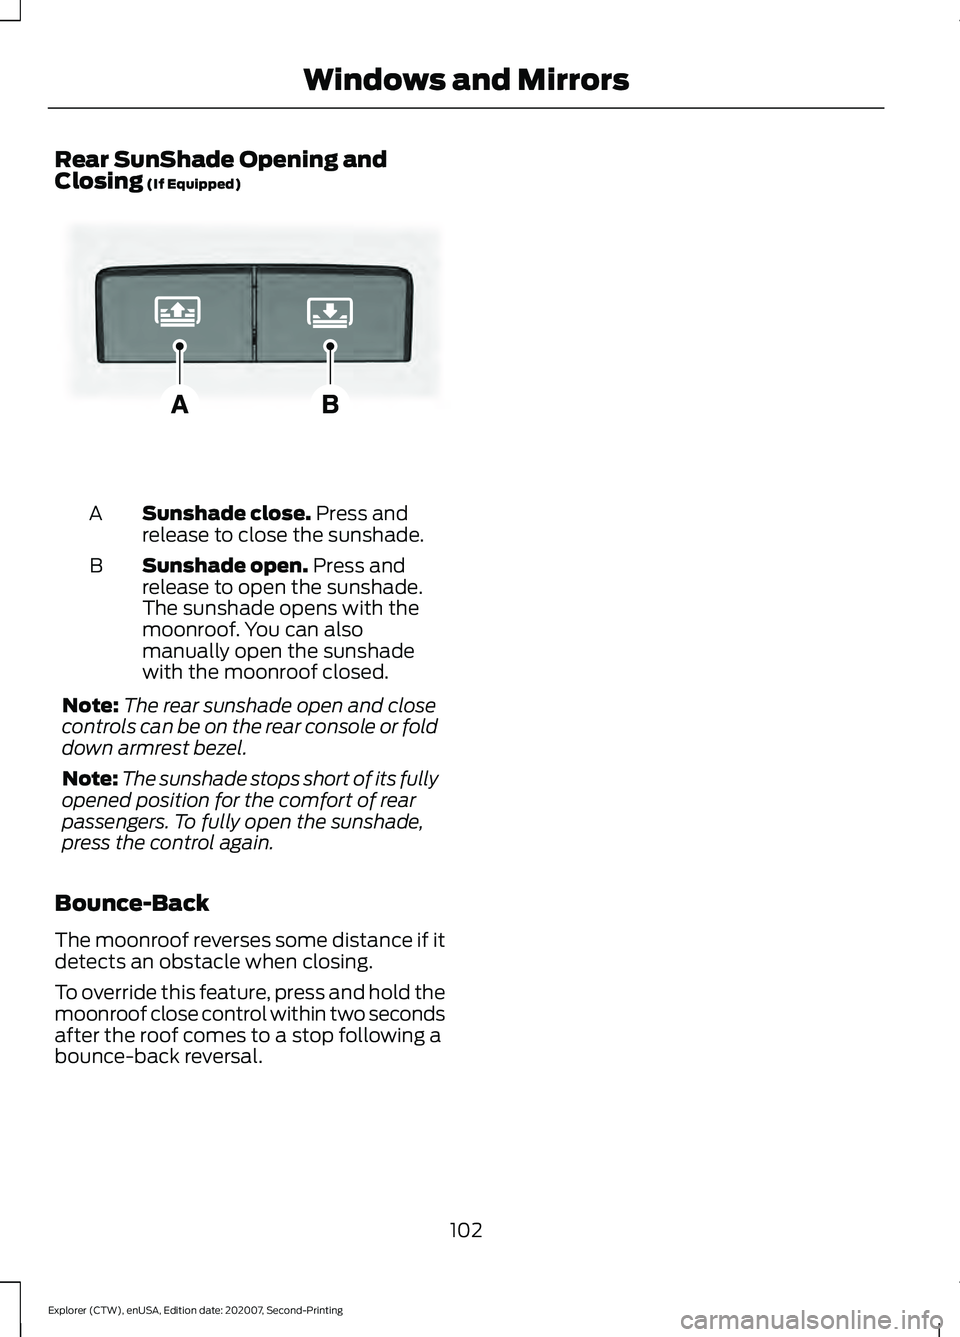
Rear SunShade Opening and
Closing (If Equipped)
Sunshade close.
Press and
release to close the sunshade.
A
Sunshade open.
Press and
release to open the sunshade.
The sunshade opens with the
moonroof. You can also
manually open the sunshade
with the moonroof closed.
B
Note: The rear sunshade open and close
controls can be on the rear console or fold
down armrest bezel.
Note: The sunshade stops short of its fully
opened position for the comfort of rear
passengers. To fully open the sunshade,
press the control again.
Bounce-Back
The moonroof reverses some distance if it
detects an obstacle when closing.
To override this feature, press and hold the
moonroof close control within two seconds
after the roof comes to a stop following a
bounce-back reversal.
102
Explorer (CTW), enUSA, Edition date: 202007, Second-Printing Windows and MirrorsE297640
Page 198 of 577

In addition, the fuel tank contains an empty
reserve. The empty reserve is an
unspecified amount of fuel that remains
in the fuel tank when the fuel gauge
indicates empty.
Note:
The amount of fuel in the empty
reserve varies and should not be relied upon
to increase driving range.
Calculating Fuel Economy
Your vehicle calculates fuel economy
figures through the trip computer average
fuel function. See Information Displays
(page 112).
The first
1,000 mi (1,600 km) of driving is
the break-in period of the vehicle. A more
accurate measurement is obtained after
2,000– 3,000 mi (3,200–4,800 km)
.
1. Completely fill the fuel tank and record
the initial odometer reading.
See
Refueling (page 192).
2. Each time you fill the fuel tank, record the amount of fuel added.
3. After at least three fill ups, fill the fuel tank and record the current odometer
reading.
4. Subtract your initial odometer reading from the current odometer reading.
To calculate L/100 km (liters per 100
kilometers) fuel consumption, multiply the
liters used by 100, then divide by kilometers
traveled. To calculate MPG (miles per
gallon) fuel consumption, divide miles
traveled by gallons used.
Keep a record for at least one month and
record the type of driving, for example city
or highway. This provides an accurate
estimate of your vehicle ’s fuel economy
under current driving conditions. Keeping
records during summer and winter shows
how temperature impacts fuel economy. Conditions Influencing Fuel Efficiency
•
Carrying unnecessary weight in your
vehicle will reduce fuel efficiency.
• Avoid adding accessories that increase
aerodynamic drag to your vehicle such
as bug deflectors, car top carriers and
ski or bike racks.
• Remove empty roof racks and keep
windows shut at high speeds to reduce
wind resistance and fuel use.
• Check and adjust tire pressure
regularly. Under inflated tires will
increase fuel consumption.
• Sudden acceleration and braking
degrade fuel efficiency. Drive smoothly
looking as far ahead as possible and
avoid short trips when possible.
• Fuel efficiency degrades with lower
temperatures.
• Comfort Features use additional energy
and consume more fuel. Use AC and
other comfort features only when
necessary.
• Using fuel blended with alcohol may
increase fuel consumption.
195
Explorer (CTW), enUSA, Edition date: 202007, Second-Printing Fuel and Refueling
Page 228 of 577

PRINCIPLE OF OPERATION
WARNING: Vehicle modifications
involving braking system, aftermarket
roof racks, suspension, steering system,
tire construction and wheel and tire size
may change the handling characteristics
of your vehicle and may adversely affect
the performance of the electronic
stability control system. In addition,
installing any stereo loudspeakers may
interfere with and adversely affect the
electronic stability control system. Install
any aftermarket stereo loudspeaker as
far as possible from the front center
console, the tunnel, and the front seats
in order to minimize the risk of interfering
with the electronic stability control
sensors. Reducing the effectiveness of
the electronic stability control system
could lead to an increased risk of loss of
vehicle control, vehicle rollover, personal
injury and death. WARNING:
Remember that even
advanced technology cannot defy the
laws of physics. It’ s always possible to
lose control of a vehicle due to
inappropriate driver input for the
conditions. Aggressive driving on any
road condition can cause you to lose
control of your vehicle increasing the risk
of personal injury or property damage.
Activation of the electronic stability
control system is an indication that at
least some of the tires have exceeded
their ability to grip the road; this could
reduce the operator ’s ability to control
the vehicle potentially resulting in a loss
of vehicle control, vehicle rollover,
personal injury and death. If your
electronic stability control system
activates, SLOW DOWN.
The system automatically turns on each
time you switch the ignition on. If a driving condition activates either the
stability control or the traction control
system you may experience the following
conditions:
•
The stability and traction control light
flashes.
• Your vehicle slows down.
• Reduced engine power.
• A vibration in the brake pedal.
• The brake pedal is stiffer than usual.
• If the driving condition is severe and
your foot is not on the brake, the brake
pedal may move as the systems
applies higher brake forces.
The stability control system has several
features built into it to help you maintain
control of your vehicle:
Electronic Stability Control
The system enhances your vehicle ’s ability
to prevent skids or lateral slides by
applying brakes to one or more of the
wheels individually and, if necessary,
reducing engine power.
Roll Stability Control
The system enhances your vehicle ’s ability
to prevent rollovers by detecting your
vehicle ’s roll motion and the rate at which
it changes by applying the brakes to one
or more wheels individually.
Curve Control
The system enhances your vehicle ’s ability
to follow the road when cornering severely
or avoiding objects in the roadway. Curve
Control operates by reducing engine power
and, if necessary, applying brakes to one
or more of the wheels individually.
225
Explorer (CTW), enUSA, Edition date: 202007, Second-Printing Stability Control
Page 284 of 577
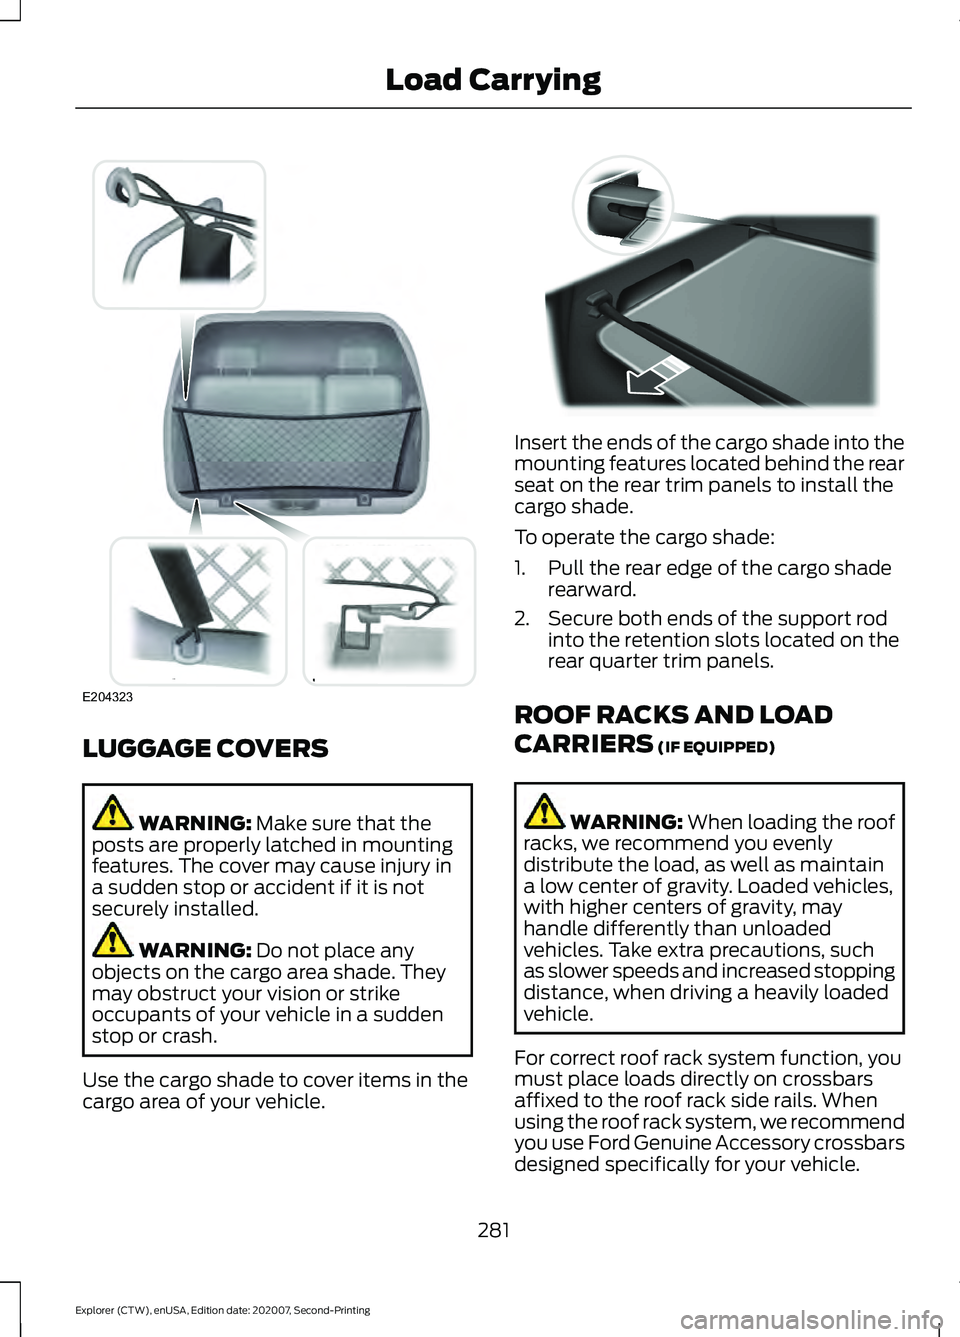
LUGGAGE COVERS
WARNING: Make sure that the
posts are properly latched in mounting
features. The cover may cause injury in
a sudden stop or accident if it is not
securely installed. WARNING:
Do not place any
objects on the cargo area shade. They
may obstruct your vision or strike
occupants of your vehicle in a sudden
stop or crash.
Use the cargo shade to cover items in the
cargo area of your vehicle. Insert the ends of the cargo shade into the
mounting features located behind the rear
seat on the rear trim panels to install the
cargo shade.
To operate the cargo shade:
1. Pull the rear edge of the cargo shade
rearward.
2. Secure both ends of the support rod into the retention slots located on the
rear quarter trim panels.
ROOF RACKS AND LOAD
CARRIERS
(IF EQUIPPED) WARNING:
When loading the roof
racks, we recommend you evenly
distribute the load, as well as maintain
a low center of gravity. Loaded vehicles,
with higher centers of gravity, may
handle differently than unloaded
vehicles. Take extra precautions, such
as slower speeds and increased stopping
distance, when driving a heavily loaded
vehicle.
For correct roof rack system function, you
must place loads directly on crossbars
affixed to the roof rack side rails. When
using the roof rack system, we recommend
you use Ford Genuine Accessory crossbars
designed specifically for your vehicle.
281
Explorer (CTW), enUSA, Edition date: 202007, Second-Printing Load CarryingE204323 E142447