2021 FORD EXPLORER steering
[x] Cancel search: steeringPage 155 of 577
Lumbar and Bolster Mode
Massage Mode
Upper lumbar
Back massage intensity
adjustment
A
Lumbar decrease
Massage intensity decrease
and off*
B
Lower lumbar**
Cushion massage intensity
adjustment
C
Lumbar increase
Massage intensity increase
D
-
On and off
E
* The massage feature defaults to an
alternating massage mode with back
massage intensity adjustment. The lumbar
and bolster feature defaults to the middle
lumbar mode.
** Press C a second time to adjust the back
bolster. Press C a third time to adjust the
cushion bolster.
You can also adjust this feature through
the touchscreen. When switched on, the
system displays directions for you to adjust
the lumbar settings in your seat or to set
the massage function.
MEMORY FUNCTION (IF EQUIPPED) WARNING:
Before activating the
memory seat, make sure that the area
immediately surrounding the seat is clear
of obstructions and that all occupants
are clear of moving parts. WARNING:
Do not use the memory
function when your vehicle is moving.
This feature recalls the position of the
following: •
Driver seat.
• Power mirrors.
• Optional power steering column.
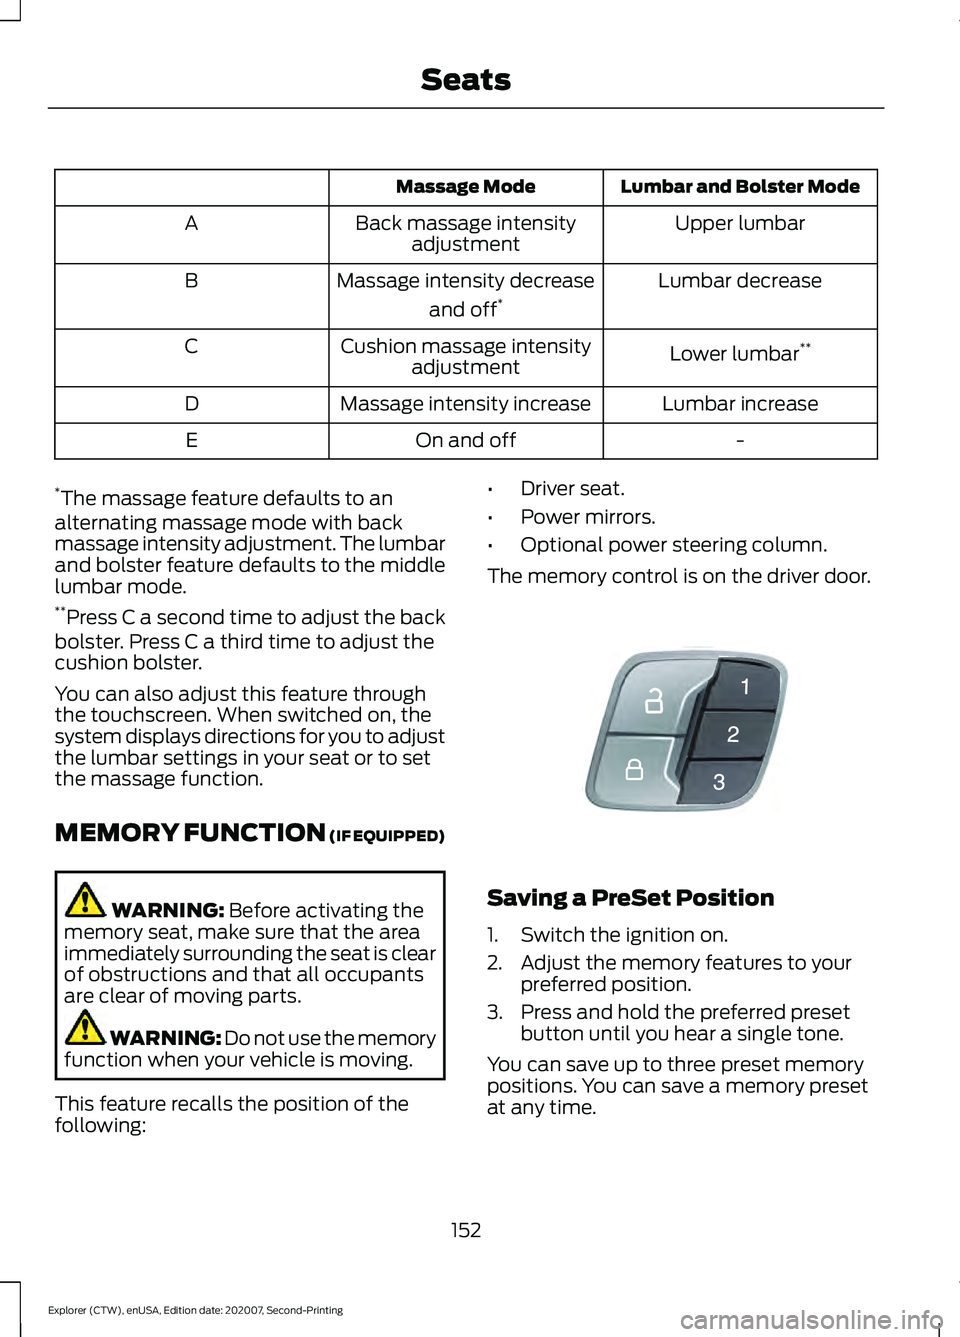
The memory control is on the driver door. Saving a PreSet Position
1. Switch the ignition on.
2. Adjust the memory features to your
preferred position.
3. Press and hold the preferred preset button until you hear a single tone.
You can save up to three preset memory
positions. You can save a memory preset
at any time.
152
Explorer (CTW), enUSA, Edition date: 202007, Second-Printing SeatsE142554
Page 178 of 577
not intervene within 30 seconds, your
vehicle shuts down. Another message
appears in the information display to
inform you that your vehicle has shut down
to save fuel. Start your vehicle as you
normally do.
Automatic Engine Shutdown Override
Note:
You cannot permanently switch off
the automatic shutdown feature. When you
switch it off temporarily, it turns on at the
next ignition cycle.
You can stop the shutdown, or reset the
timer, at any point before the 30-second
countdown has expired by doing any of the
following:
• You can reset the timer by interacting
with your vehicle, for example pressing
the brake or accelerator pedal.
• You can temporarily switch off the
shutdown feature any time the ignition
is on using the information display. See
Information Displays (page 112). The
feature only remains off for the current
ignition cycle.
• During the 30-second countdown, the
system prompts you to press OK or
RESET to temporarily switch the
feature off for the current ignition cycle
only.
Stopping the Engine When Your
Vehicle is Stationary
Vehicles with an Ignition Key
1. Shift into park (P).
2. Switch the ignition off.
3. Apply the parking brake.
Vehicles with Keyless Start
1. Shift into park (P).
2. Press the push button ignition switch.
3. Apply the parking brake. Note:
The ignition, all electrical circuits and
all warning lamps and indicators will be
turned off.
Note: If the engine is idling for 30 minutes,
the ignition and engine automatically shut
down.
Stopping the Engine When Your
Vehicle is Moving WARNING: Switching off the
engine when your vehicle is still moving
results in a significant decrease in
braking assistance. Higher effort is
required to apply the brakes and to stop
your vehicle. A significant decrease in
steering assistance could also occur. The
steering does not lock, but higher effort
could be required to steer your vehicle.
When you switch the ignition off, some
electrical circuits, for example airbags,
also turn off. If you unintentionally switch
the ignition off, shift into neutral (N) and
restart the engine.
Vehicles with an Ignition Key
1. Shift into neutral and use the brakes to
bring your vehicle to a safe stop.
2. When your vehicle has stopped, shift into park (P) and switch the ignition
off.
3. Apply the parking brake.
Vehicles with Keyless Start
1. Shift into neutral and use the brakes to
bring your vehicle to a safe stop.
2. When your vehicle has stopped, shift into park (P).
3. Press and hold the push button ignition
switch, or press it three times within
two seconds.
4. Apply the parking brake.
175
Explorer (CTW), enUSA, Edition date: 202007, Second-Printing Starting and Stopping the Engine
Page 180 of 577
Within 20 seconds of switching your
vehicle off, press the brake pedal and press
the push button ignition switch. After 20
seconds, you can no longer start your
vehicle if it does not detect a valid passive
key.
Once your vehicle starts, it remains running
until you press the push button ignition
switch, even if your vehicle does not detect
a valid passive key. You cannot start your
vehicle if the system does not detect a
valid passive key within 20 seconds.
Automatic Engine Shutdown
For vehicles with a keyless ignition, this
feature shuts down the engine if it has
been idling for an extended period. The
ignition also turns off in order to save
battery power. Before your vehicle shuts
down, a message appears in the
information display showing a timer
counting down from 30 seconds. If you do
not intervene within 30 seconds, your
vehicle shuts down. Another message
appears in the information display to
inform you that your vehicle has shut down
to save fuel. Start your vehicle as you
normally do.
Note:
Automatic Engine Shutdown may be
more frequent for hybrid vehicles.
Automatic Engine Shutdown Override
Note: You cannot permanently switch off
the automatic shutdown feature. When you
switch it off temporarily, it turns on at the
next ignition cycle. You can stop the shutdown, or reset the
timer, at any point before the 30-second
countdown expires by doing any of the
following:
•
You can reset the timer by interacting
with your vehicle, for example pressing
the brake or accelerator pedal.
• You can temporarily switch off the
shutdown feature any time the ignition
is on using the information display. See
Information Displays (page 112). The
feature only remains off for the current
ignition cycle.
• During the 30-second countdown, the
system prompts you to press OK or
RESET to temporarily switch the
feature off for the current ignition cycle
only.
Switching Off Your Vehicle When
It Is Stationary
1. Put the transmission in park (P).
2. Press the push button ignition switch once.
3. Apply the parking brake.
Note: This switches off the ignition, warning
lamps and indicators.
Switching Off Your Vehicle When
It Is Moving WARNING: Switching off the
engine when your vehicle is still moving
results in a significant decrease in
braking assistance. Higher effort is
required to apply the brakes and to stop
your vehicle. A significant decrease in
steering assistance could also occur. The
steering does not lock, but higher effort
177
Explorer (CTW), enUSA, Edition date: 202007, Second-Printing Starting and Stopping the Engine
Page 183 of 577
AUTO-START-STOP (IF EQUIPPED)
The system helps reduce fuel consumption
by automatically stopping and restarting
the engine when your vehicle has stopped.
The engine restarts automatically when
you release the brake pedal.
In some situations, your vehicle may restart
automatically, for example:
• To maintain interior comfort.
• To recharge the battery.
Note: Power assist steering turns off when
the engine is off.
Note: If your vehicle is flex fuel capable,
Auto-Start-Stop will be inhibited for a short
time after a refuel event while the system
is verifying the fuel type being used. WARNING:
Apply the parking
brake, shift into park (P), switch the
ignition off and remove the key before
you leave your vehicle. Failure to follow
this instruction could result in personal
injury or death. WARNING:
Apply the parking
brake, shift into park (P), switch the
ignition off and remove the key before
you open the hood or have any service
or repair work completed. If you do not
switch the ignition off, the engine could
restart at any time. Failure to follow this
instruction could result in personal injury
or death. WARNING:
The system may
require the engine to automatically
restart when the auto-start-stop
indicator illuminates green or flashes
amber. Failure to follow this instruction
could result in personal injury. The Auto-Start-Stop system status is
available at a glance within the information
display.
See Information Displays (page
112).
Enabling Auto-Start-Stop
The system automatically enables every
time you start your vehicle if:
• You do not press the Auto-Start-Stop
button (not illuminated).
• Your vehicle exceeds an initial speed
of
3 mph (5 km/h) after you have
initially started your vehicle.
• You have stopped your vehicle.
• Your foot is on the brake pedal.
• The driver door is closed.
• The interior compartment has cooled
or warmed to an acceptable level.
• The front windshield defroster is off.
• You have not turned the steering wheel
rapidly or you do not have it at a sharp
angle.
• The vehicle is not on a steep road
grade.
• The battery is within optimal operating
conditions (battery state of charge and
temperature in range).
• The engine coolant is near operating
temperature.
• Elevation is below about
12,000 ft
(3,650 m).
• Ambient temperature is moderate.
• The trailer is not connected.
• If you select Normal, Eco, Snow/Wet
or Grass/Gravel/Snow modes.
• You are not in 4H or 4L.
• You have not selected Manual shift
mode.
• Hill descent control is not active.
• You have not selected Tow haul, Sport,
Sand or Mud/Rut modes.
180
Explorer (CTW), enUSA, Edition date: 202007, Second-Printing Unique Driving Characteristics
Page 205 of 577
The electric parking brake may apply when
you shift to park (P) without the brake
pedal fully pressed. The electric parking
brake applies when you shift to park (P)
on large slopes. The electric parking brake
releases with the drive away release
function or manually as described in the
Releasing the Electric Parking Brake
section. See Electric Parking Brake
(page 215).
Note: A warning tone sounds if you open
the driver door and you have not shifted the
transmission selector to park (P).
Reverse (R)
With the transmission selector in reverse
(R), your vehicle moves backward. Always
come to a complete stop before shifting
into and out of reverse (R).
Neutral (N)
With the transmission selector in neutral
(N), you can start your vehicle and it is free
to roll. Hold the brake pedal down when in
this position.
Drive (D)
Drive (D) is the normal driving position for
the best fuel economy and smoothness.
Shift the transmission selector to drive (D)
to allow your vehicle to move forward and
shift automatically through the forward
gears.
The transmission shifts to the appropriate
gear for optimum performance based on
ambient temperature, road slope, vehicle
load and your input. Manual Mode (M) - Vehicles with
Paddle Shifters
With the transmission selector in manual
(M), the driver can change gears up or
down. After selecting the Manual (M)
button while the transmission range
selector is in Drive (D) position you now
have control of selecting the gear you
desire using shift buttons on the steering
wheel. See Understanding your SelectShift
Automatic
™ transmission later in this
section.
To exit manual mode, push the manual
(M) button on your transmission selector.
Low (L) - Vehicles without Paddle
Shifters
With the transmission selector in low (L),
your vehicle provides maximum engine
braking. You can shift the transmission into
low (L) at any vehicle speed. The intent is
not for use under extended or normal
driving conditions, and results in lower fuel
economy.
Automatic Return to Park
Note: This feature does not operate when
your vehicle is in Stay in Neutral mode or
neutral tow.
The transmission returns to park (P) if any
of the following occur:
• You switch the ignition off.
• Your seatbelt is not fastened, and you
open the driver door.
• The driver door is open, and you
unfasten your seatbelt.
If you switch the ignition off when your
vehicle is moving, your vehicle shifts into
neutral (N) until it slows down enough to
shift into park (P).
202
Explorer (CTW), enUSA, Edition date: 202007, Second-Printing Transmission
Page 207 of 577
SelectShift Automatic
™
Transmission (If Equipped)
Your vehicle has a SelectShift Automatic
transmission, which gives you the ability
to change gears up or down, without a
clutch, as preferred.
To prevent the engine from running at too
low an RPM, which may cause it to stall,
SelectShift still automatically makes some
downshifts if it has determined that you
have not downshifted in time. Although
SelectShift makes some downshifts for
you, it still allows you to downshift at any
time if SelectShift determines that
damage to the engine from over-revving
does not occur.
Note: Engine damage may occur if you
maintain excessive engine revving without
shifting.
Note: Vehicles may have either steering
wheel controls or gearshift lever controls.
SelectShift could upshift if the engine
reaches its RPM limit. It may also be
upshifted by pressing the + button on the
steering wheel or shift lever control.
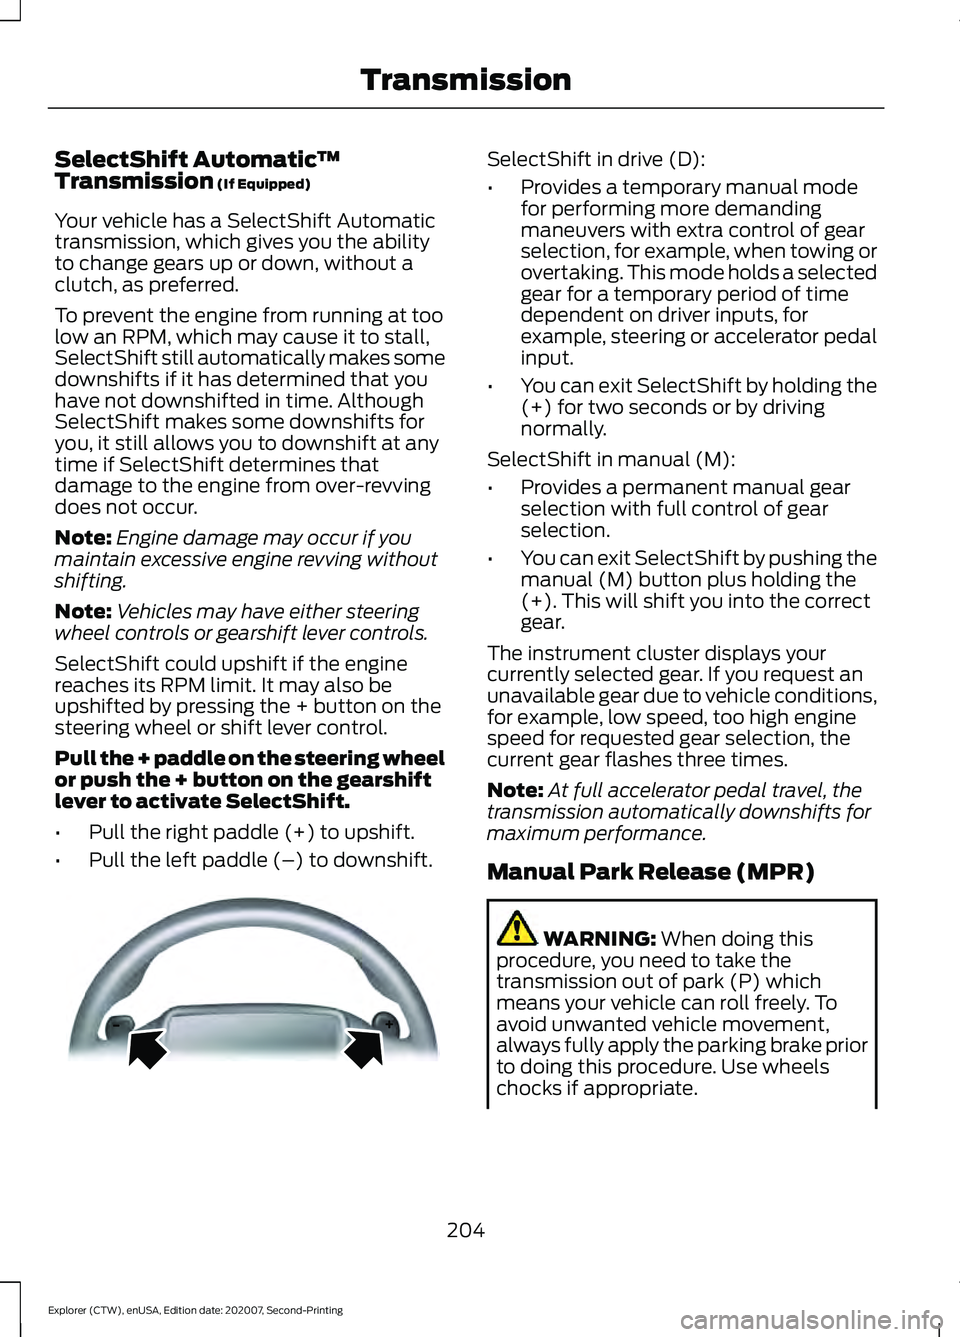
Pull the + paddle on the steering wheel
or push the + button on the gearshift
lever to activate SelectShift.
• Pull the right paddle (+) to upshift.
• Pull the left paddle (–) to downshift. SelectShift in drive (D):
•
Provides a temporary manual mode
for performing more demanding
maneuvers with extra control of gear
selection, for example, when towing or
overtaking. This mode holds a selected
gear for a temporary period of time
dependent on driver inputs, for
example, steering or accelerator pedal
input.
• You can exit SelectShift by holding the
(+) for two seconds or by driving
normally.
SelectShift in manual (M):
• Provides a permanent manual gear
selection with full control of gear
selection.
• You can exit SelectShift by pushing the
manual (M) button plus holding the
(+). This will shift you into the correct
gear.
The instrument cluster displays your
currently selected gear. If you request an
unavailable gear due to vehicle conditions,
for example, low speed, too high engine
speed for requested gear selection, the
current gear flashes three times.
Note: At full accelerator pedal travel, the
transmission automatically downshifts for
maximum performance.
Manual Park Release (MPR) WARNING:
When doing this
procedure, you need to take the
transmission out of park (P) which
means your vehicle can roll freely. To
avoid unwanted vehicle movement,
always fully apply the parking brake prior
to doing this procedure. Use wheels
chocks if appropriate.
204
Explorer (CTW), enUSA, Edition date: 202007, Second-Printing TransmissionE144821
Page 210 of 577

PRINCIPLE OF OPERATION
This system is a proactive system. It has
the ability to anticipate wheel slip and
transfer torque to the front wheels before
slip occurs. Even when wheel slip is not
present, the system is continuously
adjusting to the torque distribution, in an
attempt to improve straight line and
cornering behavior, both on and off road.
The system automatically turns on every
time you switch the ignition on.
If any component requires maintenance,
a message appears in the information
display.
USING FOUR-WHEEL DRIVE
WARNING: Vehicles with a higher
center of gravity (utility and four-wheel
drive vehicles) handle differently than
vehicles with a lower center of gravity
(passenger cars). Avoid sharp turns,
excessive speed and abrupt steering in
these vehicles. Failure to drive cautiously
increases the risk of losing control of your
vehicle, vehicle rollover, personal injury
and death.
The intelligent 4WD system continuously
monitors vehicle conditions and adjusts
the power distribution between the front
and rear wheels. It combines transparent
all-surface operation with highly capable
four-wheel drive.
The 4WD system is always active and
requires no driver input. It is capable of
handling all road conditions including
street and highway driving as well as
off-road and winter driving. You can
optimize more 4WD control by selecting
different drive modes. See
Selecting a
Drive Mode (page 278). Note:
A warning message displays in the
information display when a 4WD system
fault is present. See
Information
Messages (page 121). A 4WD system fault
causes the 4WD system to default to
rear-wheel drive only mode. When this
warning message is displayed, have your
vehicle serviced at an authorized dealer.
Note: A warning message displays in the
information display if the 4WD system
overheats. See
Information Messages
(page 121). This condition could occur if the
vehicle is operated in extreme conditions
with excessive wheel slip, such as deep
sand. To resume normal 4WD function as
soon as possible, stop the vehicle in a safe
location and stop the engine for at least 10
minutes. After the engine is restarted and
the 4WD system is adequately cooled, the
warning message turns off and normal 4WD
function returns.
Operating Four-Wheel Drive (4WD)
Vehicles With Spare Tires
Do not use a different size spare tire other
than the tire provided. If the mini-spare tire
is installed, the 4WD system will disable
and enter rear-wheel drive only mode to
protect driveline components. Some
limited 4WD traction could be provided if
the mini-spare is installed on one of the
front wheels. If you are in driving conditions
where limited 4WD traction is needed
while the mini-spare is installed, it is
recommended the mini-spare be installed
on the front axle.
See Information
Messages (page 121).
If the mini-spare is installed, this condition
is indicated by a warning in the information
display. If there is a warning message in
the information display from using the
spare tire, this indicator should turn off
after reinstalling or replacing the normal
road tire and cycling the ignition off and
on. We recommended reinstalling or
207
Explorer (CTW), enUSA, Edition date: 202007, Second-Printing Four-Wheel Drive
(If Equipped)
Page 211 of 577

replacing the normal road tire as soon as
possible. Major dissimilar tire sizes
between the front and rear axles could
cause the 4WD system to stop functioning
and default to rear-wheel drive or damage
the 4WD system.
The slip response system could activate if
the mini spare is installed on the front
wheels. If the mini spare was installed on
the rear wheels the slip response system
will fully disable. In situations where there
is a wintery mix or an off road situation,
and you need to use a mini spare, you must
install the mini spare in the front tire
position and move a full size tire to the rear
tire position for the slip response system
to function.
Operating Four-Wheel drive (4WD)
Vehicles with Mismatched Tires
WARNING: Only use replacement
tires and wheels that are the same size,
load index, speed rating and type (such
as P-metric versus LT-metric or
all-season versus all-terrain) as those
originally provided by Ford. The
recommended tire and wheel size may
be found on either the Safety
Compliance Certification Label (affixed
to either the door hinge pillar, door-latch
post, or the door edge that meets the
door-latch post, next to the driver's
seating position), or the Tire Label which
is located on the B-Pillar or edge of the
driver's door. If this information is not
found on these labels, then you should
contact your authorized dealer as soon
as possible. Use of any tire or wheel not
recommended by Ford can affect the
safety and performance of your vehicle,
which could result in an increased risk of
loss of vehicle control, vehicle rollover,
personal injury and death. Major dissimilar tire sizes between the front
and rear axles (for example, 17 inch low
profile tires on the front axle and 22 inch
high profile tires on the rear axle) could
cause the 4WD system to stop functioning
and default to rear-wheel drive or damage
the 4WD system.
For optimum 4WD Performance, it is
recommended to follow the tire rotation
maintenance schedule. To avoid potential
4WD malfunction or 4WD system damage,
it is recommended to replace all four tires
rather than mixing significantly worn tires
with new tires. For example, using 3 worn
tread tires and 1 new tread tire all of the
same original tire size/brand, can be
tolerated by the 4WD system as long as
the worn tires still have usable tread depth.
How Your Vehicle Differs from
Other Vehicles
Truck and utility vehicles can differ from
some other vehicles. Your vehicle could be
higher to allow it to travel over rough
terrain without getting hung up or
damaging underbody components.
The differences that make your vehicle so
versatile also make it handle differently
than an ordinary passenger car.
Maintain steering wheel control at all
times, especially in rough terrain. Since
sudden changes in terrain can result in
abrupt steering wheel motion, make sure
you grip the steering wheel from the
outside. Do not grip the spokes.
Drive cautiously to avoid vehicle damage
from concealed objects such as rocks and
stumps.
You should either know the terrain or
examine maps of the area before driving.
Map out your route before driving in the
area. To maintain steering and braking
control of your vehicle, you must have all
four wheels on the ground and they must
be rolling, not sliding or spinning.
208
Explorer (CTW), enUSA, Edition date: 202007, Second-Printing Four-Wheel Drive
(If Equipped)